CogniBridge User Manual (V2)
1. How to Read This Manual
1.1 Recommended Reading Order
- Launch and sign-in (Chapter 3)
- Initial setup (Chapter 4)
- Task page workflow (Chapter 5)
- Customer development loop (Chapter 7)
- Knowledge base maintenance (Chapter 8)
- Social authorization (Chapter 9)
- Business data operations (Chapter 10)
When you first open the Task, Social Authorization, or Business Data page, the client may show a step-by-step tour. Follow the highlights to learn key entry points, or skip anytime and read the matching chapter in this manual.
1.2 How to Read Figures in This Manual
- Each “Figure X-Y” in the text corresponds to an illustration in the same section—look up figures by number within the chapter.
2. Client Page Map
2.1 Page Layout
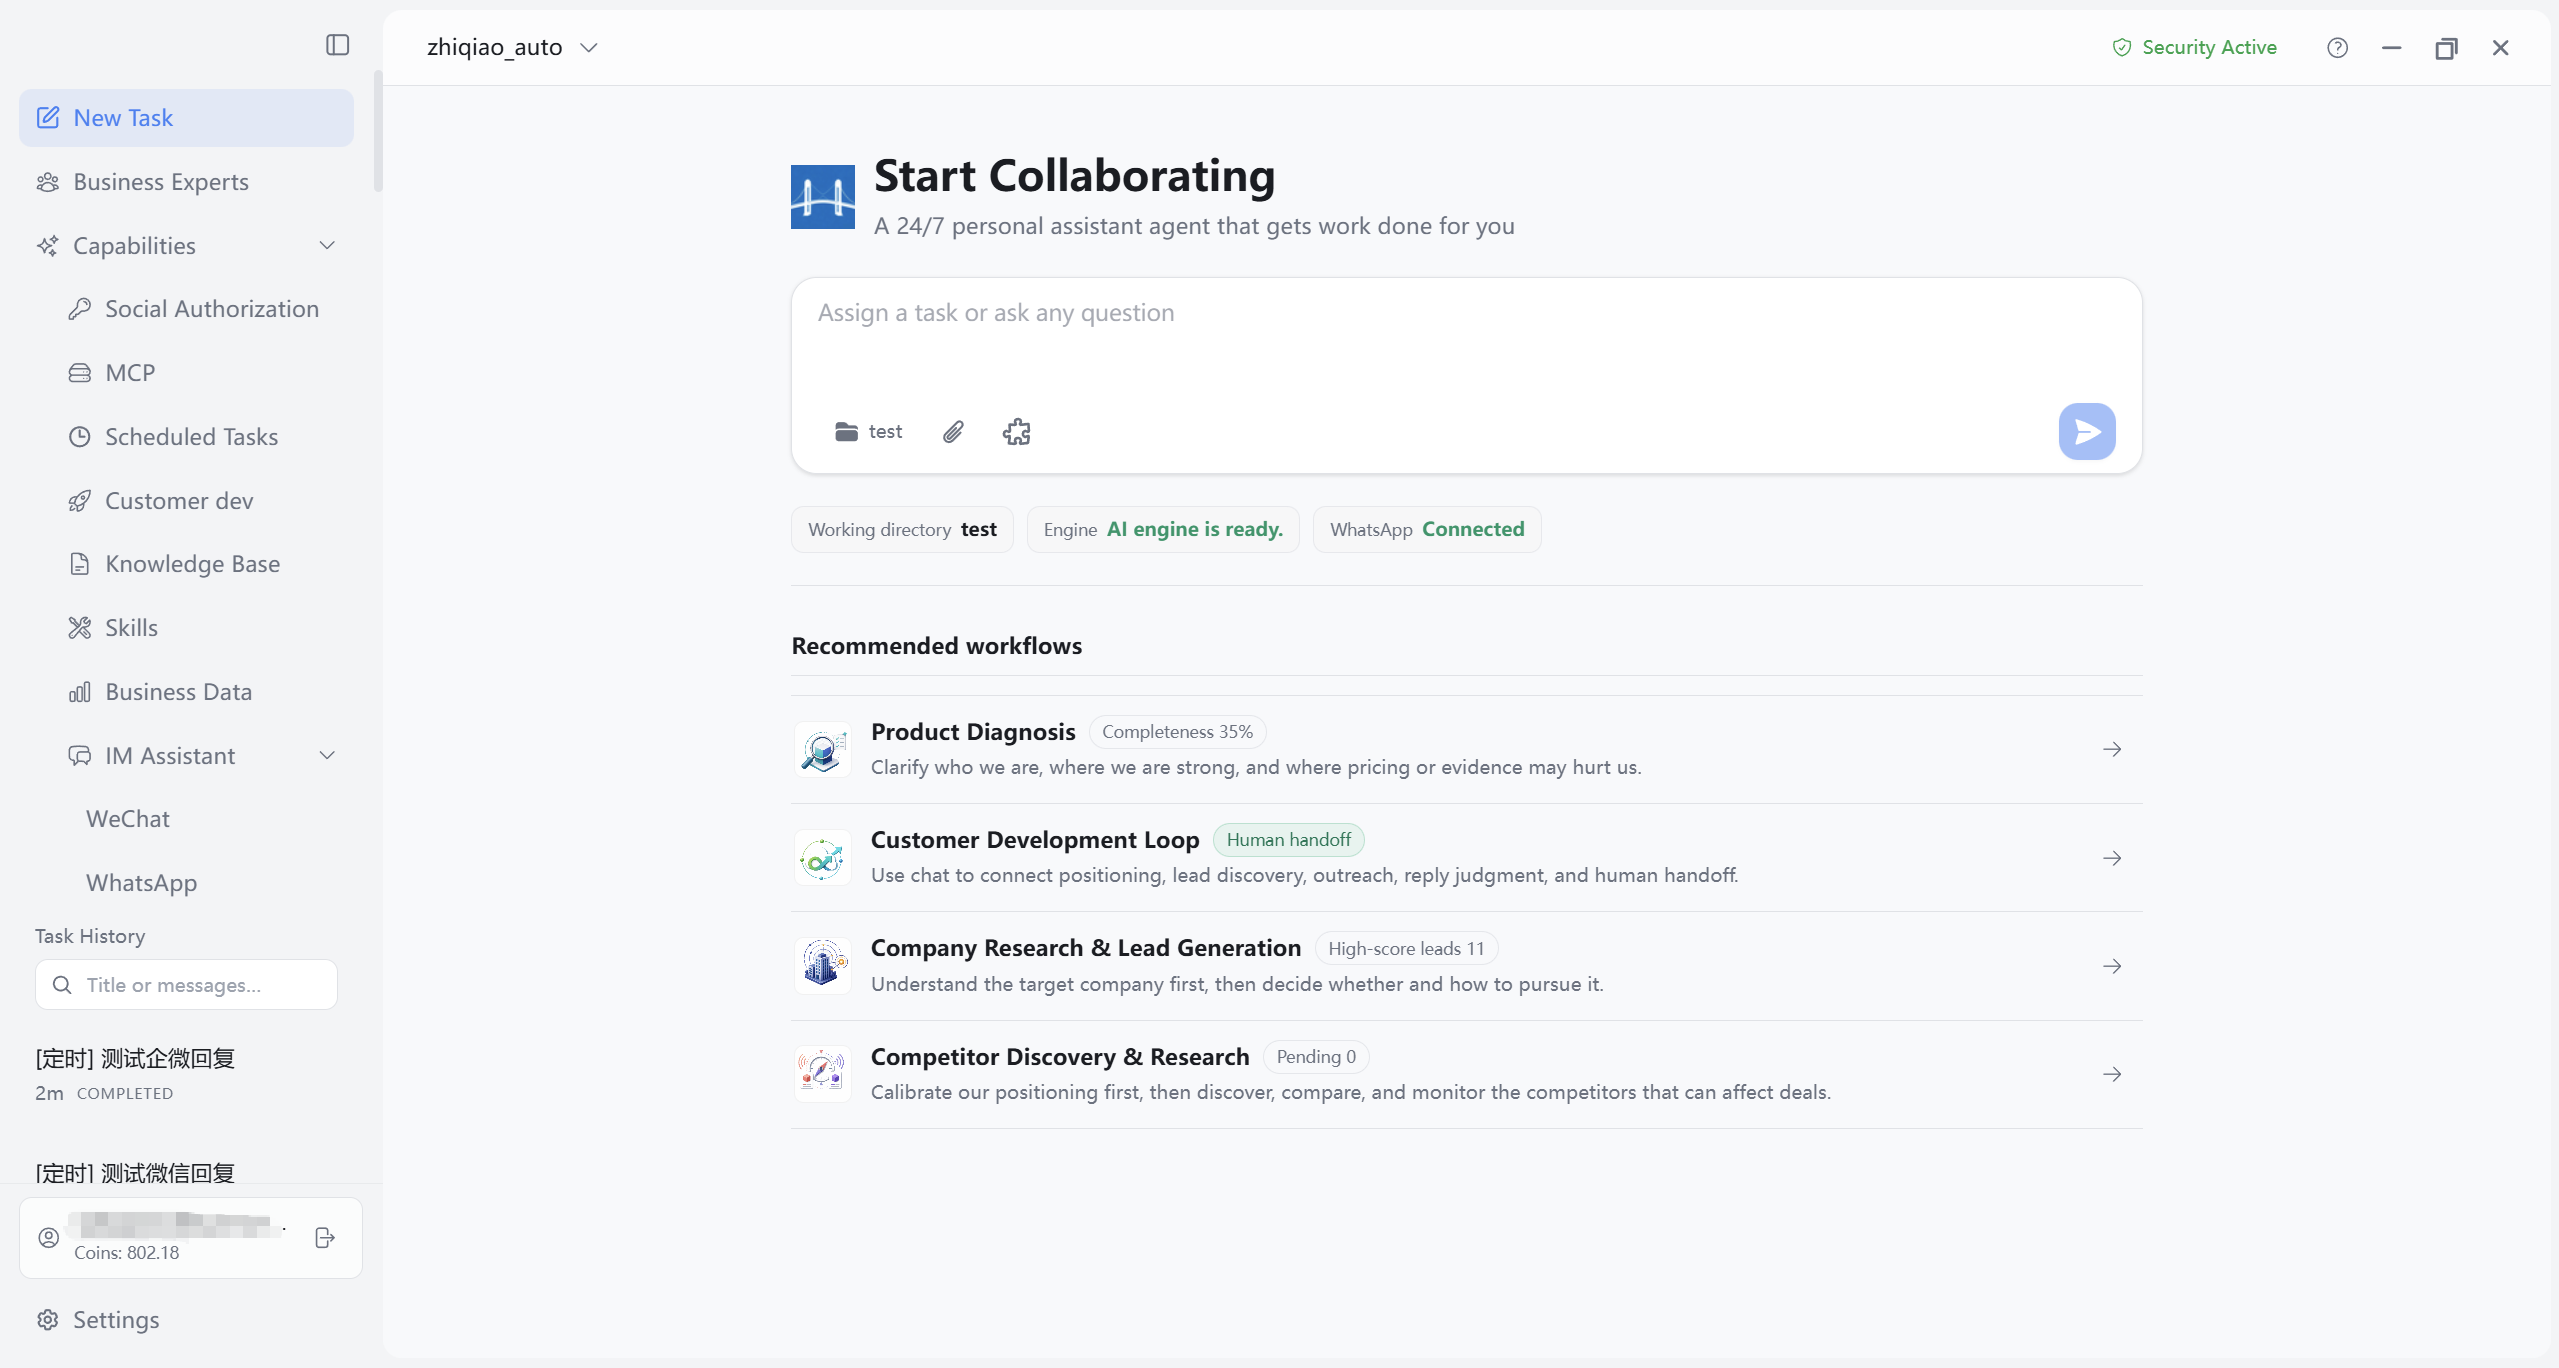
- Left sidebar: New Task, Business Experts, Customer Development, Knowledge Base, Social Authorization, Business Data, Capabilities (including Scheduled Tasks, IM Assistant, Skills, Extensions, and more), Task History, Settings, and other entries.
- Center area: the main workspace for the current page (input, filters, authorization, results).
- Top-right area: the user manual entry is the circular question-mark icon—click it to open this manual.
- On first visit to some pages, a step-by-step tour may highlight key controls (for example Task page settings, model, working directory, experts, and input; social page bridge and authorization; business data filters and Ask expert). After you finish or skip, it does not appear again automatically.
3. First Launch and Sign-In
The Terms of Service appear on the registration or sign-in page—read and accept them before continuing. On first install and launch, a separate Privacy and Terms dialog may also appear: choose Accept to proceed to sign-in, or Decline to exit (this complements the sign-in page checkbox; follow the live UI). The sections below cover common paths: registration and password sign-in, verification code sign-in, and forgot password and reset. If sign-in fails, compare the on-screen message with the troubleshooting steps below.
3.1 Flow: Registration and Password Sign-In
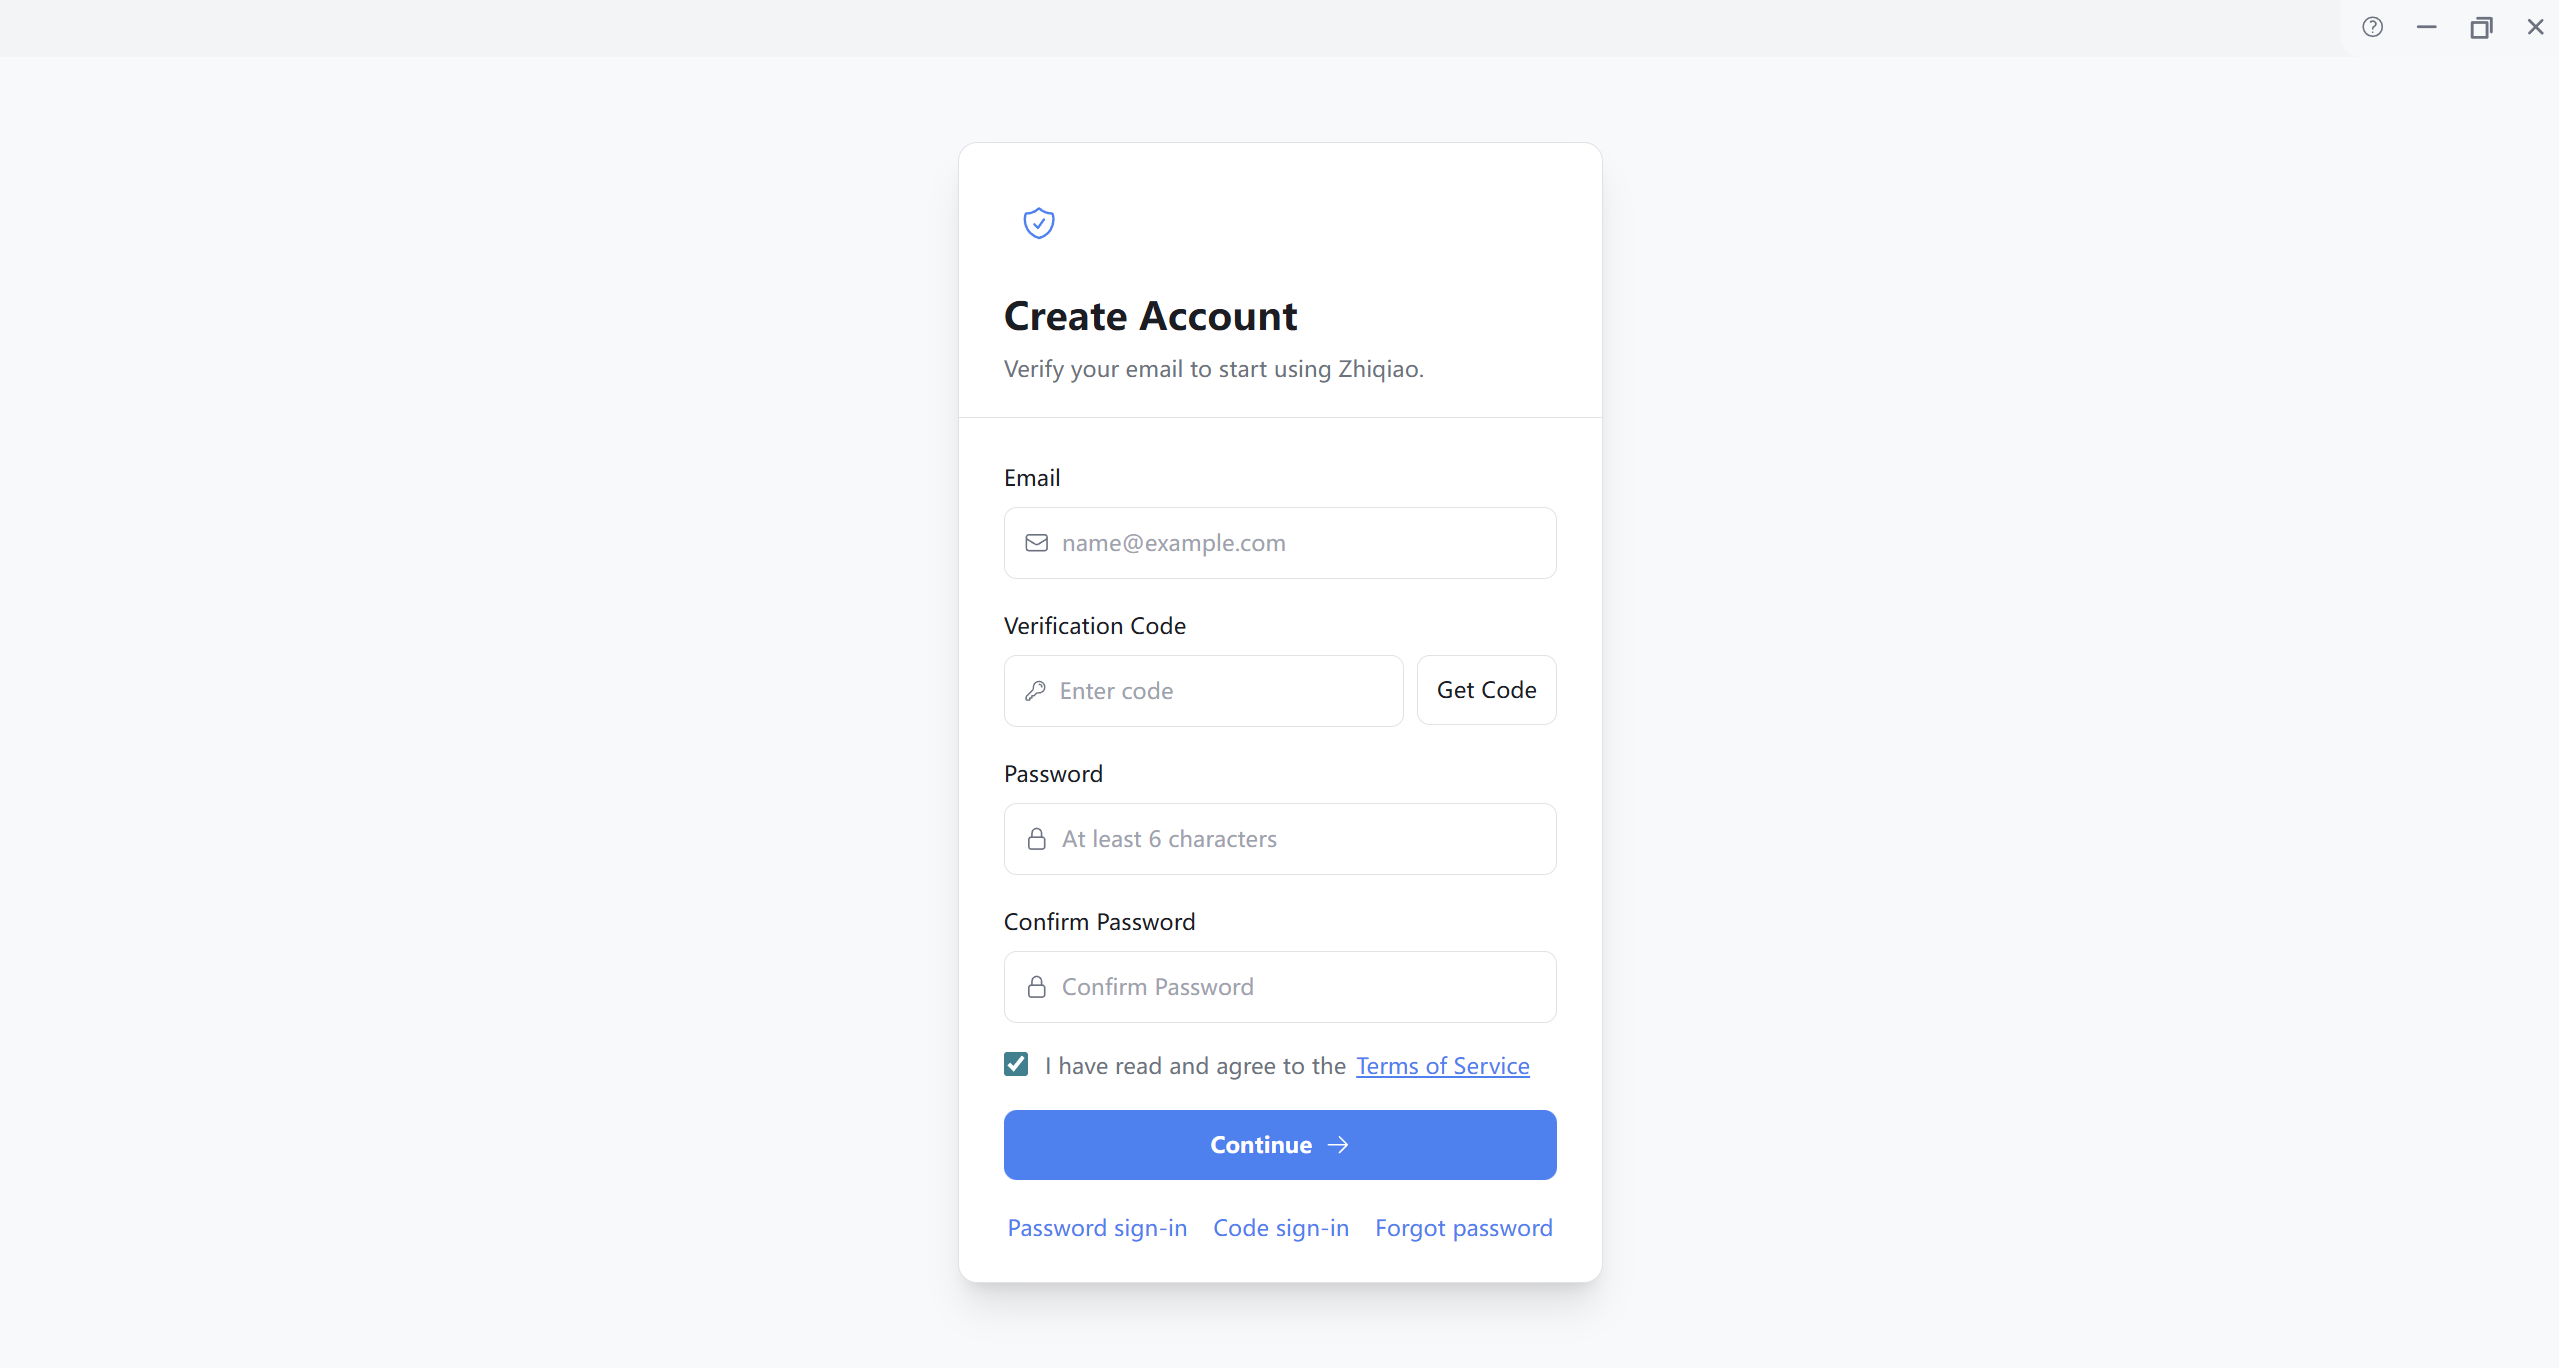
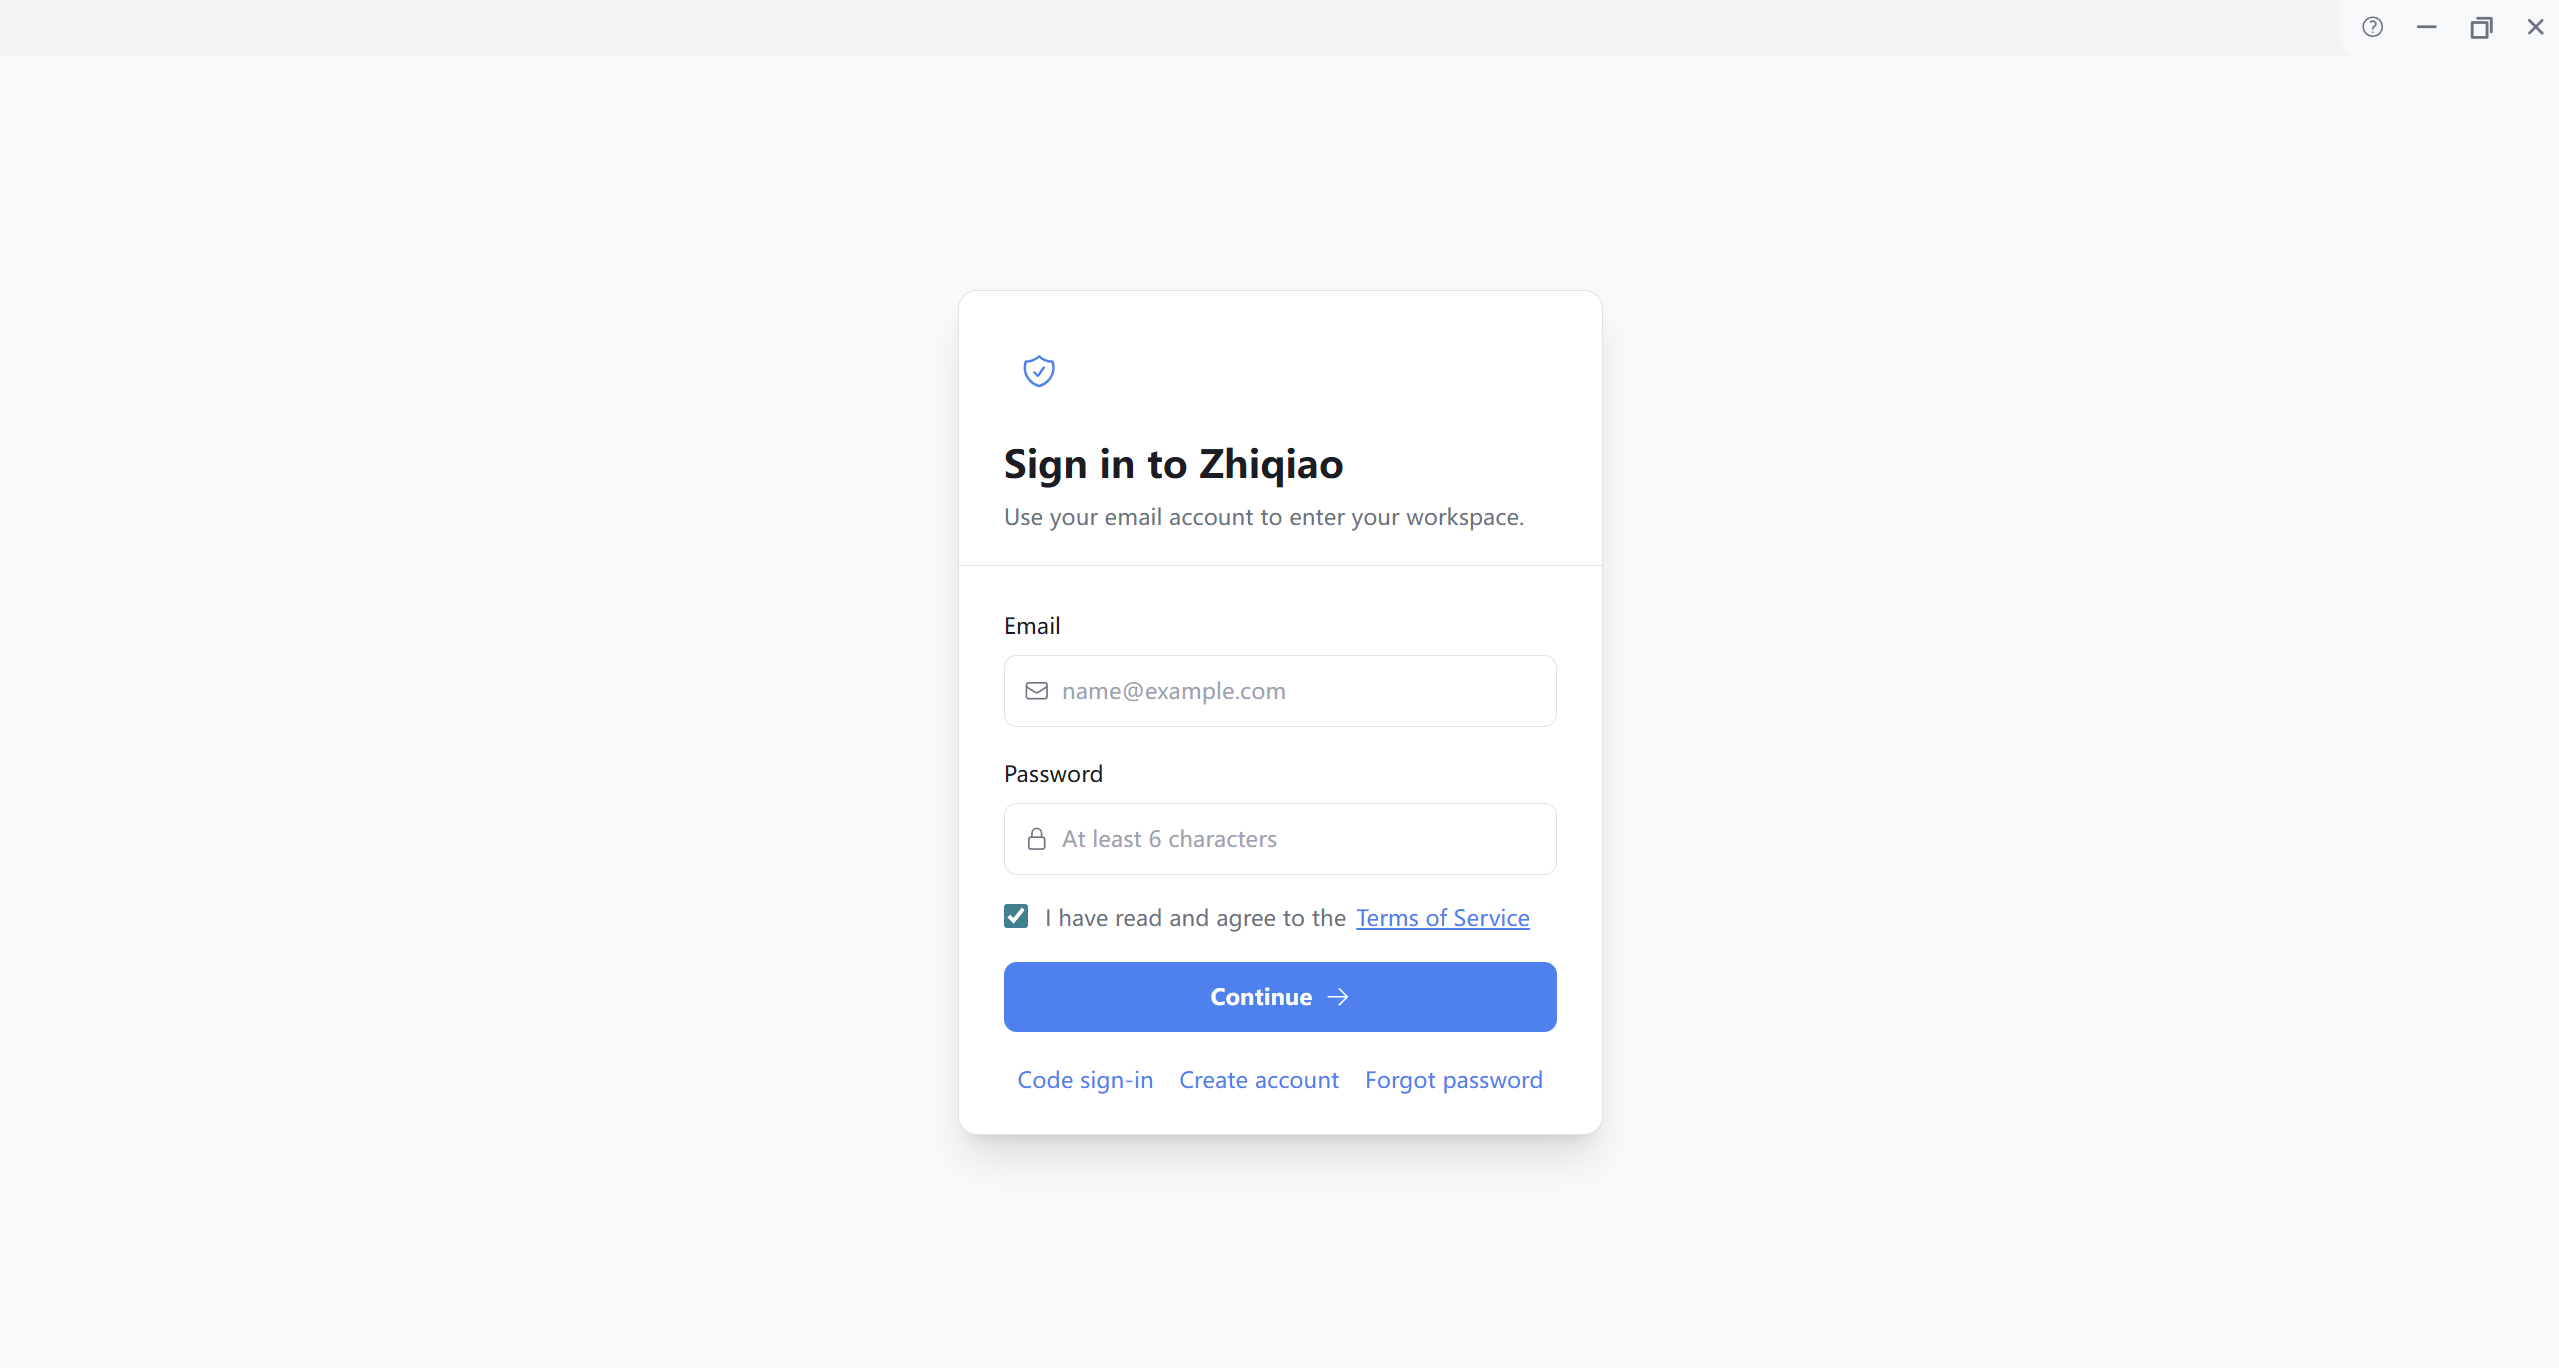
On the sign-in page, open Register Account, complete the form, accept the Terms of Service, and register. Return to sign-in, enter email and password, accept the terms, and click Continue to sign in with password.
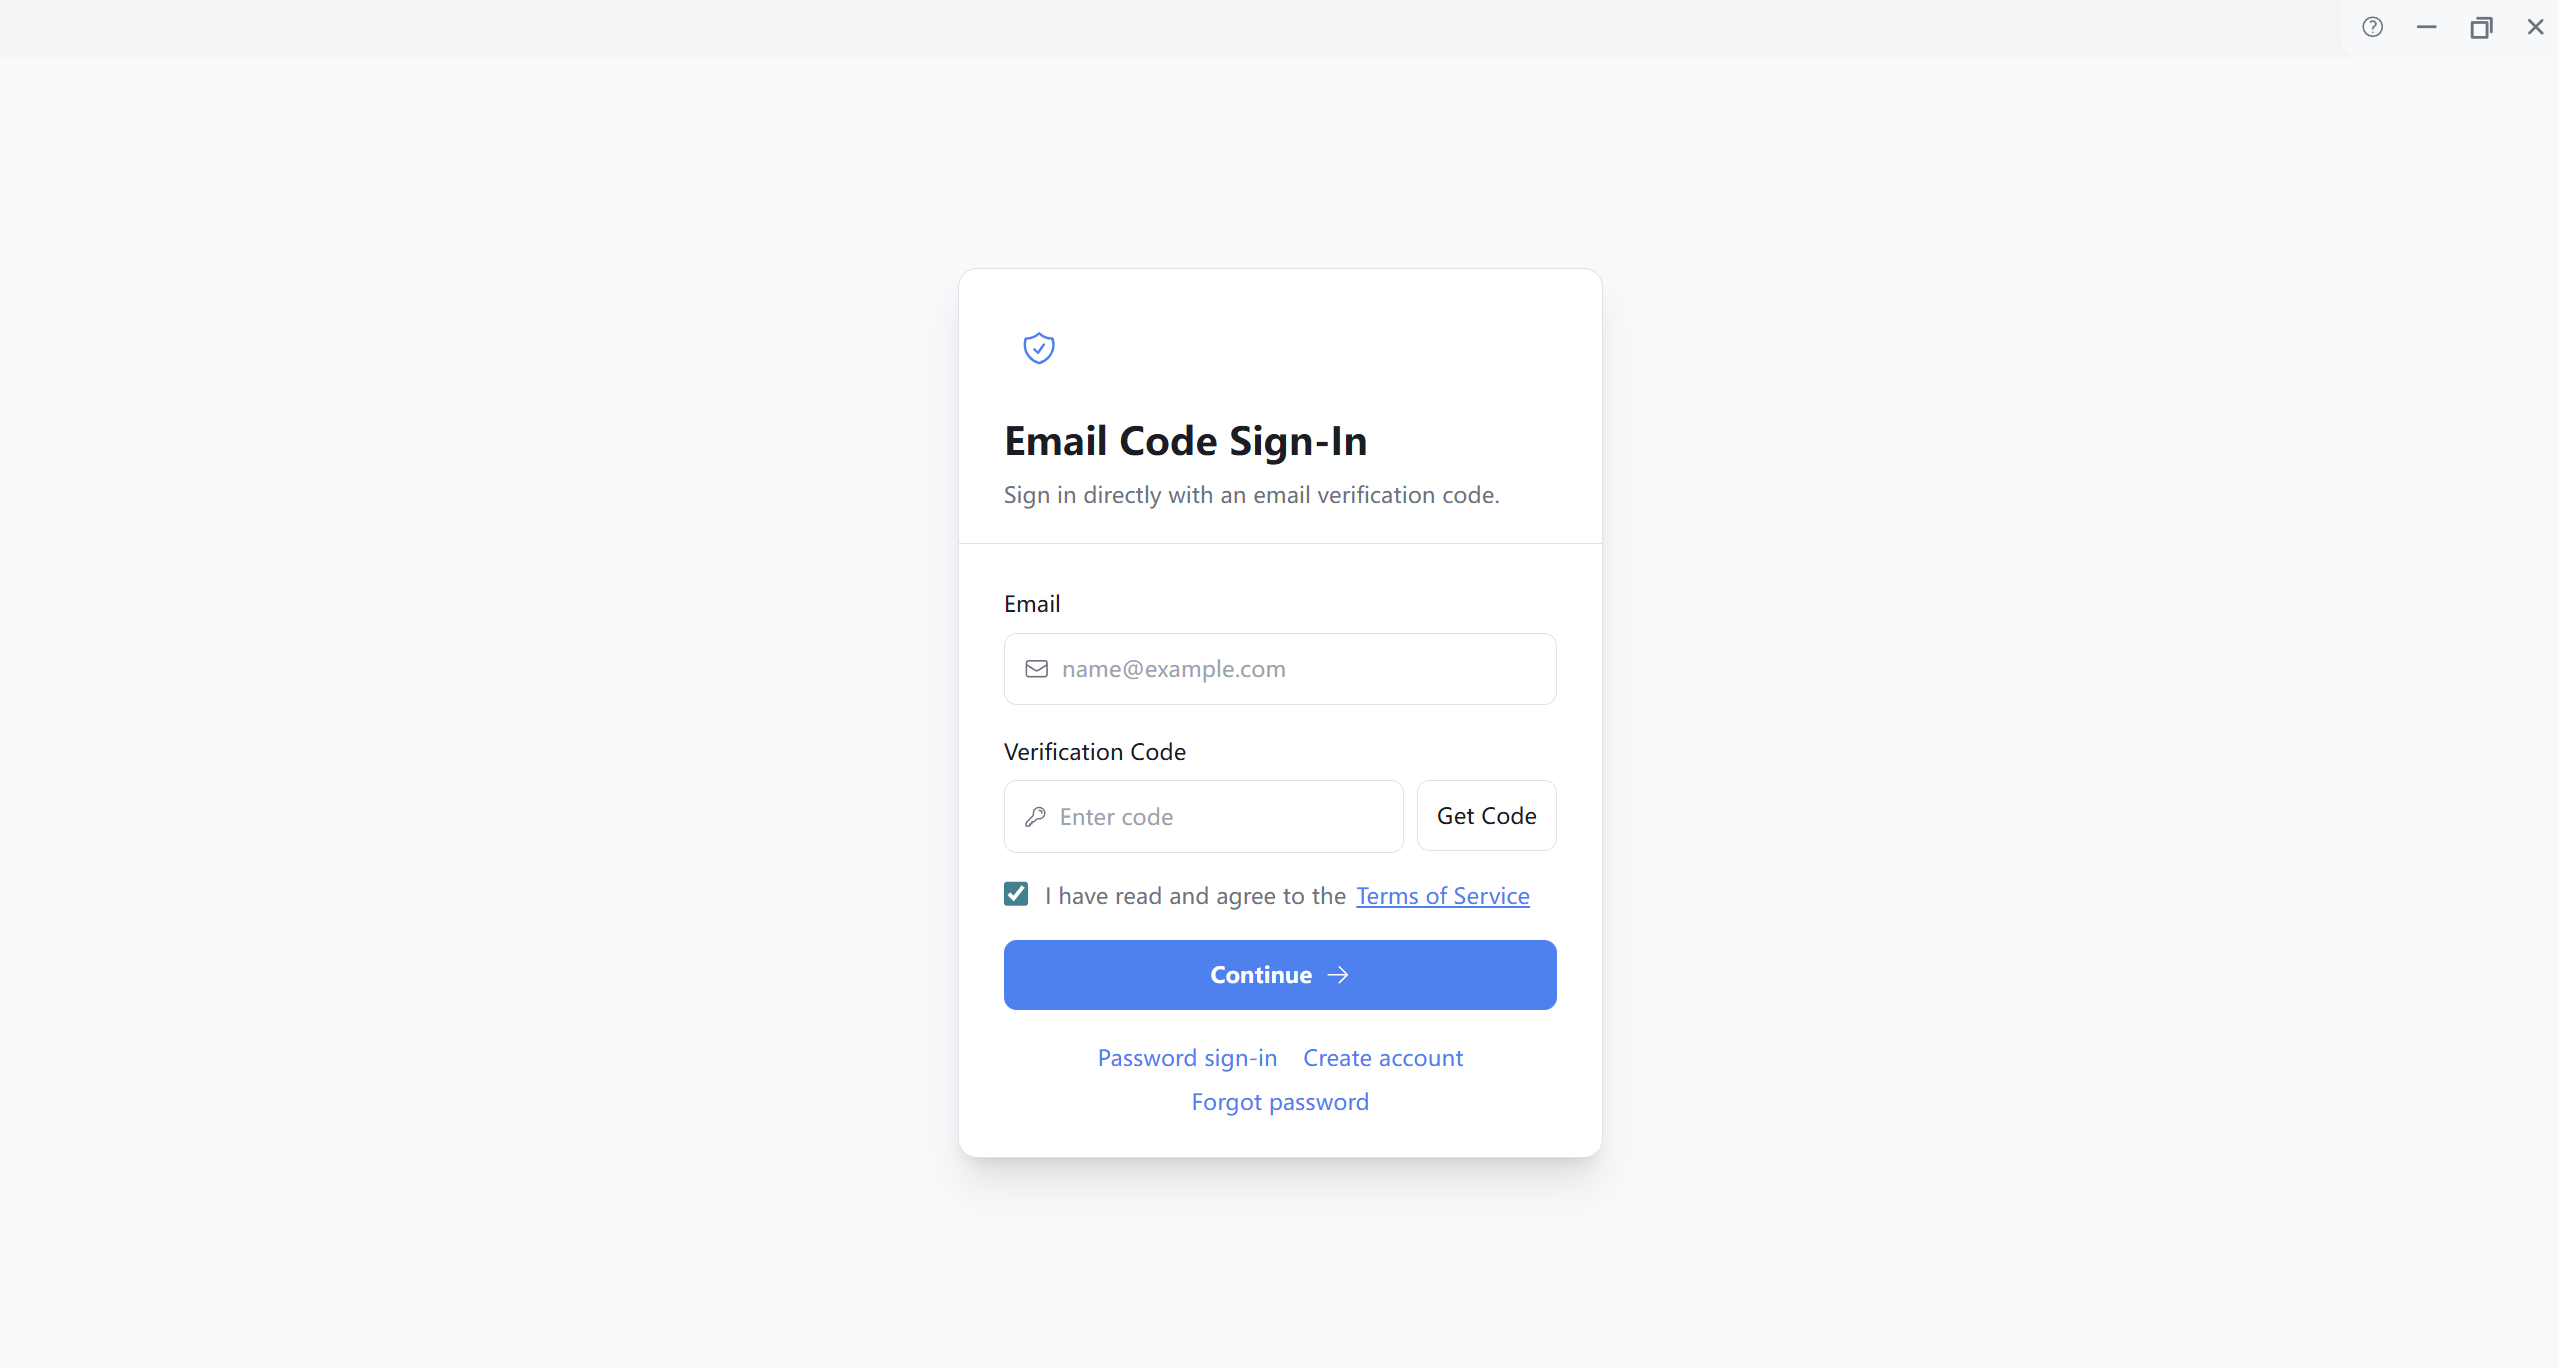
3.2 Flow: Verification Code Sign-In
On the sign-in page, choose Verification code sign-in, obtain and enter the code, accept the Terms of Service, and complete sign-in.
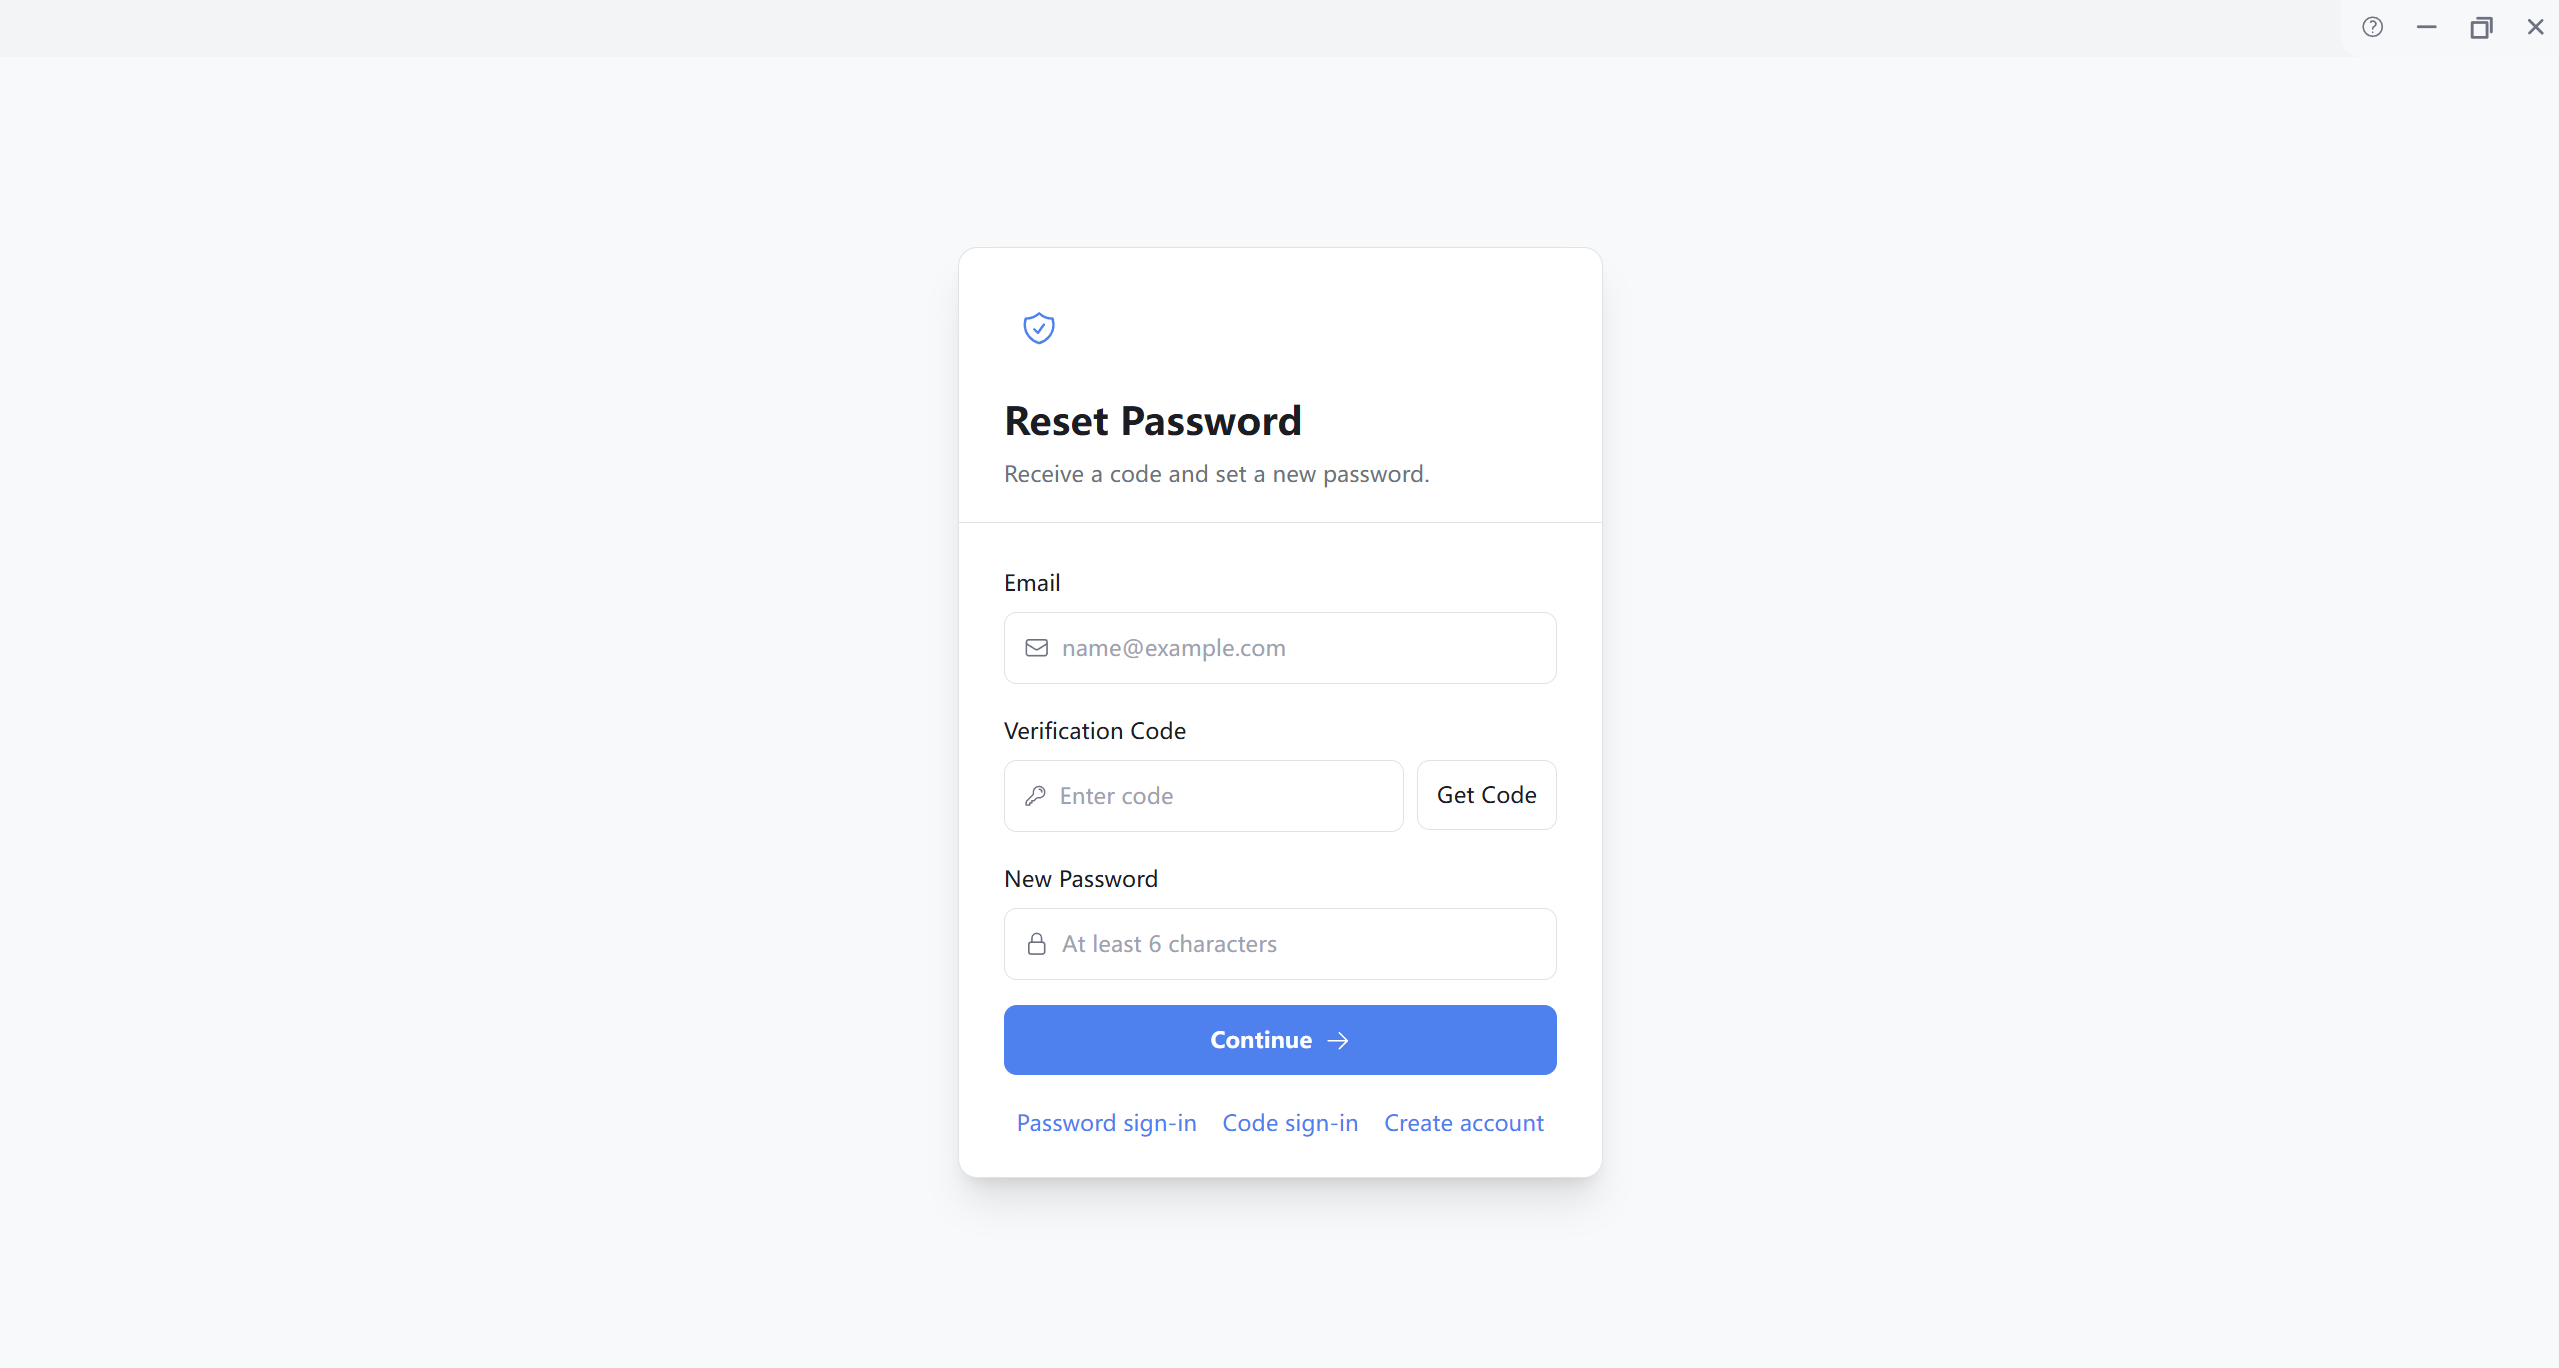
3.3 Flow: Forgot Password and Reset
On the sign-in page, click Forgot password and follow the verification flow to set a new password.
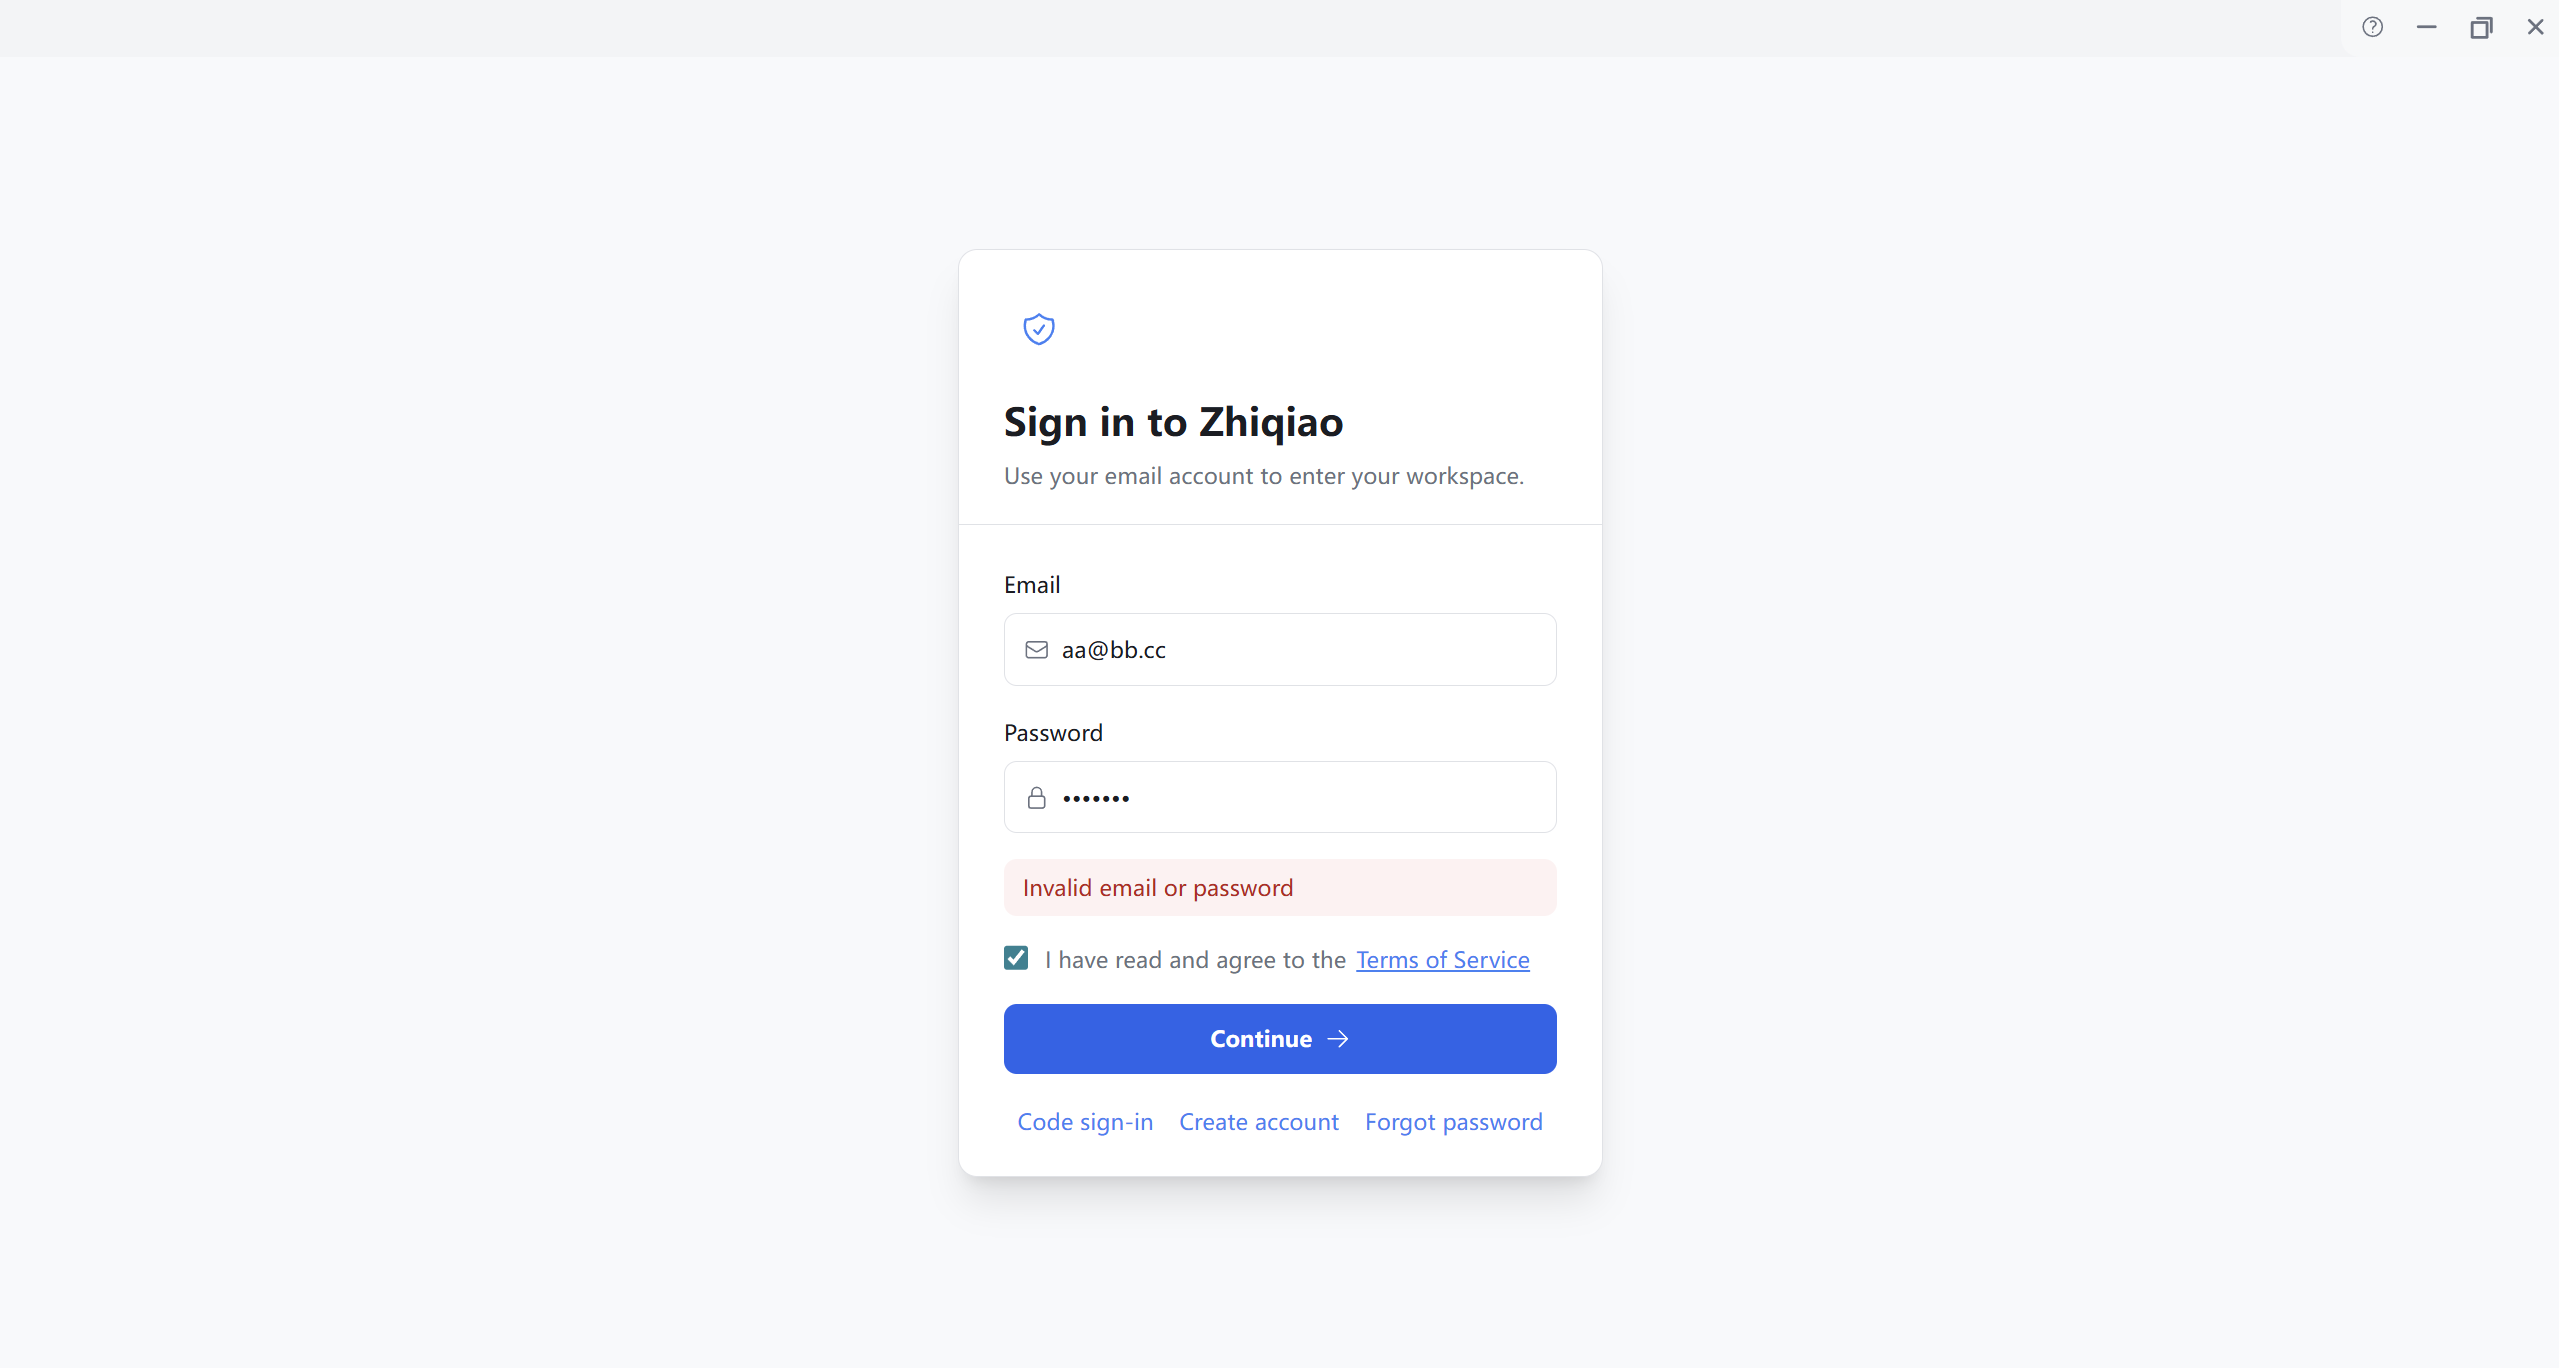
3.4 Sign-In Failure Example
Below is an example when email or password is incorrect (exact wording may vary in the client).
3.5 Common Sign-In Issues
- Confirm your network can reach company services.
- Check whether email, password, or verification code was entered incorrectly.
- Close the app completely and open it again, then sign in once more.
- If it still fails, capture the error screen and send it to your administrator.
3.6 Sign-In Failure Troubleshooting (Step by Step)
- Record the exact error message; do not close the page.
- Verify email, password, or code; check for leading/trailing spaces or extra characters.
- Re-enter credentials and submit again.
3.7 First Checks After Sign-In
- Confirm the main UI is usable (if loading takes a while after sign-in, wait until ready with no persistent errors).
- Check that the left sidebar shows all navigation items.
- Click New Task and confirm you can open the Task page.
- Click Settings and confirm you can open Settings.
- Return to the home view and confirm there are no error banners.
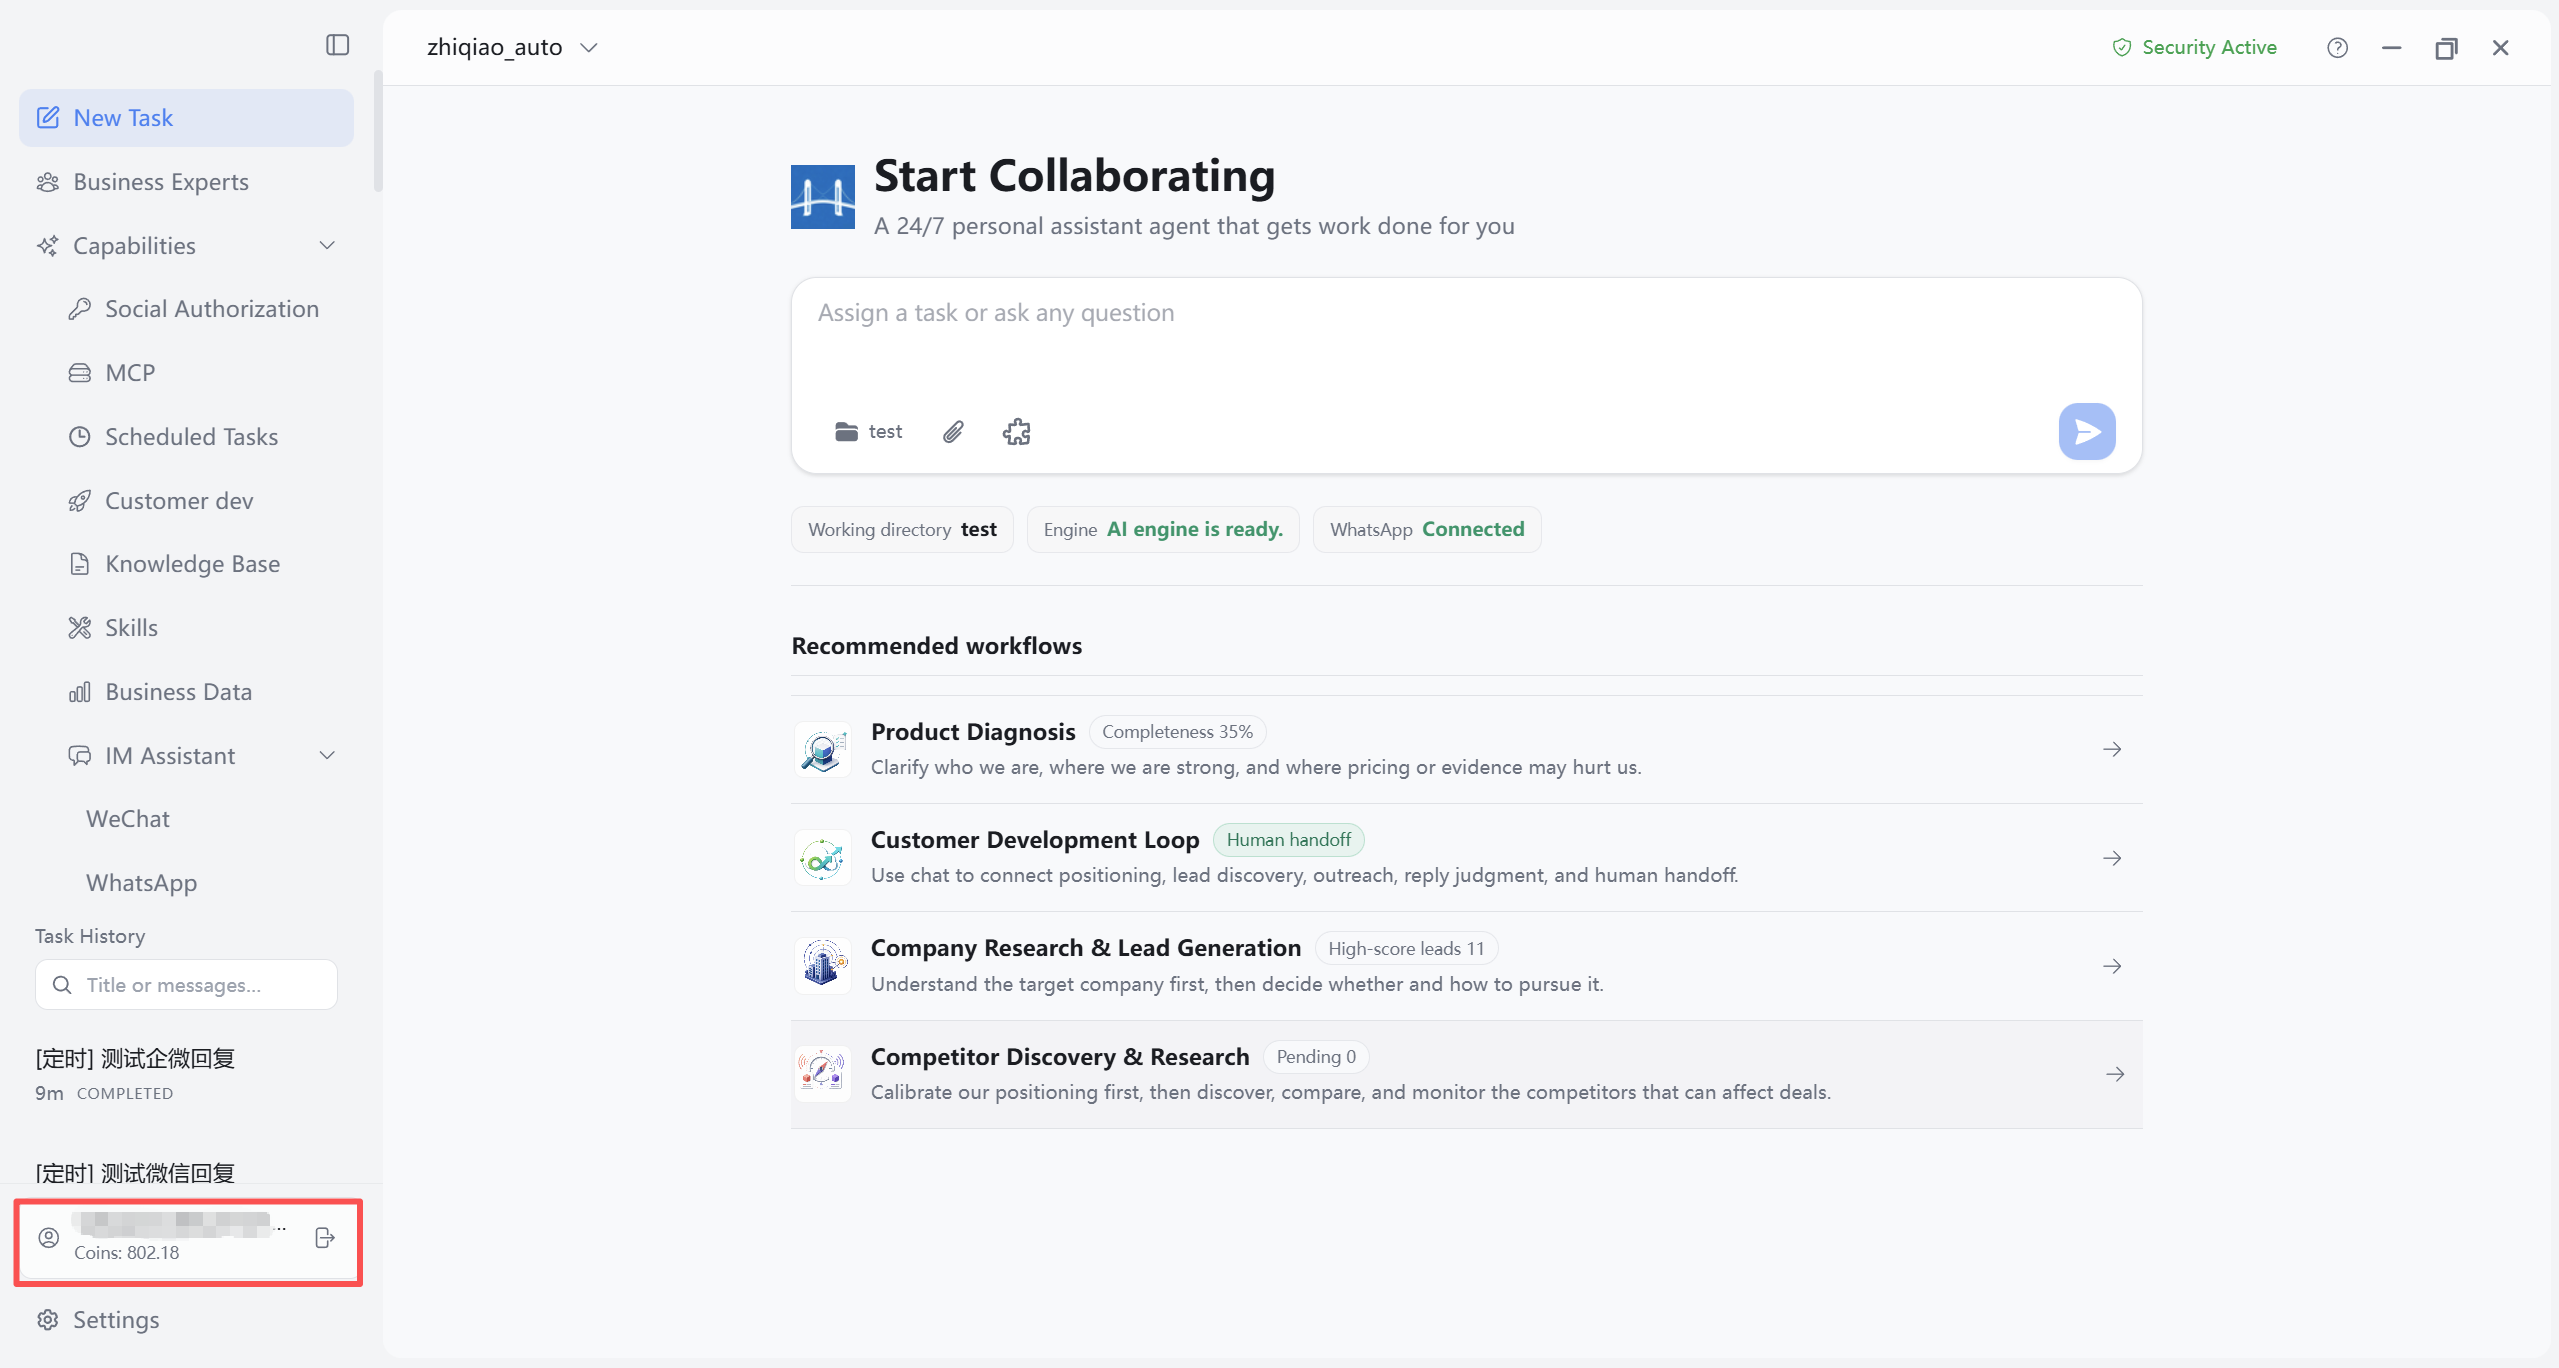
After sign-in, the bottom of the left sidebar shows your email, Credits (coins) balance, and a Sign out button. Credits meter AI task usage; when balance is insufficient, the Task page input is blocked with a recharge or contact-administrator prompt (see 3.9).
3.8 Post Sign-In Loading
After a successful sign-in, the client finishes background initialization. On first launch or after long idle periods, loading may be slow and a startup wait message may appear—wait until fully ready before using features. If errors appear, try Reload as prompted; if there is no response for a long time, see Chapter 16 FAQ.
3.9 Credits and Usage
Each CogniBridge account includes Credits (sometimes shown as “coins” in the sidebar) to limit AI Q&A and collaborative task usage. View the current balance in the sidebar account area.
- Sufficient balance: Task page, expert page, IM-linked tasks, and similar flows can send and continue conversations normally.
- Insufficient balance: a banner appears above the input and Send is disabled; contact your team administrator to top up or adjust quota.
- Sign-in relationship: Credits are tied to the signed-in account; signing out and switching accounts shows that account’s balance.
4. Initial Setup
Recommended order: Settings → Models (complete and test first) → as needed, Settings → Email (required for automated email) and Settings → IM Bots (required for IM chat) → return to the Tasks page to choose the model and working directory for this session → use New Task to complete full system initialization (database, memory, and more).
4.1 Configure Models
Configure large-model connections under Settings → Models.
Default: CogniBridge Gateway (most users)
After signing in with your CogniBridge account, CogniBridge Gateway is usually enabled automatically—no third-party API key is required. Open Settings → Models; the CogniBridge Gateway card should show Enabled with the current model (e.g. zhiqiao_auto, as shown in the UI). On first use, click Test Connection to confirm it works, then Save. For everyday chat and task collaboration, this step alone is enough to continue.
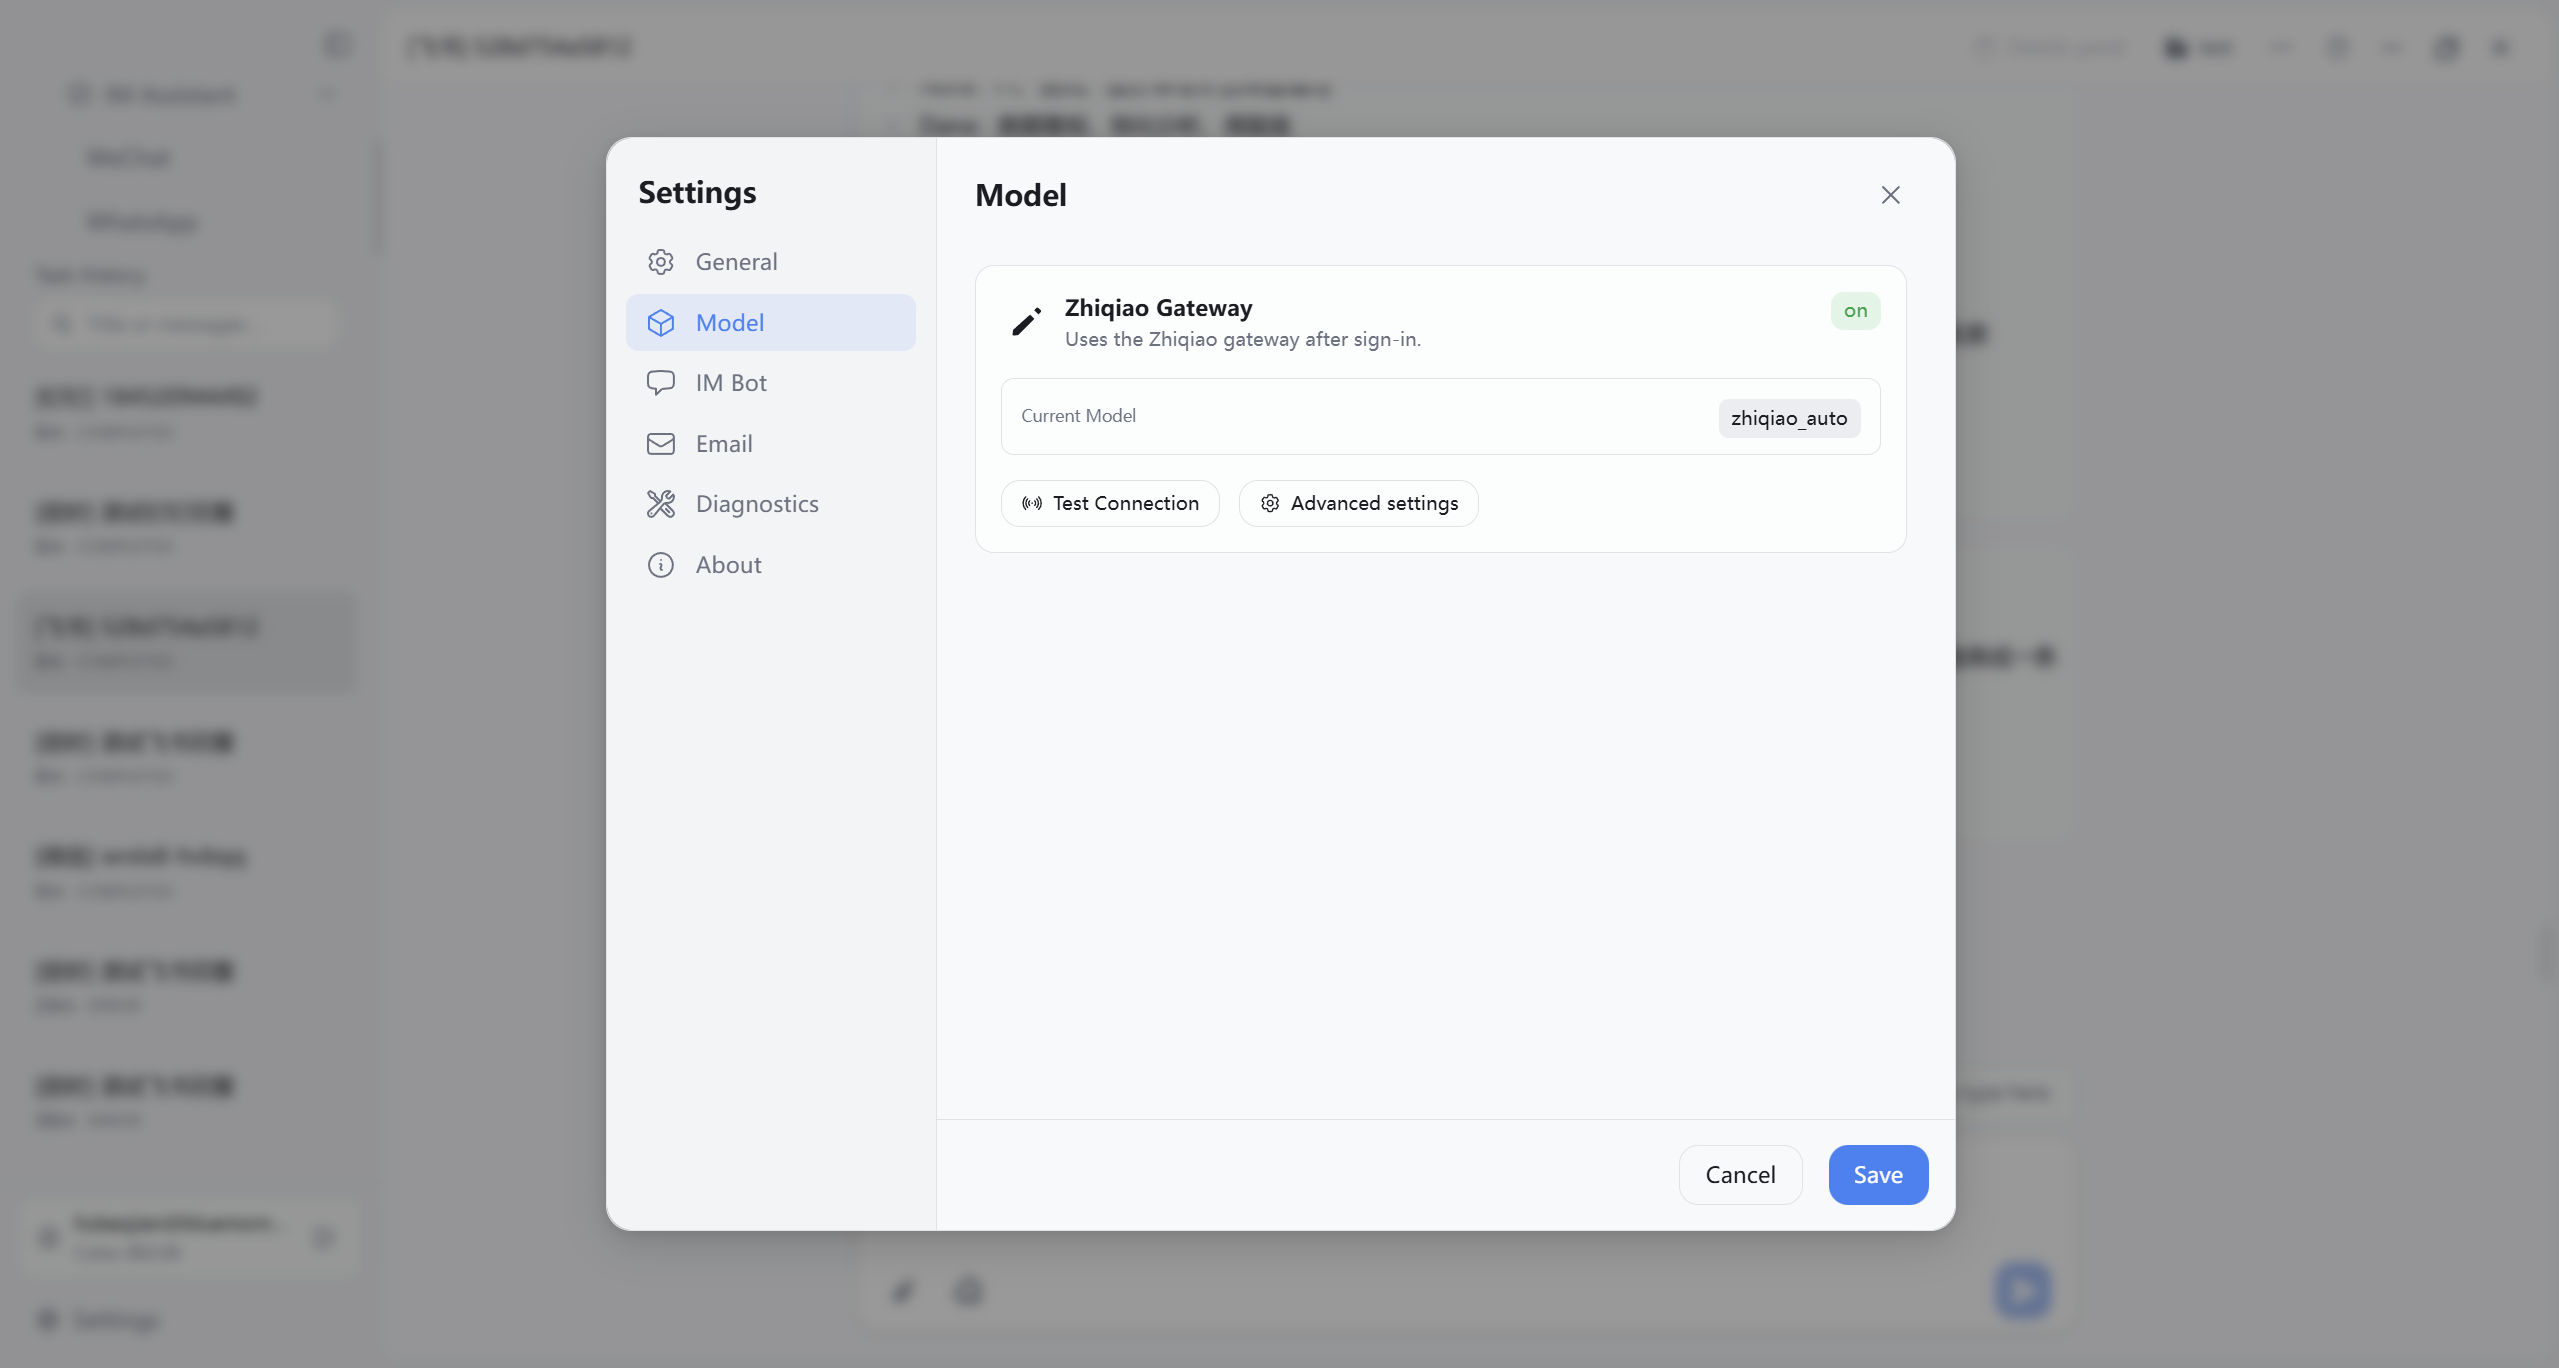
Optional: configure other model providers
If your team requires a proprietary or third-party model, switch or add other providers on the same page, enter the connection key as prompted, and complete a connection test (UI labels may differ between Chinese and English; meaning is the same).
The client lists models available under the current provider (often provider brand + model name—use the live list). Common providers include OpenAI, Gemini (Google), Anthropic, DeepSeek, Moonshot, Zhipu, MiniMax, Volcengine, Tongyi, StepFun, Xiaomi, OpenRouter, and more; local or intranet options include Ollama and LM Studio; you can also choose Custom for compatible server endpoints.
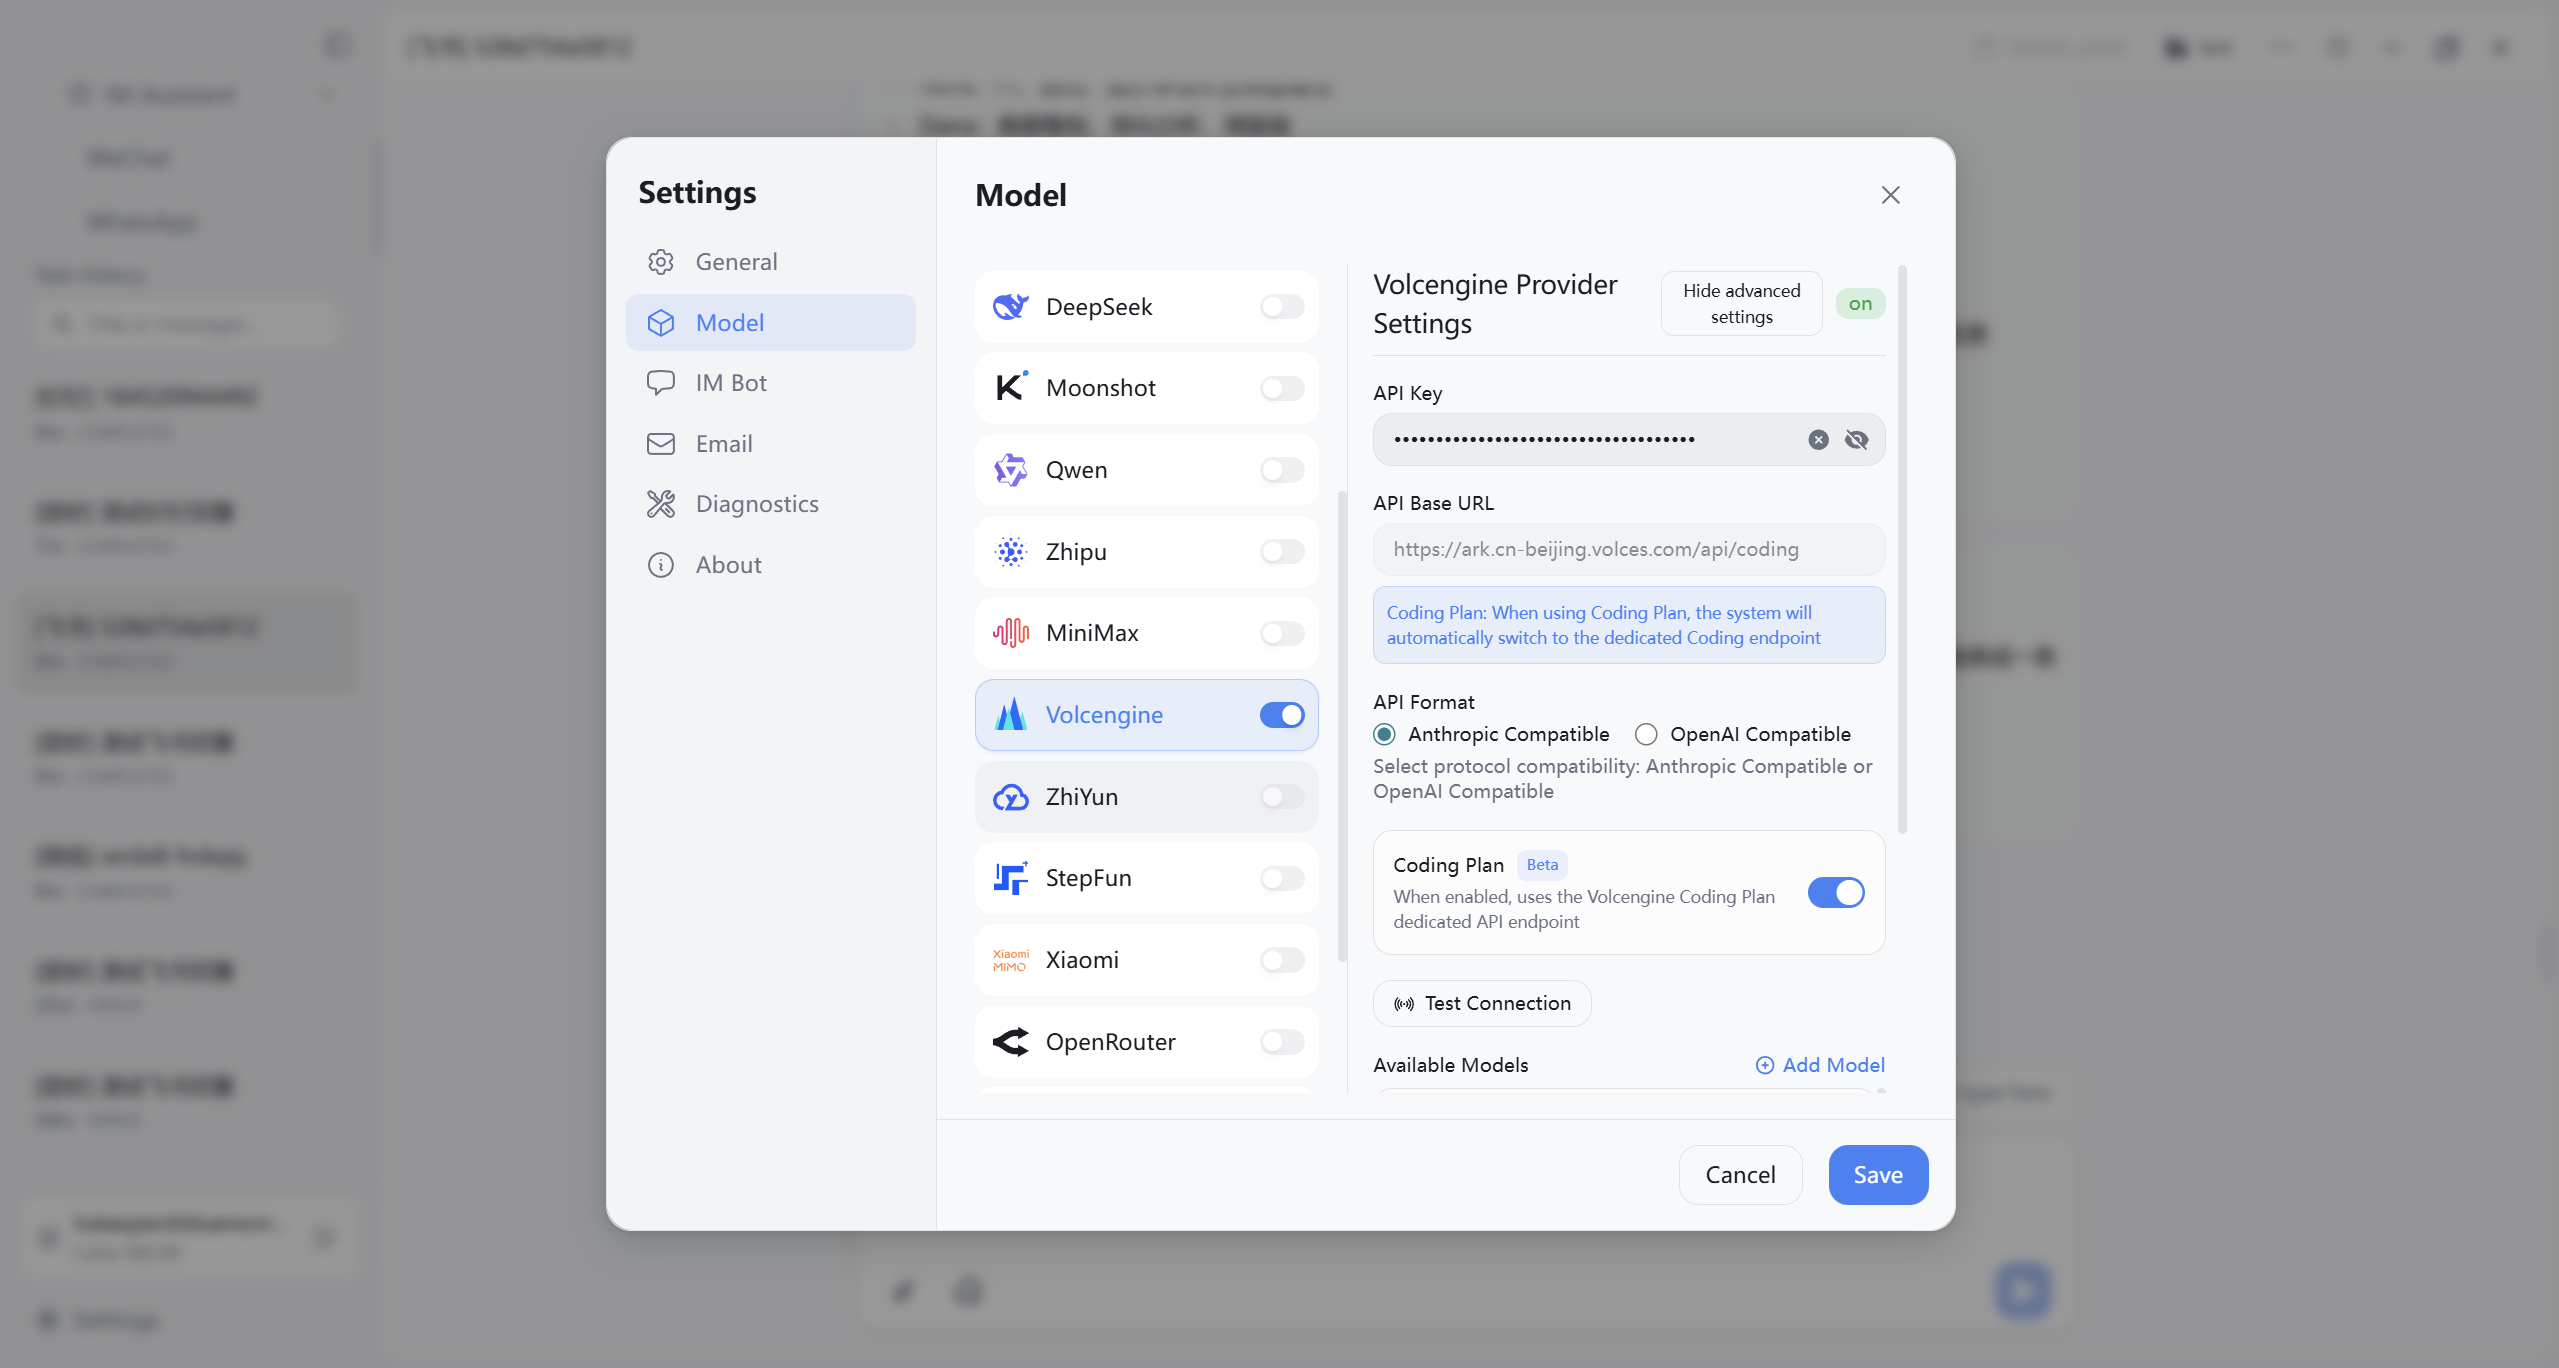
Example: Volcengine Coding Plan mode
- Apply for and copy the connection key in the Volcengine console.
- In CogniBridge model settings, select Volcengine, paste the key, and enable options related to Coding Plan (consistent with what you enabled in the console; exact labels follow the client).
- Click Test Connection and confirm the model list loads without errors.
- Click Save; you can then choose models under that provider on the Tasks page (see configuration UI in Figure 4-06).
4.2 Configure Email (required for automated email)
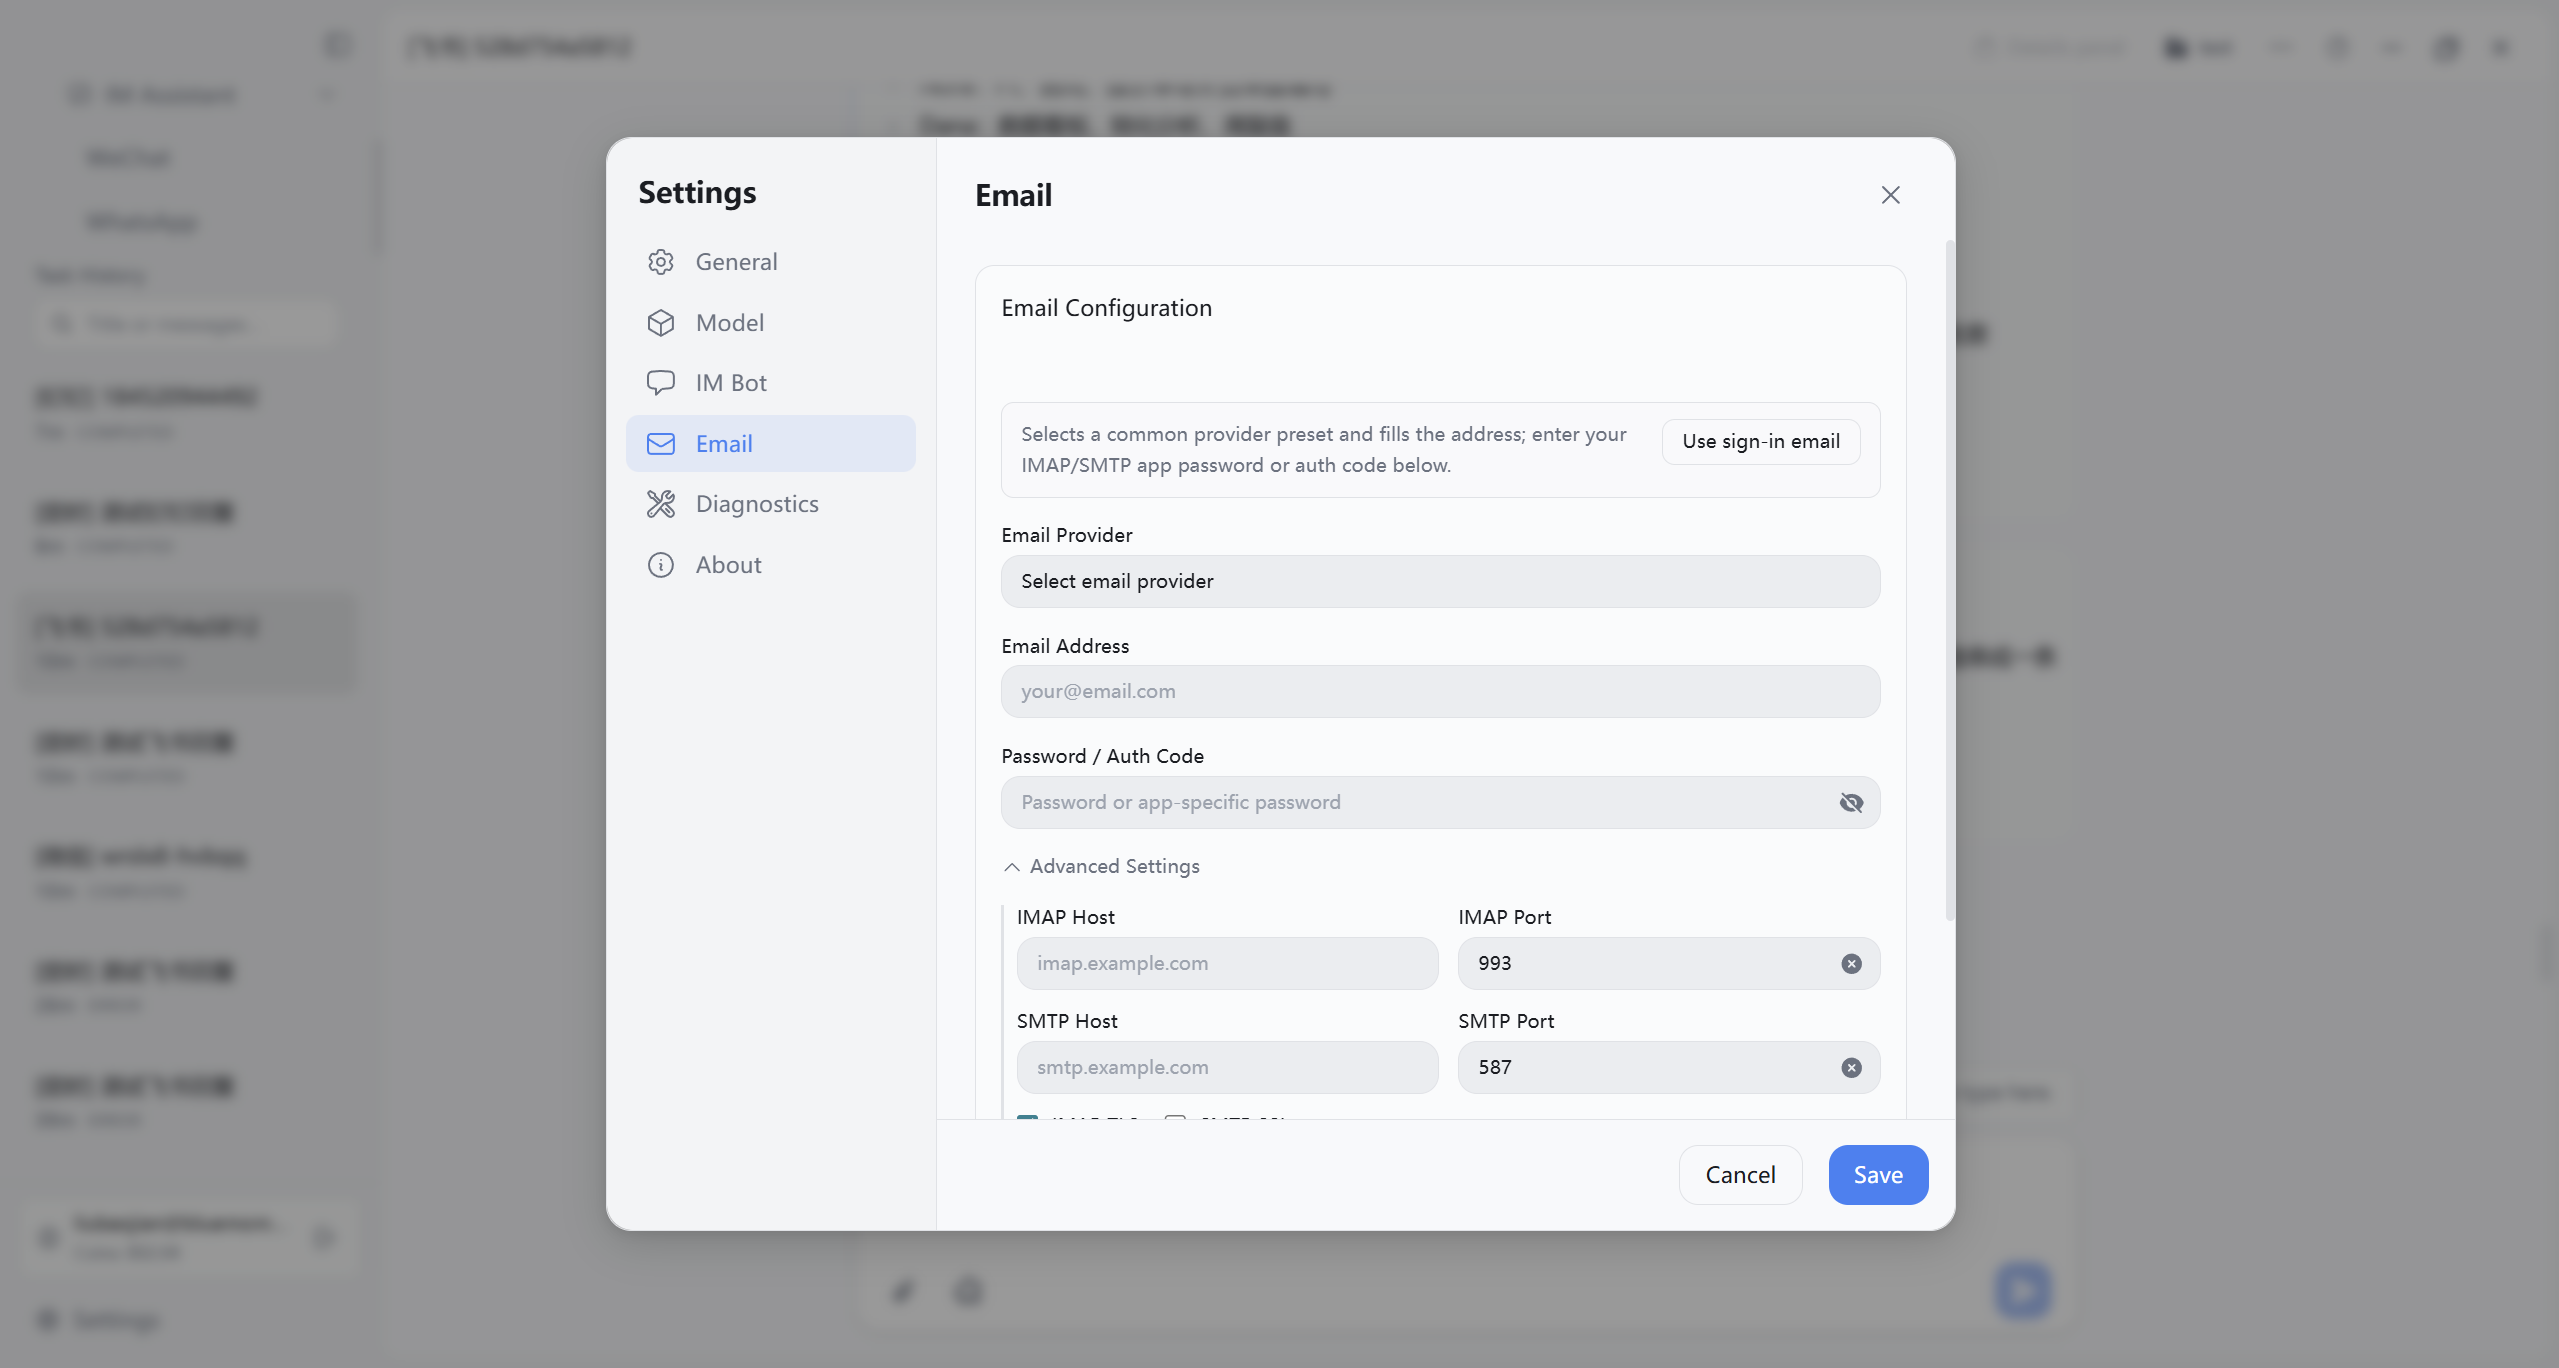
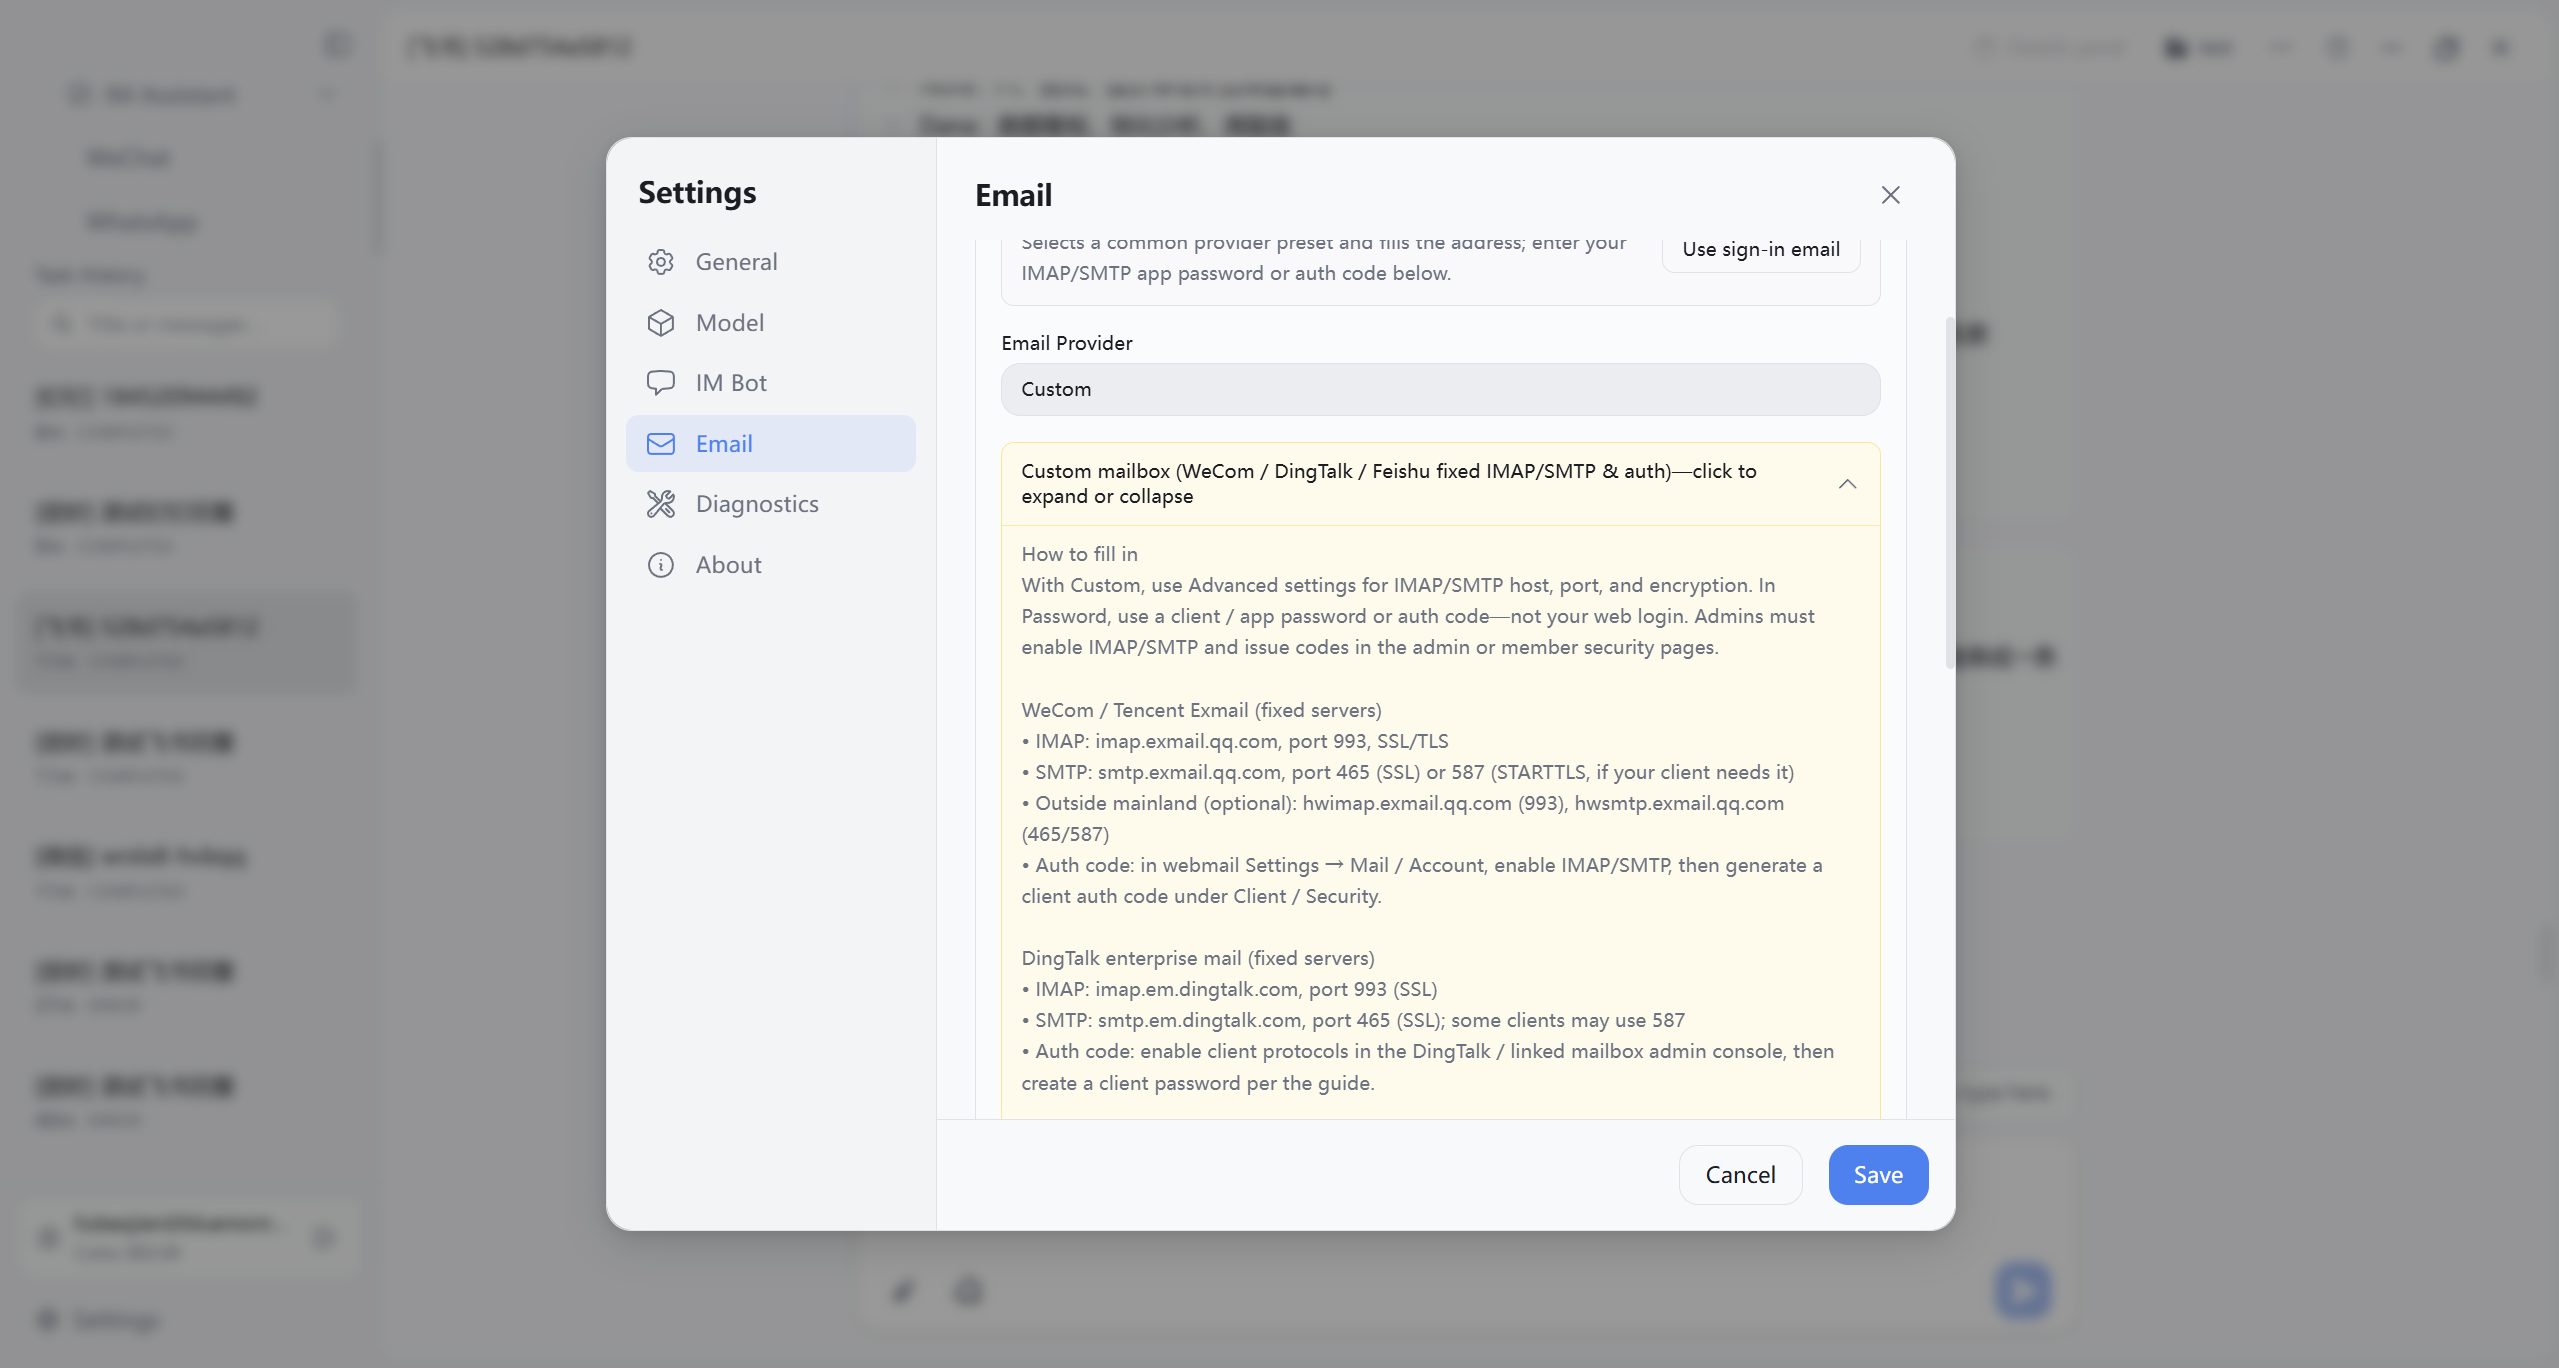
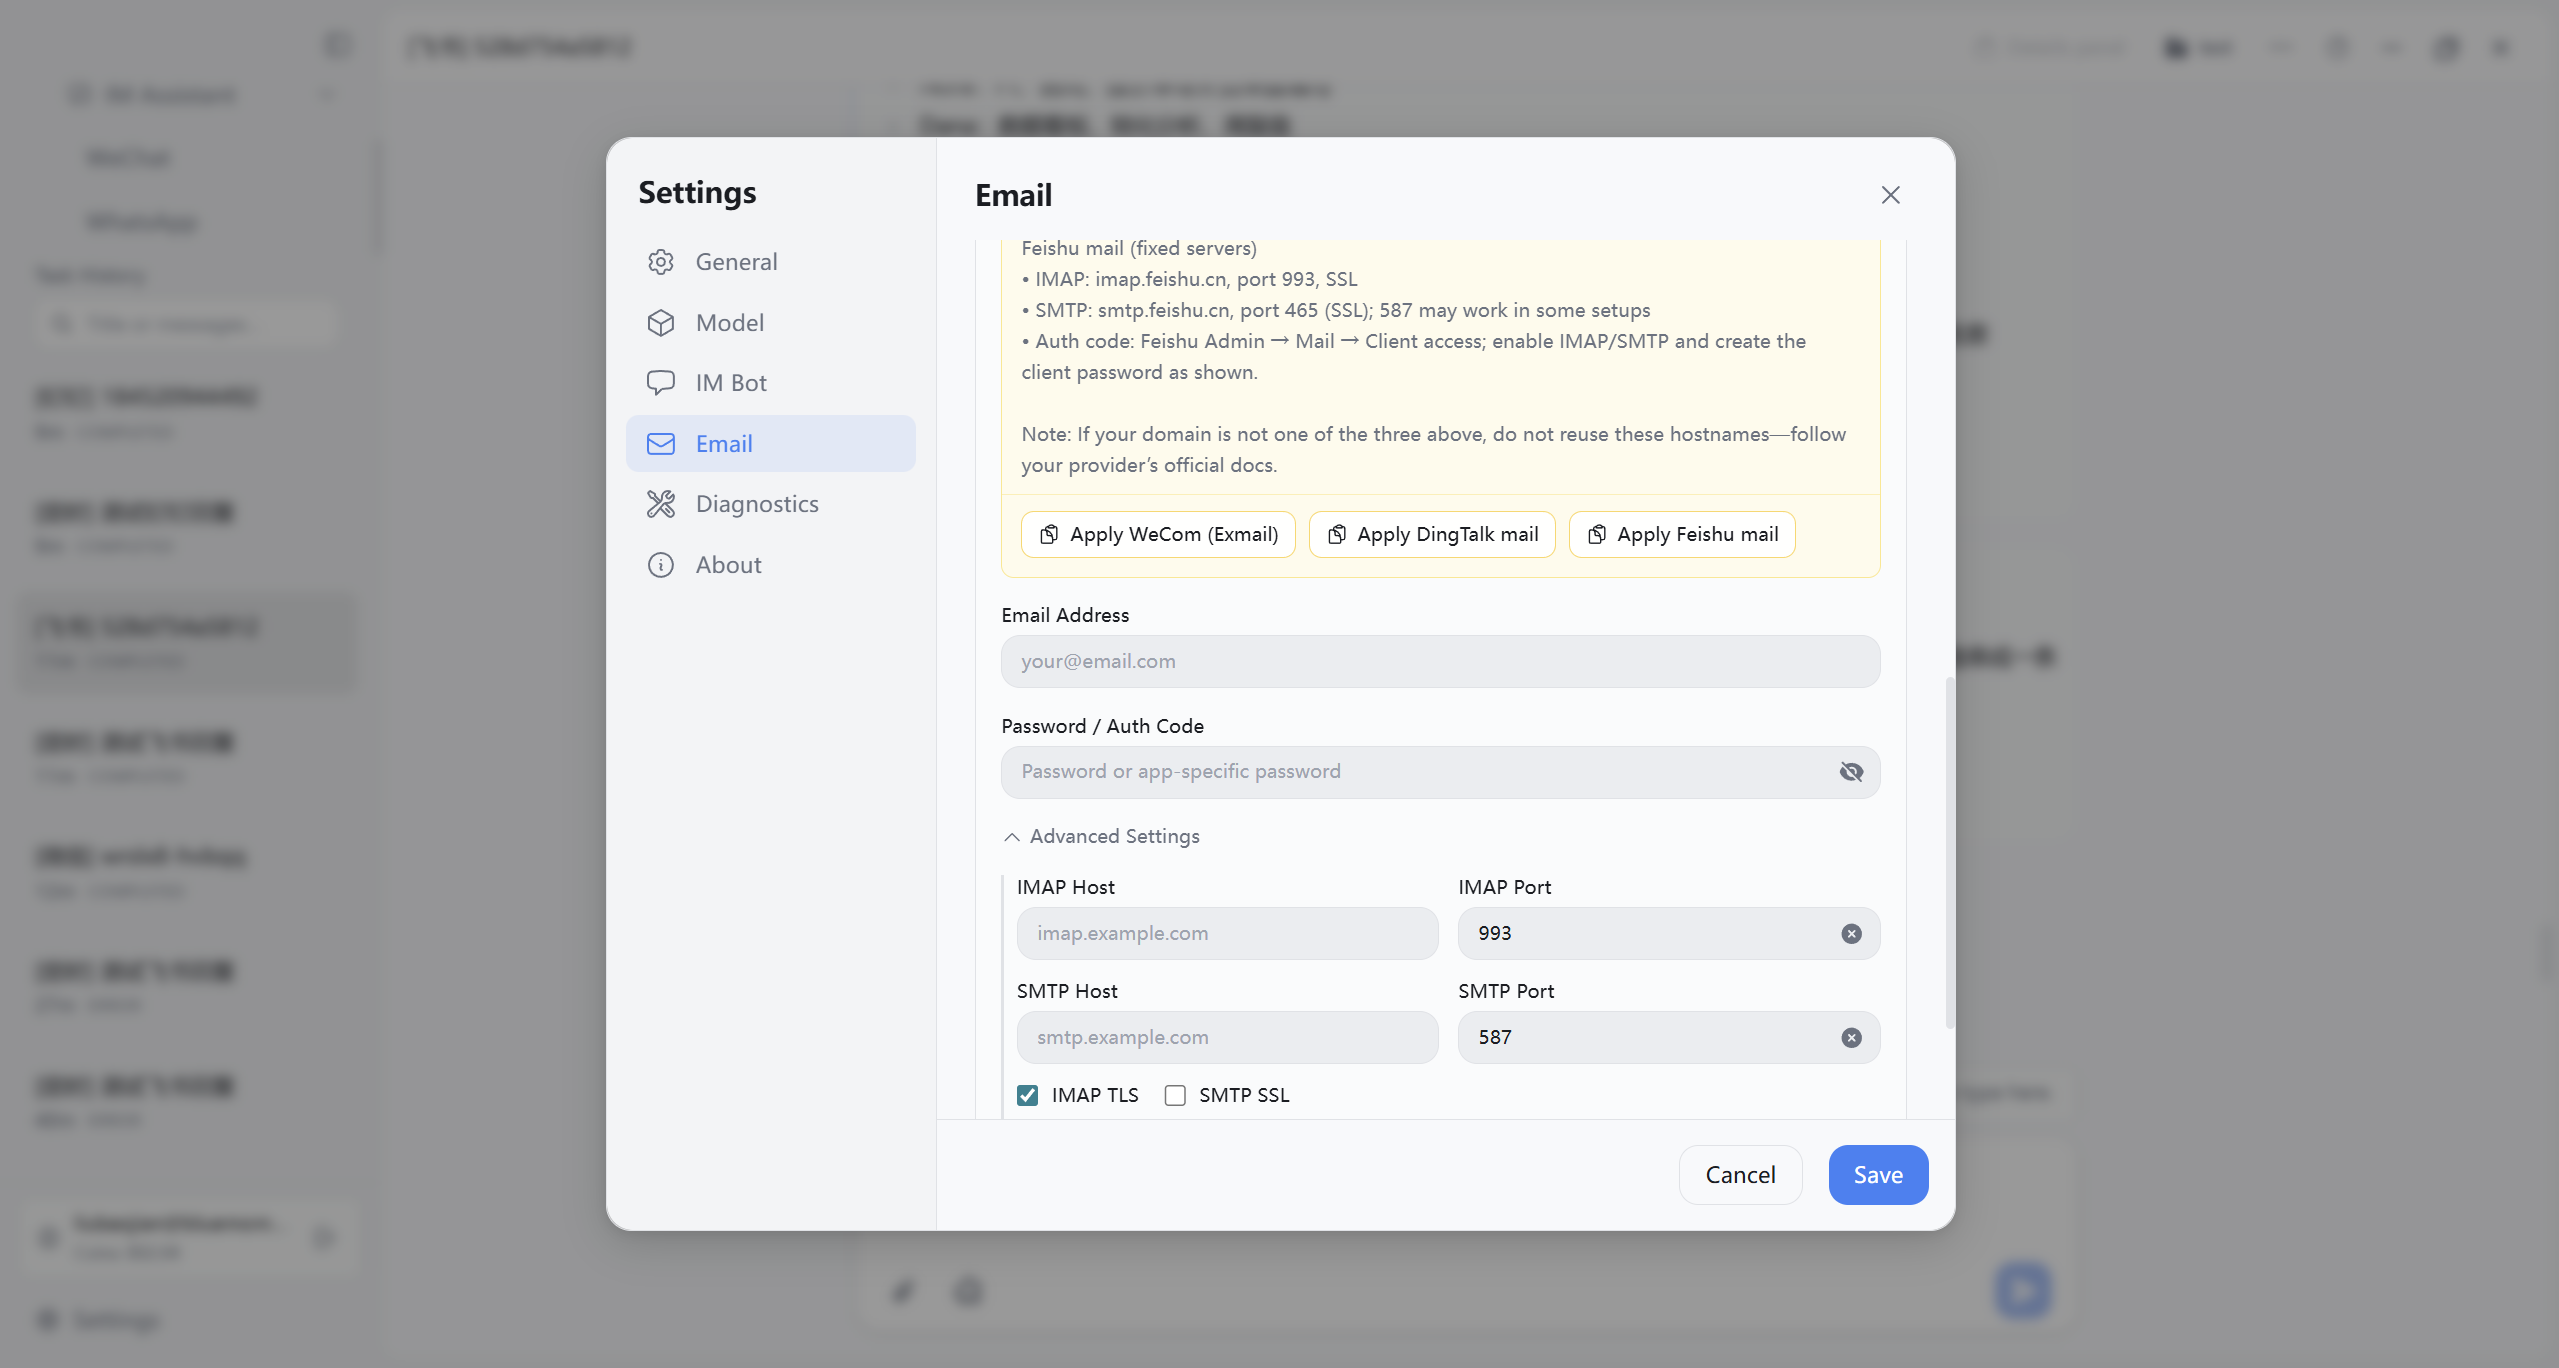
Configure send/receive accounts under Settings → Email. For common personal mailboxes (126, 163, Gmail, Outlook, QQ, etc.), choose the matching provider and the client will try to auto-match IMAP/SMTP; you still need to enable IMAP/SMTP in the webmail console and enter an authorization code or app-specific password (not your web login password).
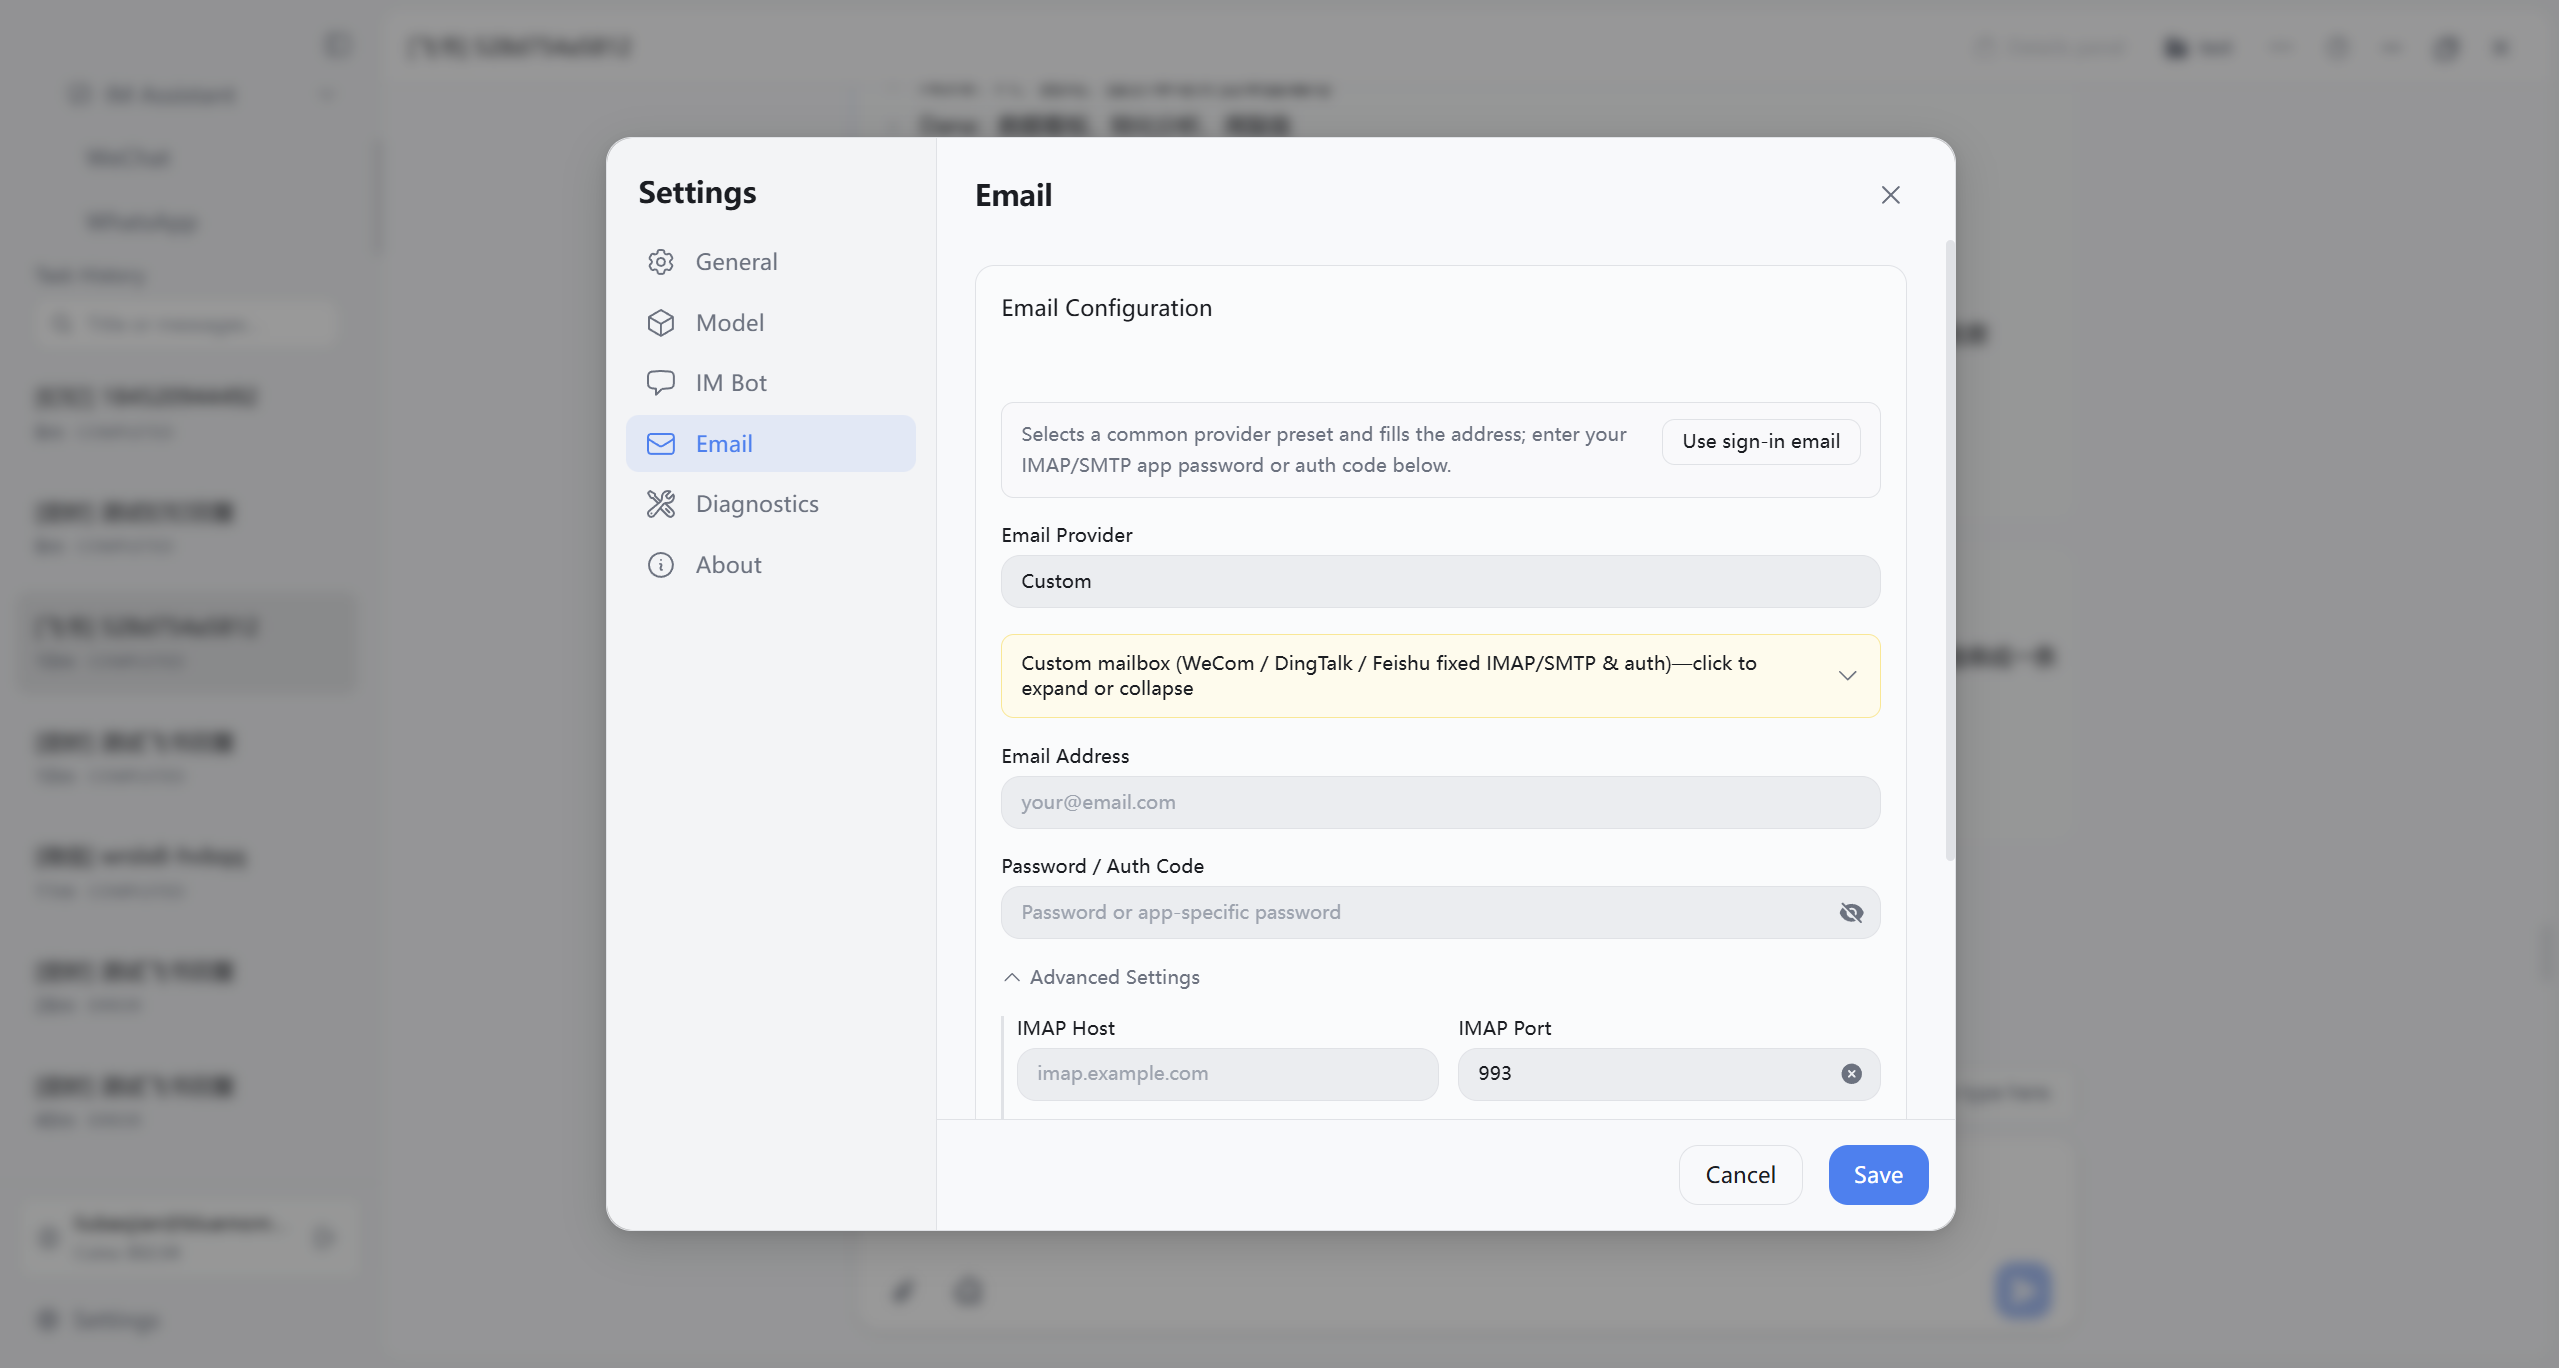
When choosing a Custom provider, expand the yellow help area for custom mailbox instructions (WeCom / Tencent enterprise mail, DingTalk, Feishu, and fixed server/authorization guidance). Use Use sign-in email to fill in your current account email; for WeCom, DingTalk, or Feishu enterprise mail, use Fill WeCom / Fill DingTalk / Fill Feishu to prefill host and port, then complete the authorization code and advanced fields. Always run Test Connectivity (or “Test Connection”) and Save after it passes.
4.3 Configure IM Bots (required for IM chat)
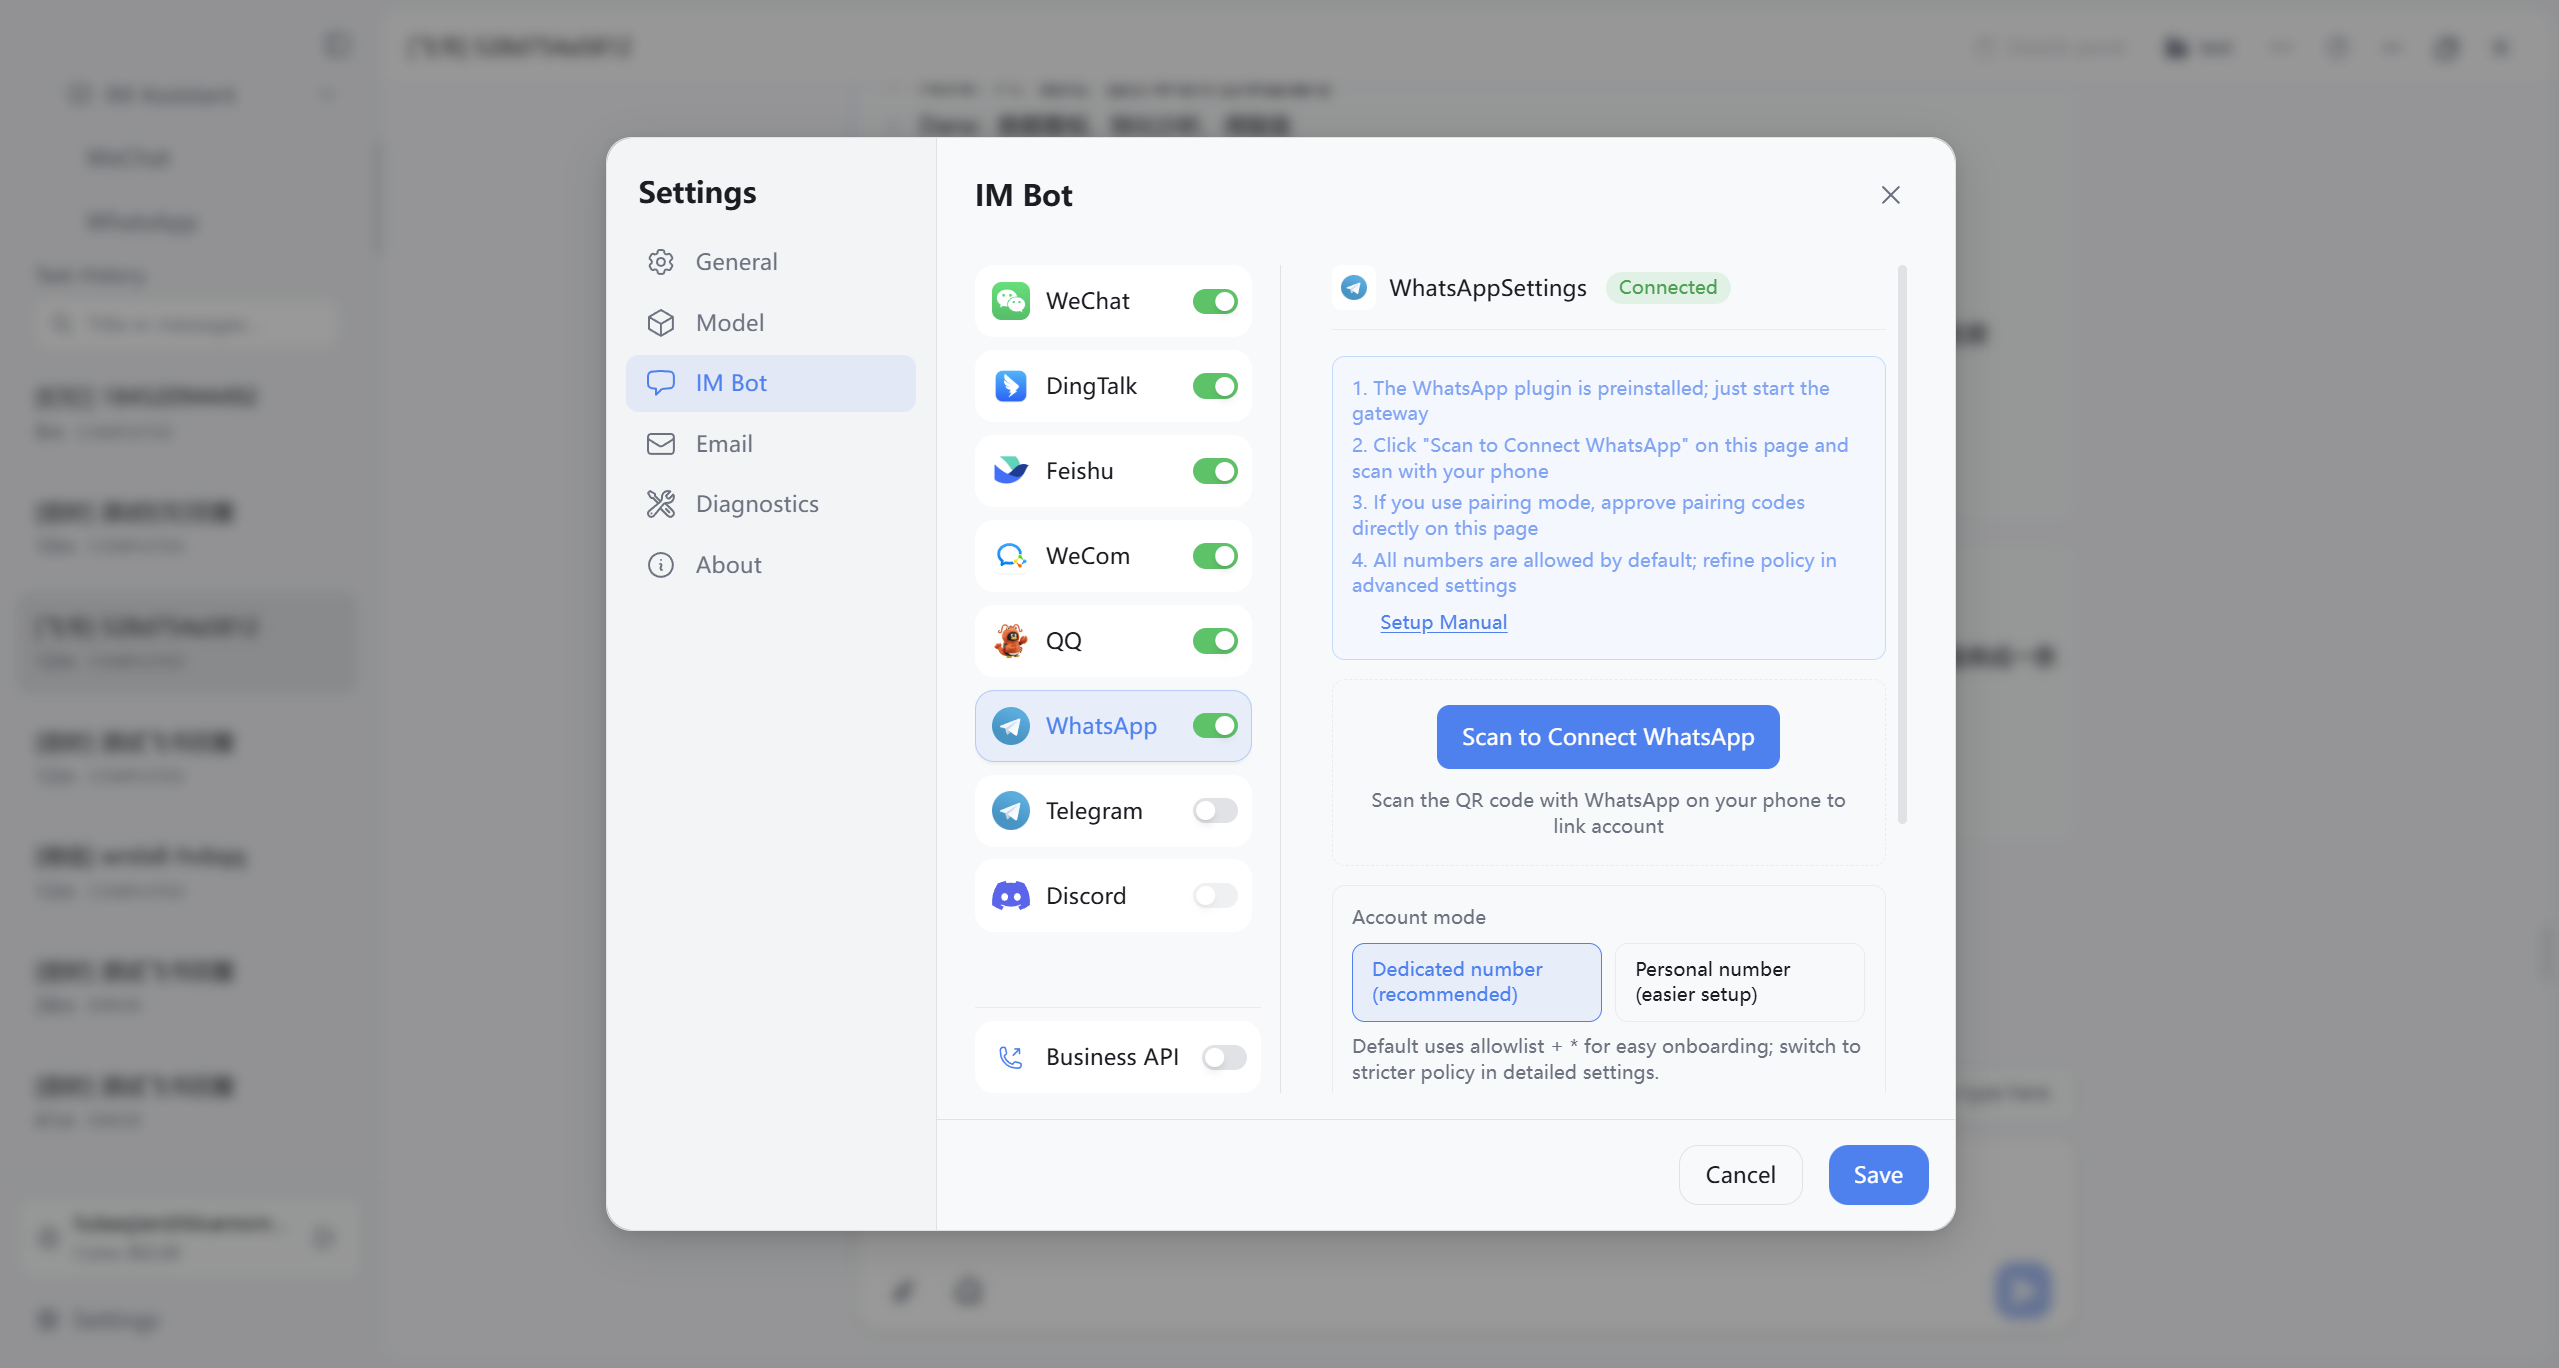
Enable channels as needed under Settings → IM Bots. In the Chinese UI, the left list shows platform names in this order: WeChat, DingTalk, Feishu, WeCom, QQ, WhatsApp. The English UI adds Telegram and Discord, with sidebar names WeChat, DingTalk, Feishu, WeCom, QQ, WhatsApp, Telegram, Discord. In Feishu settings you can choose domain type “Feishu (feishu.cn)” or “Lark (larksuite.com)”; the sidebar still shows “Feishu” or “Feishu.”
Configuration: Follow each platform page in the client: WeChat and WhatsApp support QR sign-in; Feishu includes QR flows plus Open Platform app credentials; WeCom focuses on bot credentials and on-page guidance; DingTalk, QQ, and English-only Telegram, Discord usually require applying for bot credentials on the platform, then entering them in the client.
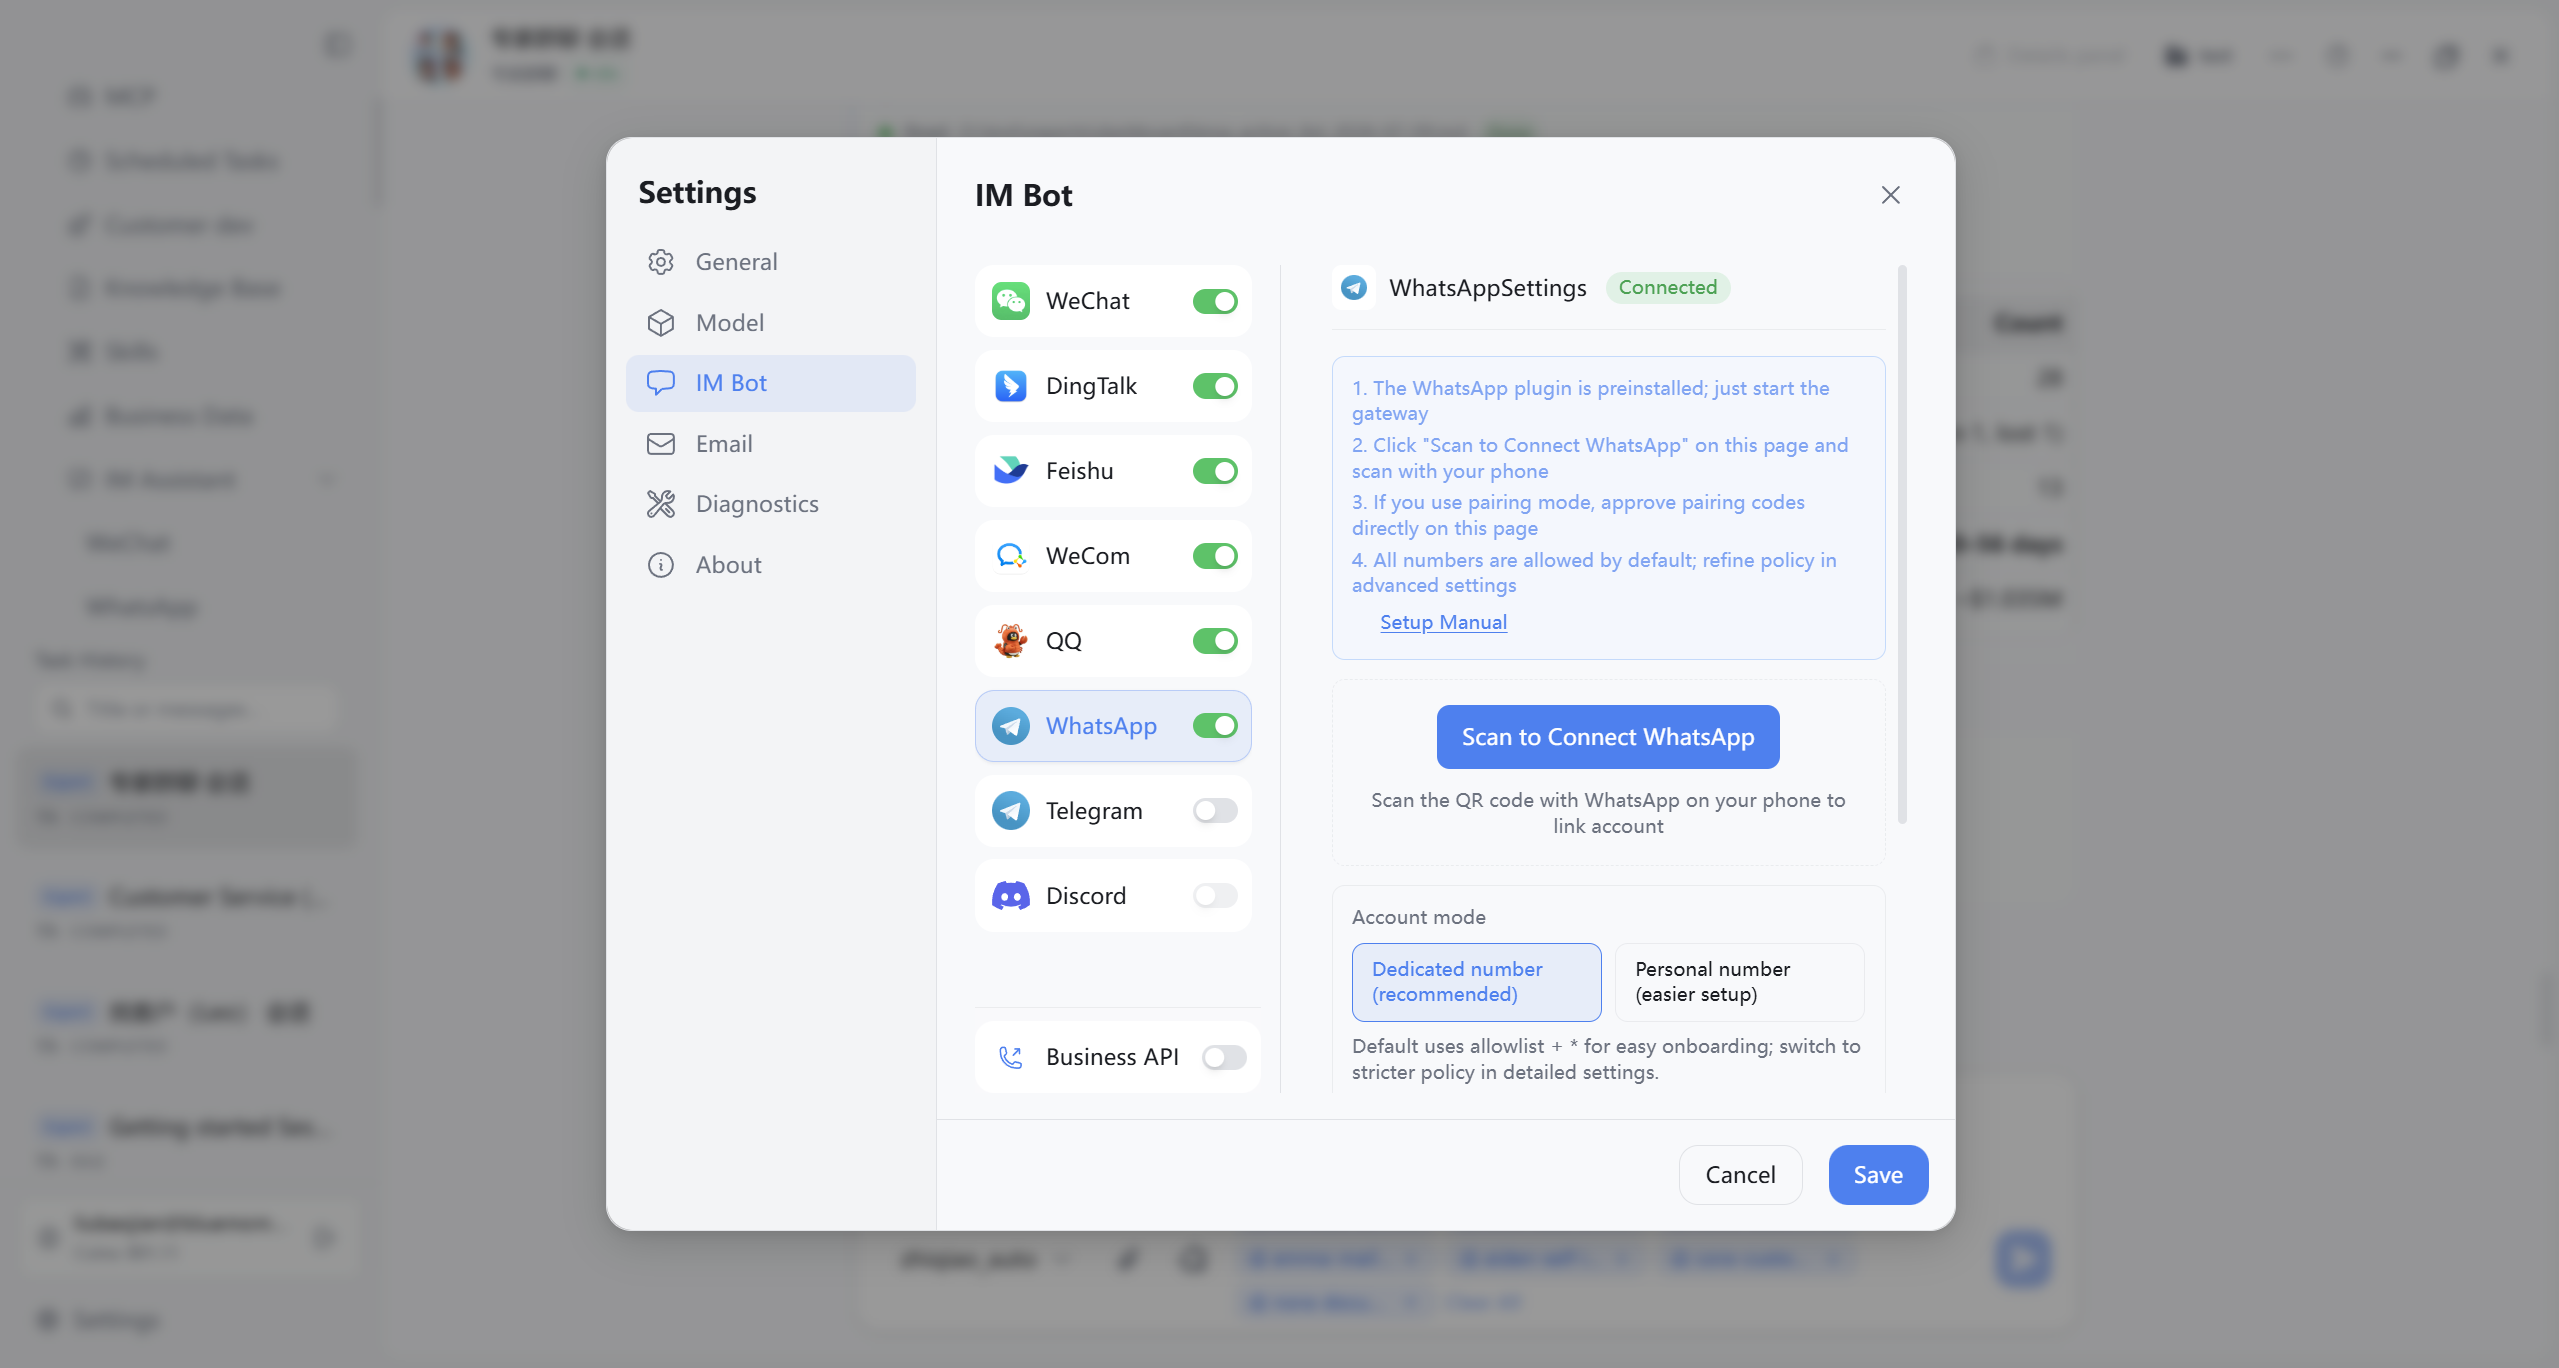
Example: WhatsApp — After enabling the switch, click Connect WhatsApp via QR, scan with WhatsApp on your phone to pair; when connected, confirm status shows “Connected”; run connectivity checks if offered, then Save to apply.
4.4 Tasks Page: Choose a Model
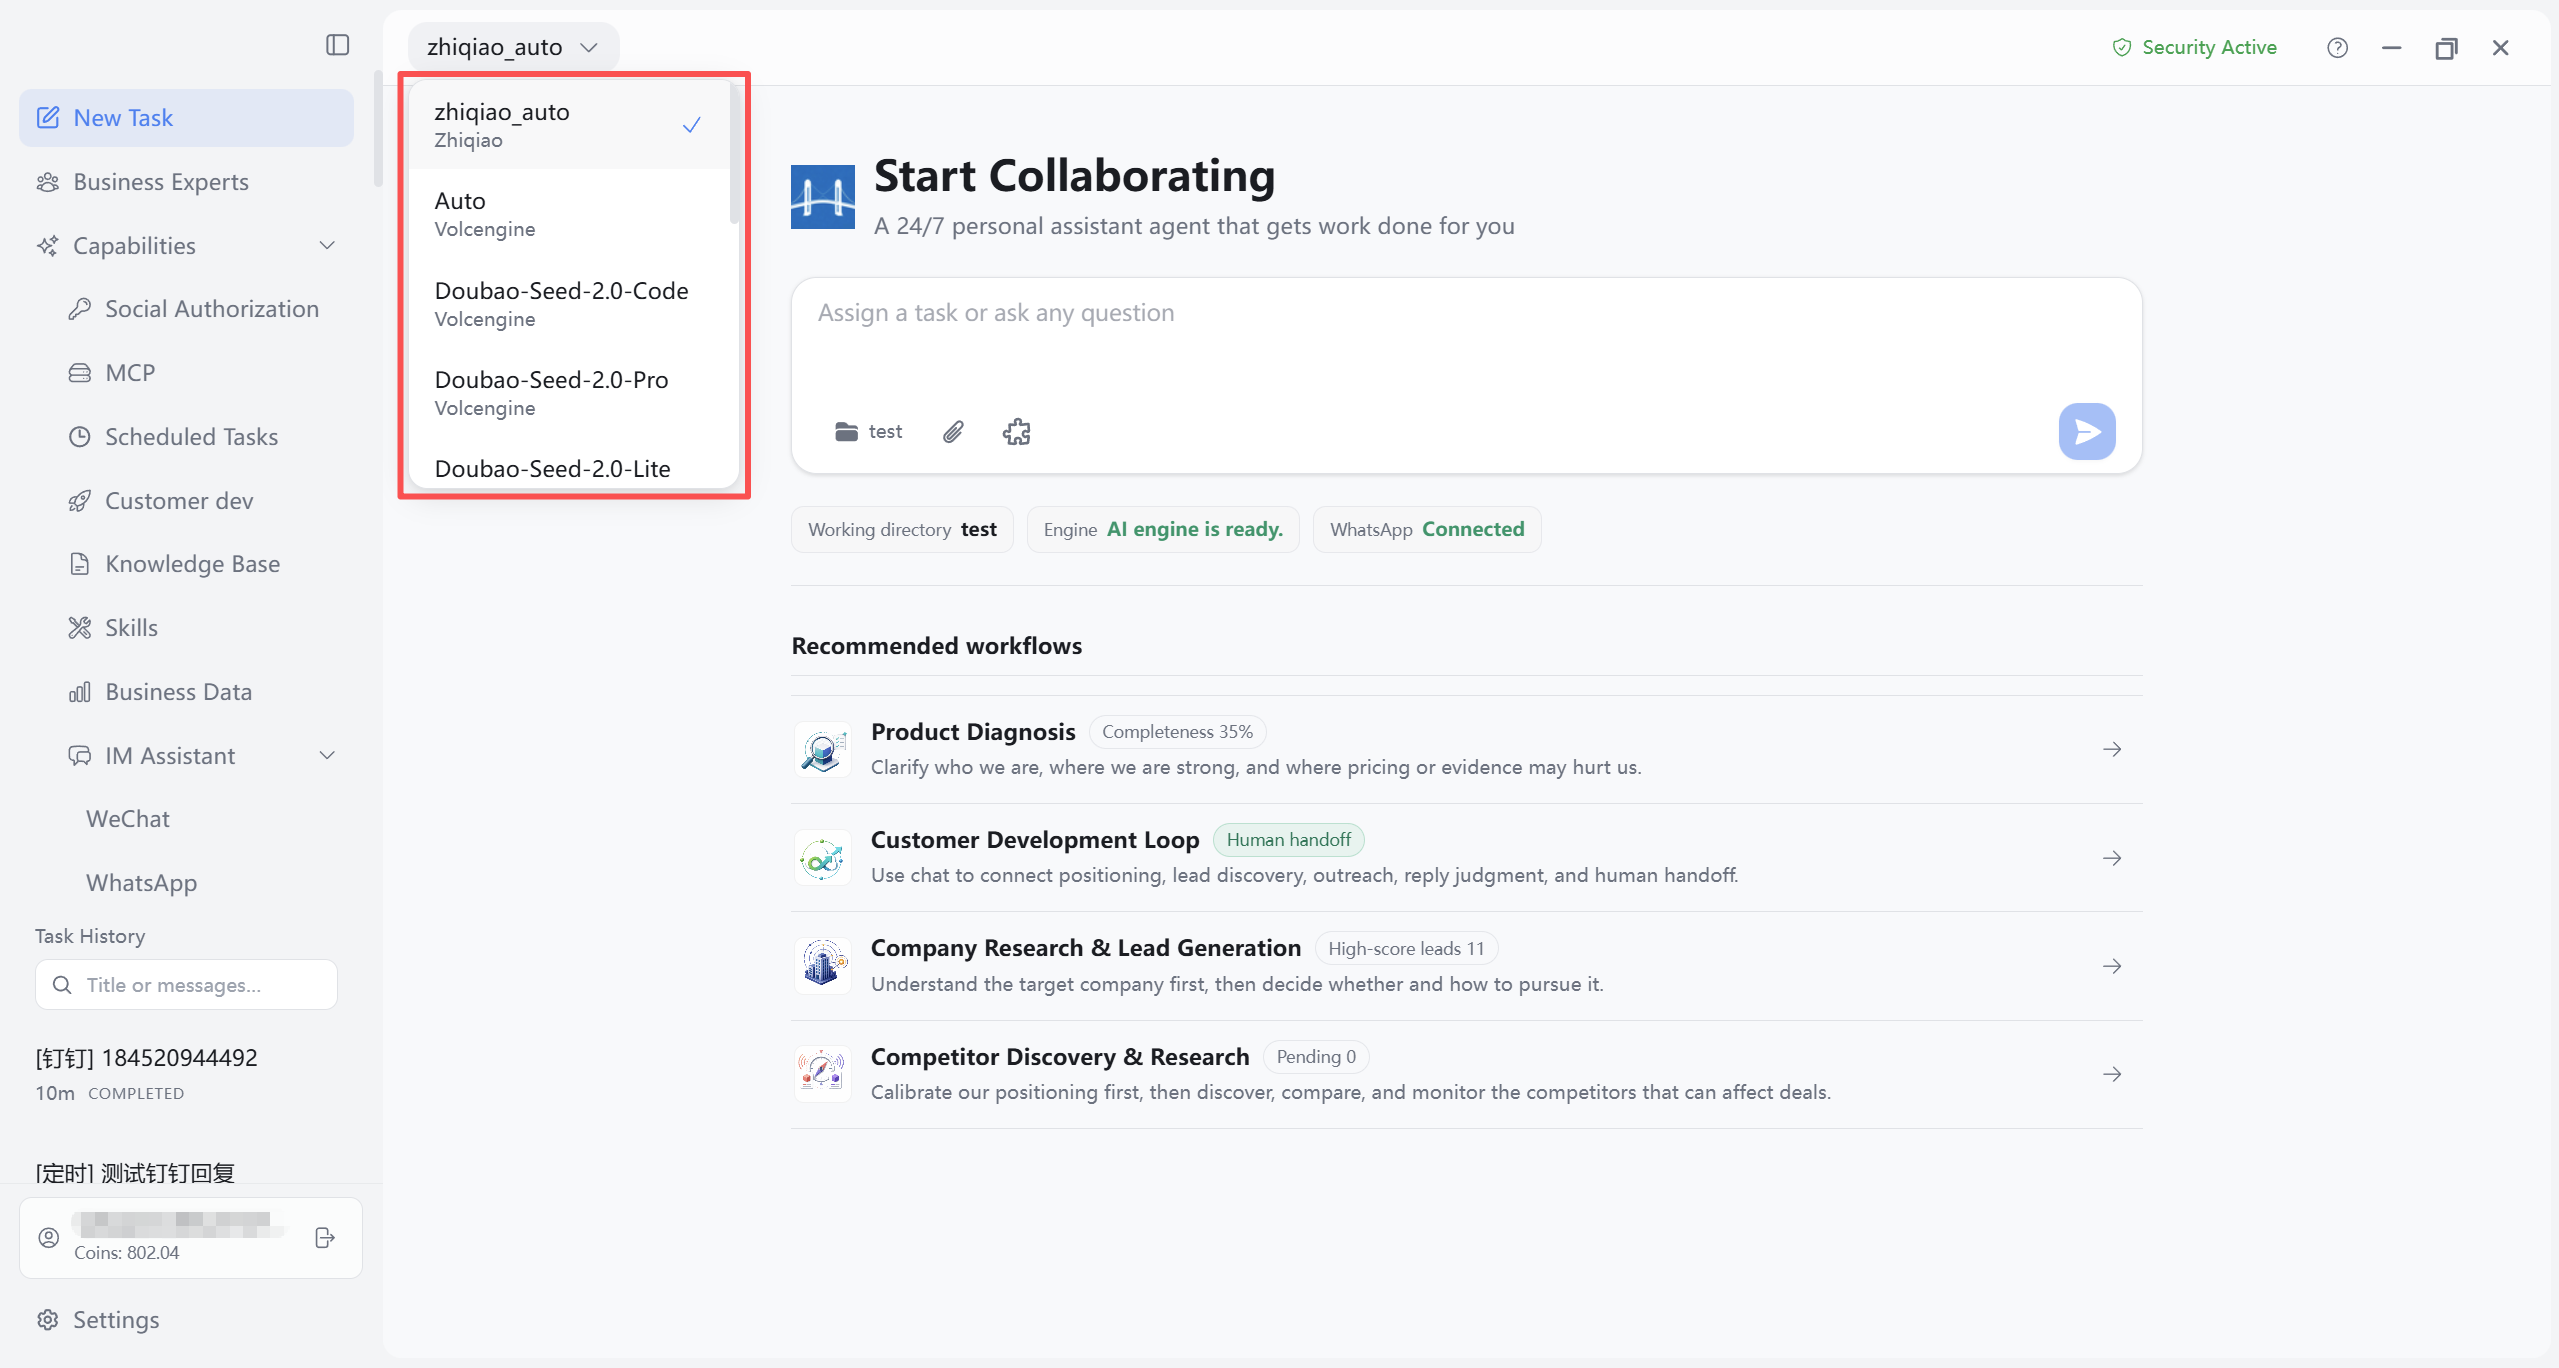
After completing and saving Settings → Models, click the model selector at the top of the Tasks page (dropdown showing the current model name) to choose the model for this conversation. The button label updates after selection—confirm it matches your intent before sending.
Choose CogniBridge Gateway (recommended for most users)
- In the dropdown, select a model under provider CogniBridge (or Zhiqiao as shown), such as zhiqiao_auto.
- This matches the default CogniBridge Gateway in section 4.1—available after sign-in; usually no change needed.
- A check mark on the list item means it is currently selected.
Choose custom / other provider models
- If your team configured Volcengine, OpenAI, or other providers in Settings → Models (see 4.1 and Figure 4-06), the dropdown shows each provider name and its models (e.g. Auto, Doubao series under Volcengine).
- Select to switch; this affects only subsequent messages on the current Tasks page, not the default gateway switch in Settings.
- If the expected provider or model is missing, return to Settings → Models and confirm it is saved and passes Test Connection.
4.5 Tasks Page: Choose a Working Directory
On the Tasks page, specify a local working directory for attachments, exports, and business files. After choosing a folder, the UI shows the current path; use the same directory consistently to avoid missing generated data or memory.
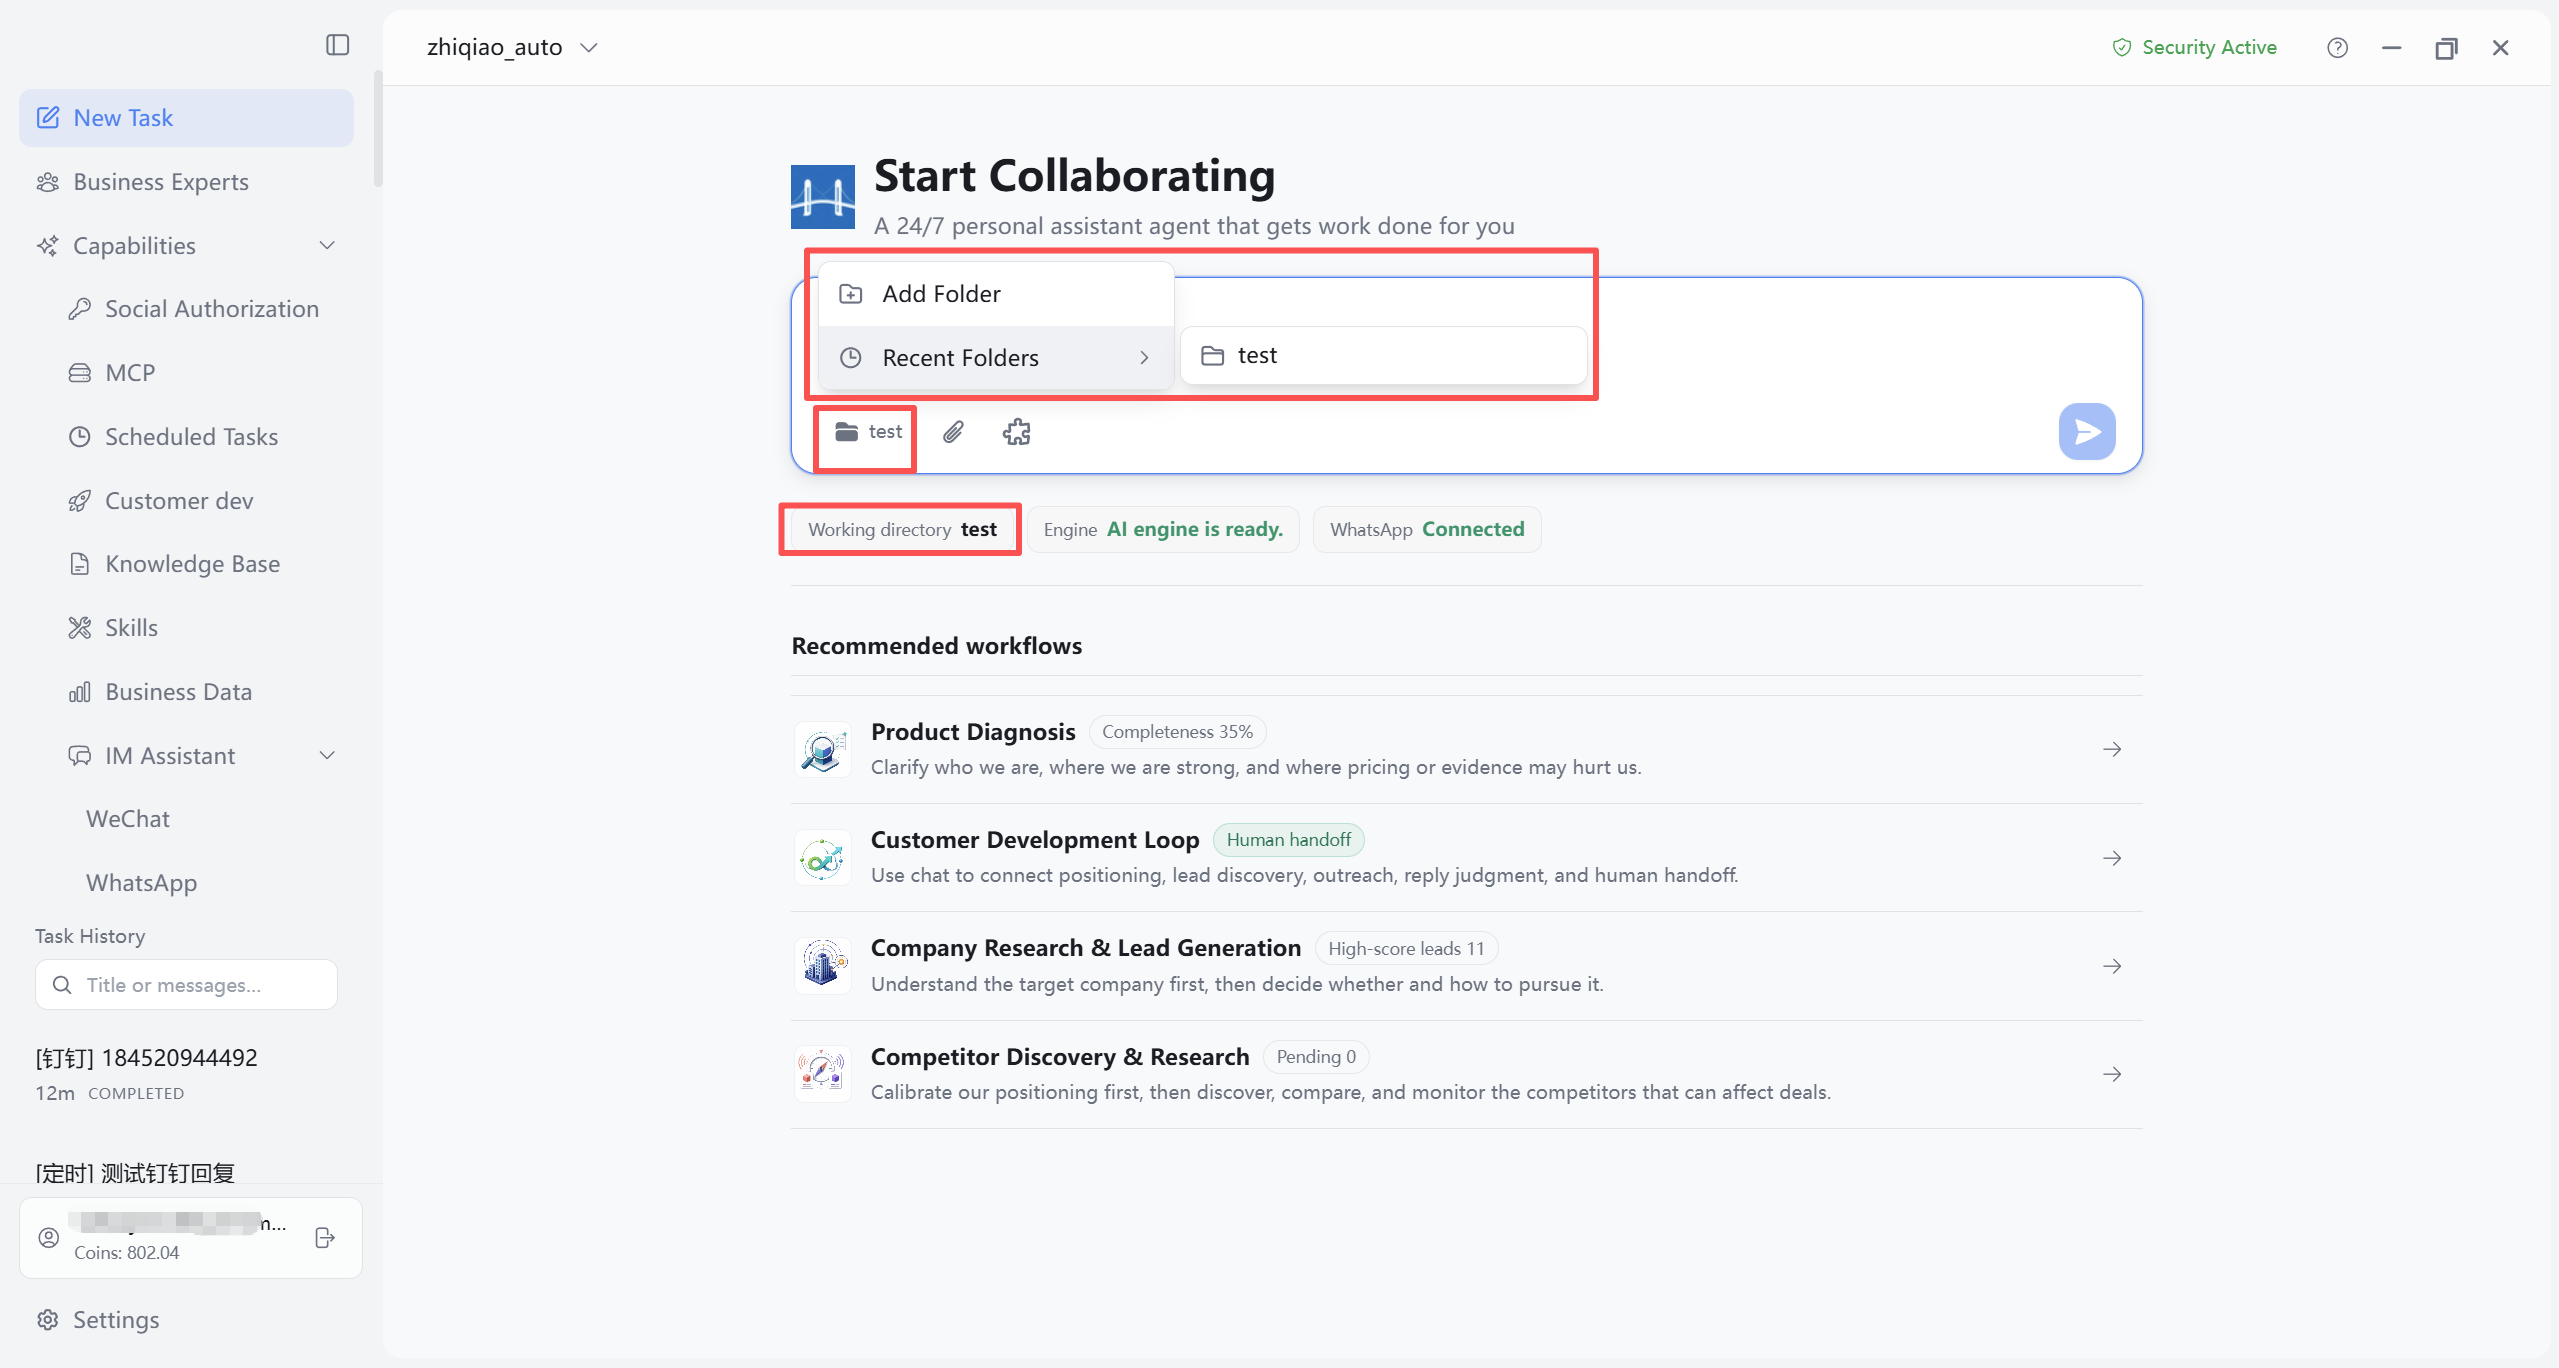
4.6 New Task: Full System Initialization
After testing and saving models in Settings → Models and choosing a working directory on the Tasks page, trigger full system initialization once via New Task (database, memory, and more—exact steps follow the client).
You can type your request directly in the New Task input (e.g. “Help me initialize the system”); or choose IT Expert Xiao Li from Business Experts or Quick Start entries to assist with initialization.
After sending, wait for completion; avoid repeatedly submitting the same initialization task until the current run finishes.
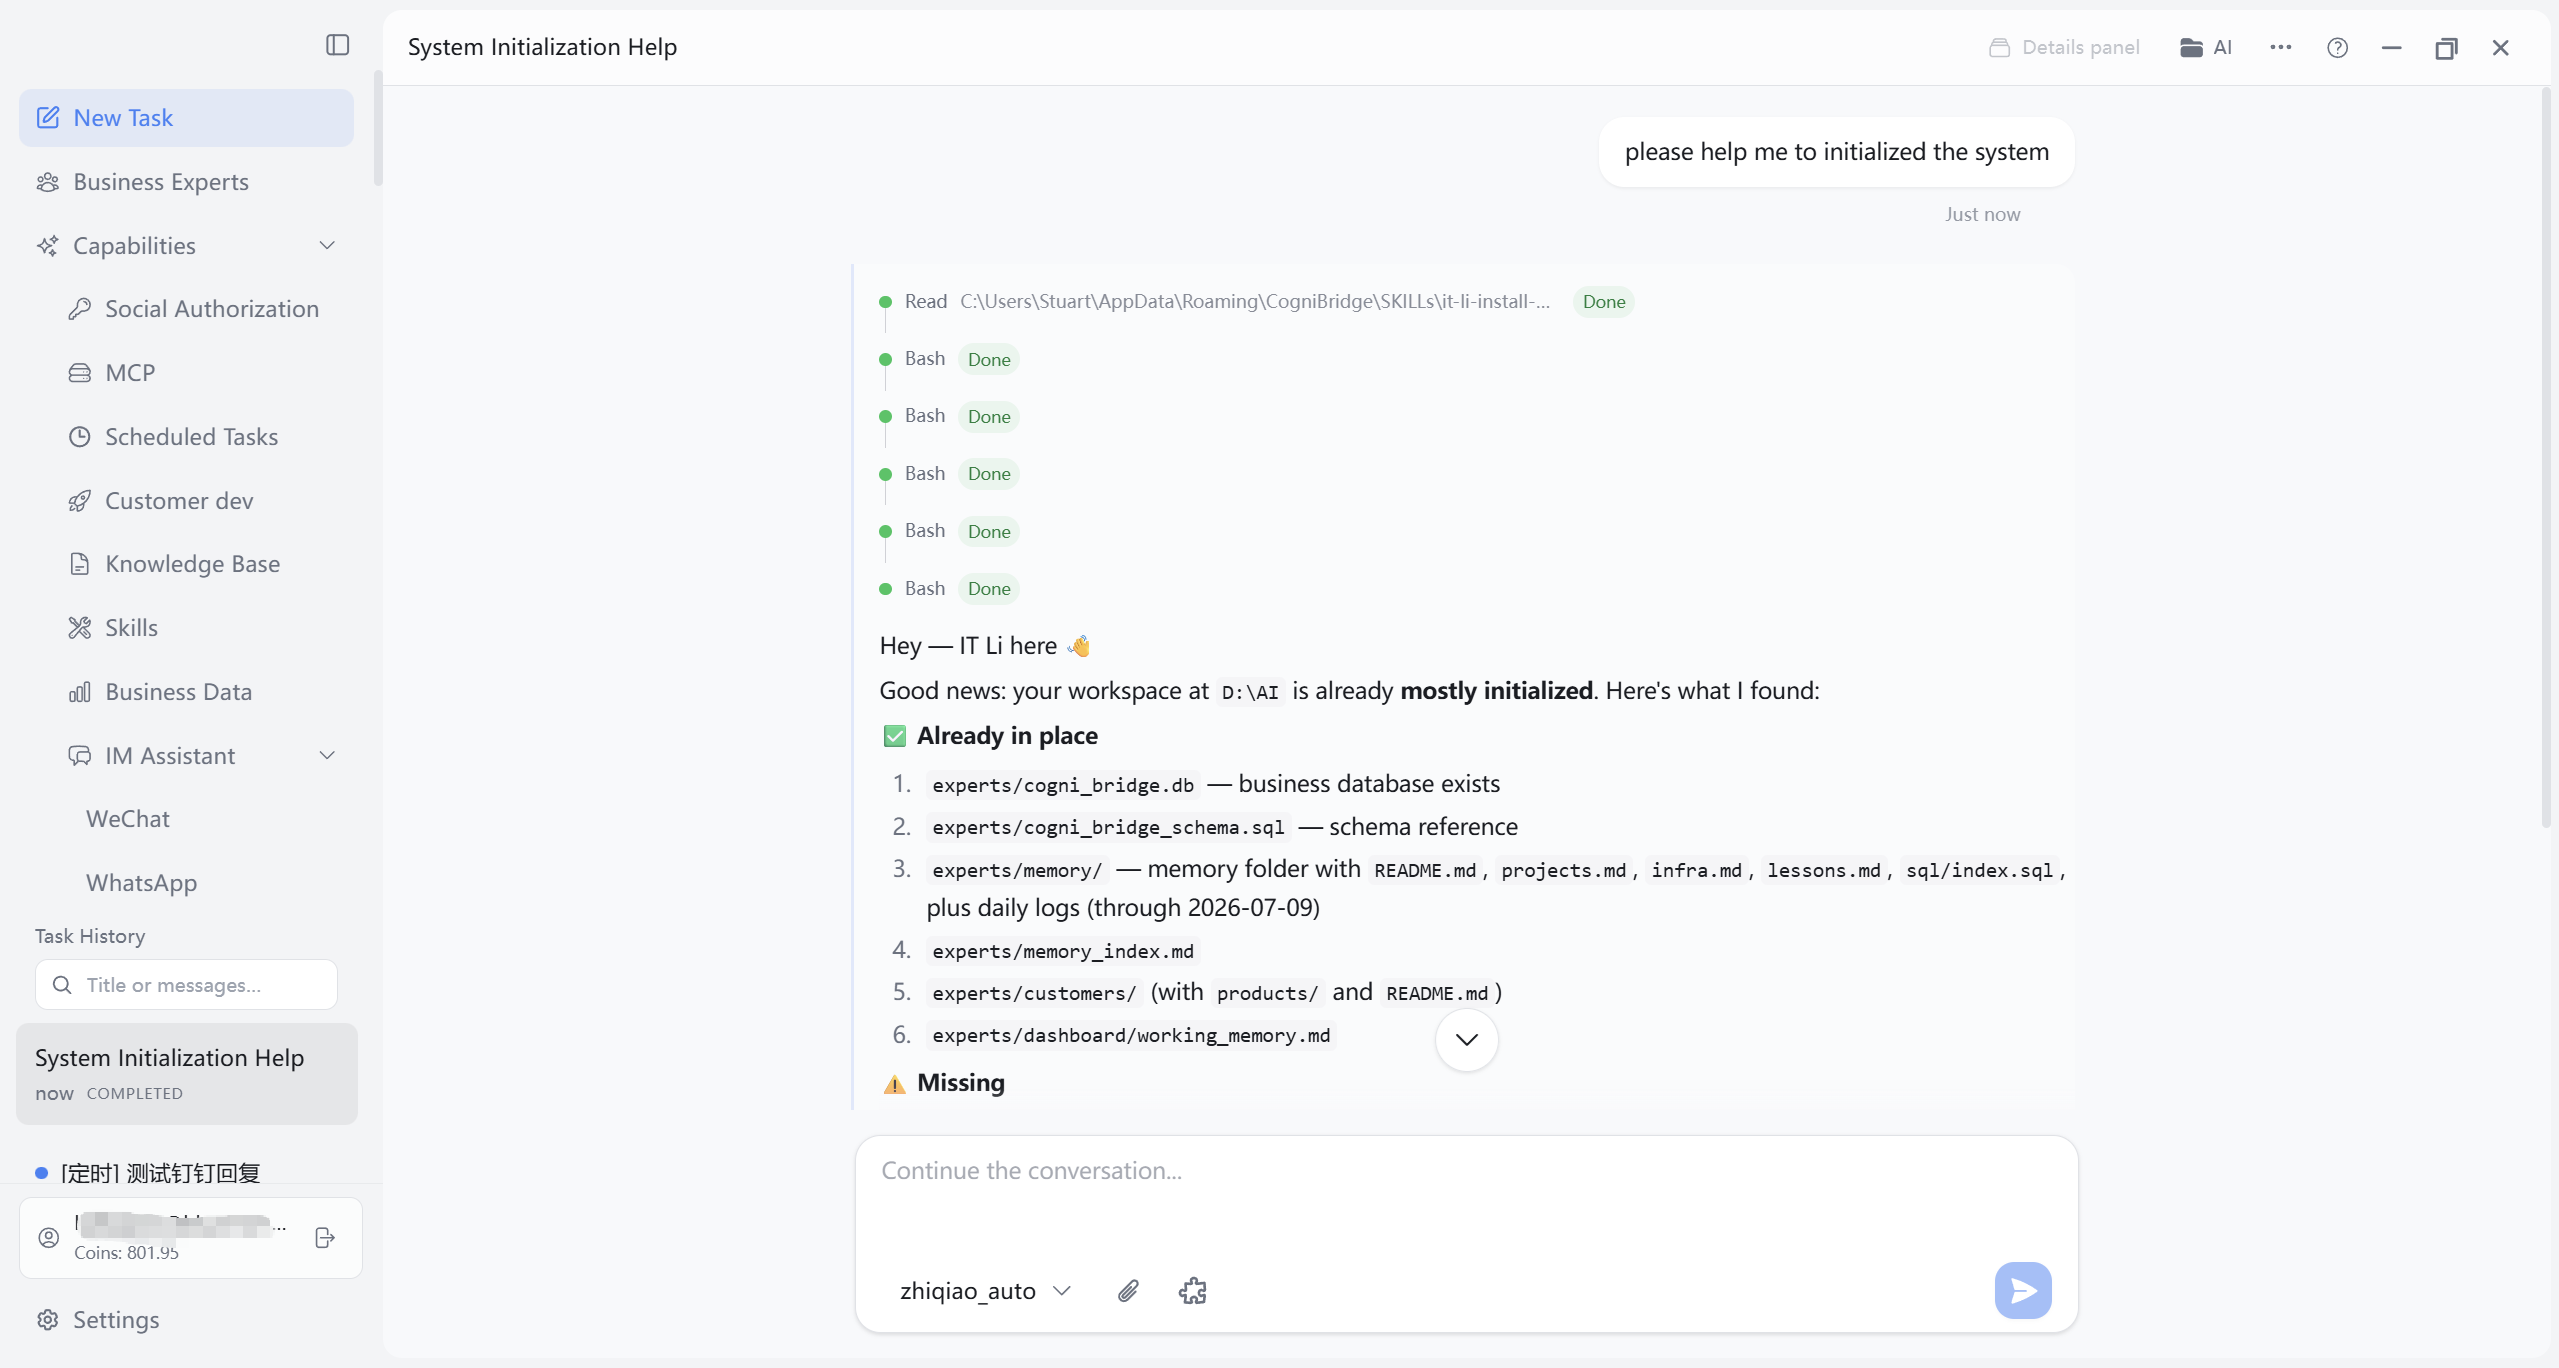
4.7 Setup Verification Checklist
- Model connection test in Settings succeeded and was saved.
- If using email: email connectivity test succeeded and was saved.
- If using IM: corresponding IM channel is connected and saved.
- Tasks page has model and working directory selected; path displays correctly.
- Full system initialization completed via New Task (database, memory, etc.) without persistent errors.
- Tasks page can send a simple test message; if email is needed, the Mail page shows sync-related entries.
5. Tasks Page
The Tasks page is CogniBridge’s primary workspace: most day-to-day needs are handled here as conversational tasks. Follow the flow below for a stable loop—New Task for a blank or continued session; Recommended Workflows when you want a scenario template; input and attachments, then send; after sending, watch execution status and permission prompts (the UI may show “Running,” tool confirmations, etc.); when the first reply arrives, review the result for format and facts; if it falls short, iterate in the same task with added constraints—usually more efficient than starting over. For goals that span days or weeks (competitor tracking, customer radar, weekly reports), ask the AI assistant in the task to break down the plan and create scheduled tasks so CogniBridge runs and summarizes on schedule in the background (see 5.1 and Chapter 11).
5.1 New Task
Click “New Task” in the left sidebar to open the Tasks page: the center area is the main conversation surface; the top or title area shows the current task name (often a default title when new; may change after you send, per client). For a completely fresh start, write your request in the bottom input; if you arrived from another page, the input may already contain prior text or system prefill—scan quickly before sending.
Planning long-running work (recommended): A single conversation suits “this one thing right now”; if the goal needs ongoing follow-up, periodic review, or multiple rounds (competitor monitoring, customer radar expansion, weekly briefings, multi-phase market research), avoid stuffing every requirement into one message. A steadier approach:
- Break it down first: In the current task, ask the AI assistant to split the large goal into subtasks and agree on output format for each step (daily change list, candidate customer table, weekly report outline, etc.).
- Then automate: For steps that repeat, describe timing and cadence in the conversation and ask the AI assistant to create scheduled tasks (e.g. “Every weekday at 9:00 check competitor site changes,” “Every Friday at 17:00 summarize this week’s customer development progress”). CogniBridge triggers the AI assistant on schedule in the background—you do not need to open the Tasks page each time.
- Finally summarize: Add a rollup scheduled task that periodically reads subtask results or outputs in the working directory and merges them into one report or to-do list.
You do not need to learn the scheduled-task form first—describe in natural language, e.g. “Help me plan quarterly competitor tracking: split into daily checks and weekly rollups, and create the matching scheduled tasks.” After creation, open Capabilities → Scheduled Tasks to verify the list and schedule; run history is on the History tab (see Chapter 11 11.1).
5.2 Recommended Workflows
When a new task has an empty conversation area, Recommended Workflows often appear below the input, packaging common export-growth scenarios as one-click templates. The current release includes four types (names follow the UI):
- Product diagnosis: From website, product line, pricing, and case studies, output value proposition, target customers, strengths/weaknesses, and evidence gaps; results write to the business library in the working directory for Business Data and customer development (see Chapter 10 10.3 and Chapter 7).
- Customer development loop: Progress through “positioning → find customers → review → outreach → reply handoff,” sharing the same business library as the Chapter 7 workbench.
- Deep company research: Understand target companies first, then decide whether to follow up and how to reach out; candidates can enter the review queue without automatic email or WhatsApp sends.
- Competitor discovery research: After calibrating your positioning, discover and track competitors that affect deals, with structured research output.
How to use: Click a workflow entry to open its template list; choose a template and the system prefills the input. Before sending, add your real customers, markets, and attachments. List items may show progress or status tags (completeness, pending confirmations, etc.). Some scenarios also offer historical result summaries with refresh; for periodic runs, describe the plan in conversation (see Chapter 11 11.1) or open the Scheduled Tasks page to configure manually. If you are unsure how to phrase a request, start from Recommended Workflows, then iterate per 5.5.
5.3 Input and Attachments
In the bottom input, state goal, constraints, and desired output shape in natural language (table, email draft, word limit, etc.). To reference local materials, use Attachments (paperclip) or the working directory / folder entry to include files in this turn’s context before sending. The input toolbar also supports images (typically up to 10) as context for this turn. Prefer one core goal per send; for multiple items, split across sends or add steps in “Result iteration” below.
Skills entry: The Skills button beside the input lets you pick one or more installed skills before sending, injecting specialized capabilities (document handling, email, browser bridge, etc.). Selected skills show as badges in the input area; your message is labeled with skills used after send. If you do not pick skills manually, CogniBridge matches and invokes suitable enabled skills from your question—usually no need to check each time. Install and manage skills in Chapter 15; manual selection on the Tasks page is in 5.8.
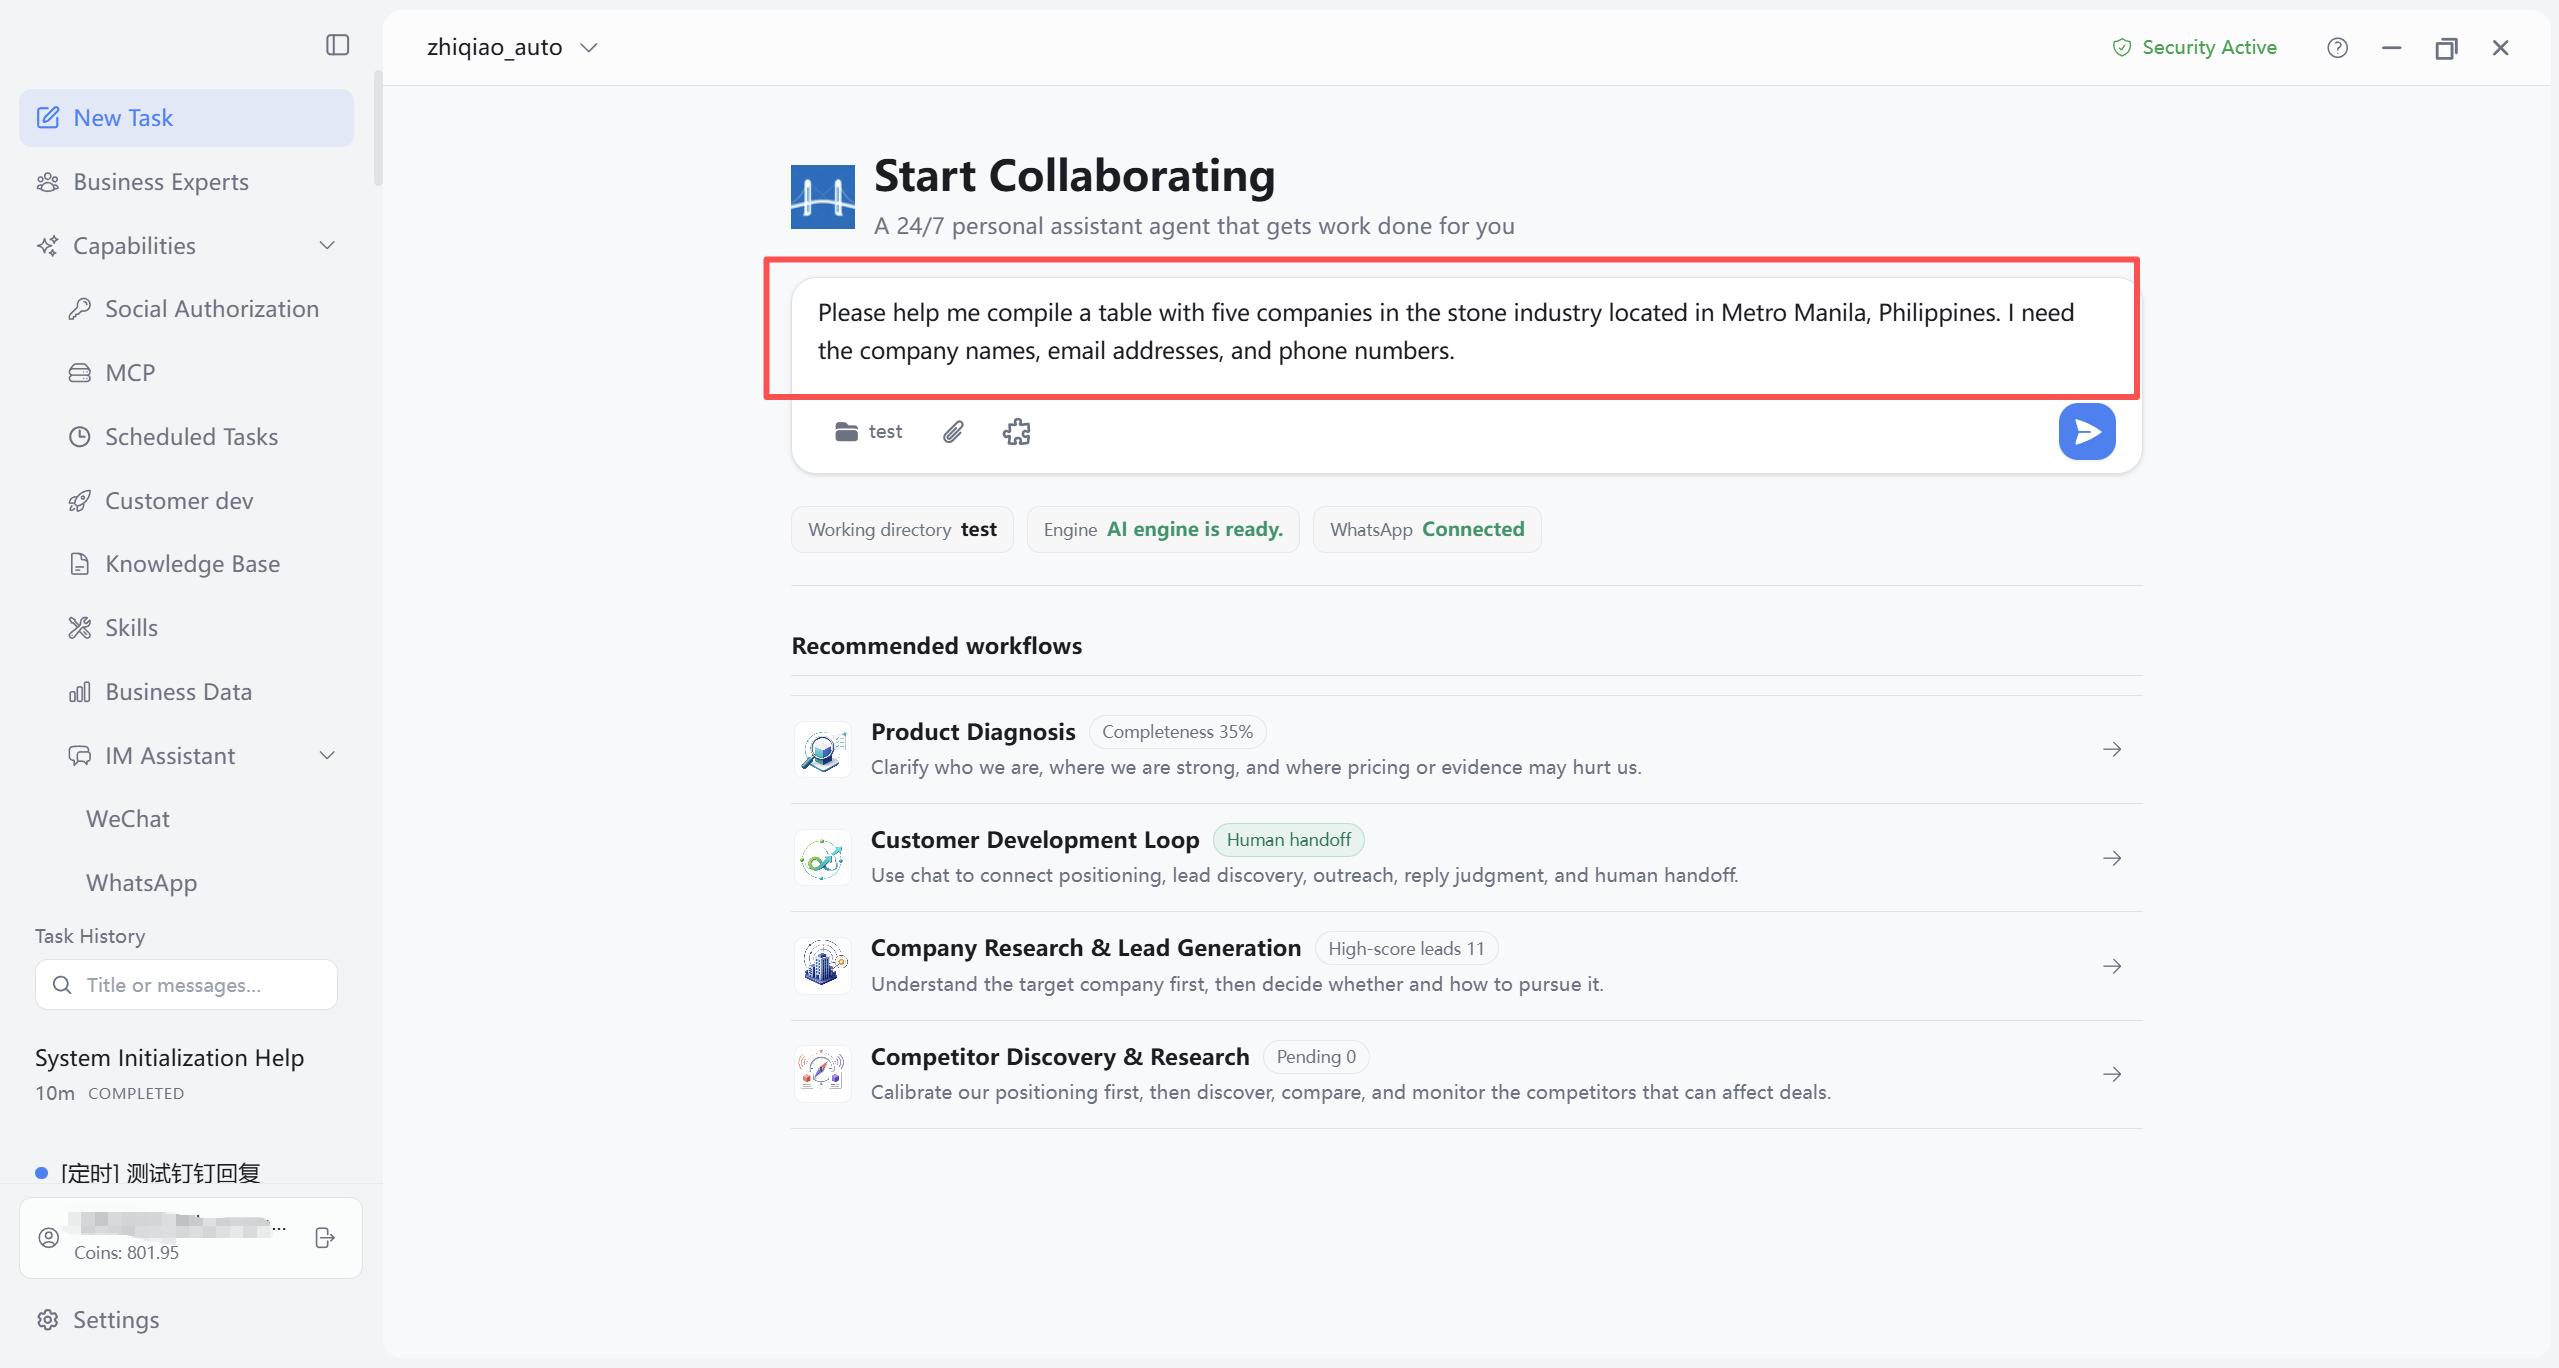
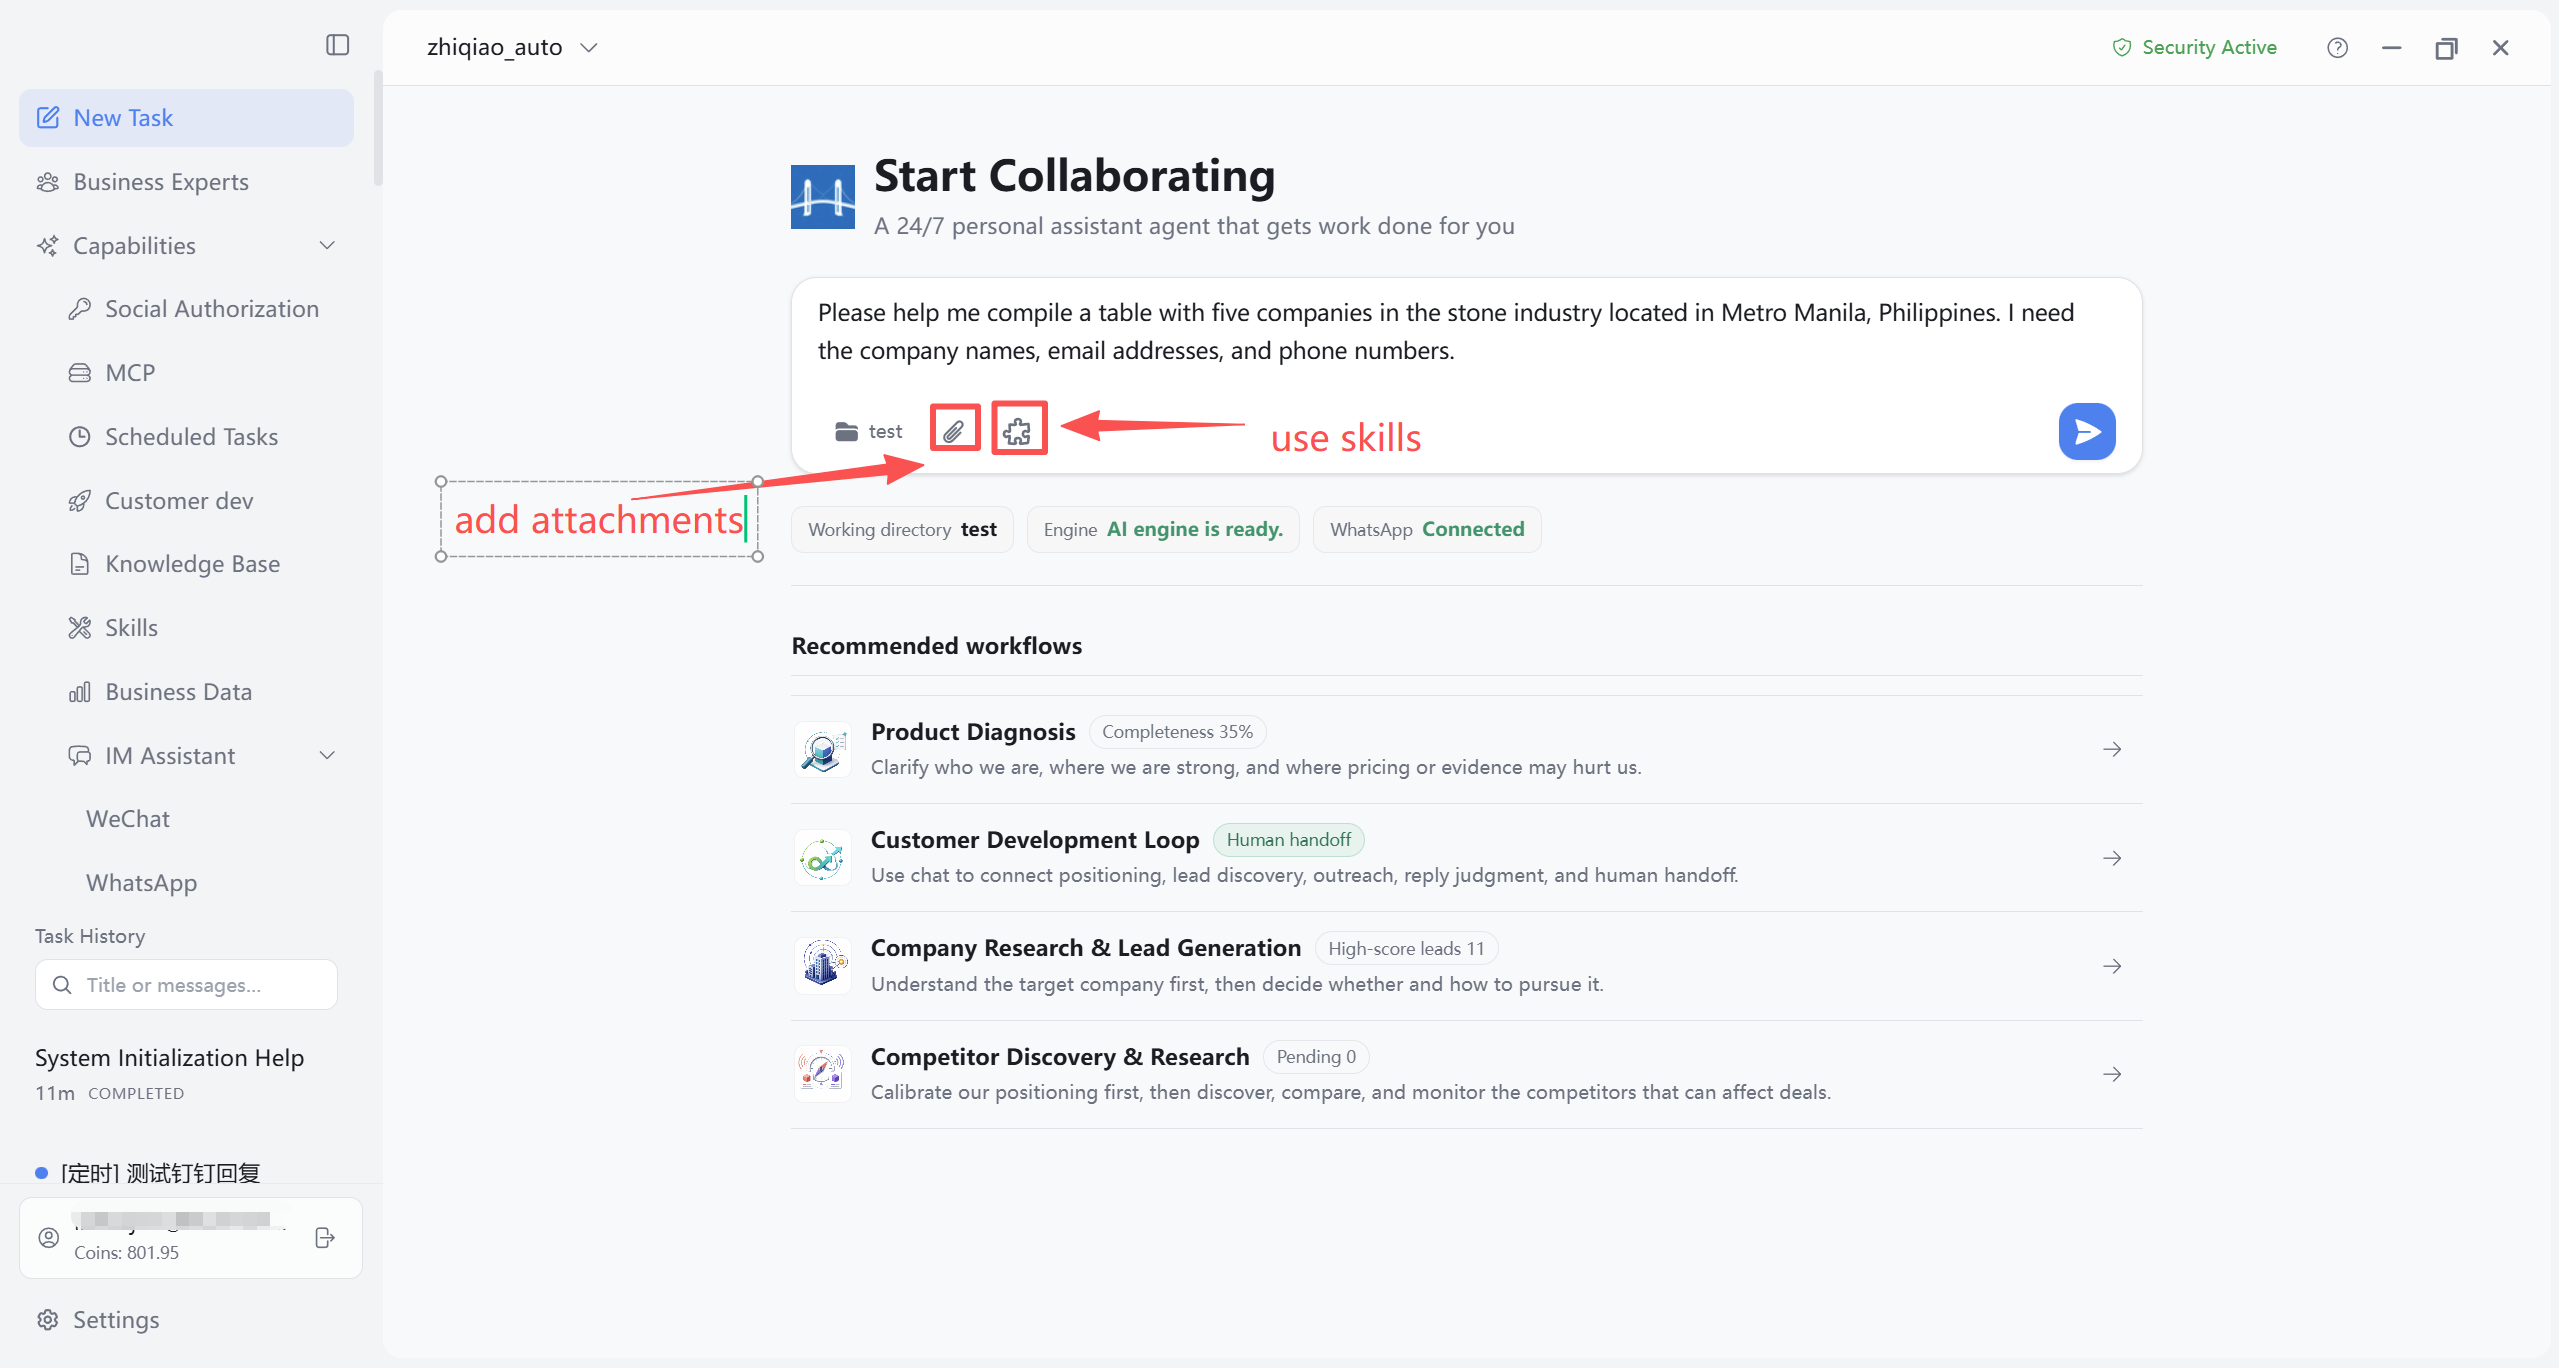
5.4 Review Execution Results
After sending, the main area gradually shows reasoning, tool calls, intermediate outputs, and the final reply. In long multi-turn threads, later replies may recall earlier content incompletely; summarize key points and New Task to continue, or ask the AI assistant to compress history.
If you see Running or progress hints, wait until the turn finishes—avoid repeat sends that stack the queue. During execution you may need to confirm:
- Permission or action confirmation: When the AI assistant requests file access, commands, or tools, read what will be accessed and allow only if relevant; if unsure, deny and ask the AI assistant to explain, then retry.
- Step-by-step confirmation wizard: When the AI assistant needs choices or preferences, a multi-step wizard appears (including “Custom answer”), unlike a single permission dialog; complete each step so execution can continue.
After the first result arrives, check against your 5.3 goals: facts aligned, format deliverable, no missing fields. If the AI assistant produced web pages, charts, flow diagrams, or similar viewable content, click the preview entry in the message area to open the preview panel on the right (see 5.7).
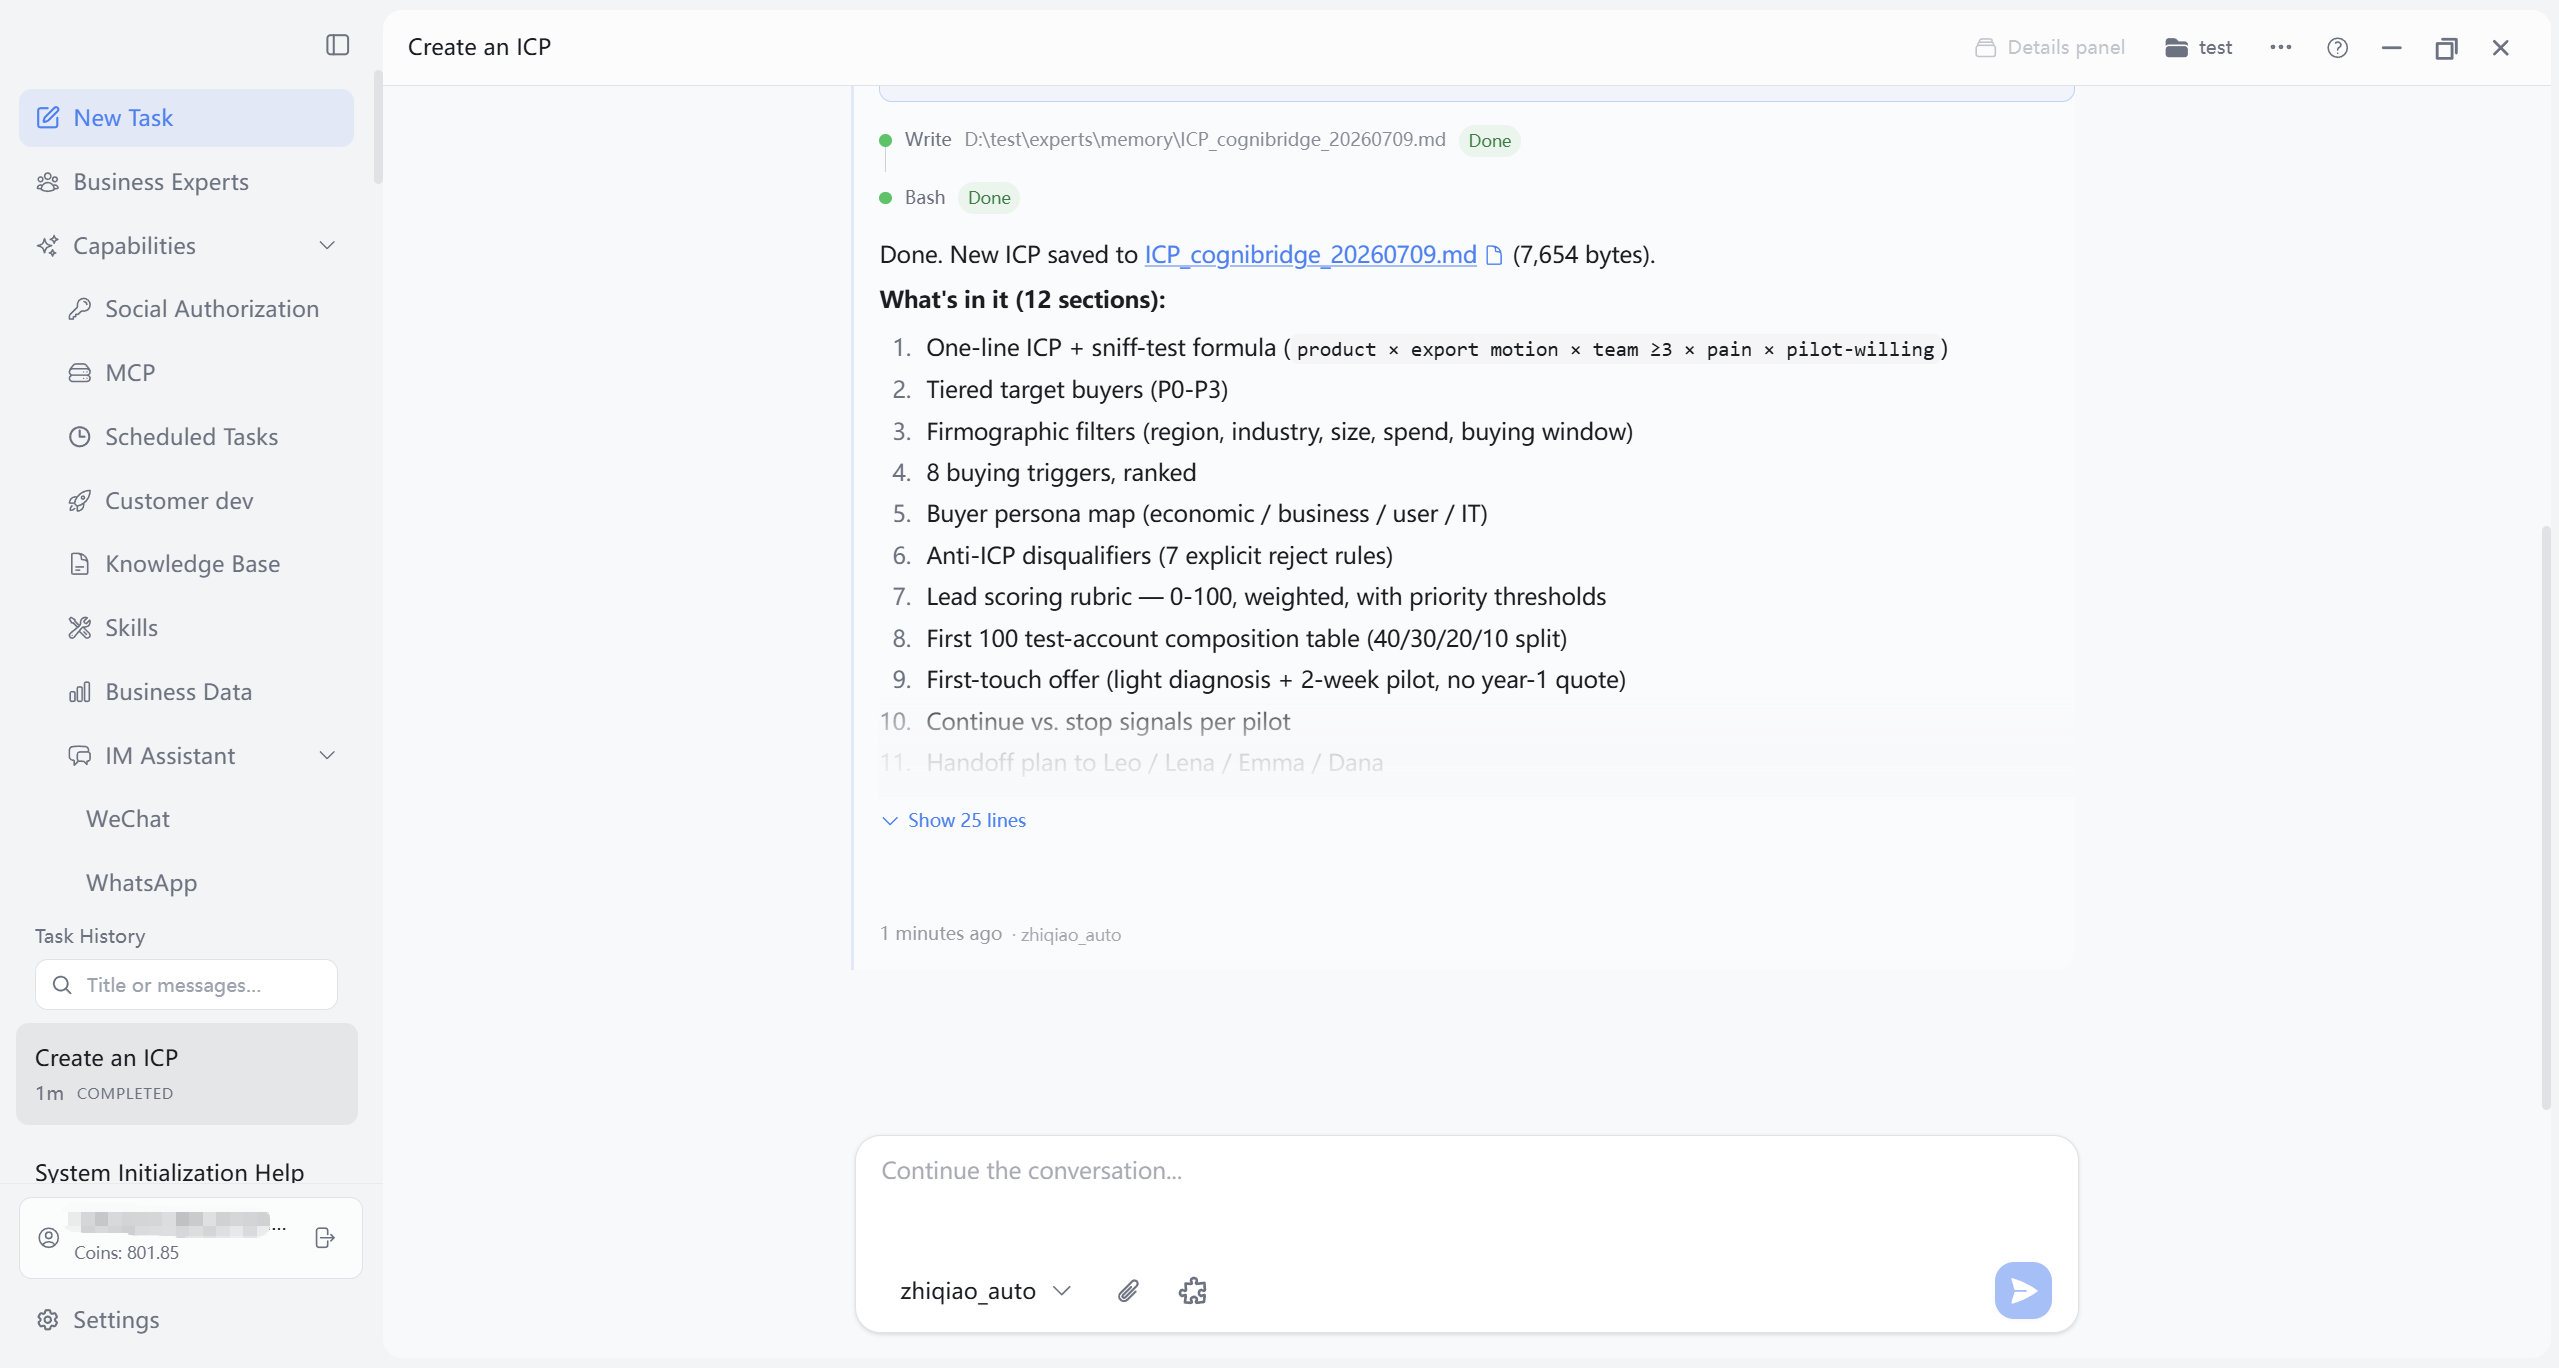
5.5 Result Iteration
When the first result falls short, do not rush to New Task—continue in the same conversation’s bottom input. Recommended phrasing: point out the gap (“Change section two to a three-bullet list,” “Add EU compliance notes,” “Shorten to 200 words”). If the prior scope was too broad, ask for outline or table of contents only, confirm, then have the AI assistant expand. Add new attachments when new source material is needed.
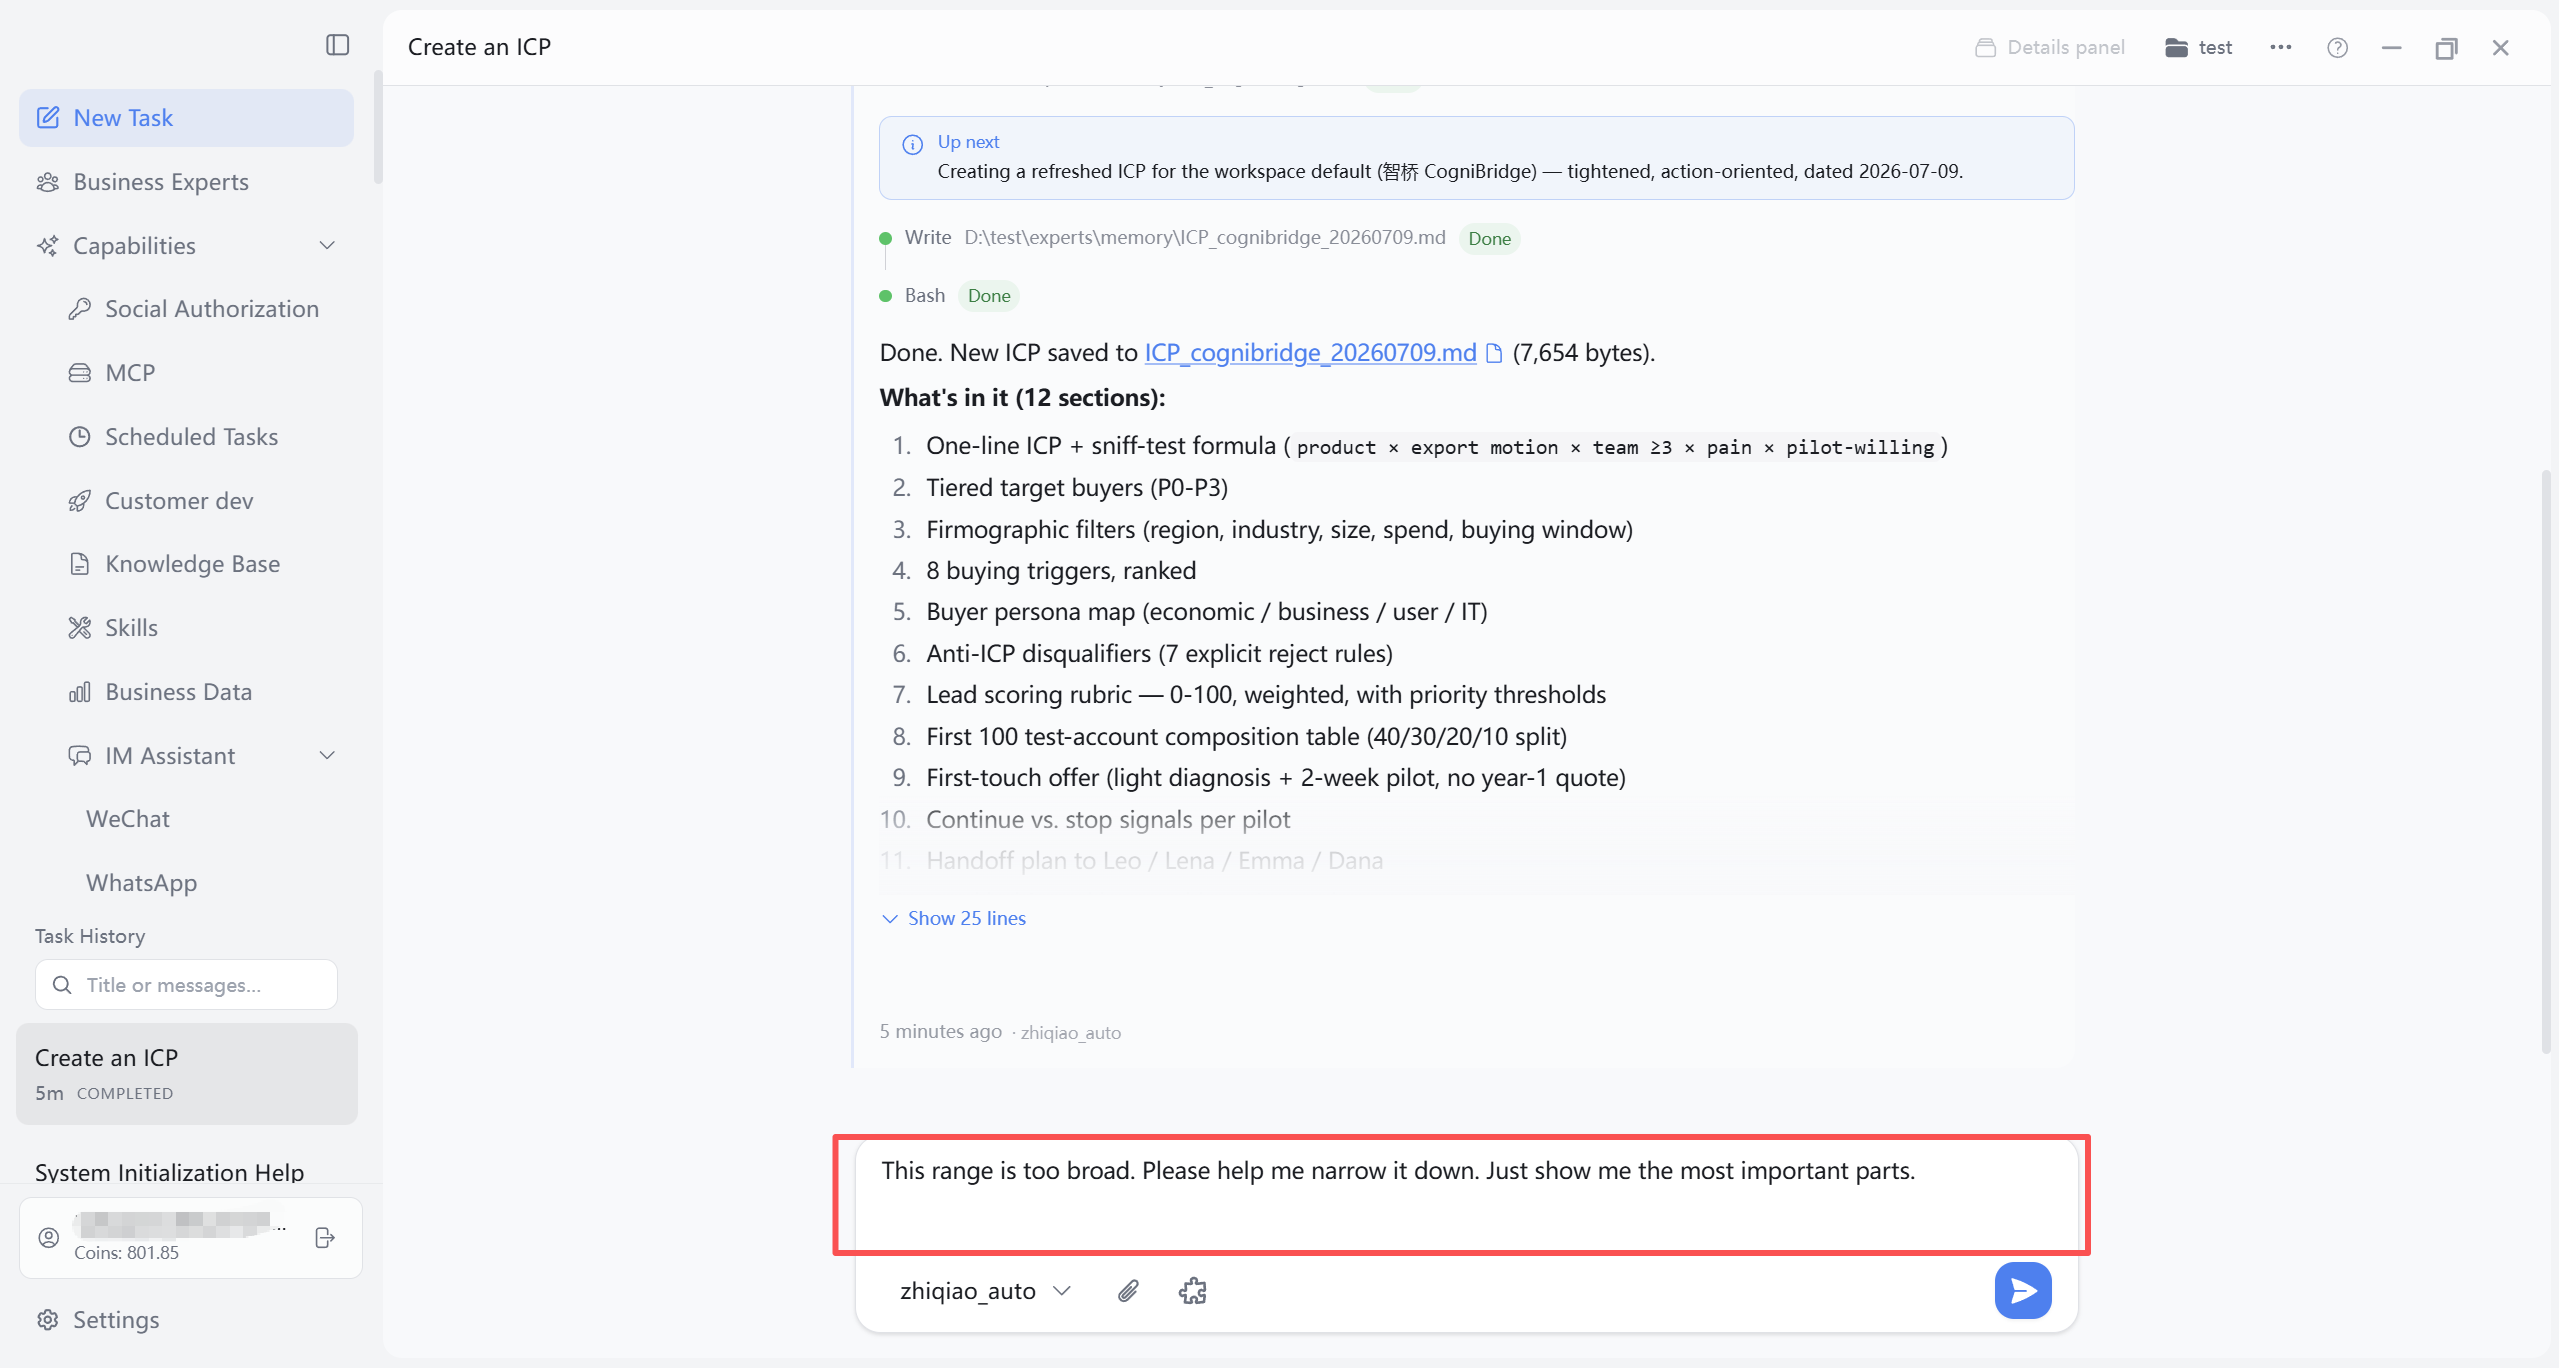
5.6 High-Quality Input Template (copy-ready)
Template: goal + constraints + output format + tone
Example: Based on my uploaded product materials, draft an English outreach email. Keep it under 120 words, professional tone, end with one reply-worthy question, and provide two versions.
5.7 Output Preview
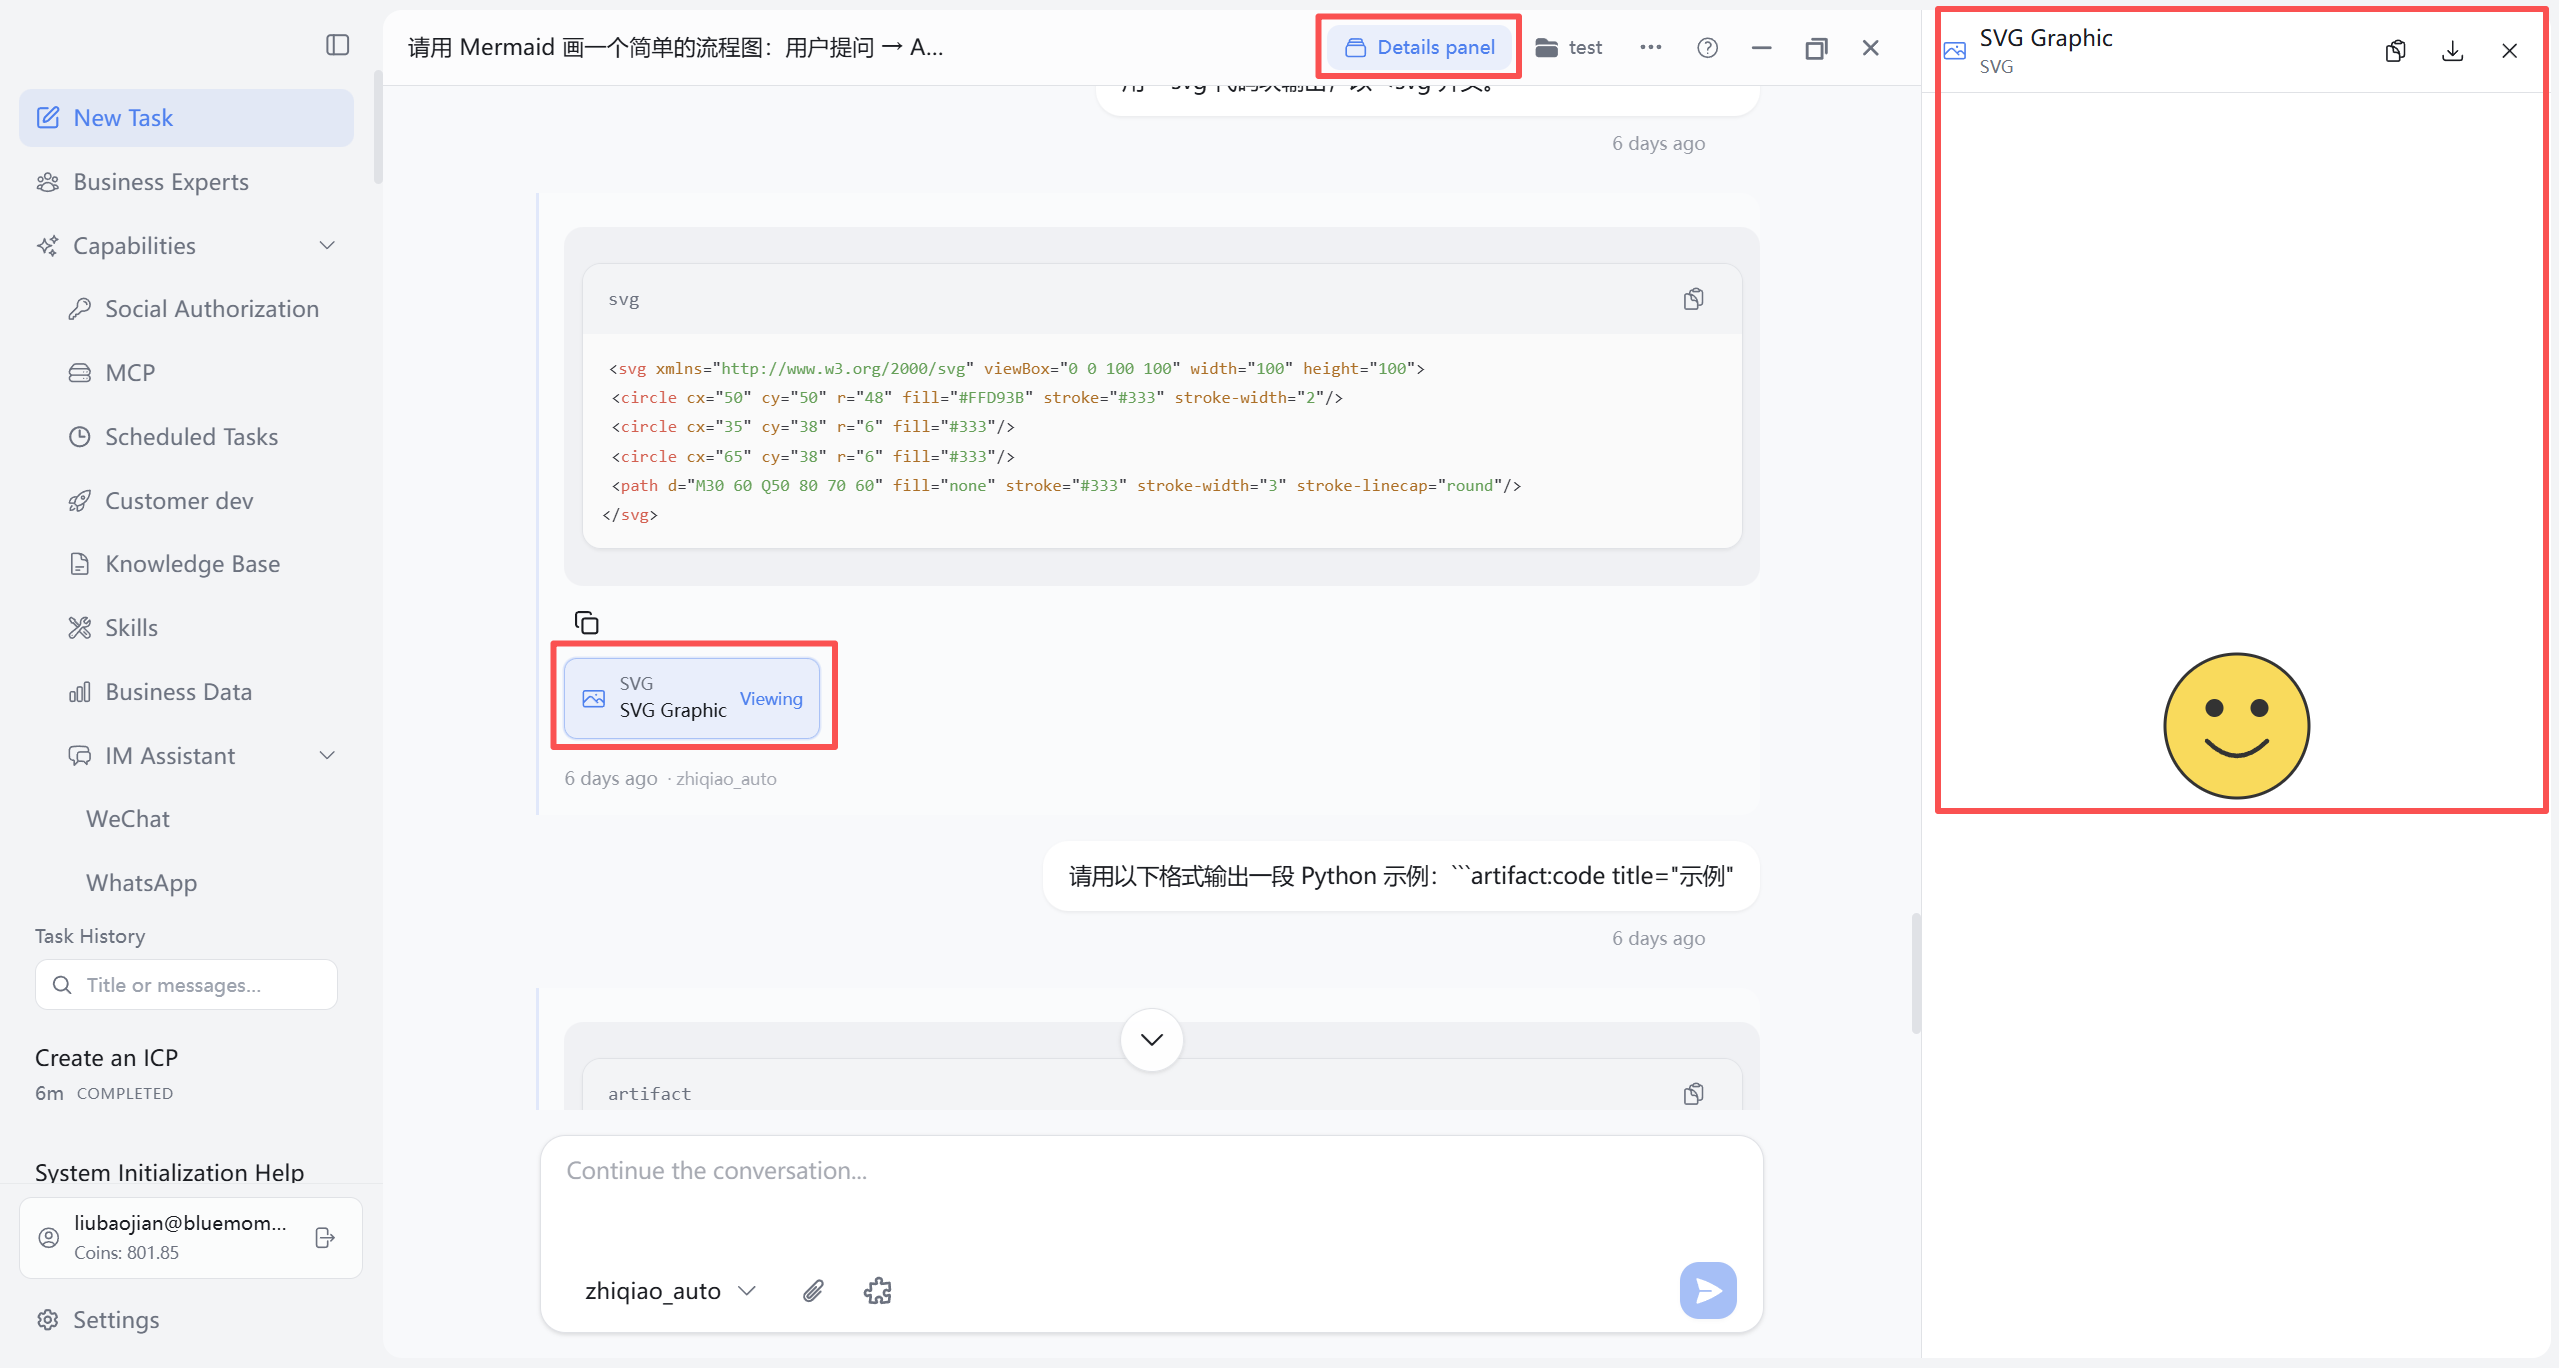
When the AI assistant outputs web pages, charts, flow diagrams, SVG graphics, or similar content suited to standalone viewing, a preview entry appears in the message area (usually a small labeled tag, possibly showing “Previewing,” etc.). Click to open the output preview panel on the right of the conversation (width is draggable), side by side with the main thread for easier reading of complex layout or graphics.
- Panel actions: The top shows content title and type; you can Copy, Download as a file, or Close the panel. Switch between preview entries if multiple outputs exist in one session.
- How to edit: Preview is for viewing and delivery; to change content, describe adjustments in the conversation and let the AI assistant regenerate.
5.8 Choose Skills
Besides temporary selection via the Skills button in 5.3, you can pre-enable and order skills under Capabilities → Skills (see Chapter 15). On the Tasks page:
- Click the Skills button beside the input to open enabled skills.
- Check or uncheck skills; selections show as badges above the input.
- After send, that turn includes the chosen skill capabilities; the AI assistant follows each skill’s instructions.
- If results miss expectations, change skill combinations in the same task and rephrase, or verify the skill is enabled on the Skills page.
Templates from Recommended Workflows (5.2) may auto-attach related skills—no duplicate manual selection needed.
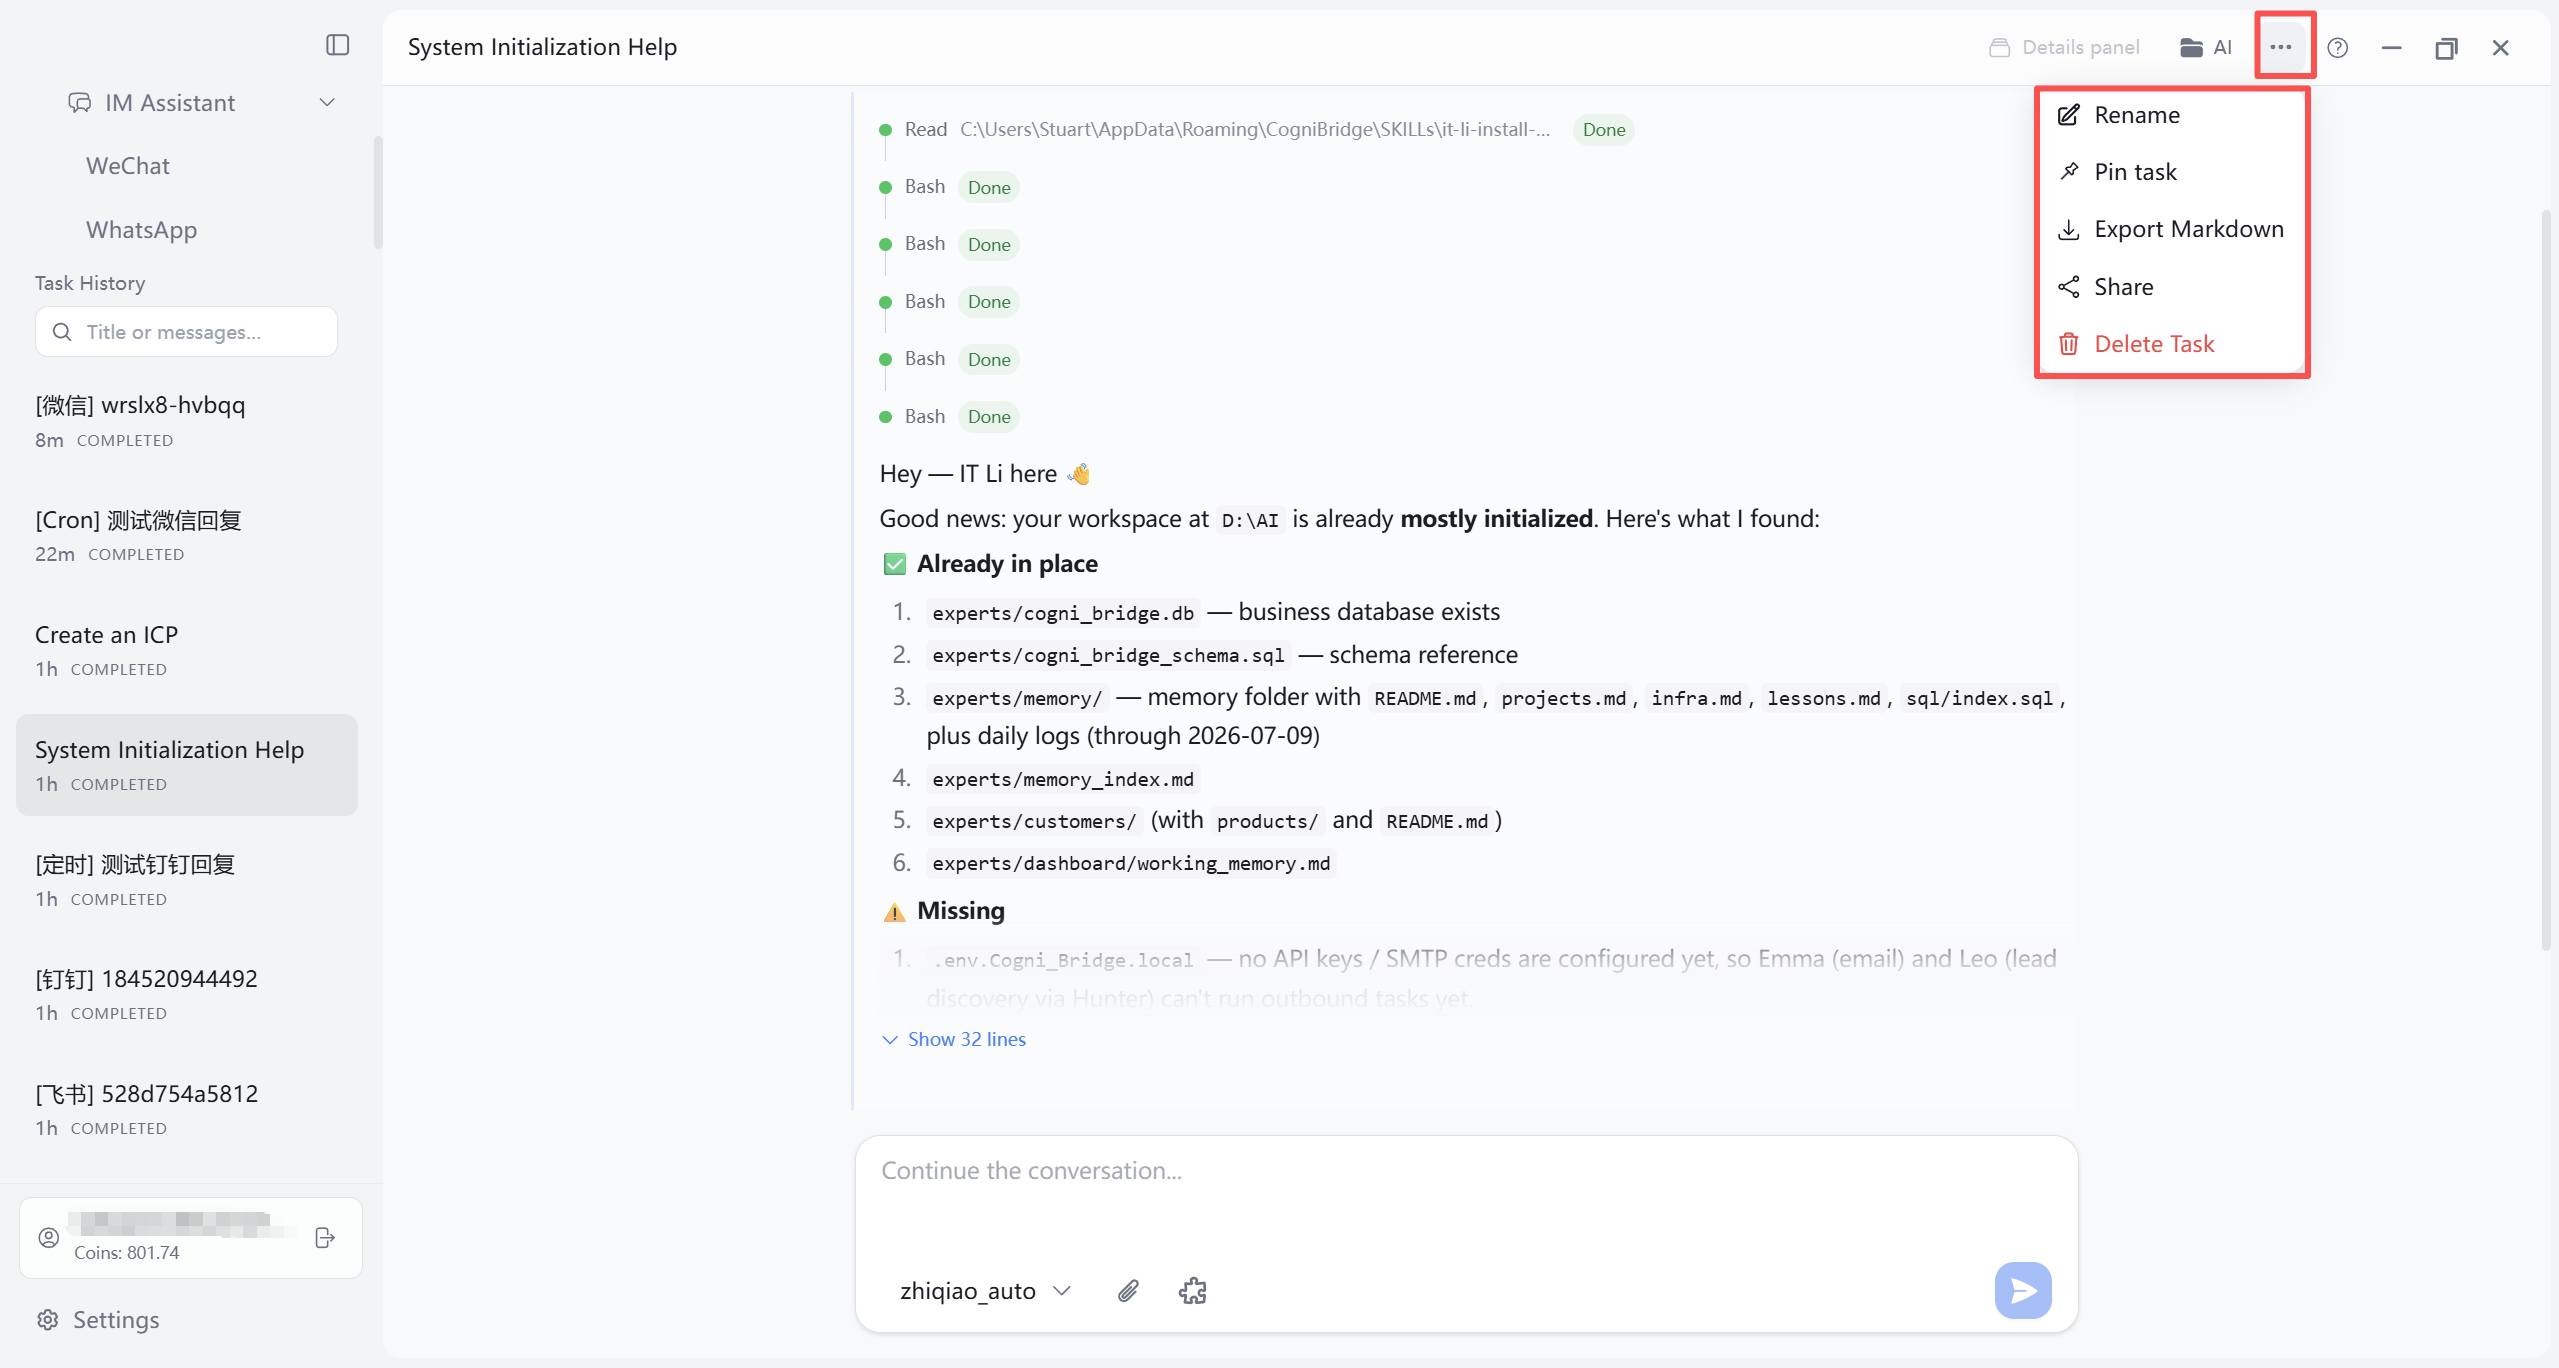
5.9 More Menu
The More button (“⋯”) on the top-right of the Tasks page opens task management. The current release includes (UI may vary):
- Rename: Change the title shown in the sidebar and top bar to distinguish sessions.
- Pin task / Unpin: Pin frequent tasks to the top of the left task list; tap again to unpin.
- Export Markdown: Export the session title and all turns to a
.mdfile for local archive or paste into documents. If there are no messages yet, export is blocked. - Share: Stitch the visible conversation into a long image (PNG) and save locally for colleagues or screenshots. Very long sessions may fail—use Export Markdown instead.
- Delete task: After confirmation, permanently deletes the task and all messages—cannot be undone.
6. Business Experts Page
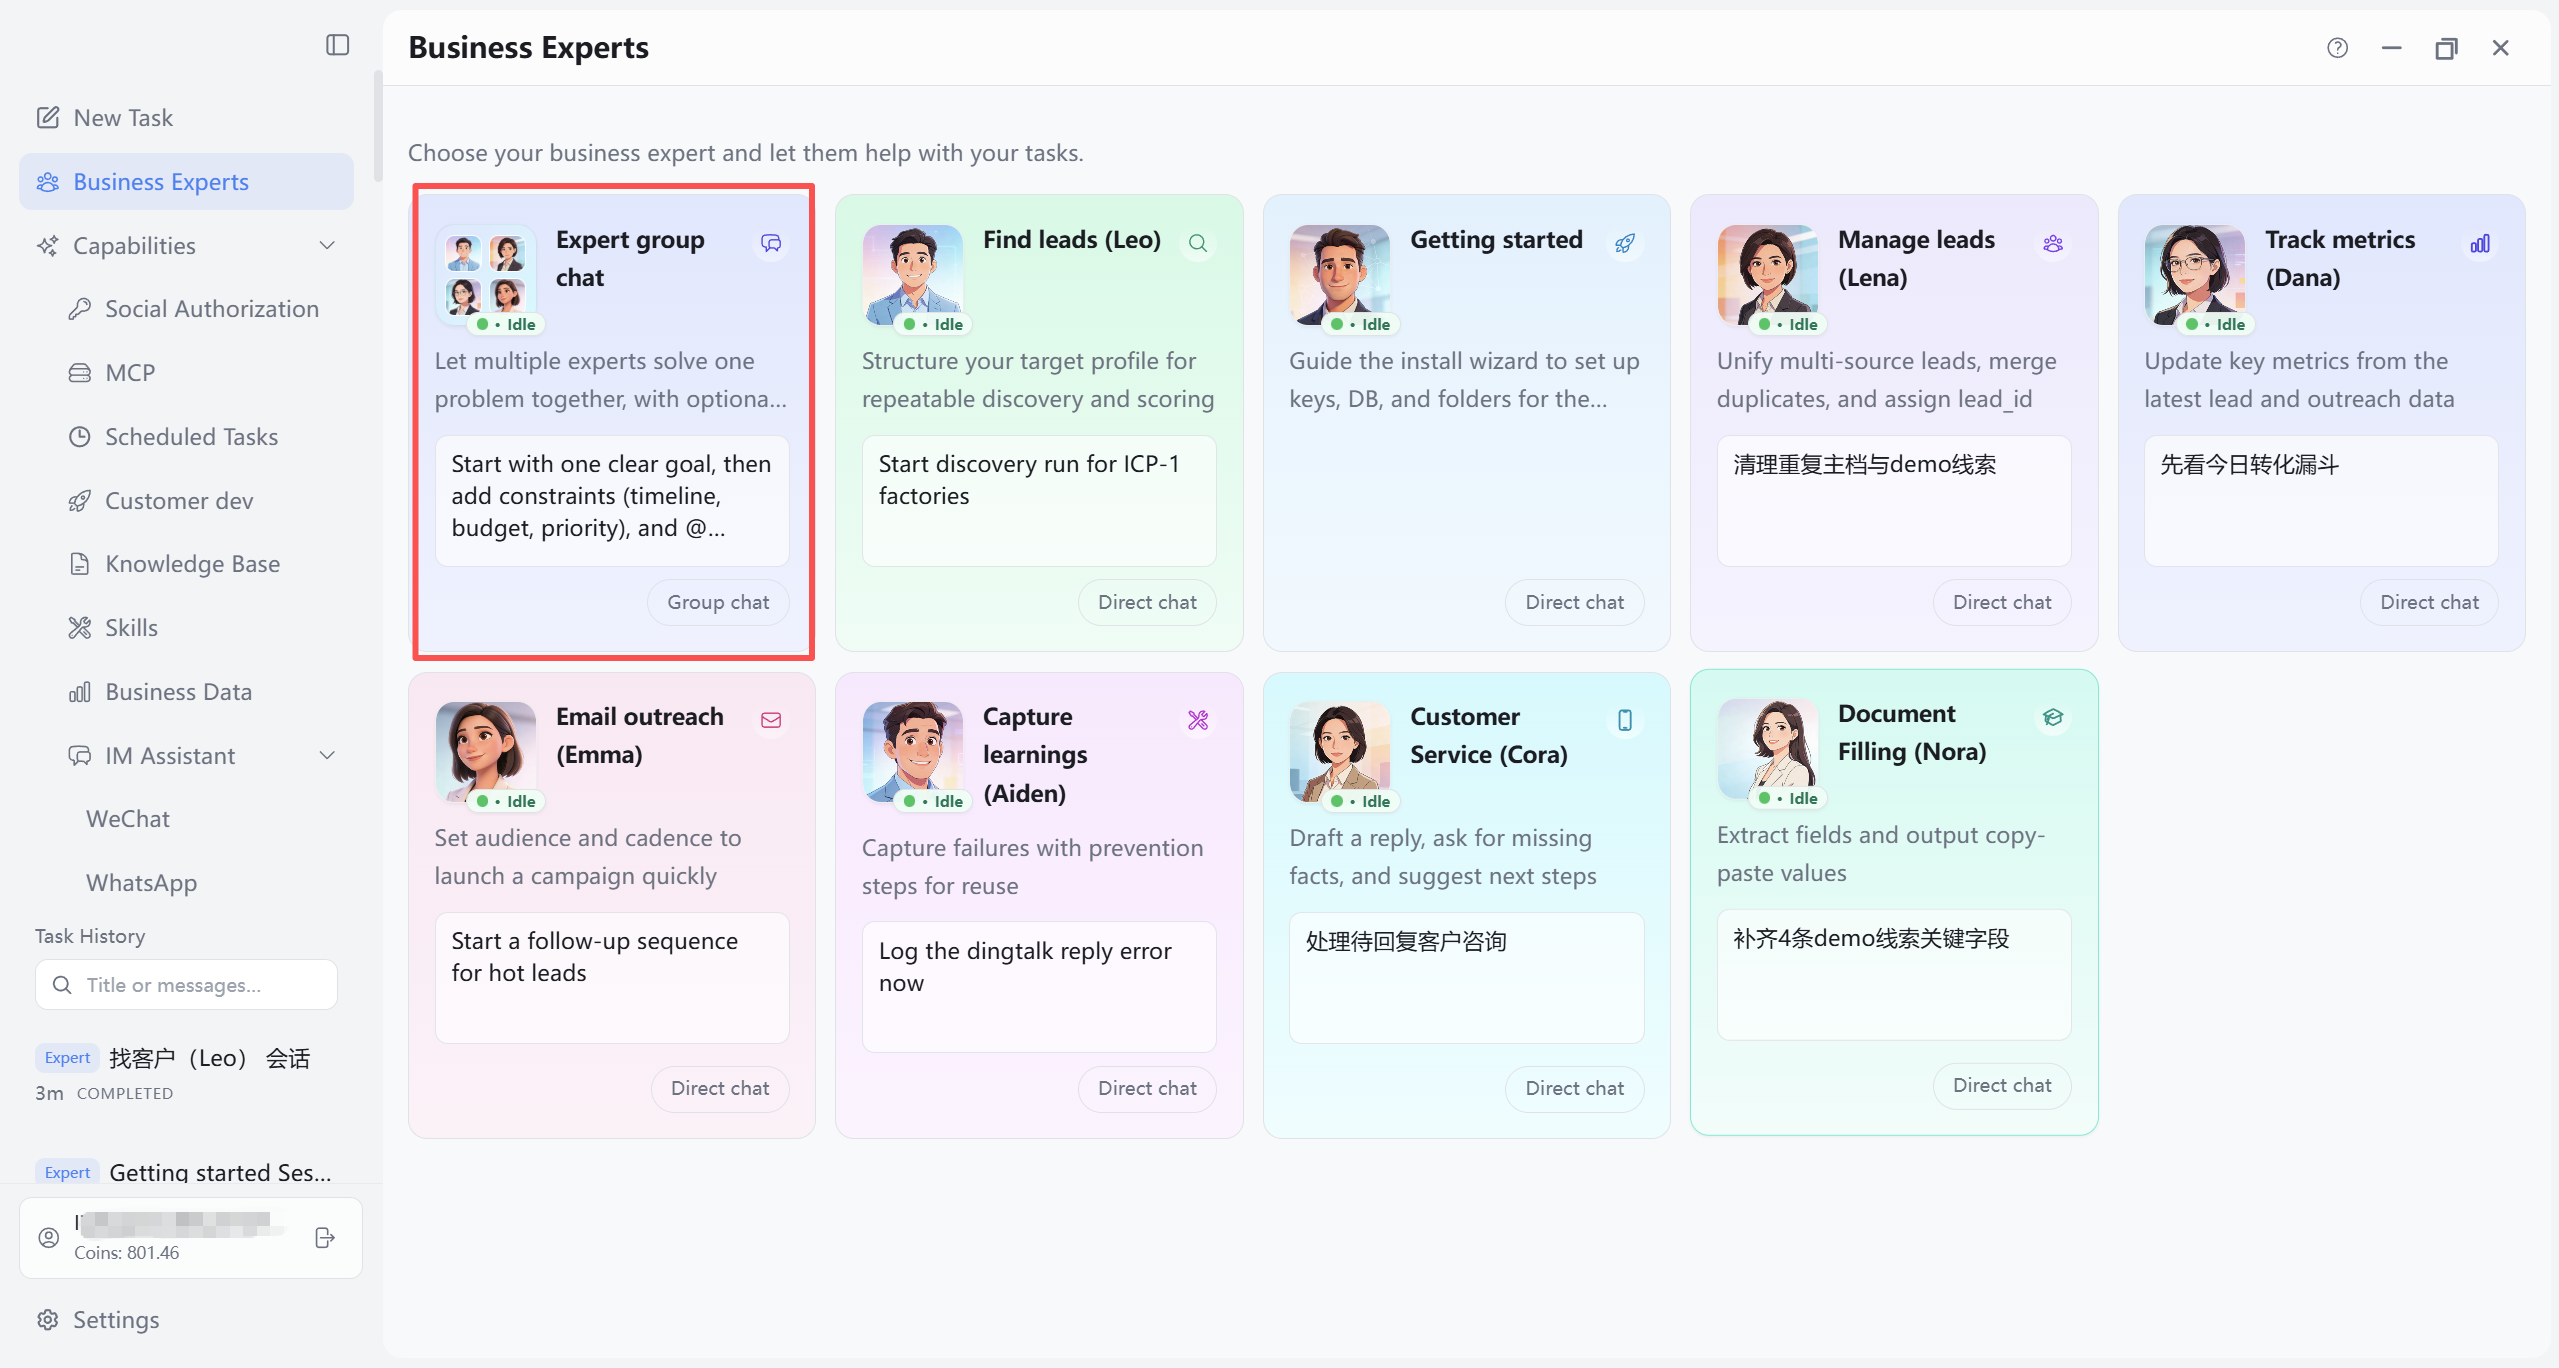
Business Experts packages common export and office scenarios into ready-to-use role entry points. The current release includes: expert card list, expert detail and custom tasks, solo chat dialog, and expert group chat. Browse expert status and suggestions on the list, read capabilities and apply custom tasks on detail, or enter solo or group chat for continuous conversation. Frequent Tasks page scenarios can also start from Recommended Workflows (Chapter 5 5.2), complementing this chapter’s expert capabilities.
6.1 Overview: Expert List and Scenario Entry
From the left sidebar, open “Business Experts”; the main area shows experts in a card grid. Each card includes name, scenario positioning, status badge, and suggestions (when available). Pick an expert by current work type, then enter solo chat, group chat, or a template task.
Status badges on cards change with session progress (thinking, running, awaiting confirmation, completed, etc.). When an expert has unread results, a red dot appears on the card; the sidebar “Business Experts” entry may show an aggregate badge for quick discovery.
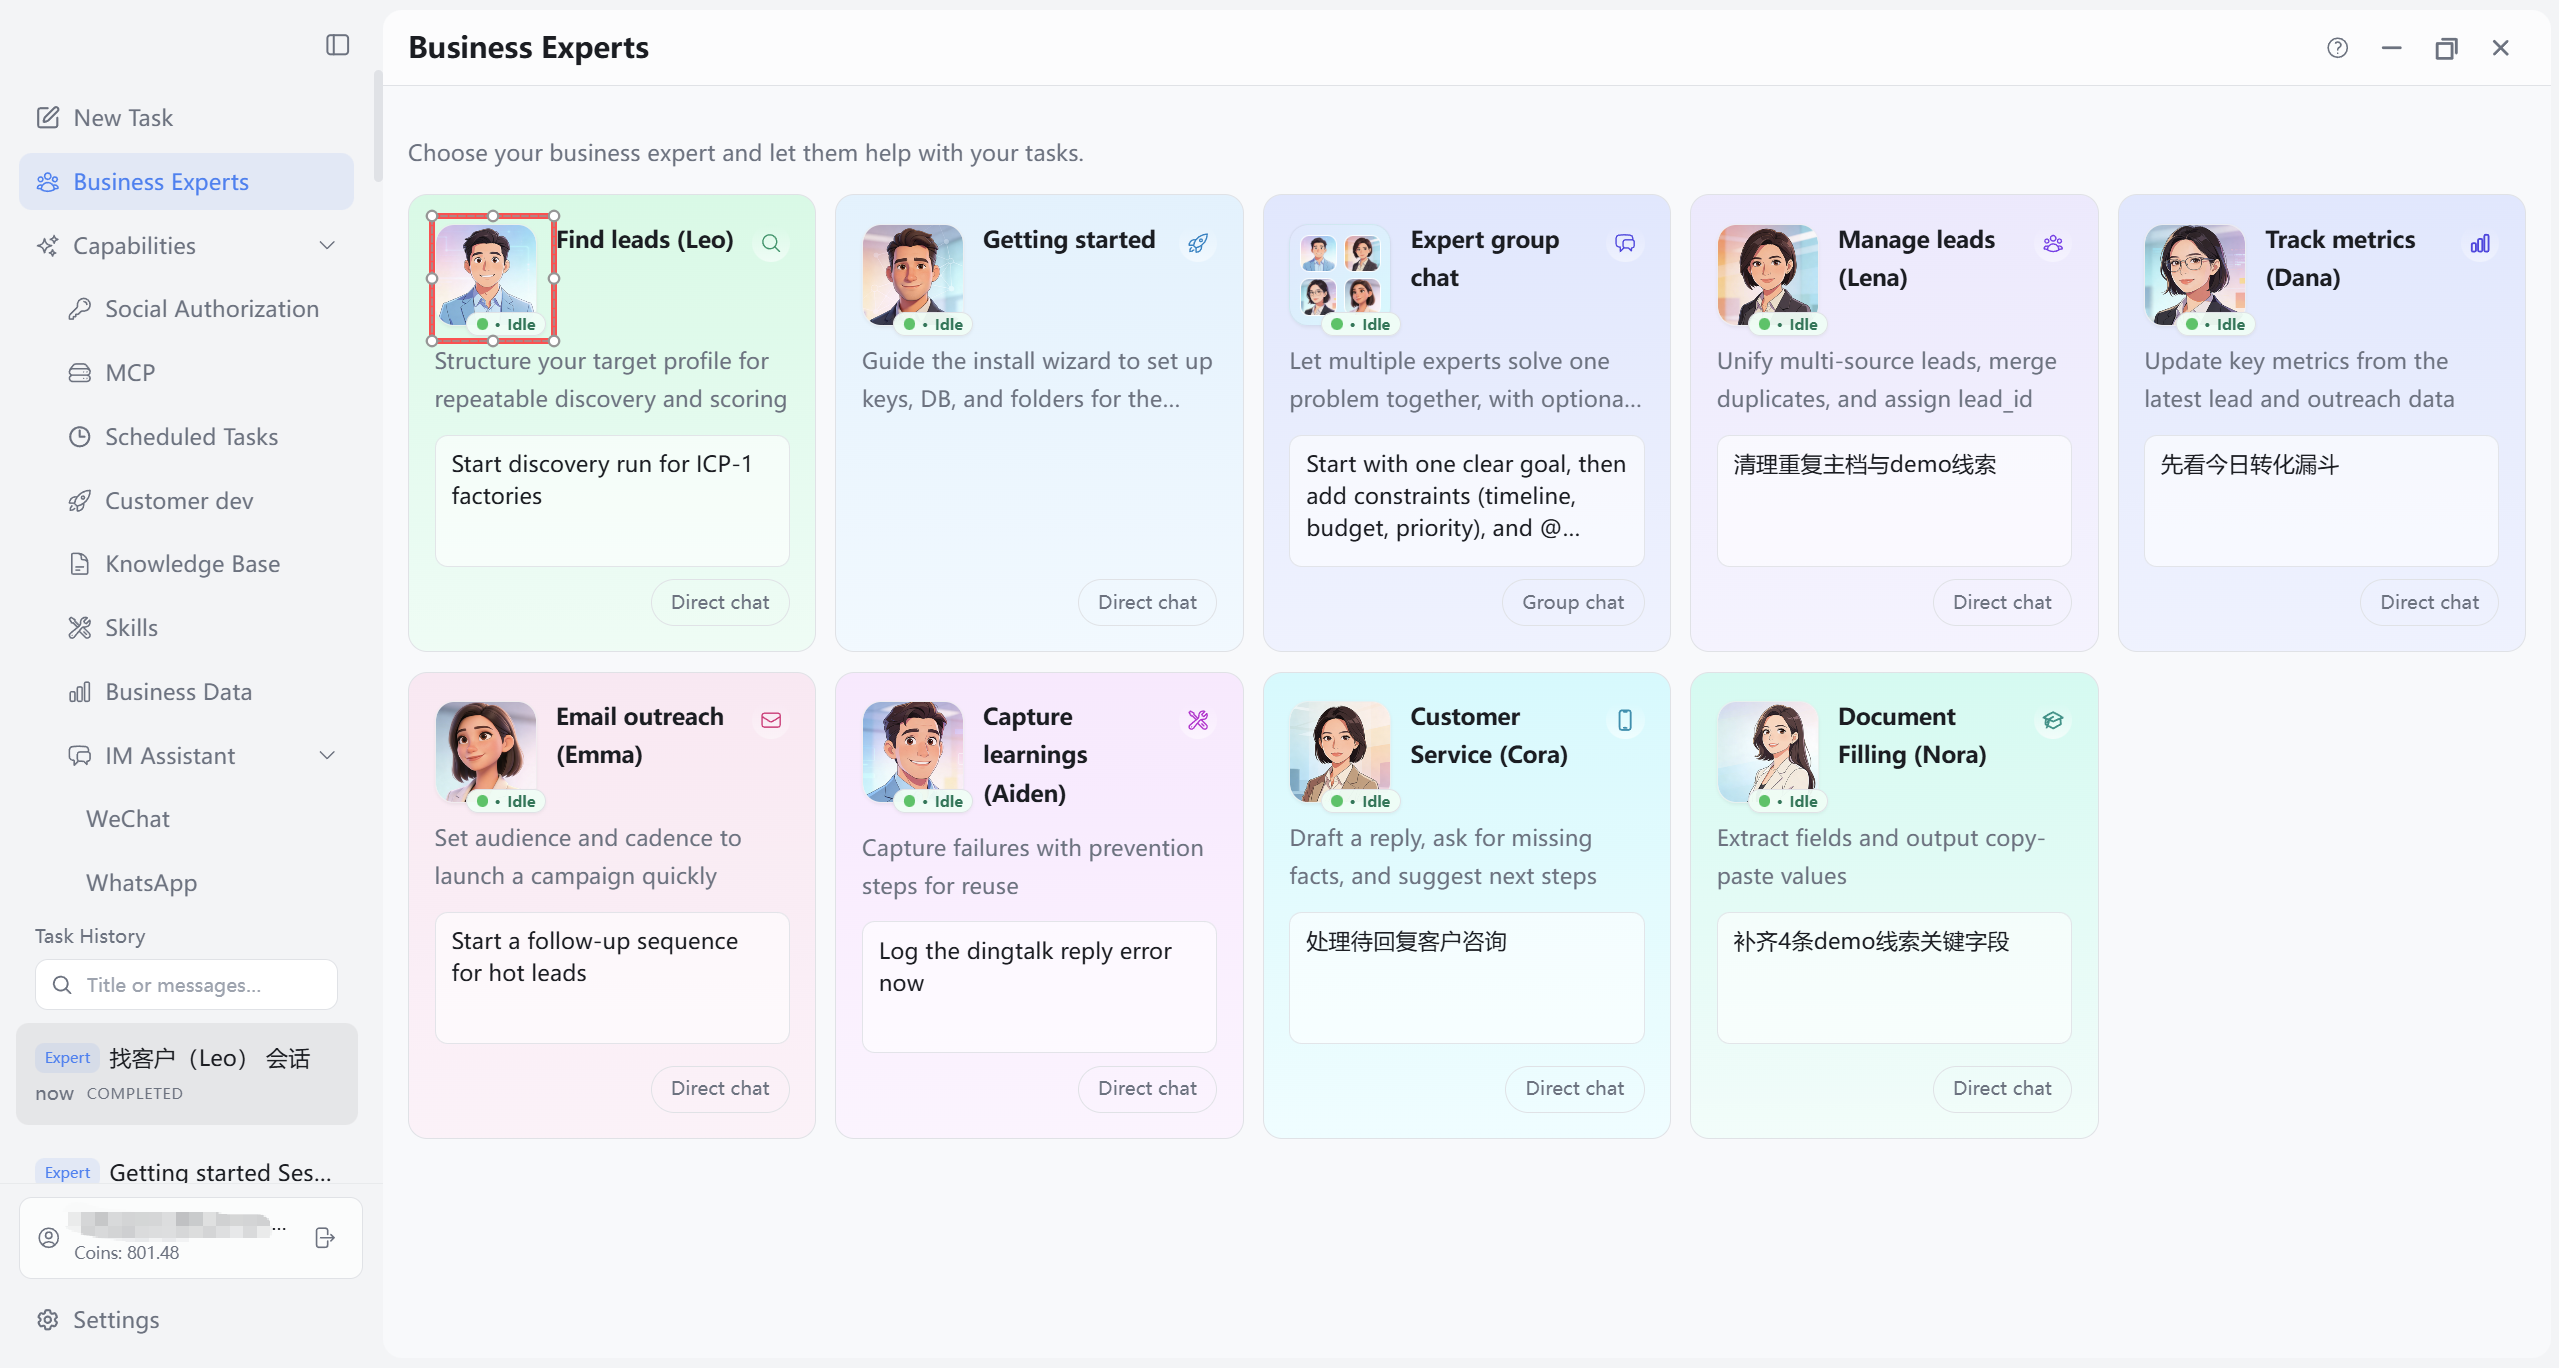
6.2 Detail Page and Custom Tasks
Detail page: Click an expert card for capability description, scope boundaries, and recommended usage—good for judging fit before starting work.
Custom tasks: Task templates on the detail page can one-click open the Tasks page; add customer context, deadlines, and attachments before sending.
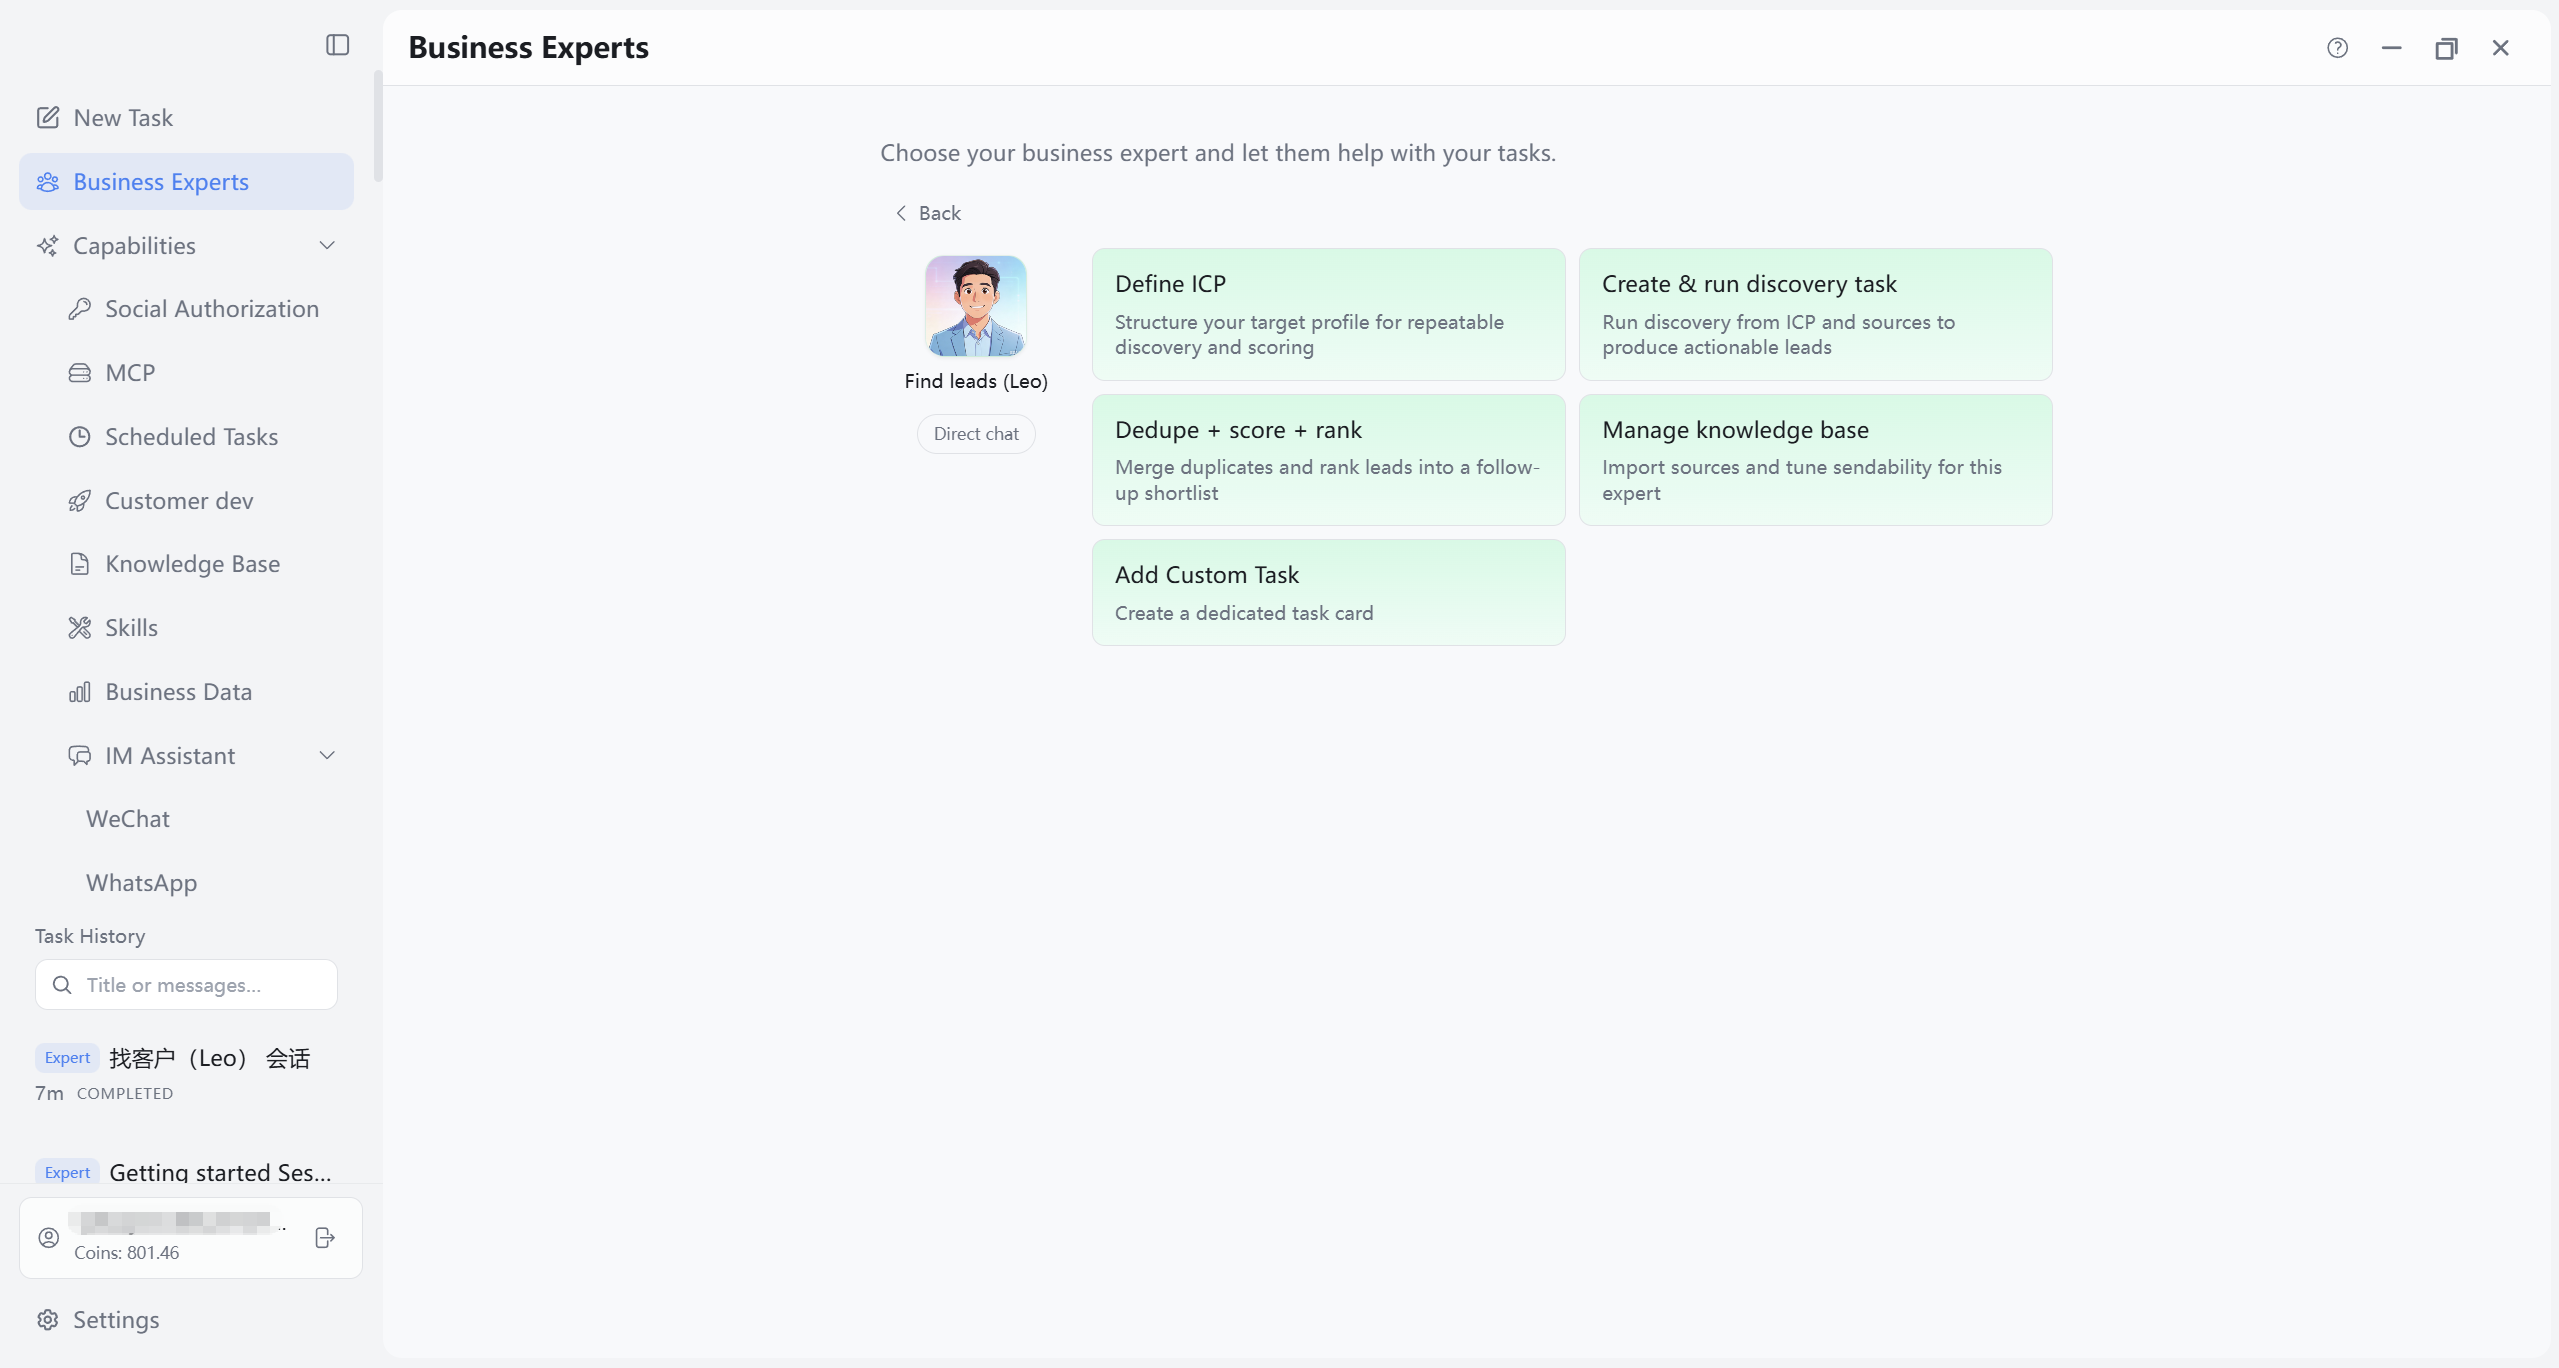
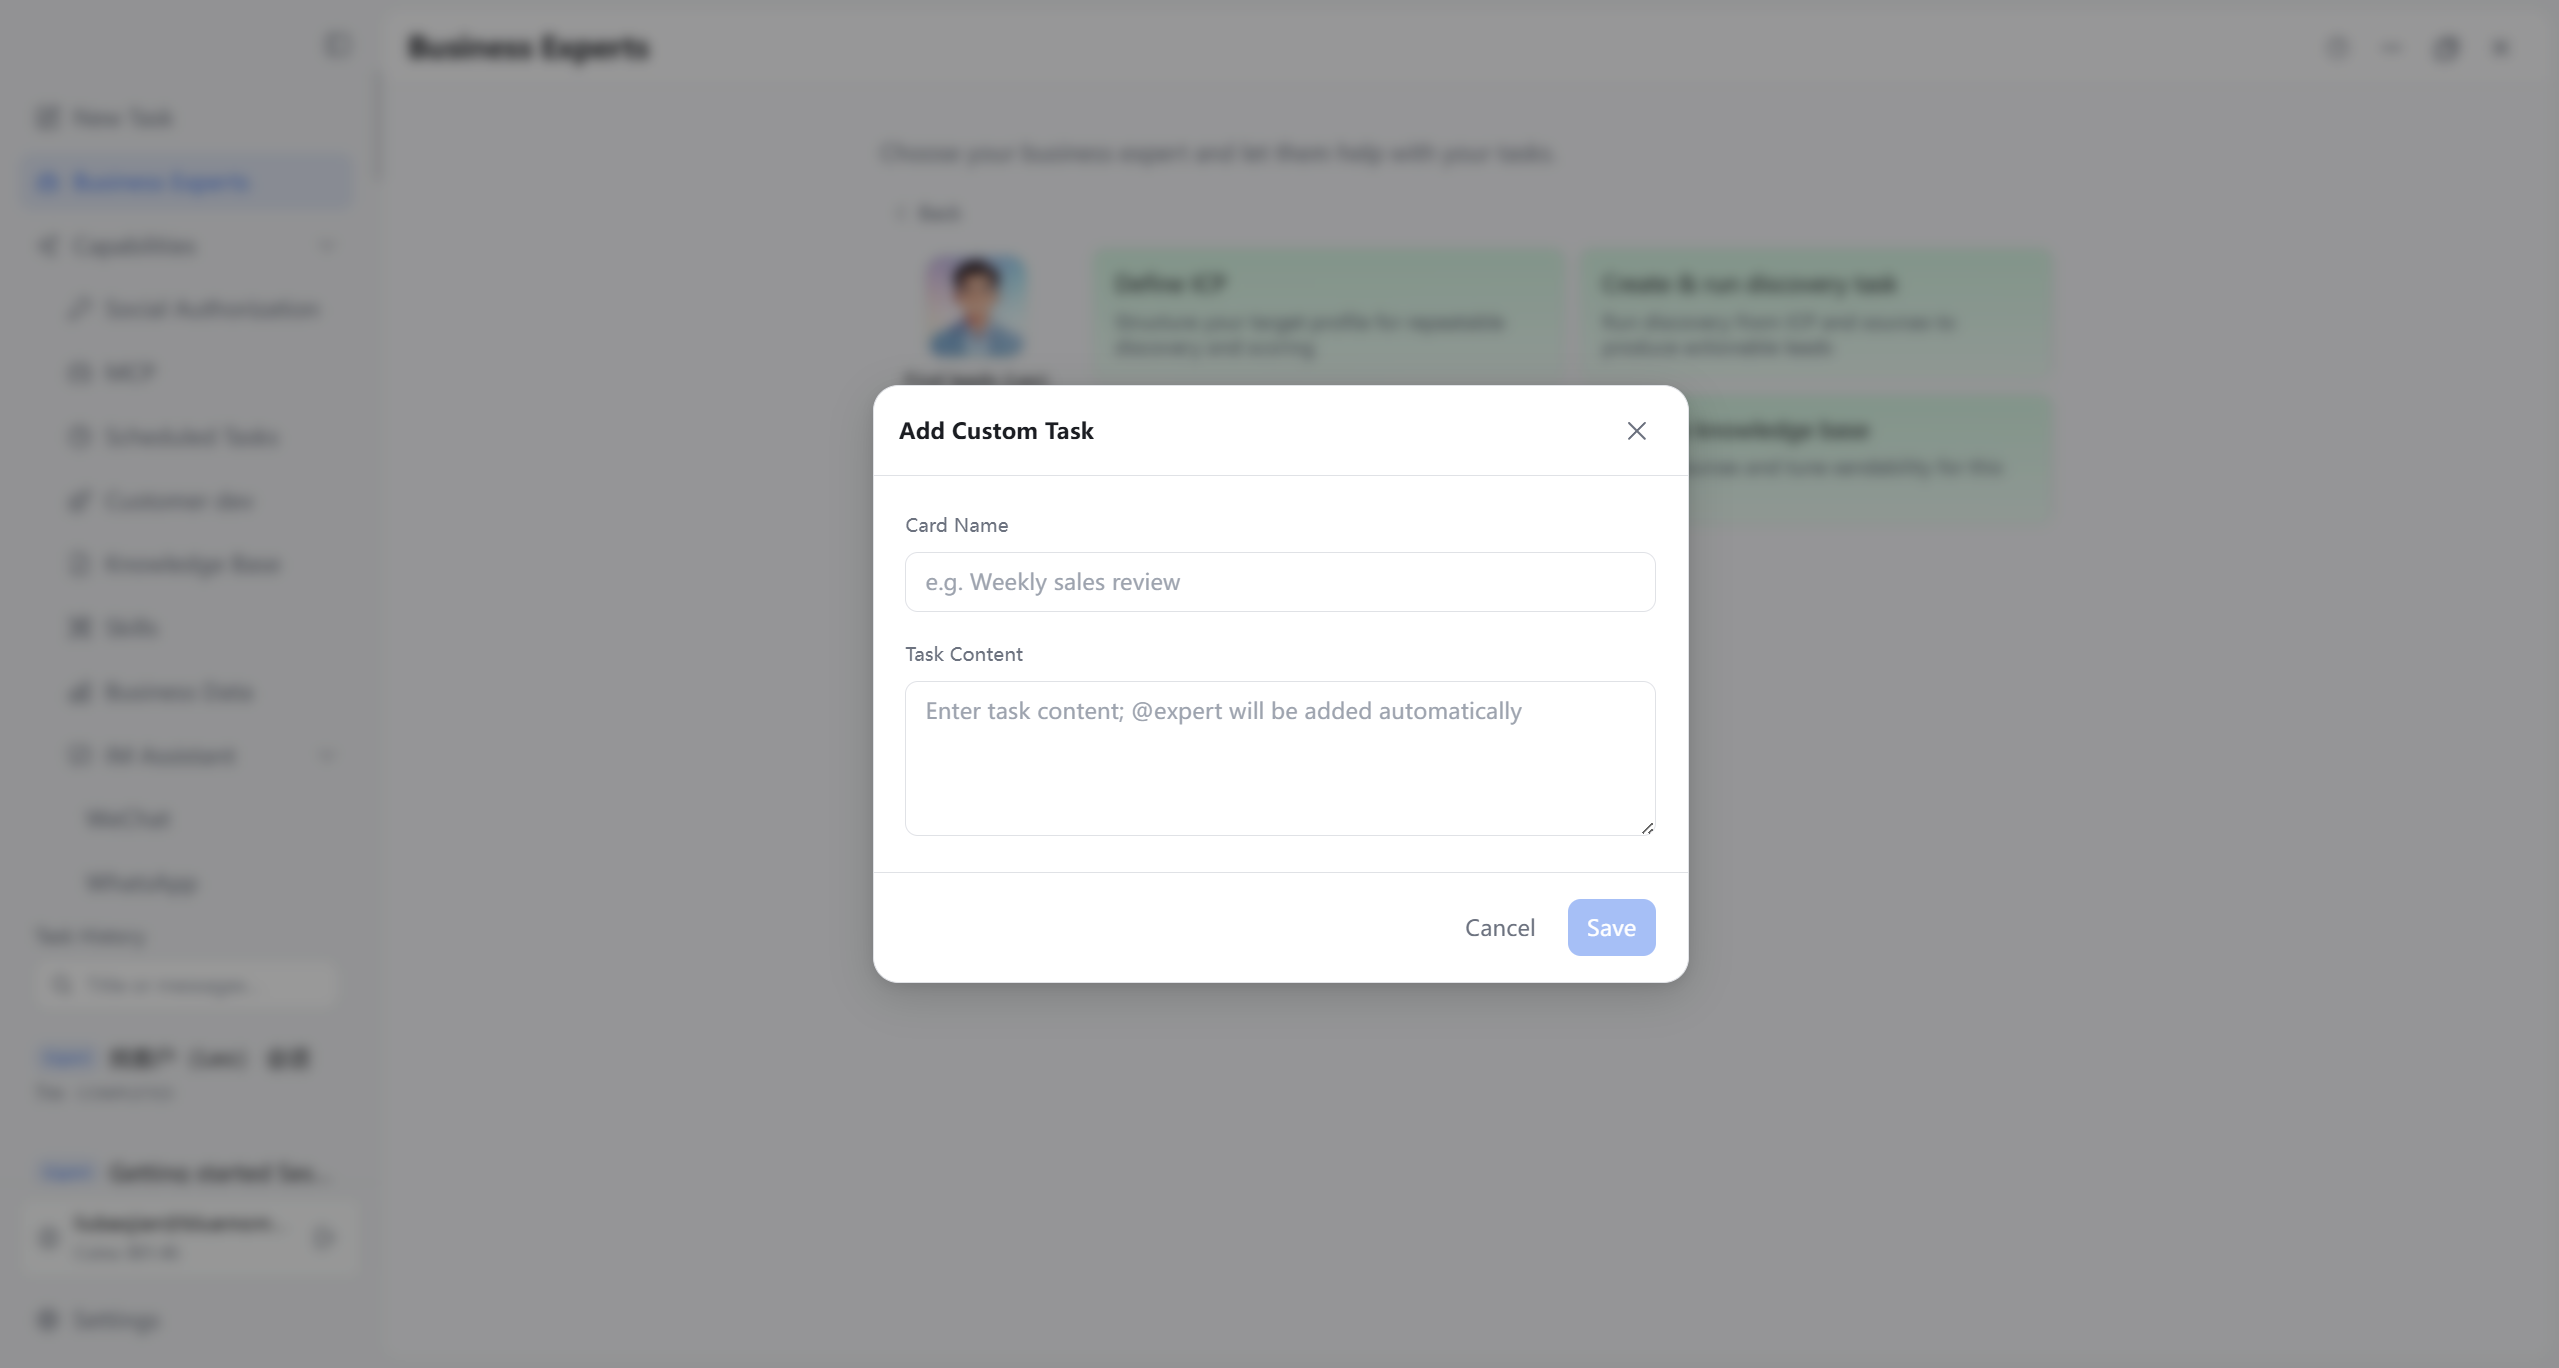
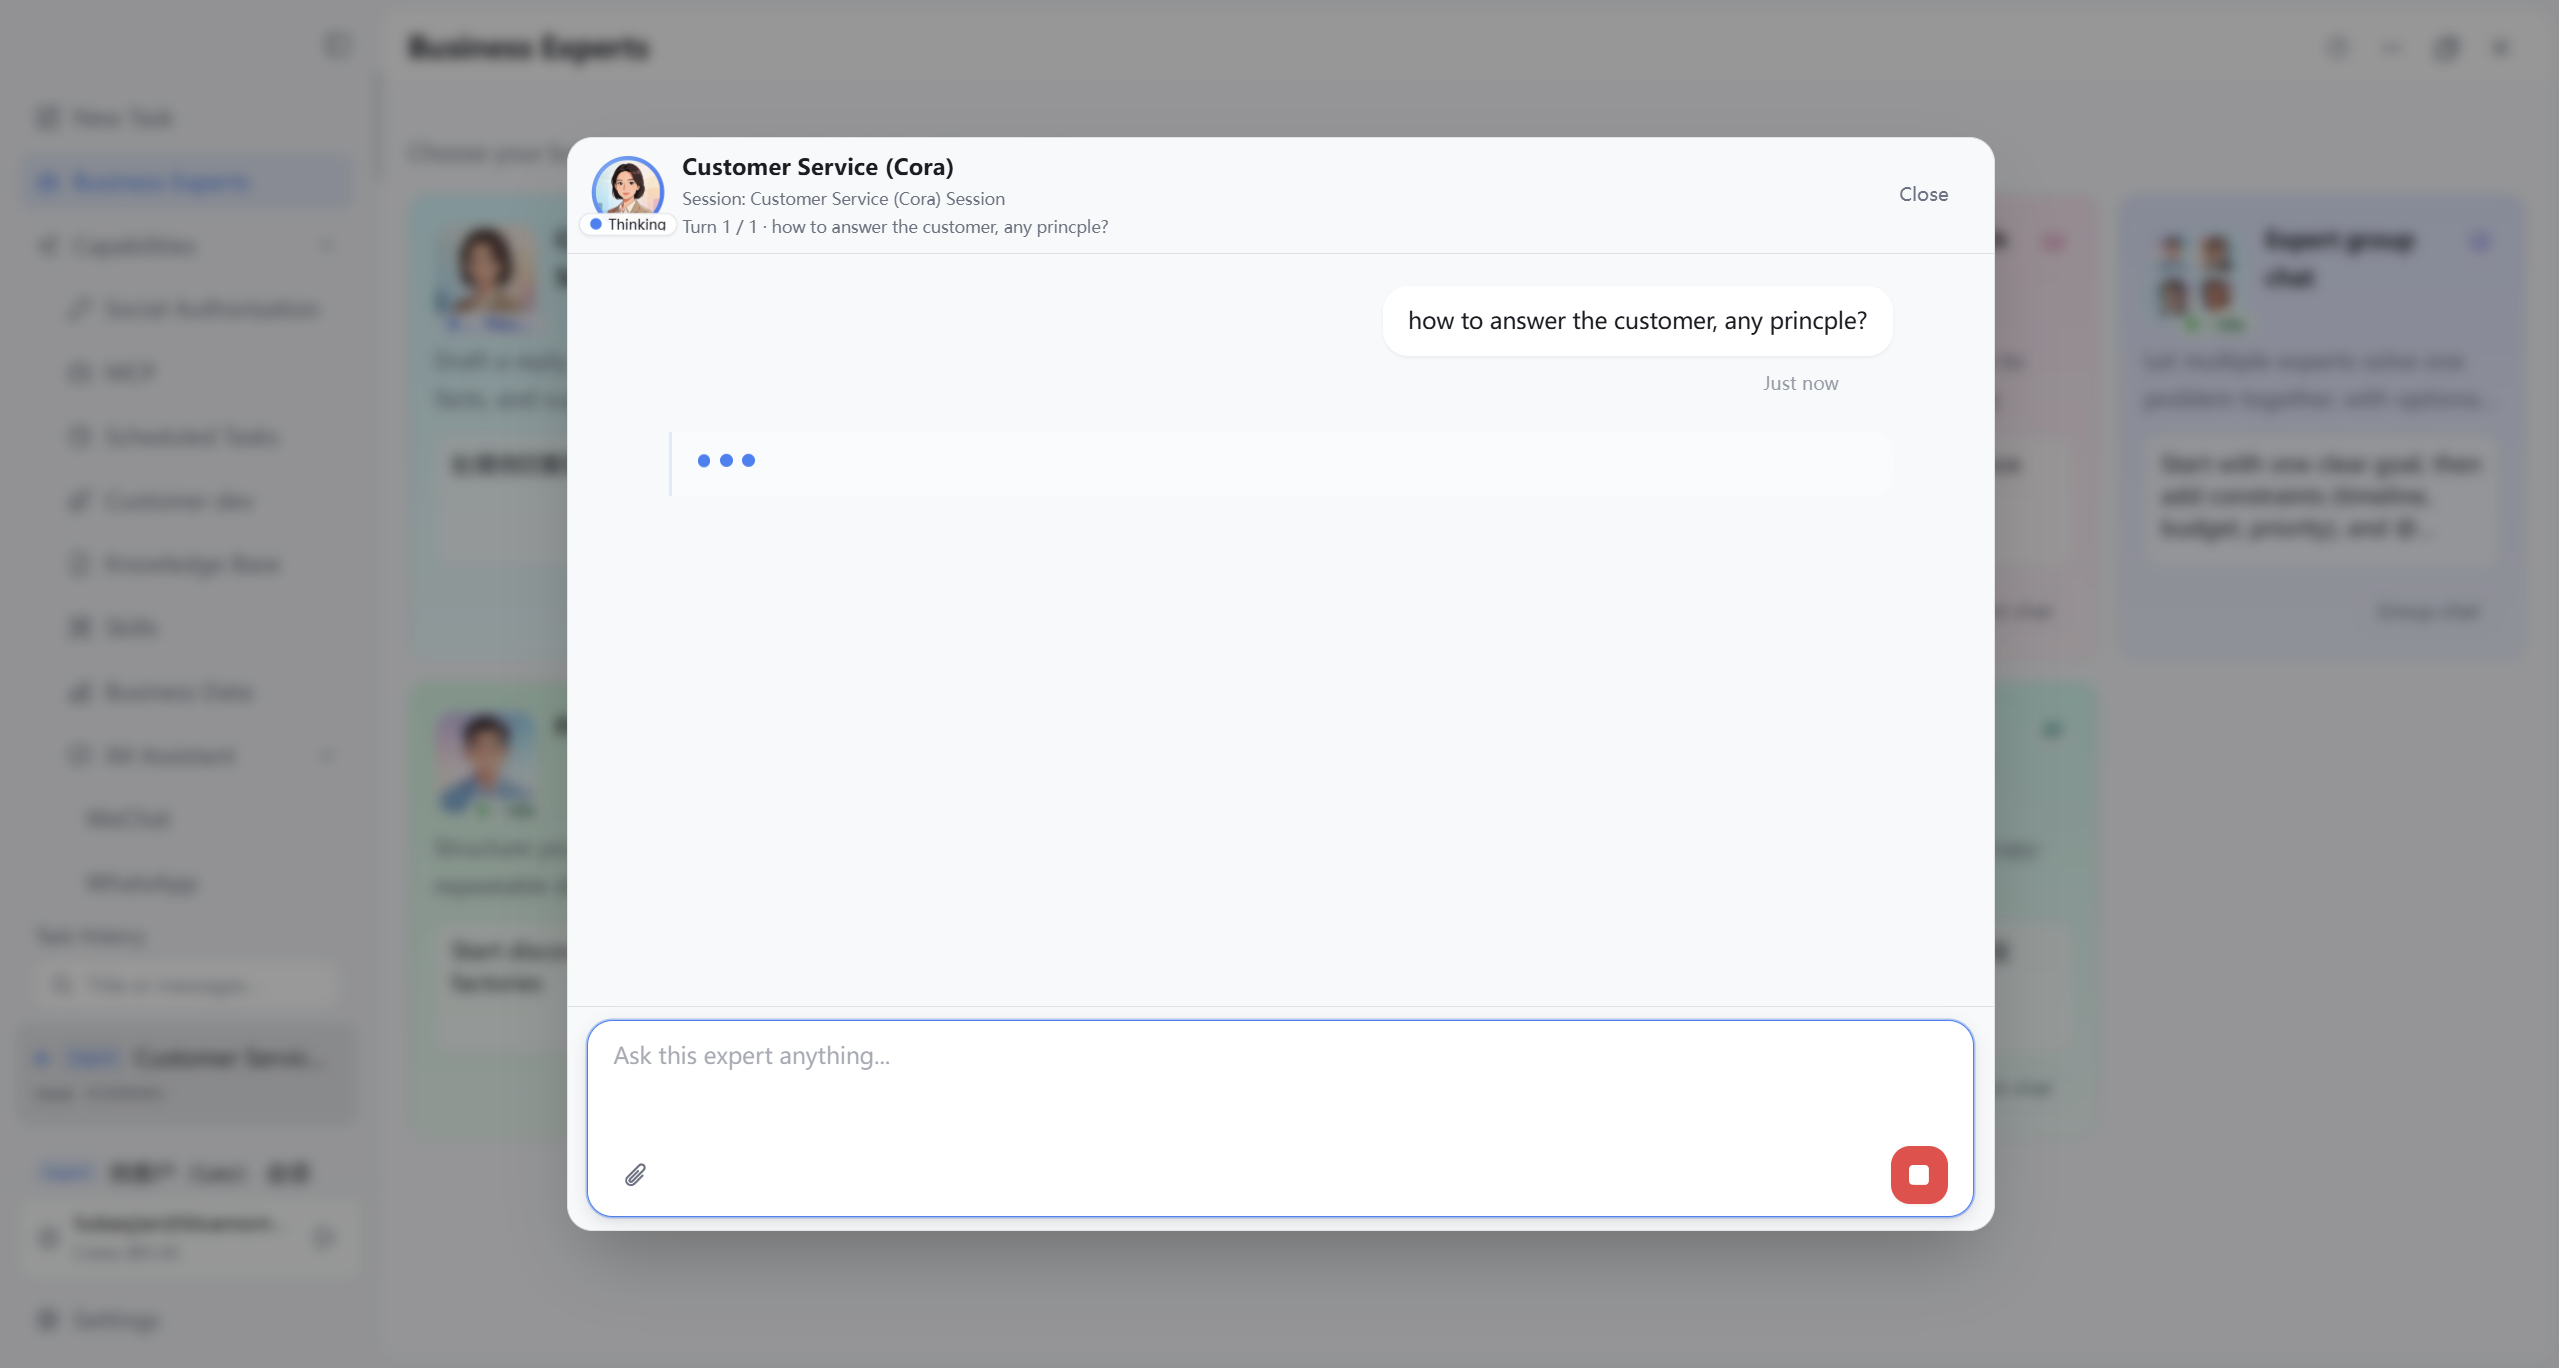
6.3 Solo Chat and Suggestion Display
This section covers the lightweight conversation after opening an expert card: follow up with the same expert without jumping to the main Tasks page—best for quick next-step confirmation, adding context, and actionable advice in a short loop.
Solo chat: Click “Solo chat” at the bottom of a card to open that expert’s lightweight dialog without leaving for the main Tasks page. The dialog supports continued input, attachments, and back-and-forth—ideal for rapid iteration with one expert.
Suggestion labels: When entering solo chat, if the expert has suggestions, labeled messages appear in the session: first-time initialization shows “Today’s suggestion”; refreshed suggestions after the expert completes work show “Current suggestion”.
When suggestions generate: On first entry to the Experts page after app launch, when a single expert completes (refreshing only that expert), or on manual refresh command. Other cases do not auto-recompute.
6.4 Group Chat (@Expert Collaboration)
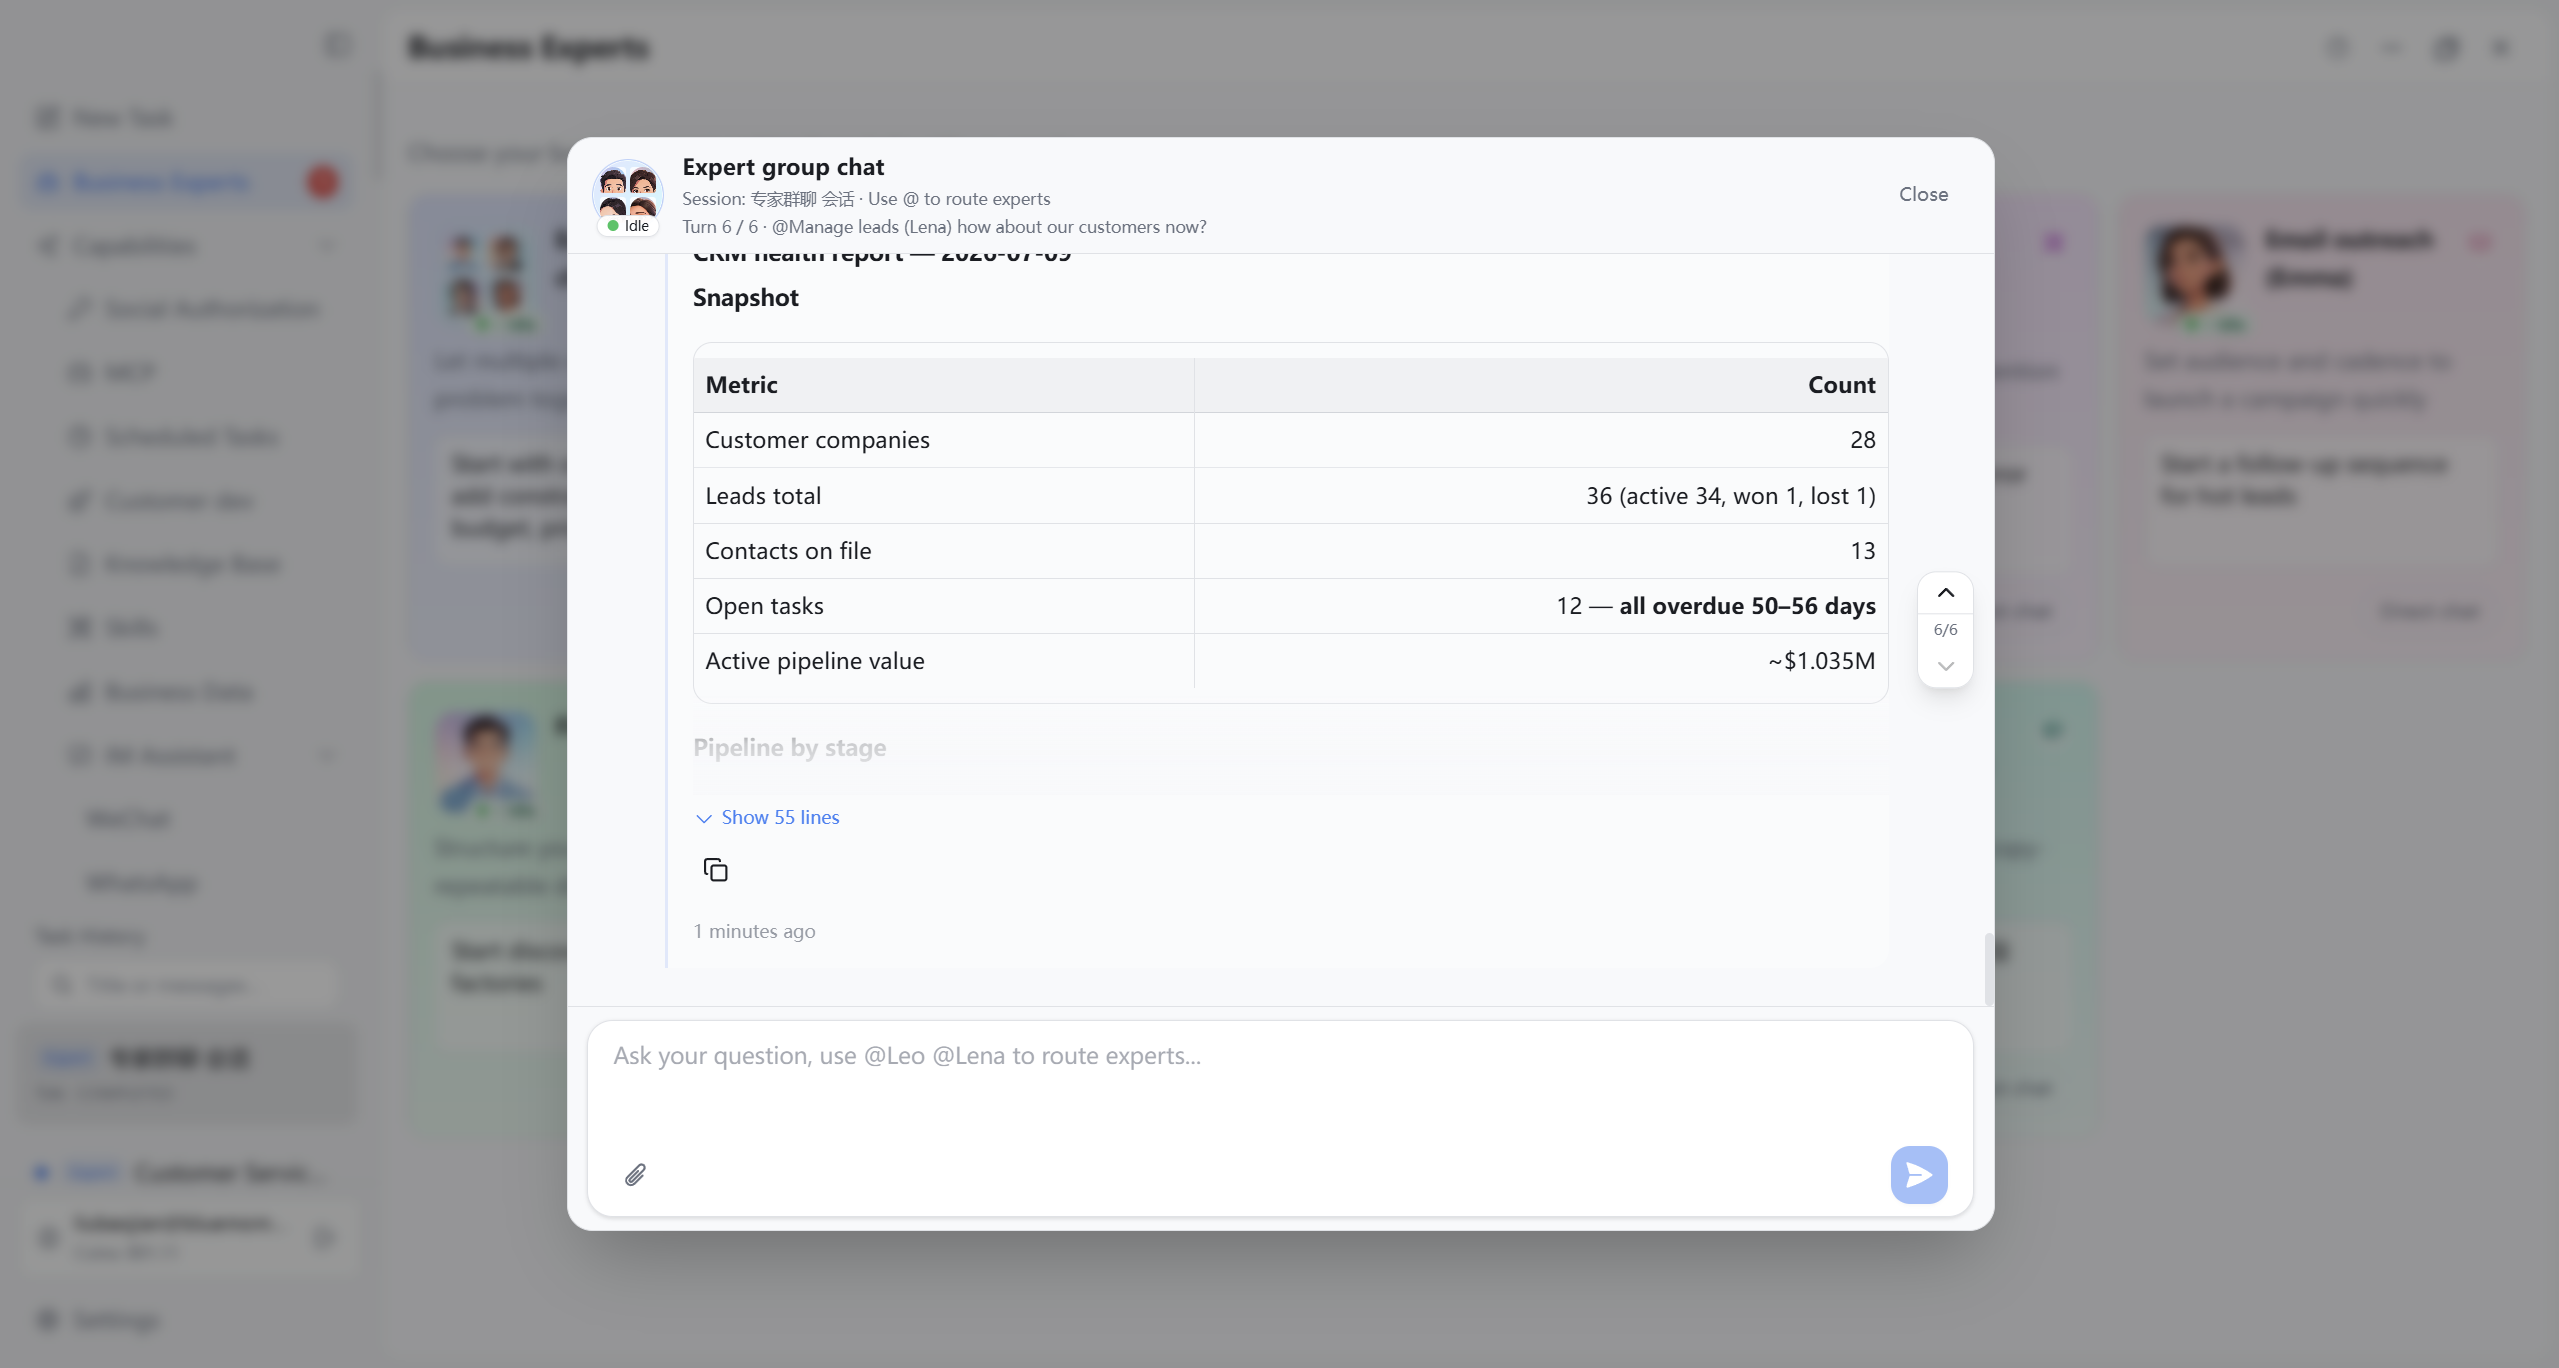
Group chat: On the expert group chat card, click “Group chat” to open the group dialog for multiple experts on one problem—suited to cross-scenario analysis.
@ specific expert: The input supports @ to pick an expert (dropdown) so one expert answers first; without @, the system assigns collaborators from context.
Group display: Messages show avatar and name per responding expert; card status can reflect who is thinking or running.
6.5 Expert Page Troubleshooting
- “Solo chat” does nothing: confirm the card is interactive, switch away and return, or restart the client if it persists.
- Empty card suggestions: confirm a valid trigger (first init, expert completion, manual refresh); invalid model suggestions hide the suggestion area by design.
- Unread red dot remains: open solo chat for that expert or the matching session in Task History; the dot should clear after viewing.
6.6 Judging Whether Expert Results Are Sufficient
- Suggestion text should be actionable natural-language sentences, not short tags or placeholders.
- Suggestions align with the expert’s role (find customers, manage leads, email outreach, document completion, etc.).
- After reading “Current suggestion,” you can act or start the next conversation without large extra explanation.
7. Customer Development Page
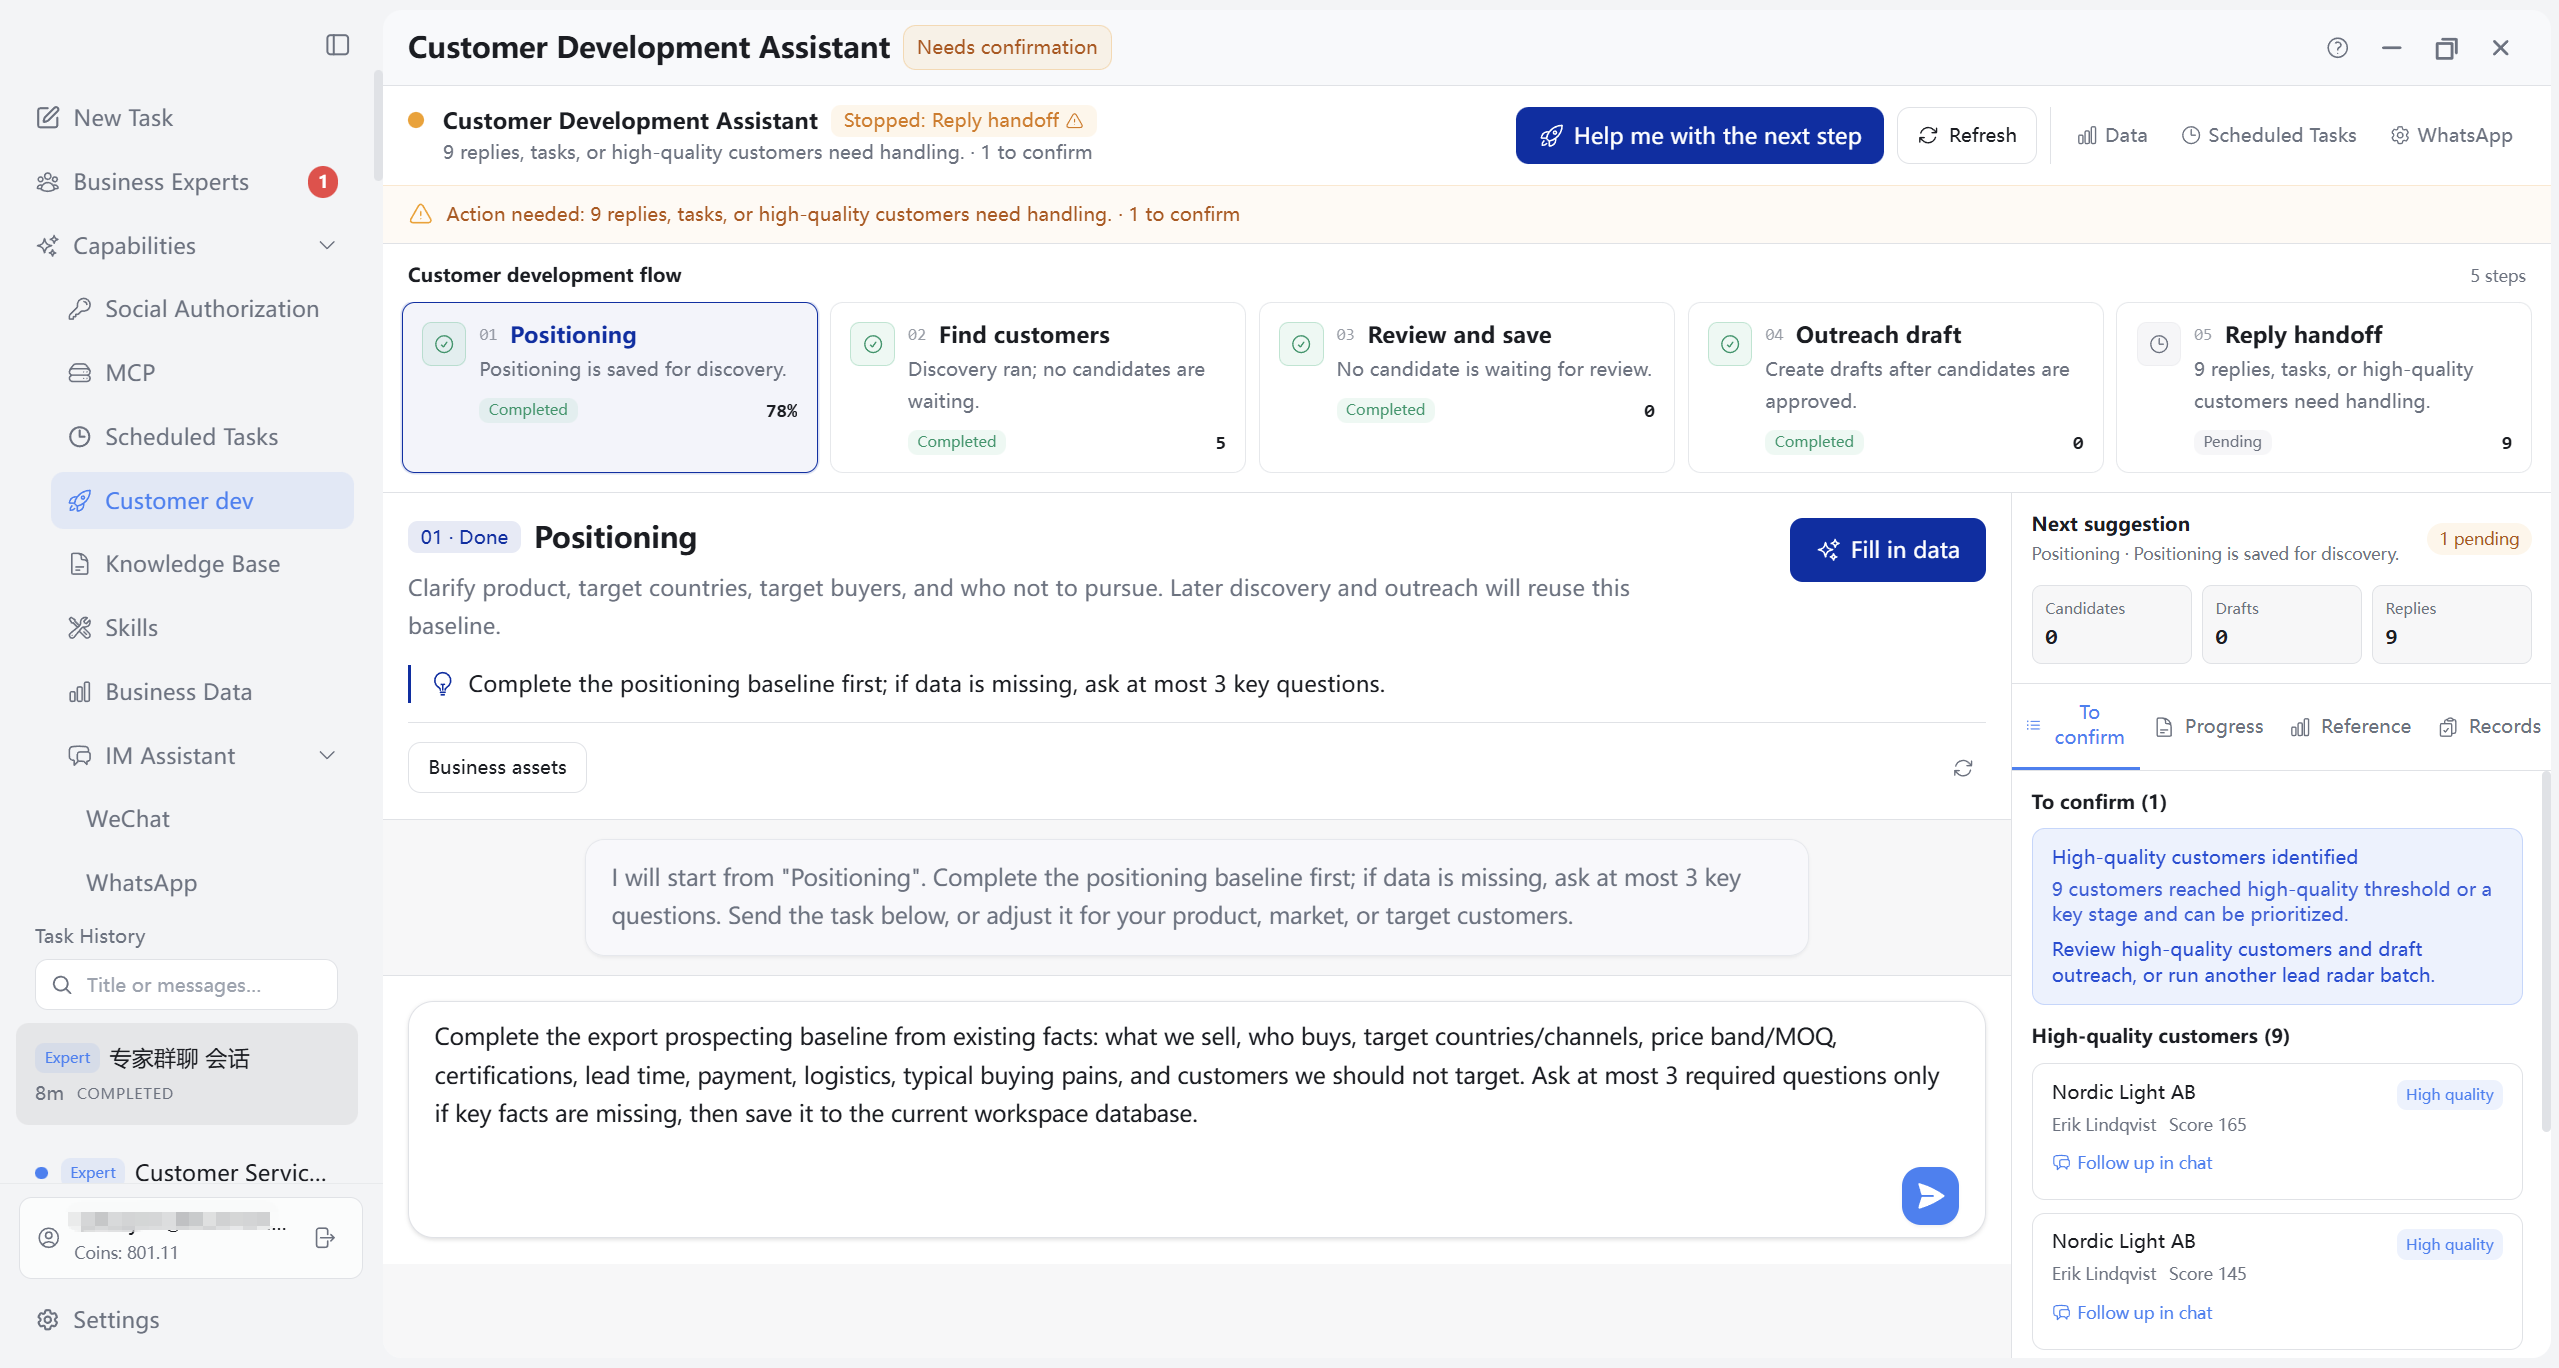
Click Customer Development in the left nav to open the customer development loop workbench. It chains “positioning → find customers → review → outreach drafts → reply handoff” on the same business library (shared with Chapter 10 Business Data and the Chapter 4 working directory). Choose a working directory on the Tasks page and complete initialization first; for email outreach, complete Chapter 4 email setup.
7.1 Entry and Page Layout
The page is roughly organized top to bottom as:
- Title bar: Shows “Customer Development” and an overall status badge (e.g. Ready, Needs attention, Blocked).
- Loop top bar: Titled “Customer development loop,” shows where you are paused; yellow alerts appear for pending items or blockers. Right side: Refresh, primary action (“Find customers” when clear, “Continue from here” when blocked), and shortcuts to Business Data, Scheduled Tasks, WhatsApp configuration, etc.
- Three-column body: Left—Customer development flow (five nodes); center—conversation workspace (node description, system suggestions, quick actions, input, conversation log); right—context panel (below).
The context panel is fixed on the right with four tabs that change with the active node:
- Manual to-dos: Blocker list, high-quality customers, pending tasks; when a node is pending/blocked/error, switching nodes opens this tab by default.
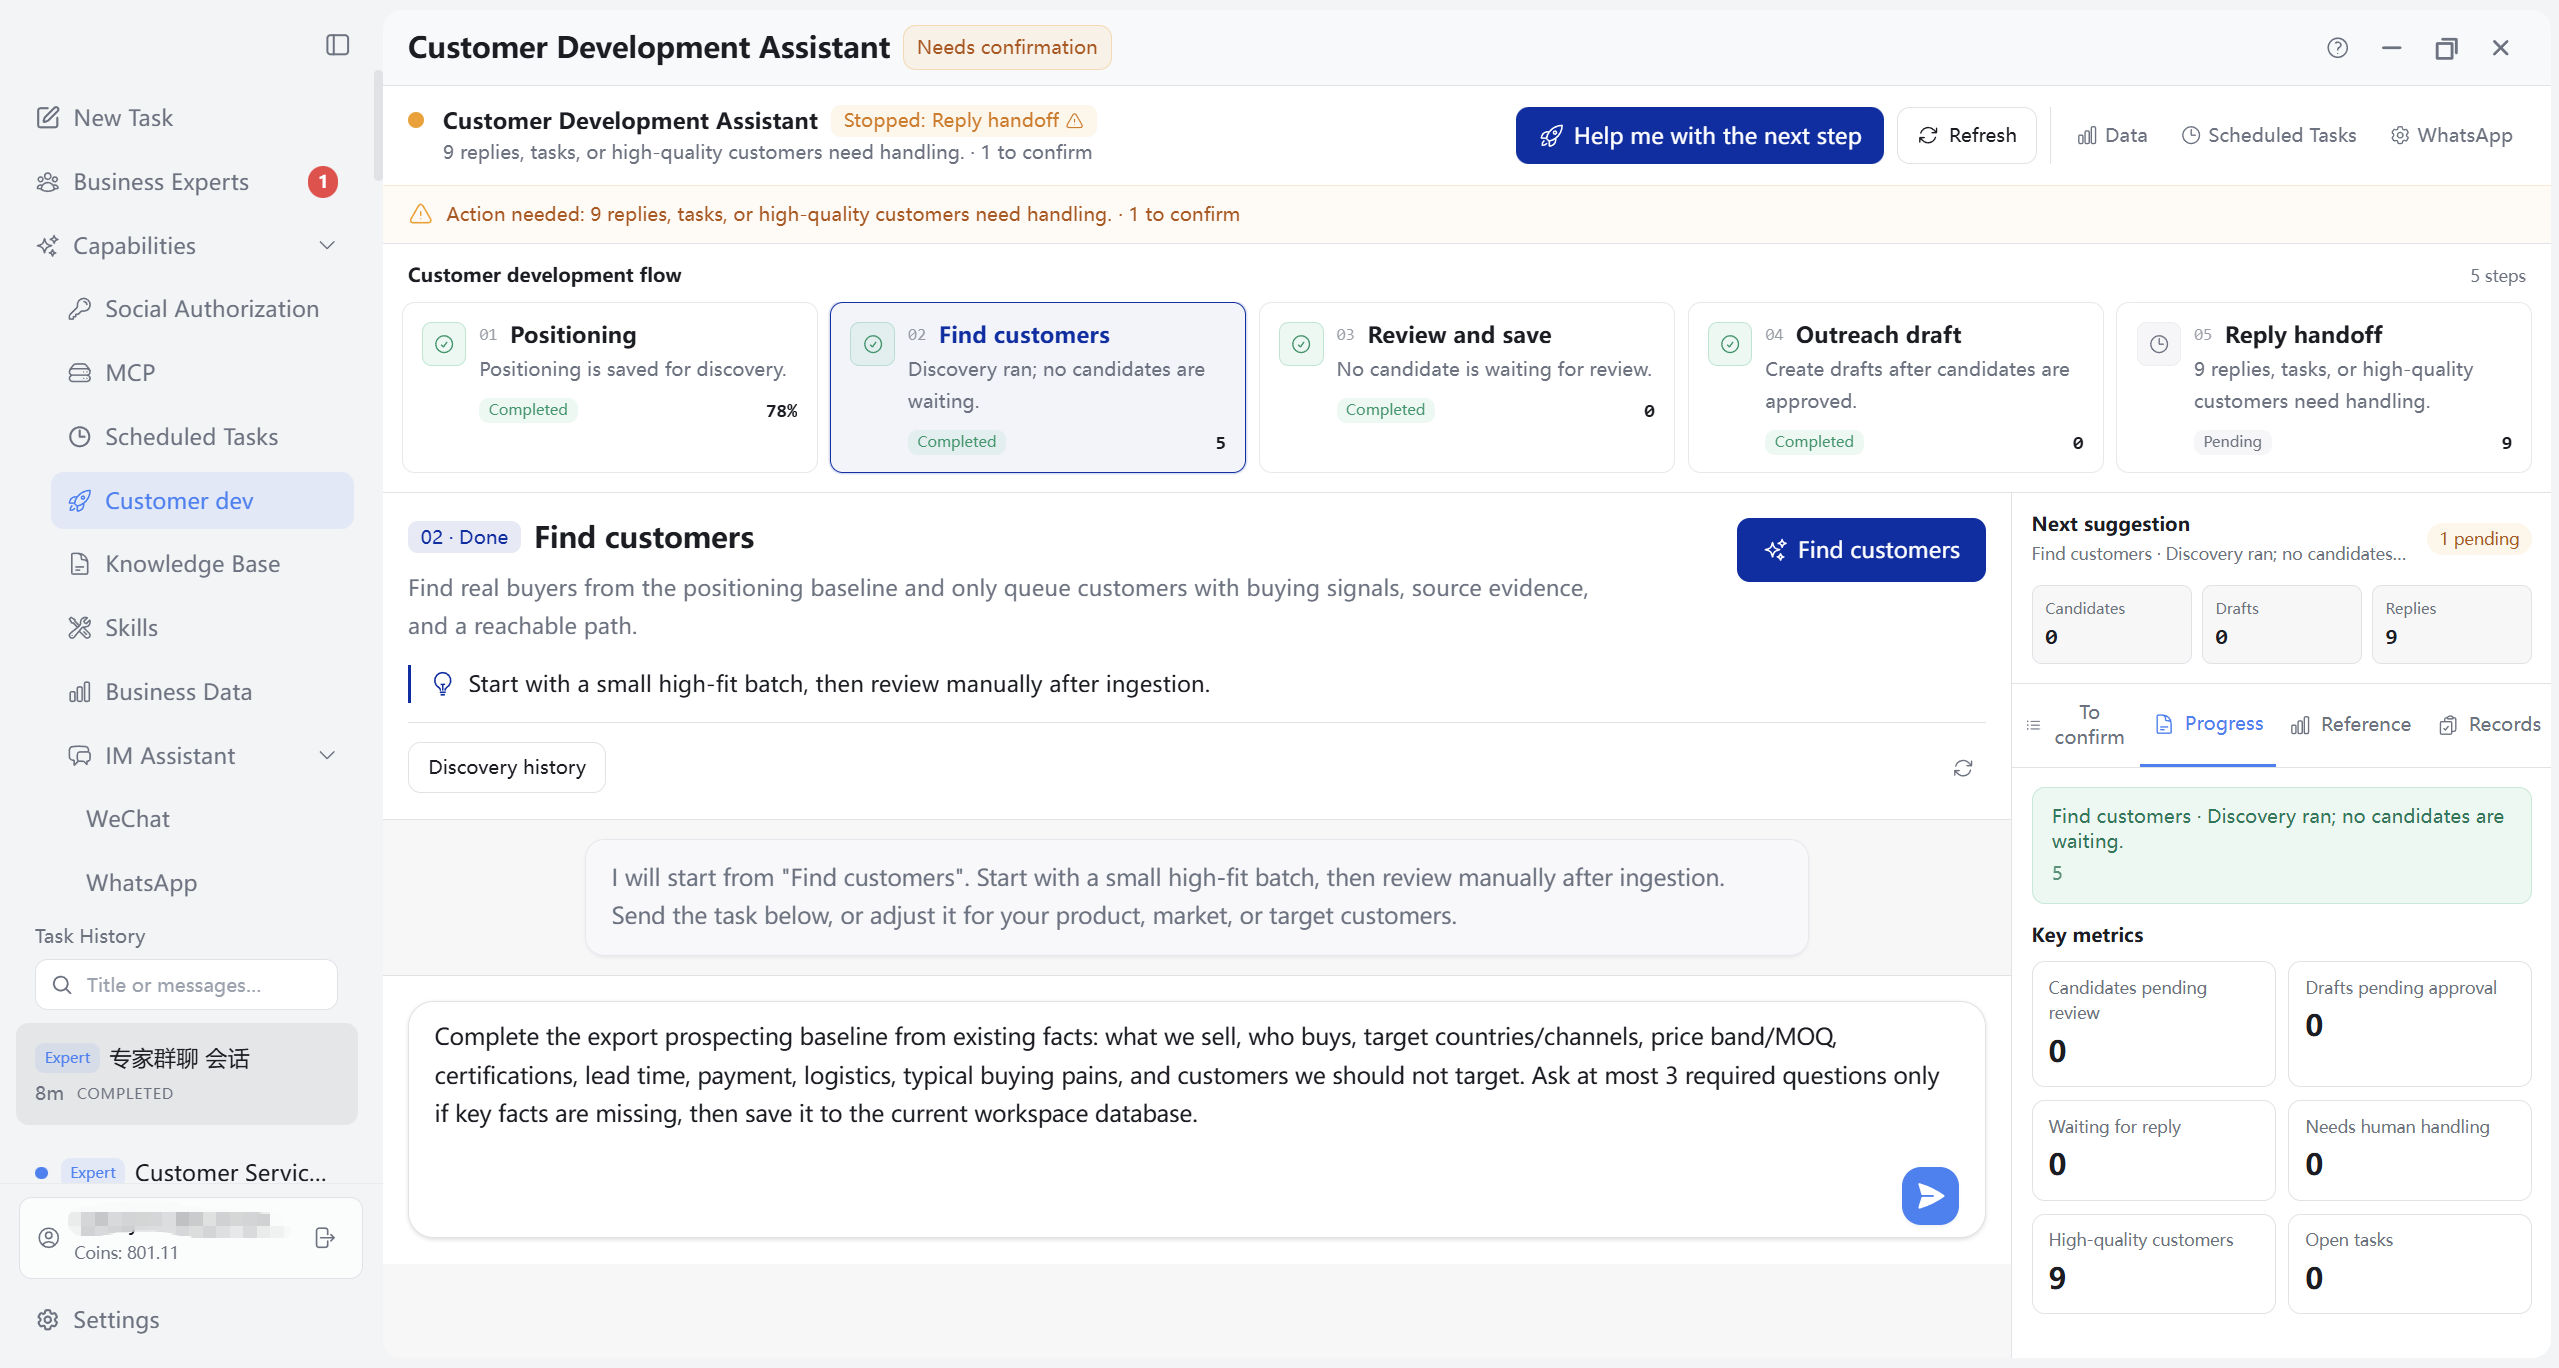
- Node results: Current node status summary, six key metrics (candidates pending review, drafts pending approval, awaiting reply, needs manual handling, high-quality customers, pending tasks), and a copyable manual report.
- Business data: Positioning baseline completeness and confidence, channel status snapshot for email/WhatsApp drafts, etc.
- Run log: Flow snapshot (discovery batches, stopped threads, generation time) and stopped outreach thread details.
When the sidebar is collapsed, the title bar may show “Expand sidebar,” “New Task,” and similar icons as on other main pages.
7.2 Customer Development Loop and Five Nodes
The left flow lists five core nodes in order; click to switch the active node. Each card shows index, name, status icon, and brief metrics (pending review count, drafts pending approval, etc.). Switching updates the center workspace and right context panel.
Top bar Continue from here / Find customers advances in sequence from the current blocker; it stops on missing data or manual confirmation—it does not skip blockers or auto-send outreach. Quick actions under each node prefill conversation tasks and open the Tasks page; some buttons open the matching Chapter 10 Business Data tab.
7.2.1 Positioning baseline
Complete baseline company, product, target market, and buyer persona data for reuse in customer discovery and outreach. Blockers often mean incomplete positioning or low confidence. Center area common quick actions include “Complete materials”; right Manual to-dos shows blockers and high-quality customers (overall layout in Figure 7-01).
7.2.2 Find customers
Run customer radar from positioning; candidates with buying signals and source evidence enter the review queue. Center: “Find customers,” “Discovery history”; right Node results shows summary and key metrics (discovery batch count, high-quality customers, etc.).
7.2.3 Review and intake
Process pending candidates—follow up, need more data, not worth pursuing, etc.—then pass approved leads to outreach. Center common actions: “Review candidates,” “Lead list”; right Business data tab compares positioning completeness and channel draft counts without leaving the page.
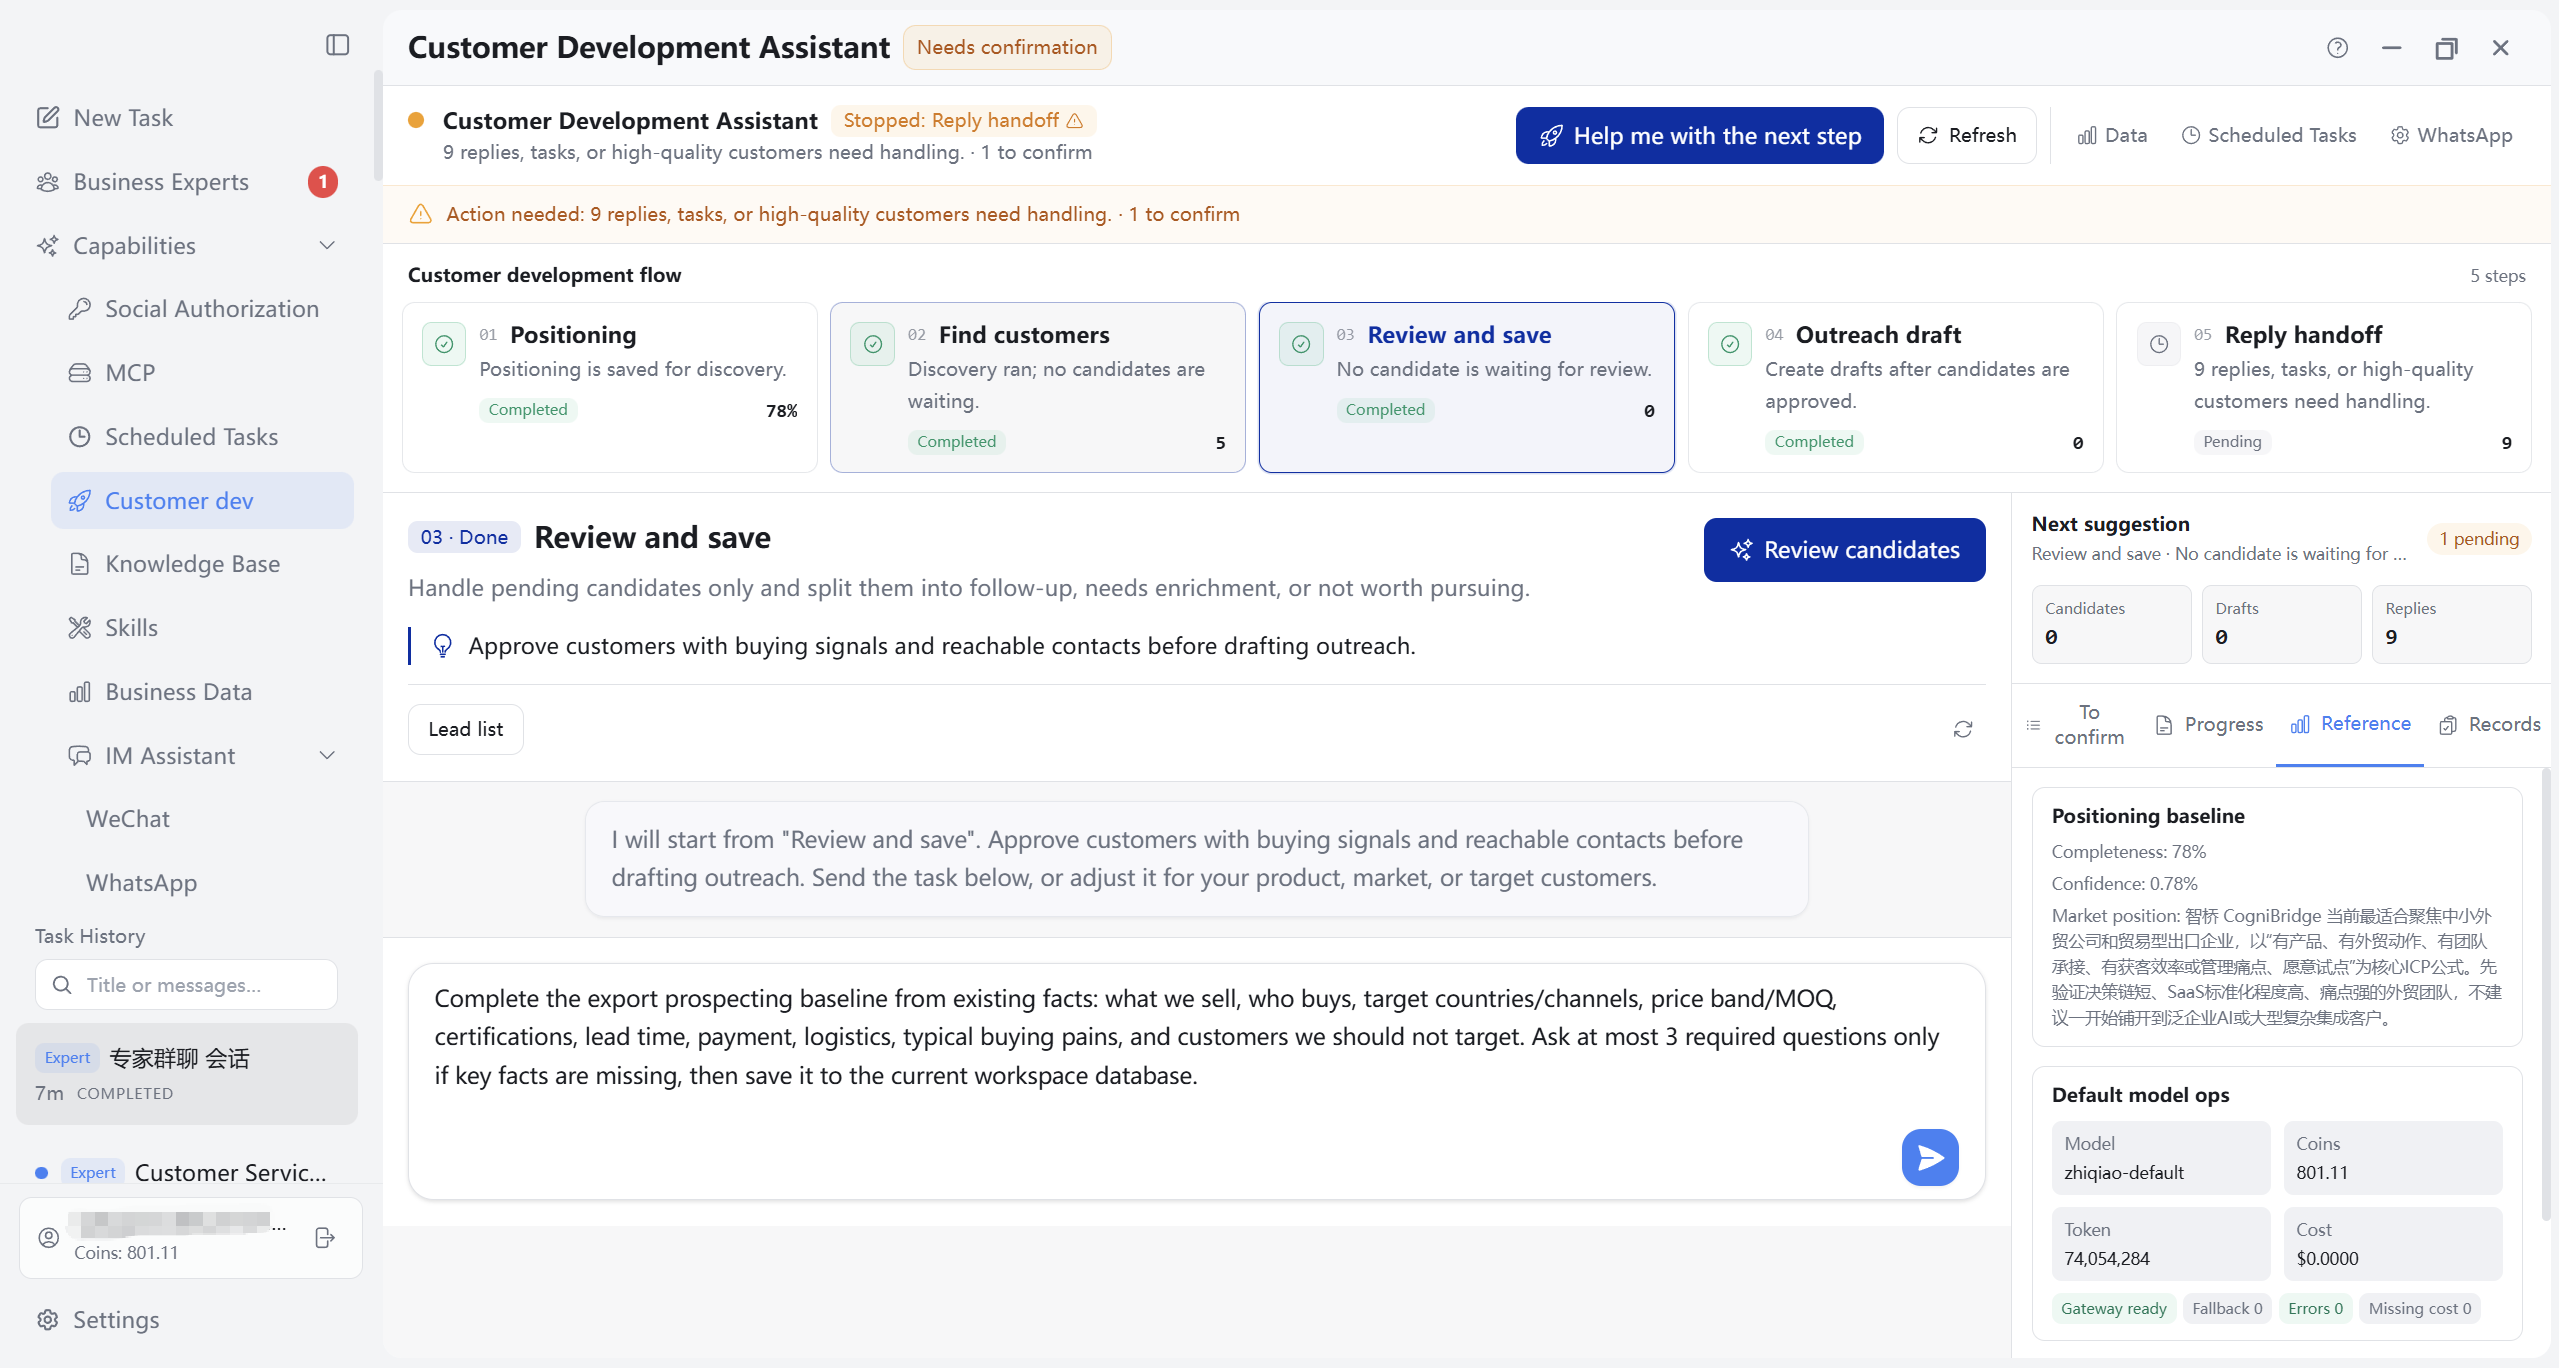
7.2.4 Outreach drafts
Generate outreach drafts such as development emails; not sent automatically by default—review manually, then save draft or confirm send (email/WhatsApp subject to channel configuration). Center: “Review drafts,” “Draft box”; right Run log for flow snapshot and stopped threads.
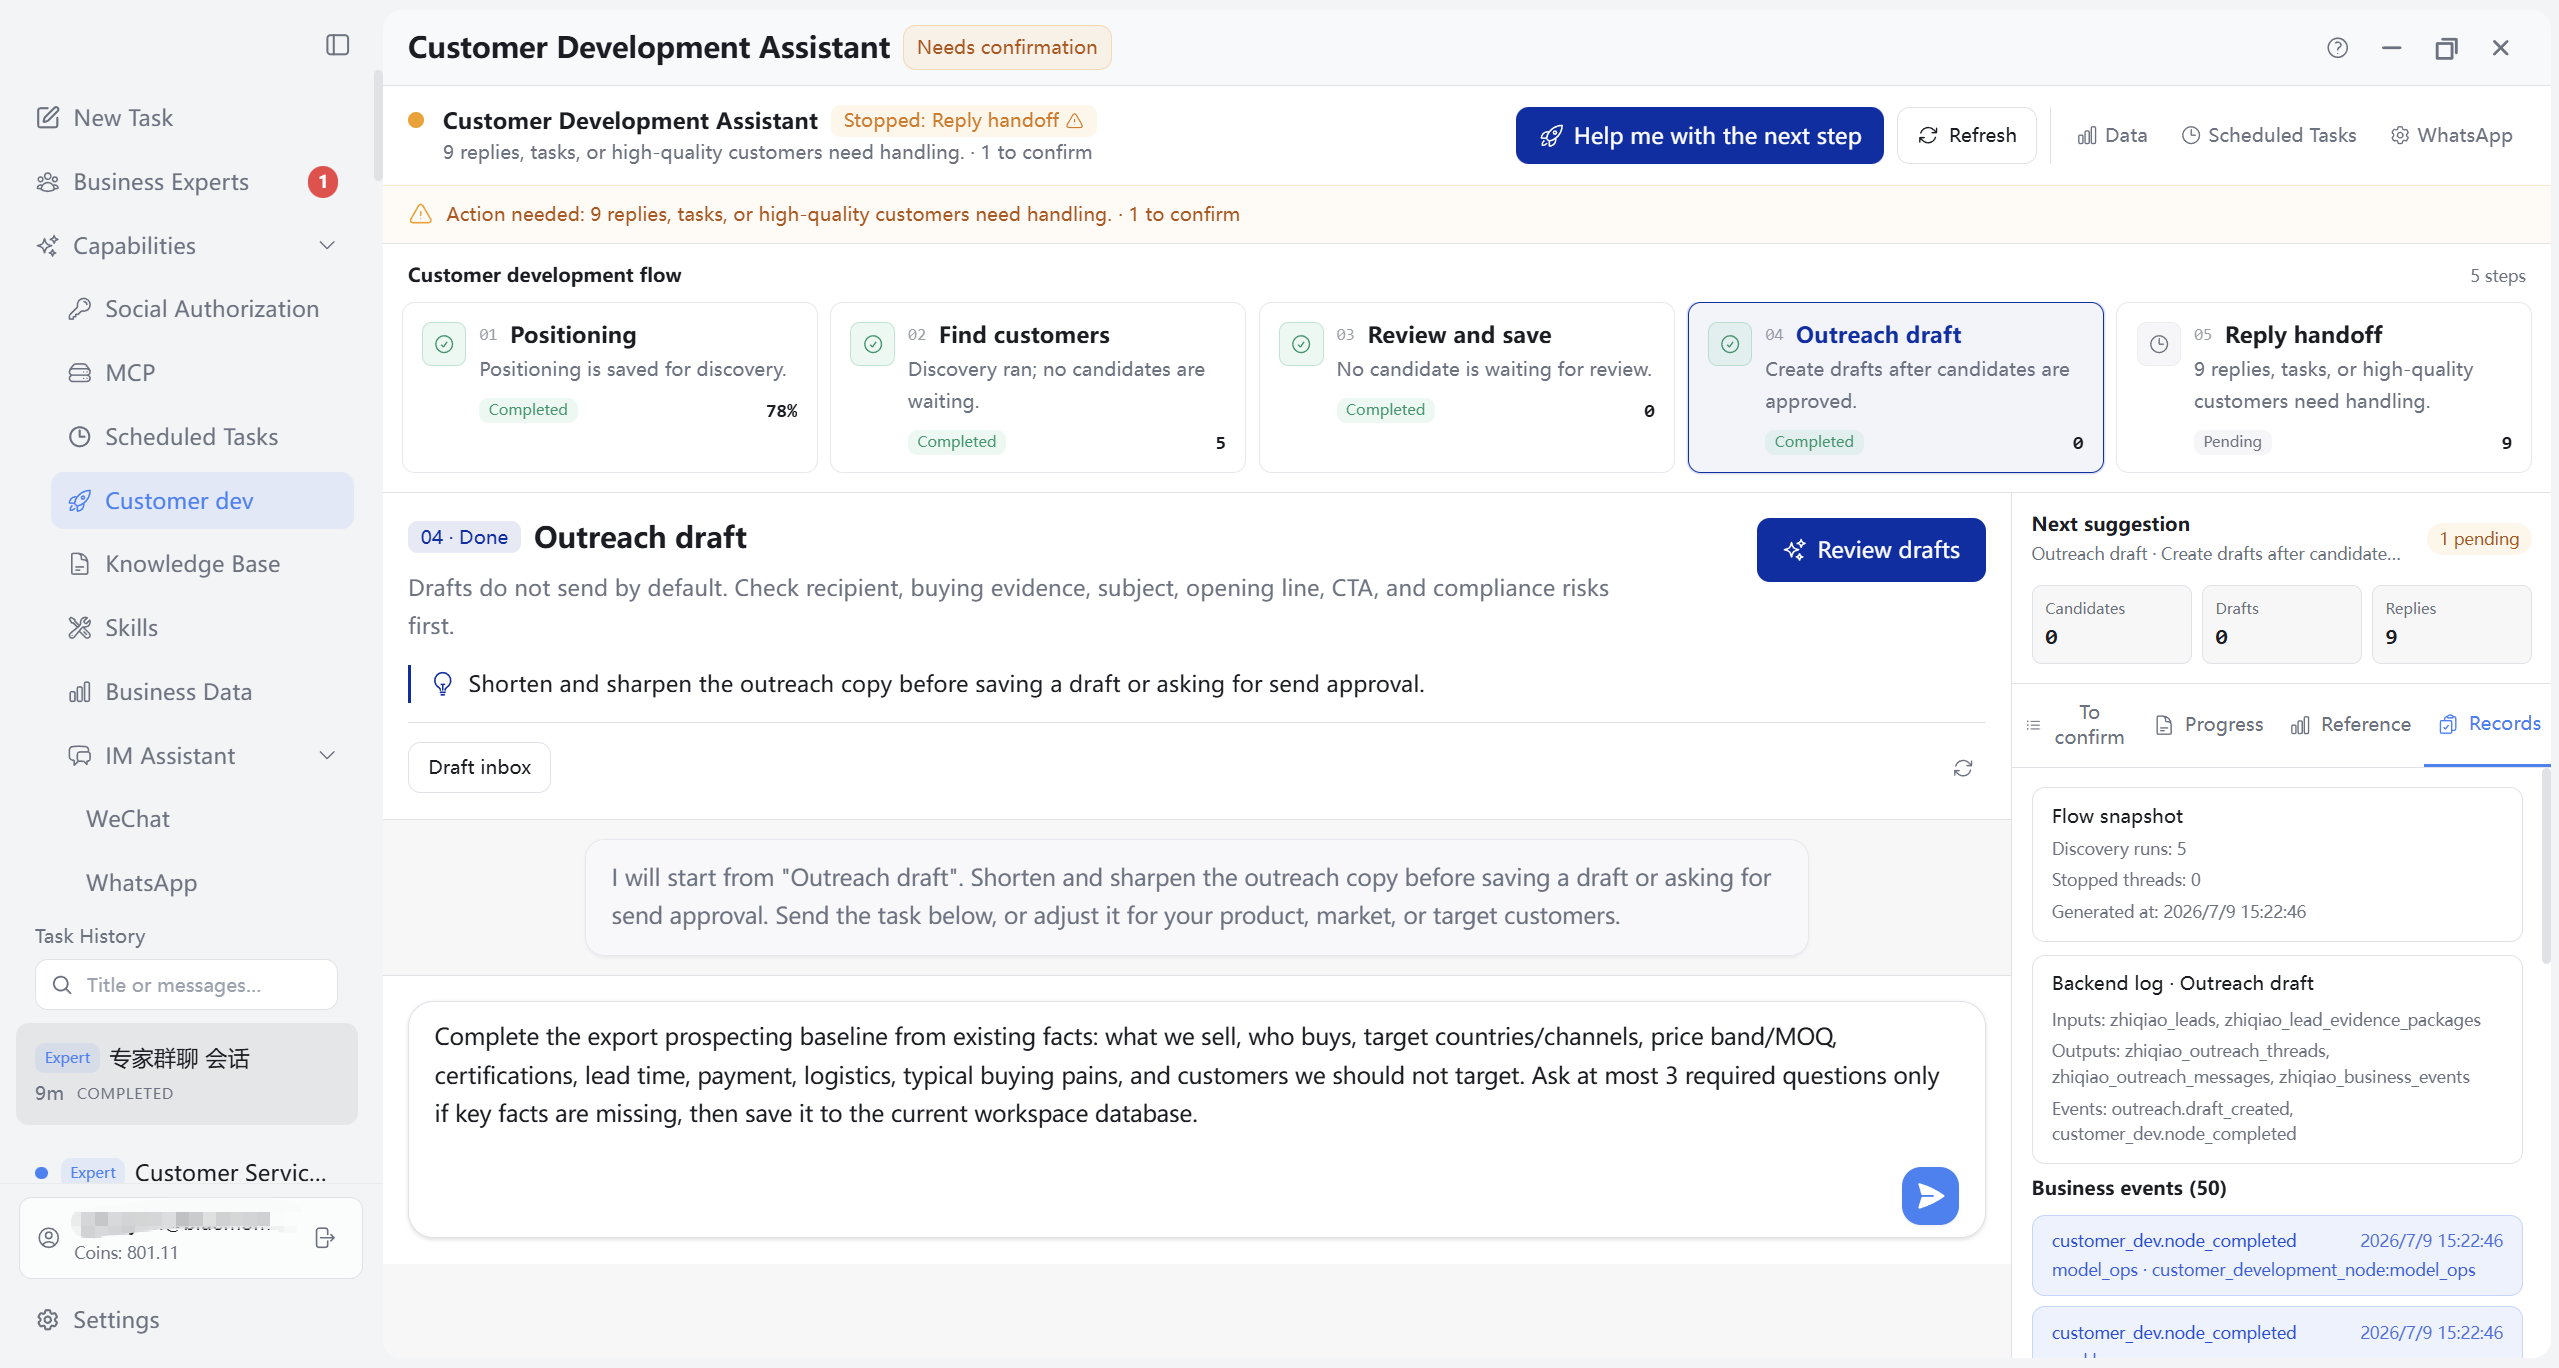
7.2.5 Reply handoff
Summarize threads awaiting reply, needing human judgment, and high-quality customers for sales follow-up. Center: “Handle replies,” “Draft follow-up,” “Inbox”; right Manual to-dos lists blockers and high-quality customers with “Follow up in conversation” per item.
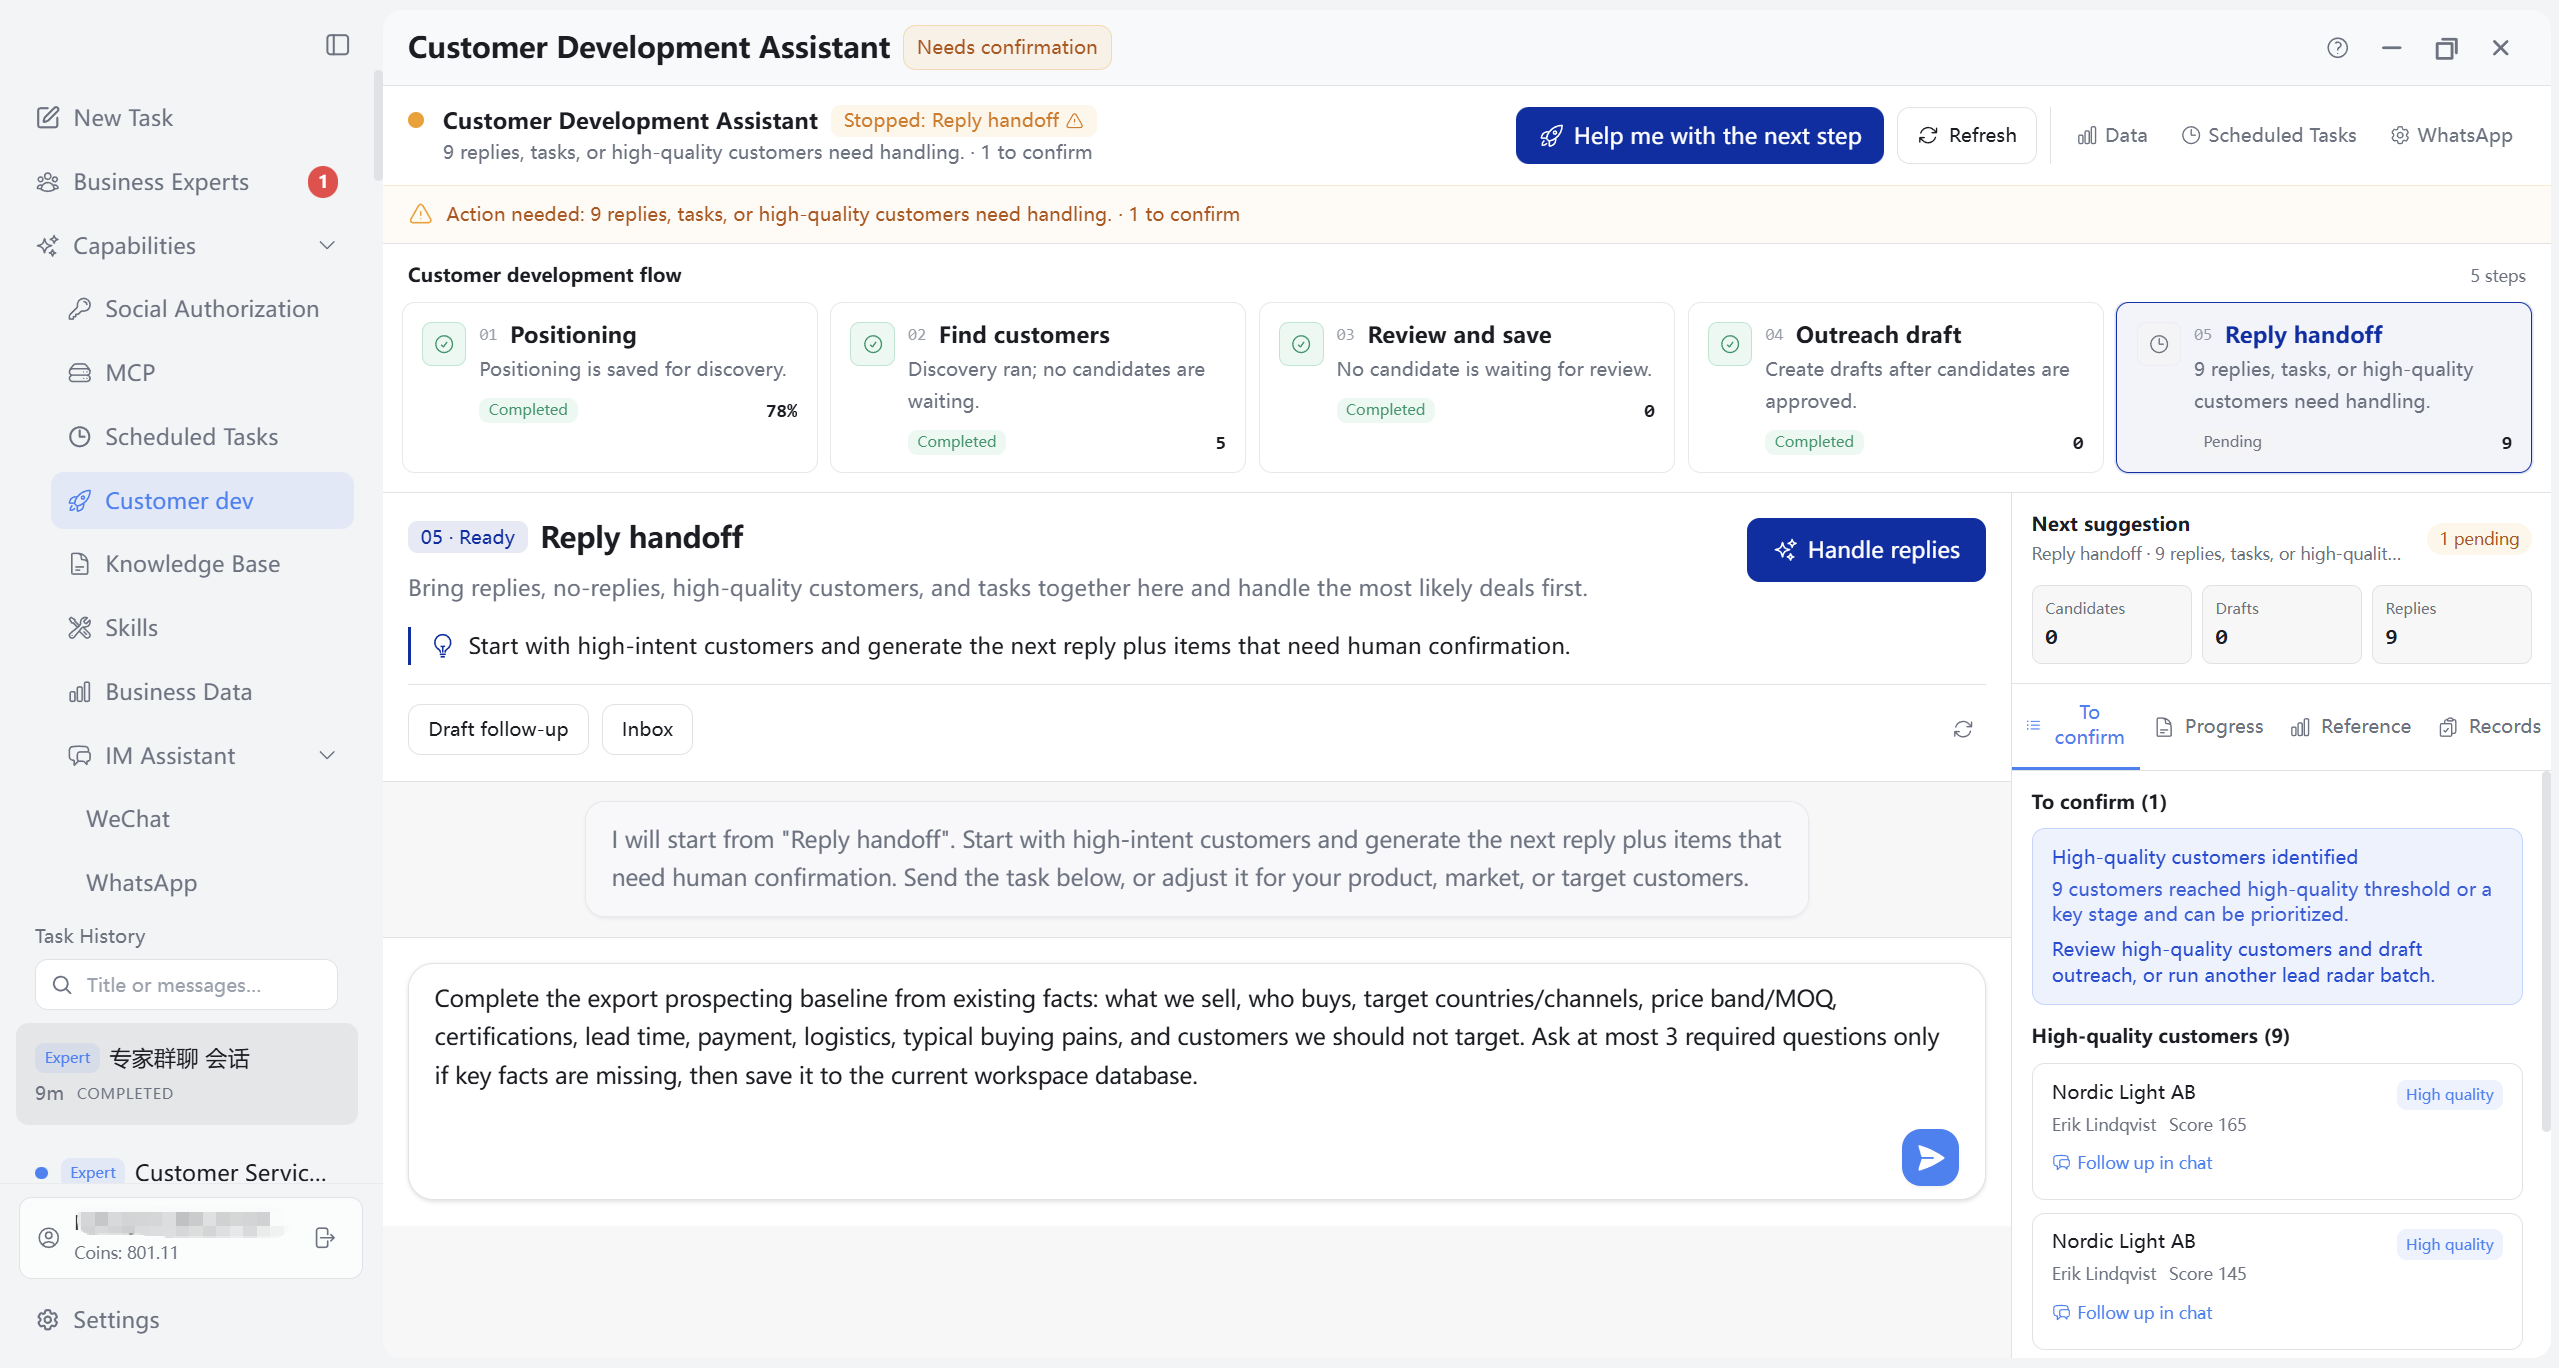
7.3 Advance via Conversation
The center workspace is the core of “advance via conversation” (node UIs in Figure 7-01–7-05 center column):
- After selecting a node, operation guidance and suggested next step appear above; the input prefills a prompt skeleton for that node—edit before sending.
- After send, execution moves to the Tasks page by the AI assistant (same as Chapter 5); brief conversation log may appear here during execution.
- Top-bar preset tasks (“View current status,” “Find new customers,” “Initialize cadence,” “Review queue,” “Check replies”) one-click common instructions into the conversation area.
- Candidates, drafts, high-quality customers in the right lists are clickable to generate targeted follow-up or review instructions.
Refresh: Reloads workbench snapshot only; if “sent awaiting reply” or “reply needs human” data exists, refresh may also trigger check replies logic.
Outbound constraints: Email/WhatsApp outreach requires your explicit confirmation; AI assistant prompts also require draft review before send. WhatsApp Business template messages need opt-in and other channel-ready conditions (see channel prompts).
7.4 Mapping to Business Data
Customer Development is the loop command center; detail data lives in Business Data modules—the right panel Business data tab is a light snapshot (Figure 7-03); full editing is in Chapter 10:
- Business assets: Company profile, product materials, positioning diagnosis → “Positioning baseline” node (see Chapter 10 10.3).
- Leads: Customer radar and public-search candidates, stage and score → “Find customers / Review and intake.”
- Mail: Pending outreach drafts, sent mail, inbox replies → “Outreach drafts / Reply handoff.”
- Opportunities and outcomes: Progress after high-quality customer intake → “Reply handoff” and manual follow-up.
“Business data” shortcuts in the top bar or node quick actions open the relevant tab; cadence tasks for radar, reply checks, weekly reports, etc. are managed on Scheduled Tasks (Chapter 11) or created via conversation with the AI assistant (11.1).
8. Knowledge Base Page
Click Knowledge Base in the left nav to manage structured materials and search indexes under the current working directory, referenced on demand by tasks and experts in conversation. Choose a working directory on the Tasks page first; without one, the page prompts that import is unavailable.
8.1 Entry and Knowledge Scope
Besides the sidebar Knowledge Base entry, Business Experts detail may offer “Manage knowledge base,” opening the same page with that expert’s knowledge scope preselected.
After entry, the top bar typically includes (left to right): Refresh, Knowledge scope dropdown (shared library vs. expert-specific materials), blue Import materials, Re-index, Clean zero-fragment sources, Clean unused copies, etc. (UI may vary).
- Knowledge scope: Top dropdown switches the managed scope. Usually includes Shared knowledge base and expert-specific scopes (indexed document count in parentheses).
- Index status cards: Show current scope index status (Ready / Needs attention / Pending import), search fragments, document count, sendable material count.
- When status is “Pending import” or “Needs attention,” a yellow banner explains you must import and index before asking the AI assistant.
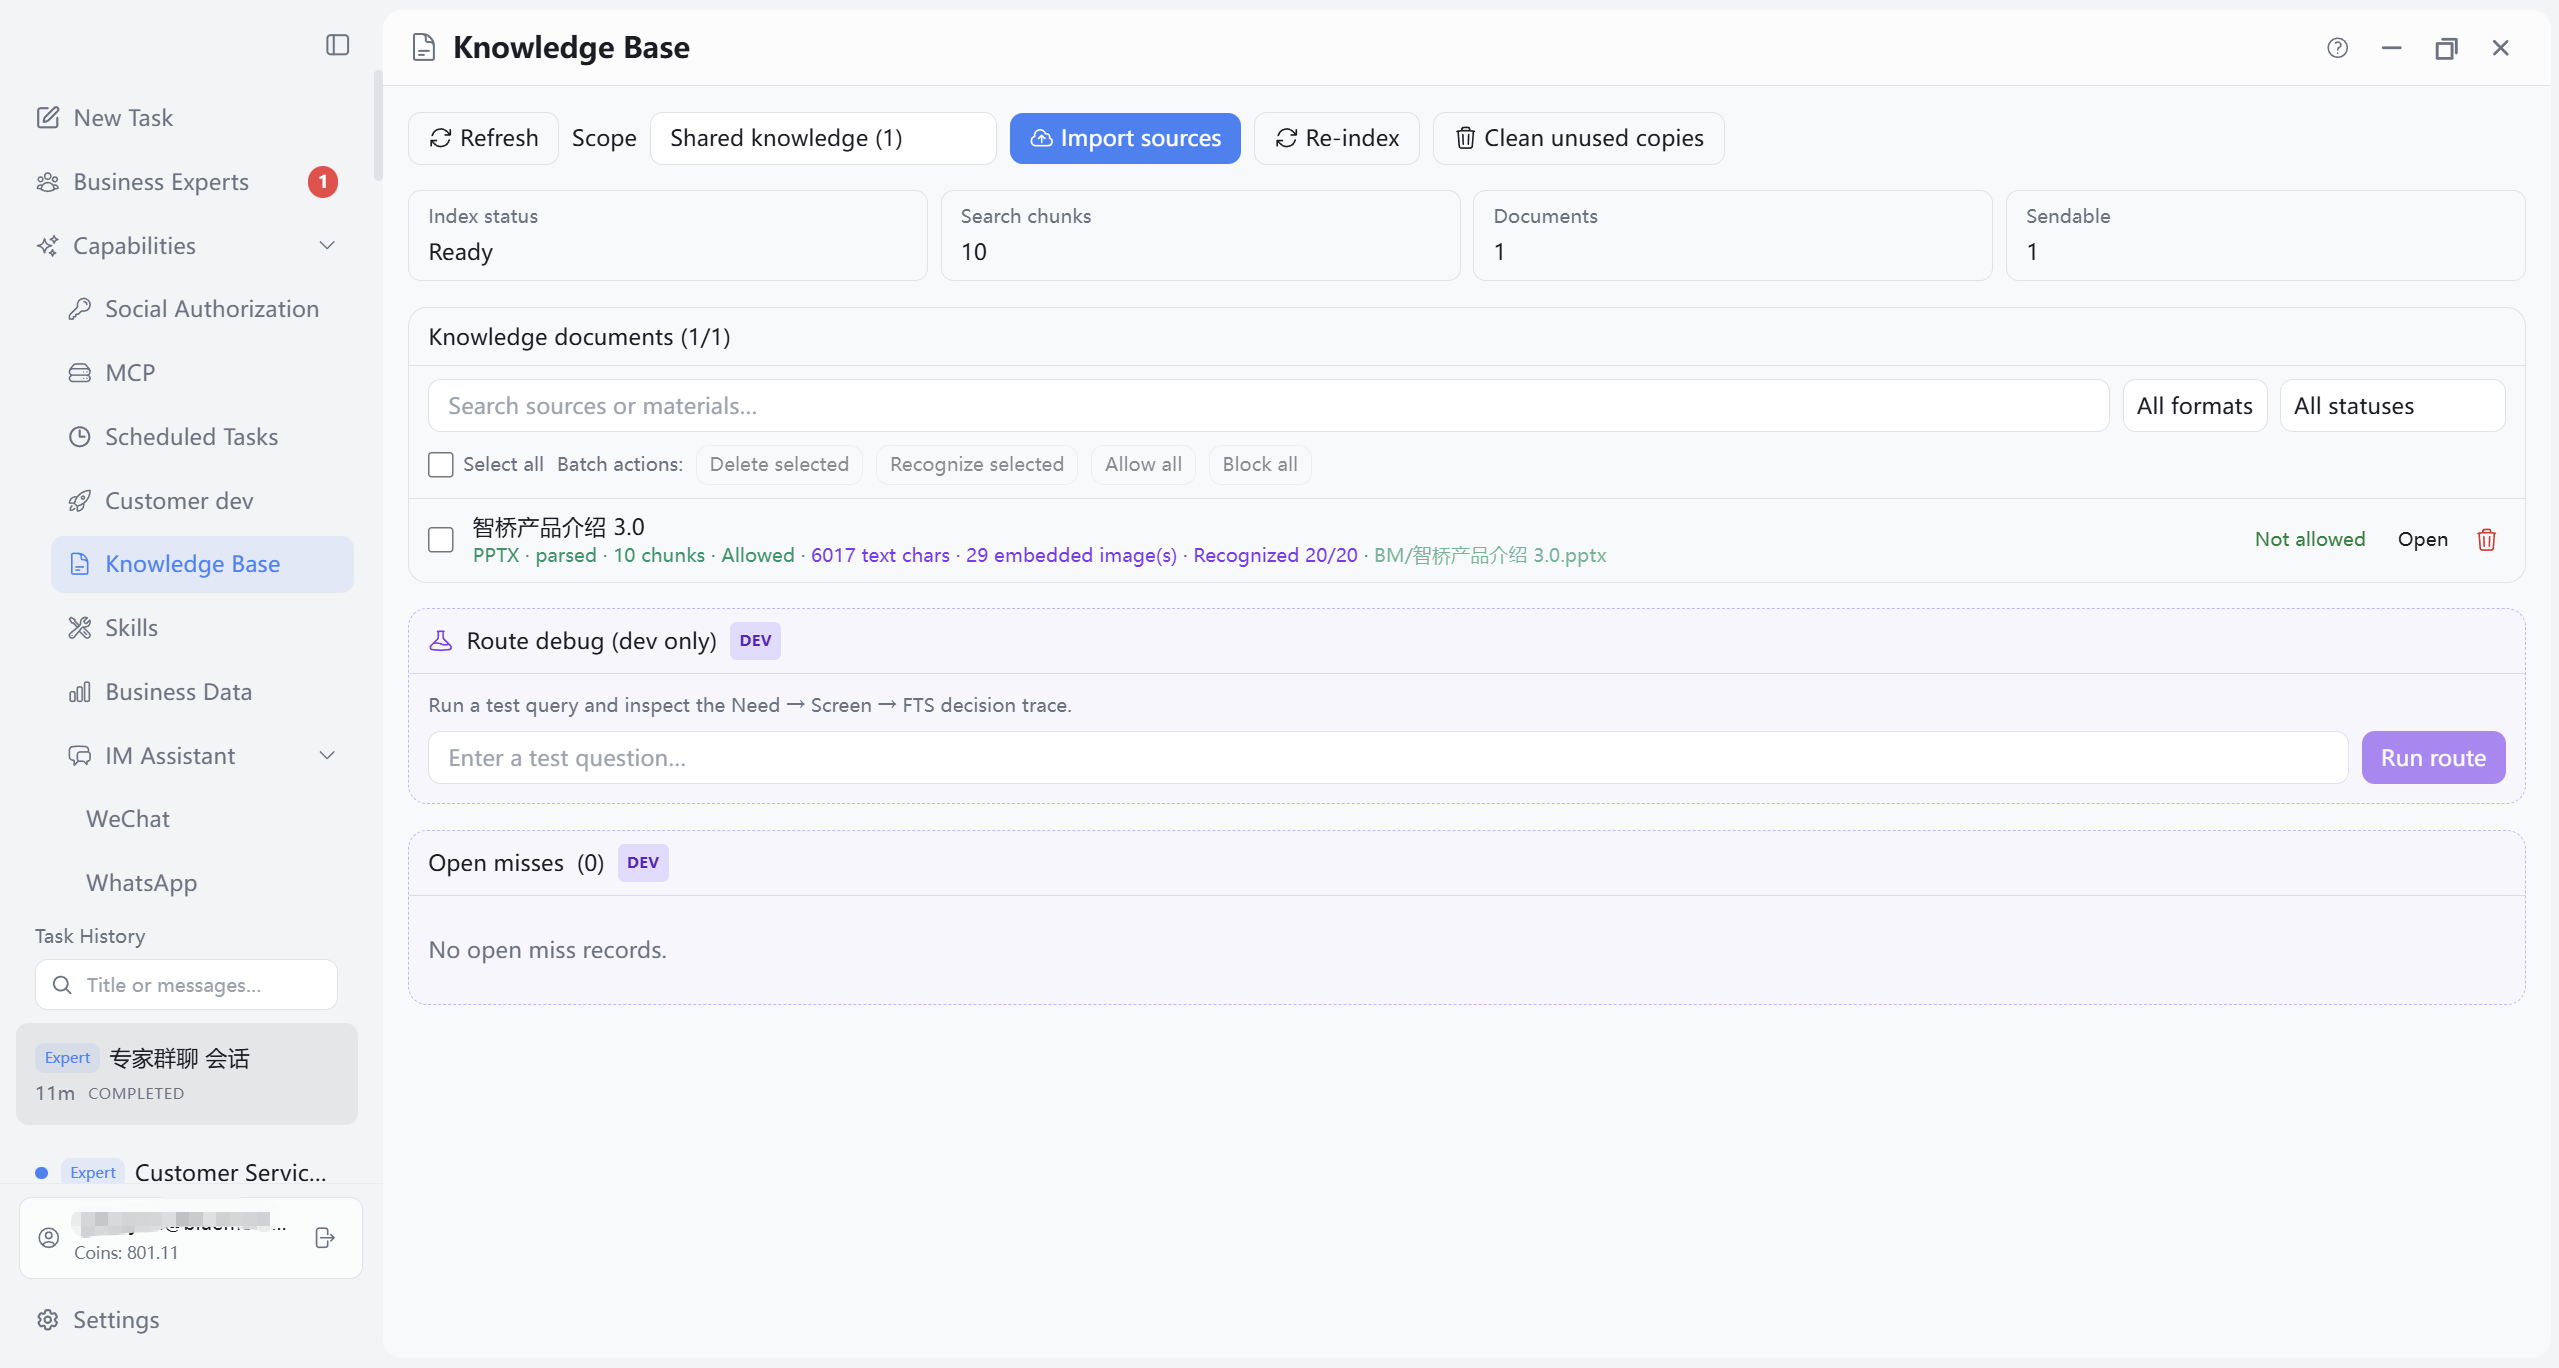
8.2 Import Materials and Indexing
Common top-bar actions:
- Refresh: Reload the current scope snapshot.
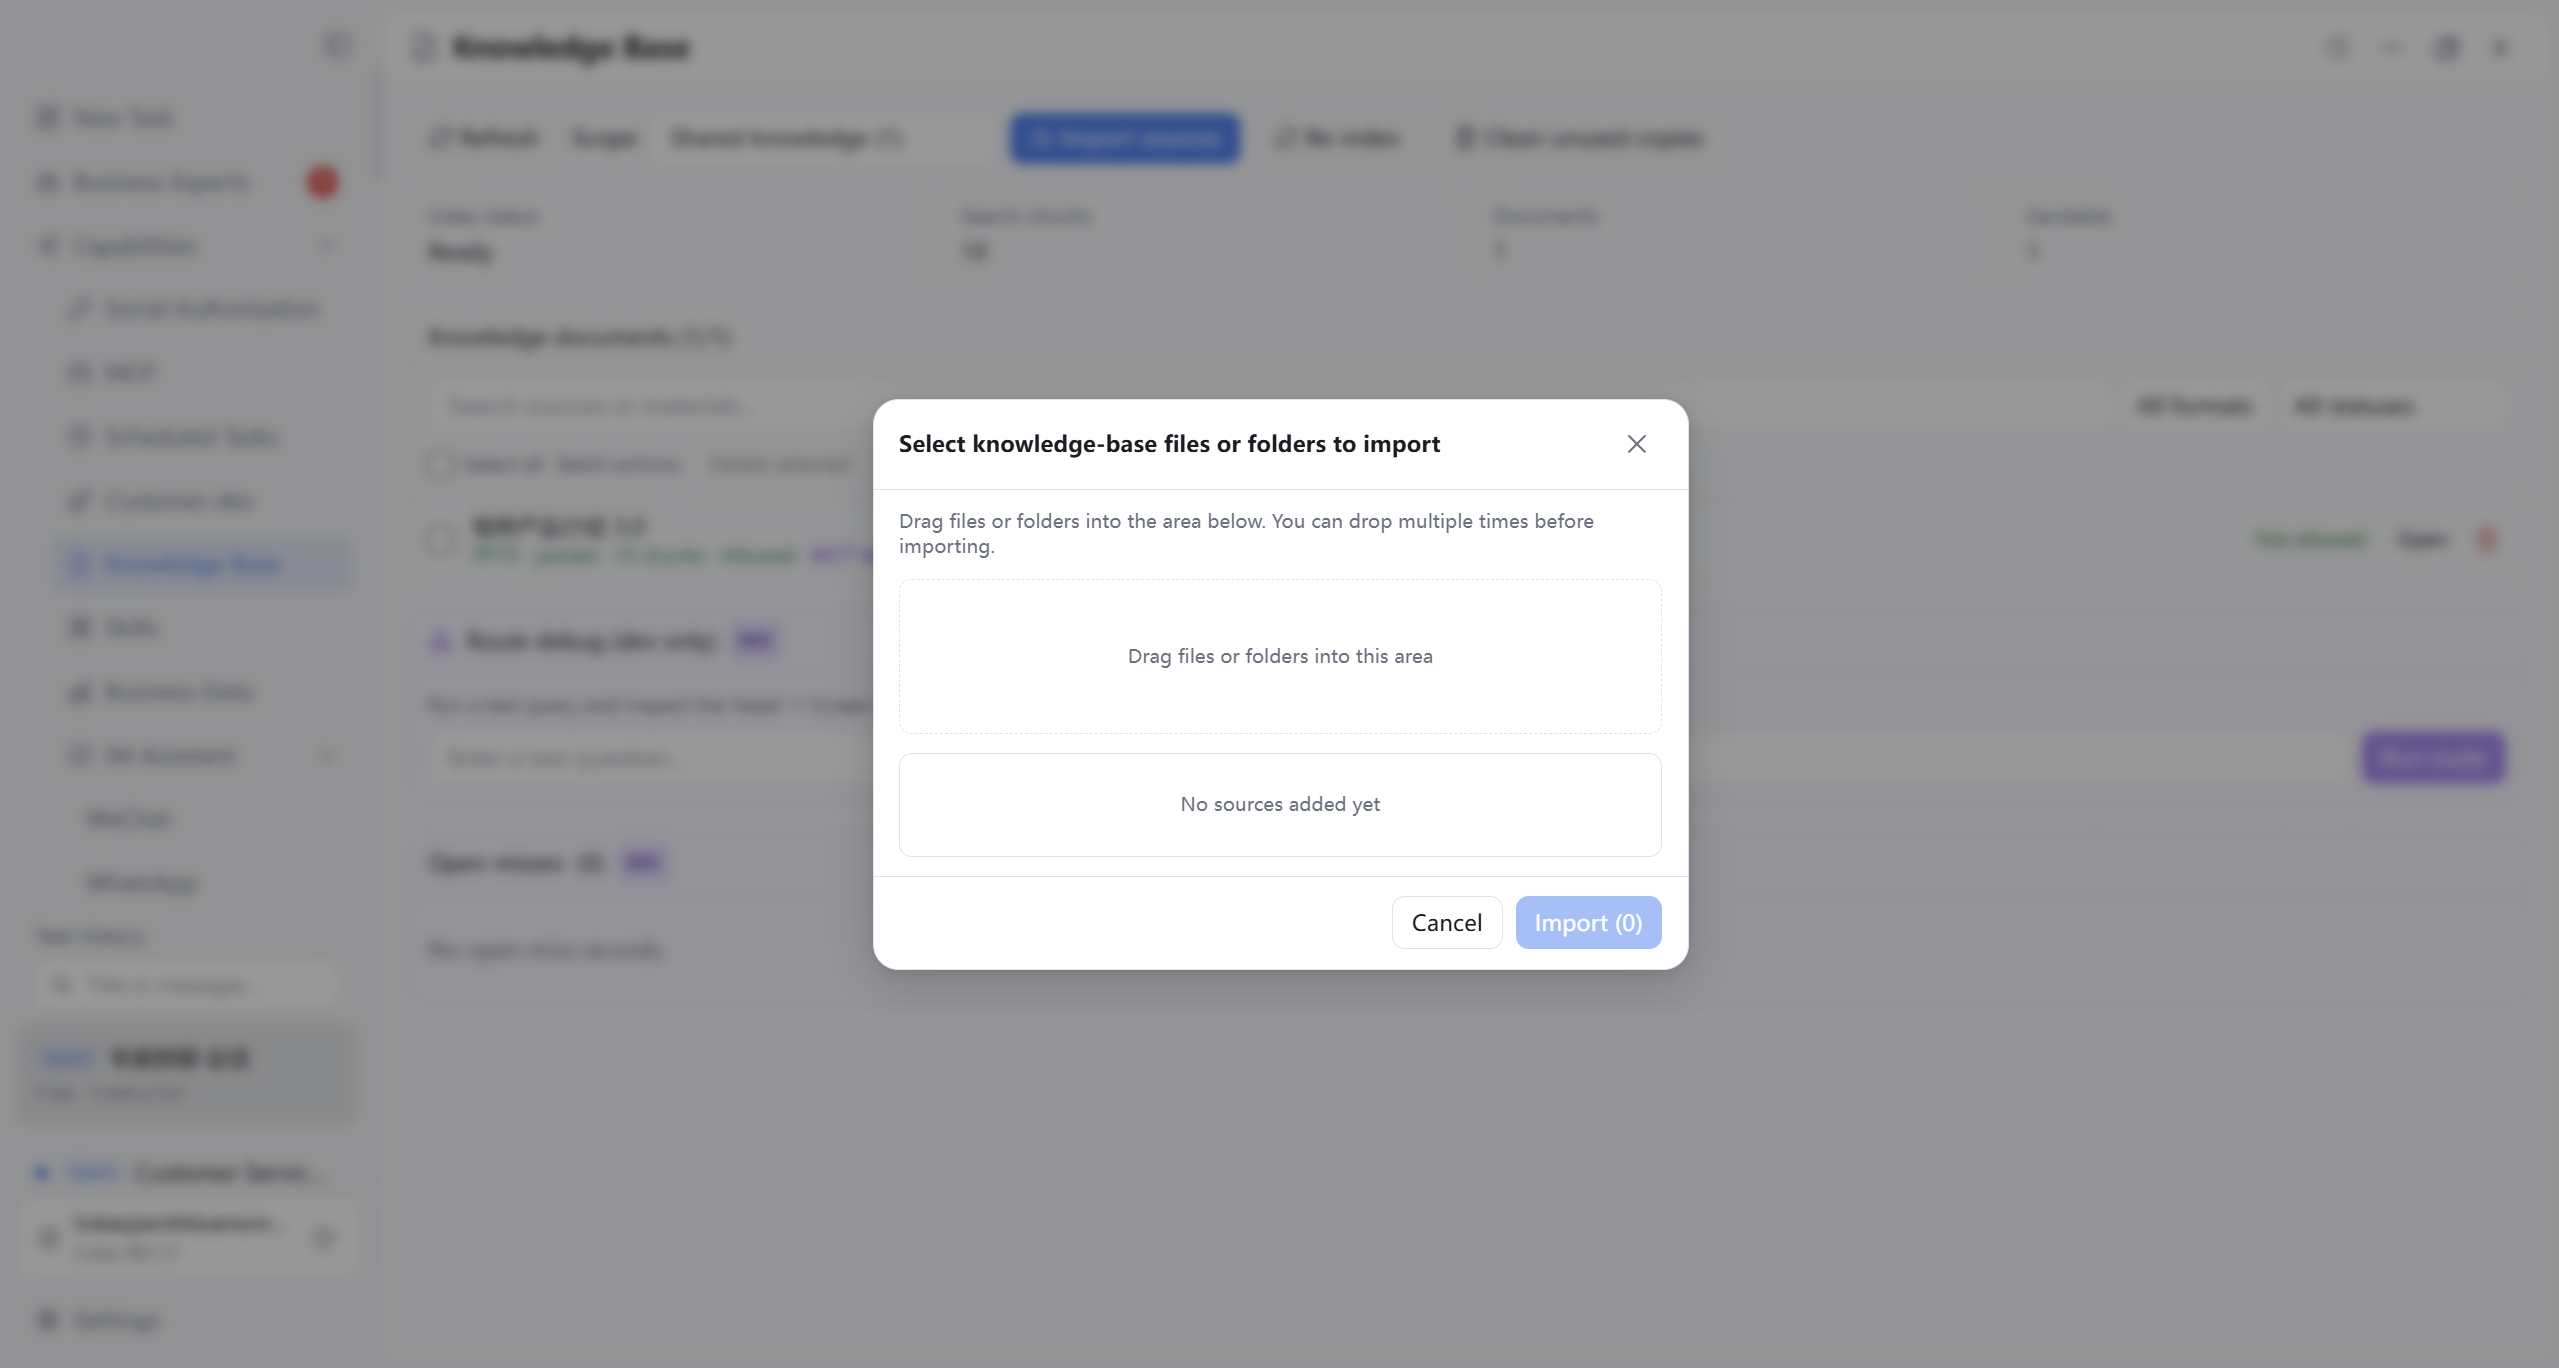
- Import materials: Opens the import dialog (Figure 8-02). On Windows, drag files or folders into the dialog, or click “Add materials…” to pick multiple files/folders; on Mac, use Add materials… or drag, add in batches, then confirm with “Import (N).” Supports documents, images, video, etc. (per client filters).
- Re-index: Rebuild search index for imported documents in the current scope (disabled when no documents).
- Clean zero-fragment sources / Clean unused copies: Remove invalid sources with no search fragments; clean unreferenced copy files in the knowledge directory (confirmation before the latter).
After import, documents appear in the list below; some image materials need row-level Recognize (or batch recognize) to fill text via vision—depends on model/vision API configuration.
8.3 Document List and Filters
The Knowledge base documents list shows all entries in the current scope, with:
- Search: Filter by source name or keywords (placeholder “Search source or materials…”).
- Format filter: All / Text / PDF / Word / Excel / PPT / Image / Video, etc.
- Status filter: All / Indexed / Zero fragments / Pending recognition.
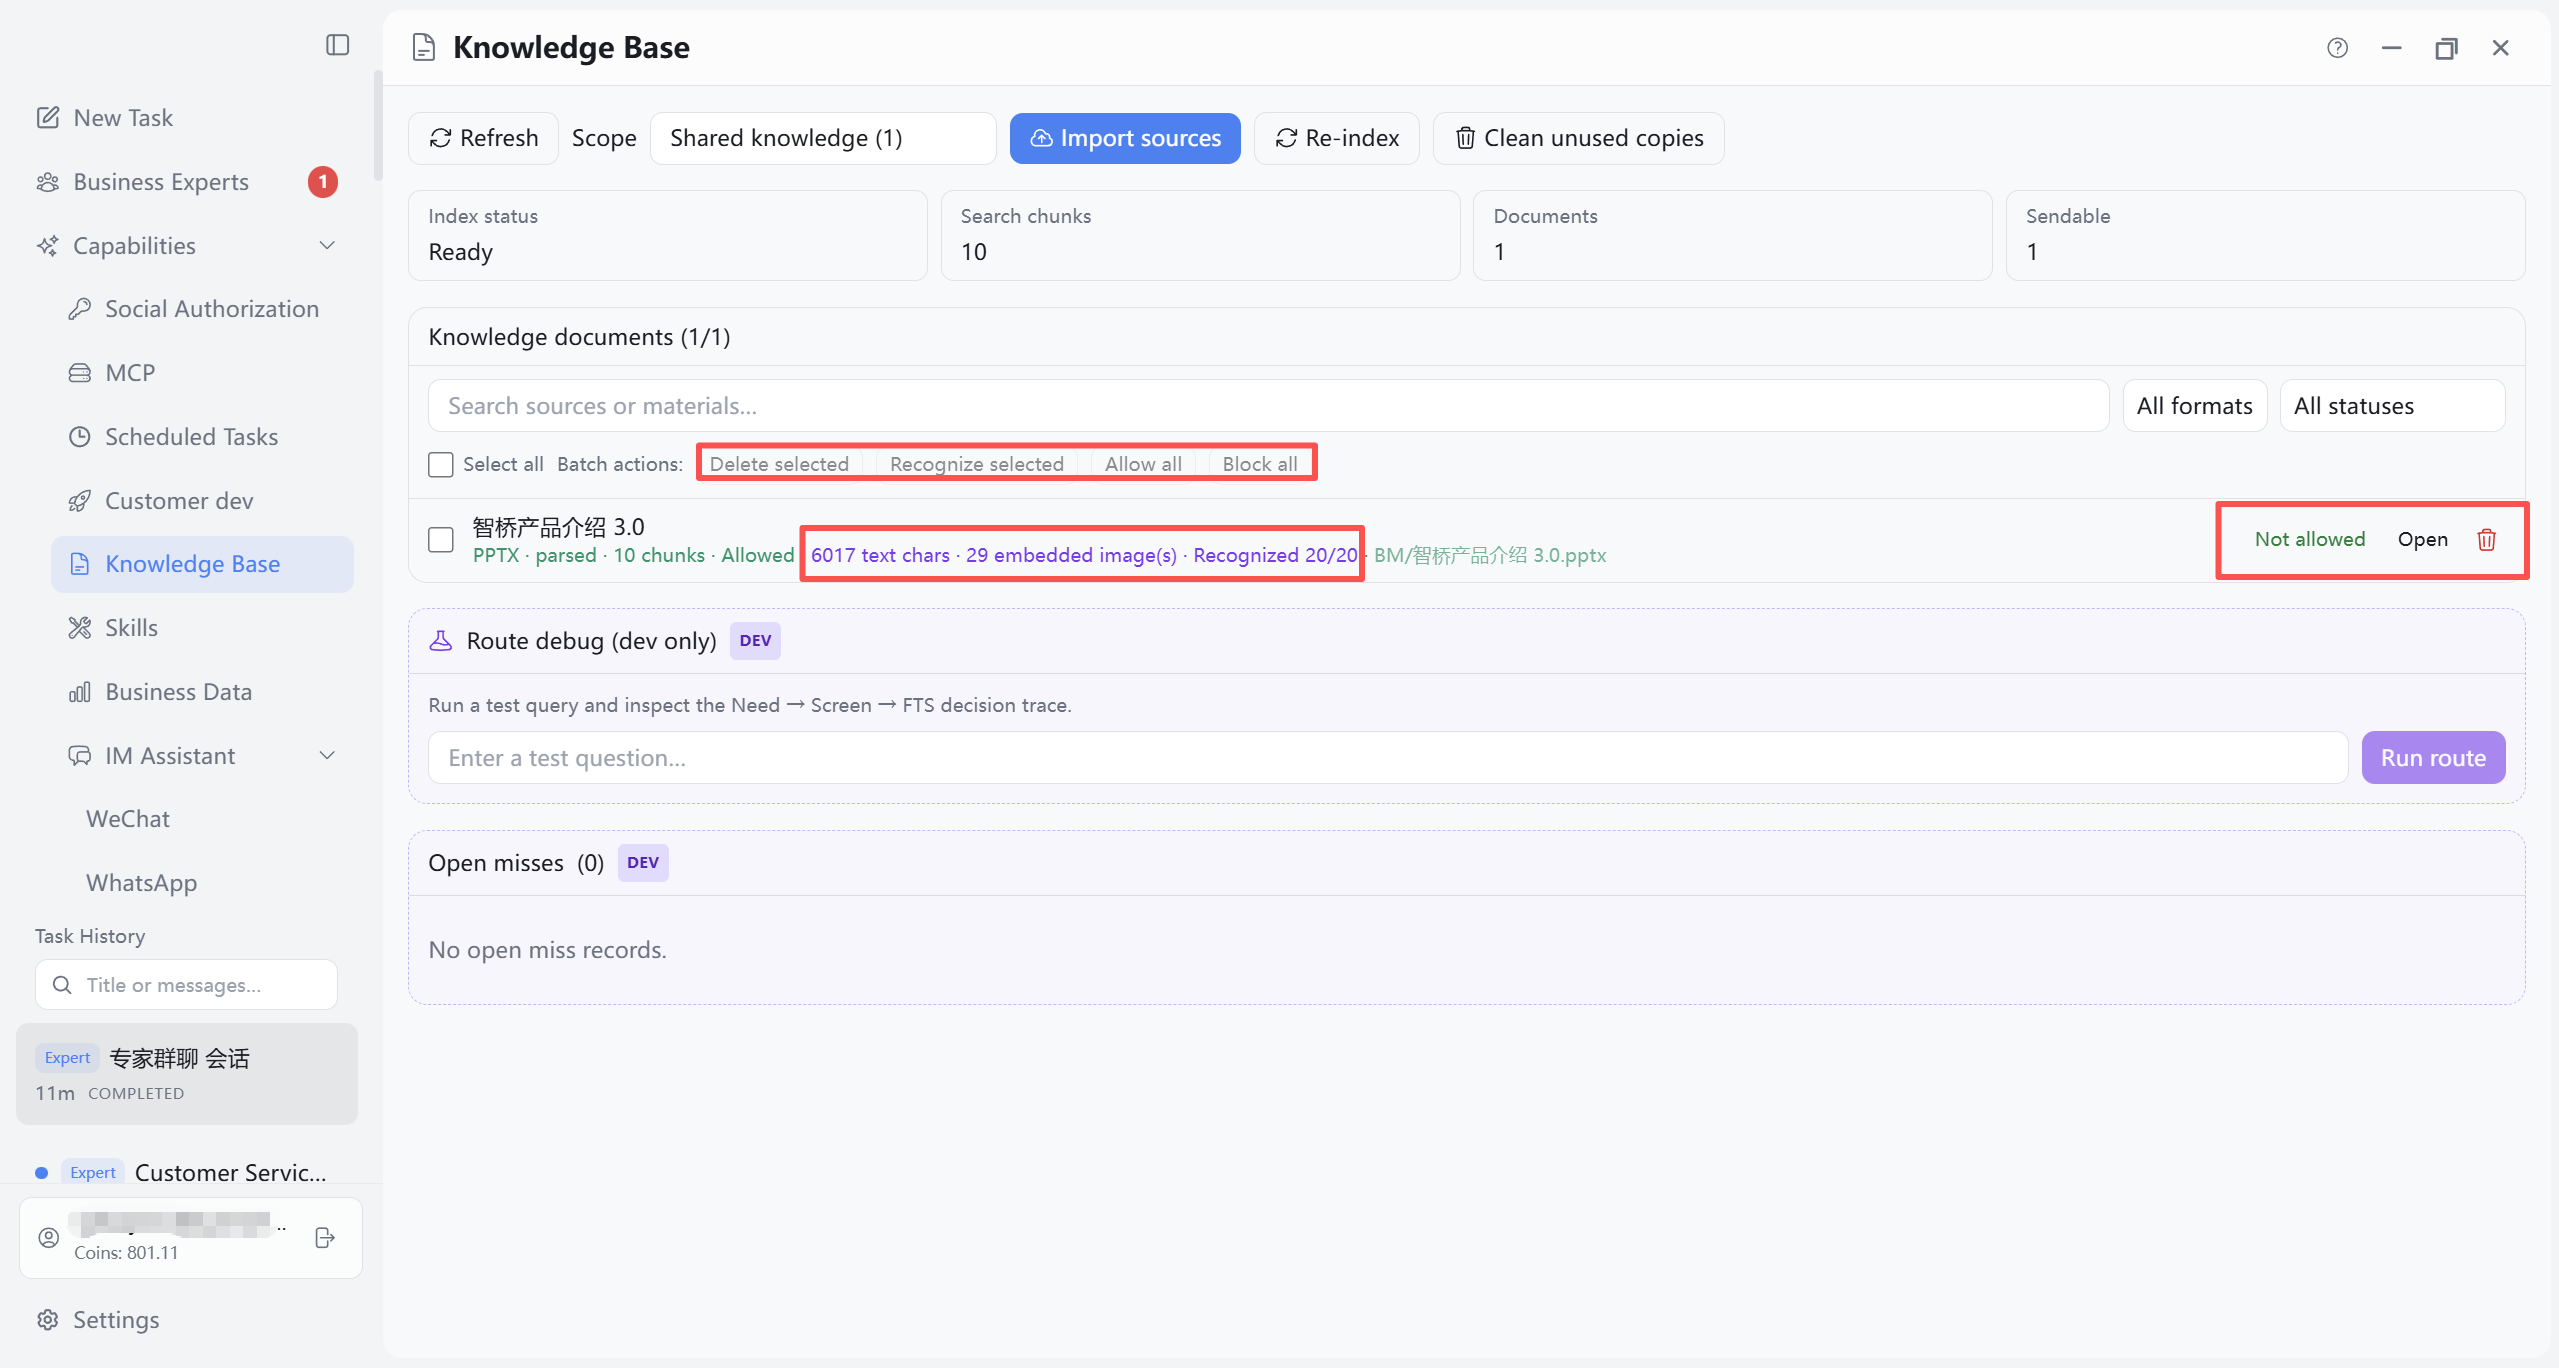
- Each row shows format and parse status (e.g. PPTX · parsed), search fragment count, body word count, image count, pending image recognition, file path, etc.; row actions include Recognize, Allow/Disallow, Open, delete (Figure 8-03).
8.4 Batch Actions and Send Policy
After selecting one or more rows, a batch actions bar appears (grayed when nothing selected):
- Select all / Batch delete
- Batch recognize (for pending images, etc.)
- Batch allow / Batch disallow / Set to auto: Control whether materials are used as attachments or for outbound send in conversation (Allow, Disallow, Auto).
Row-level Recognize and Allow/Disallow match batch actions with a smaller scope. “Sendable” does not mean automatic email or message send—only the policy boundary when the AI assistant references materials in tasks; actual outreach still follows manual confirmation in Customer Development and similar modules.
8.5 Relationship to Experts and Tasks
- In Tasks or expert conversation, the AI assistant uses built-in knowledge base search to decide when to consult materials; matched fragments inform answers.
- Shared knowledge base is visible to all tasks; expert-specific scopes match preferentially when that expert is involved.
- If the AI assistant says “no materials” or answers generically, check: correct working directory, current scope shows Ready (Figure 8-01 status cards), documents indexed or images recognized (Figure 8-03).
- “Manage knowledge base” on Business Expert cards maintains materials for that expert scenario—use with Chapter 6 experts.
9. Social Authorization Page
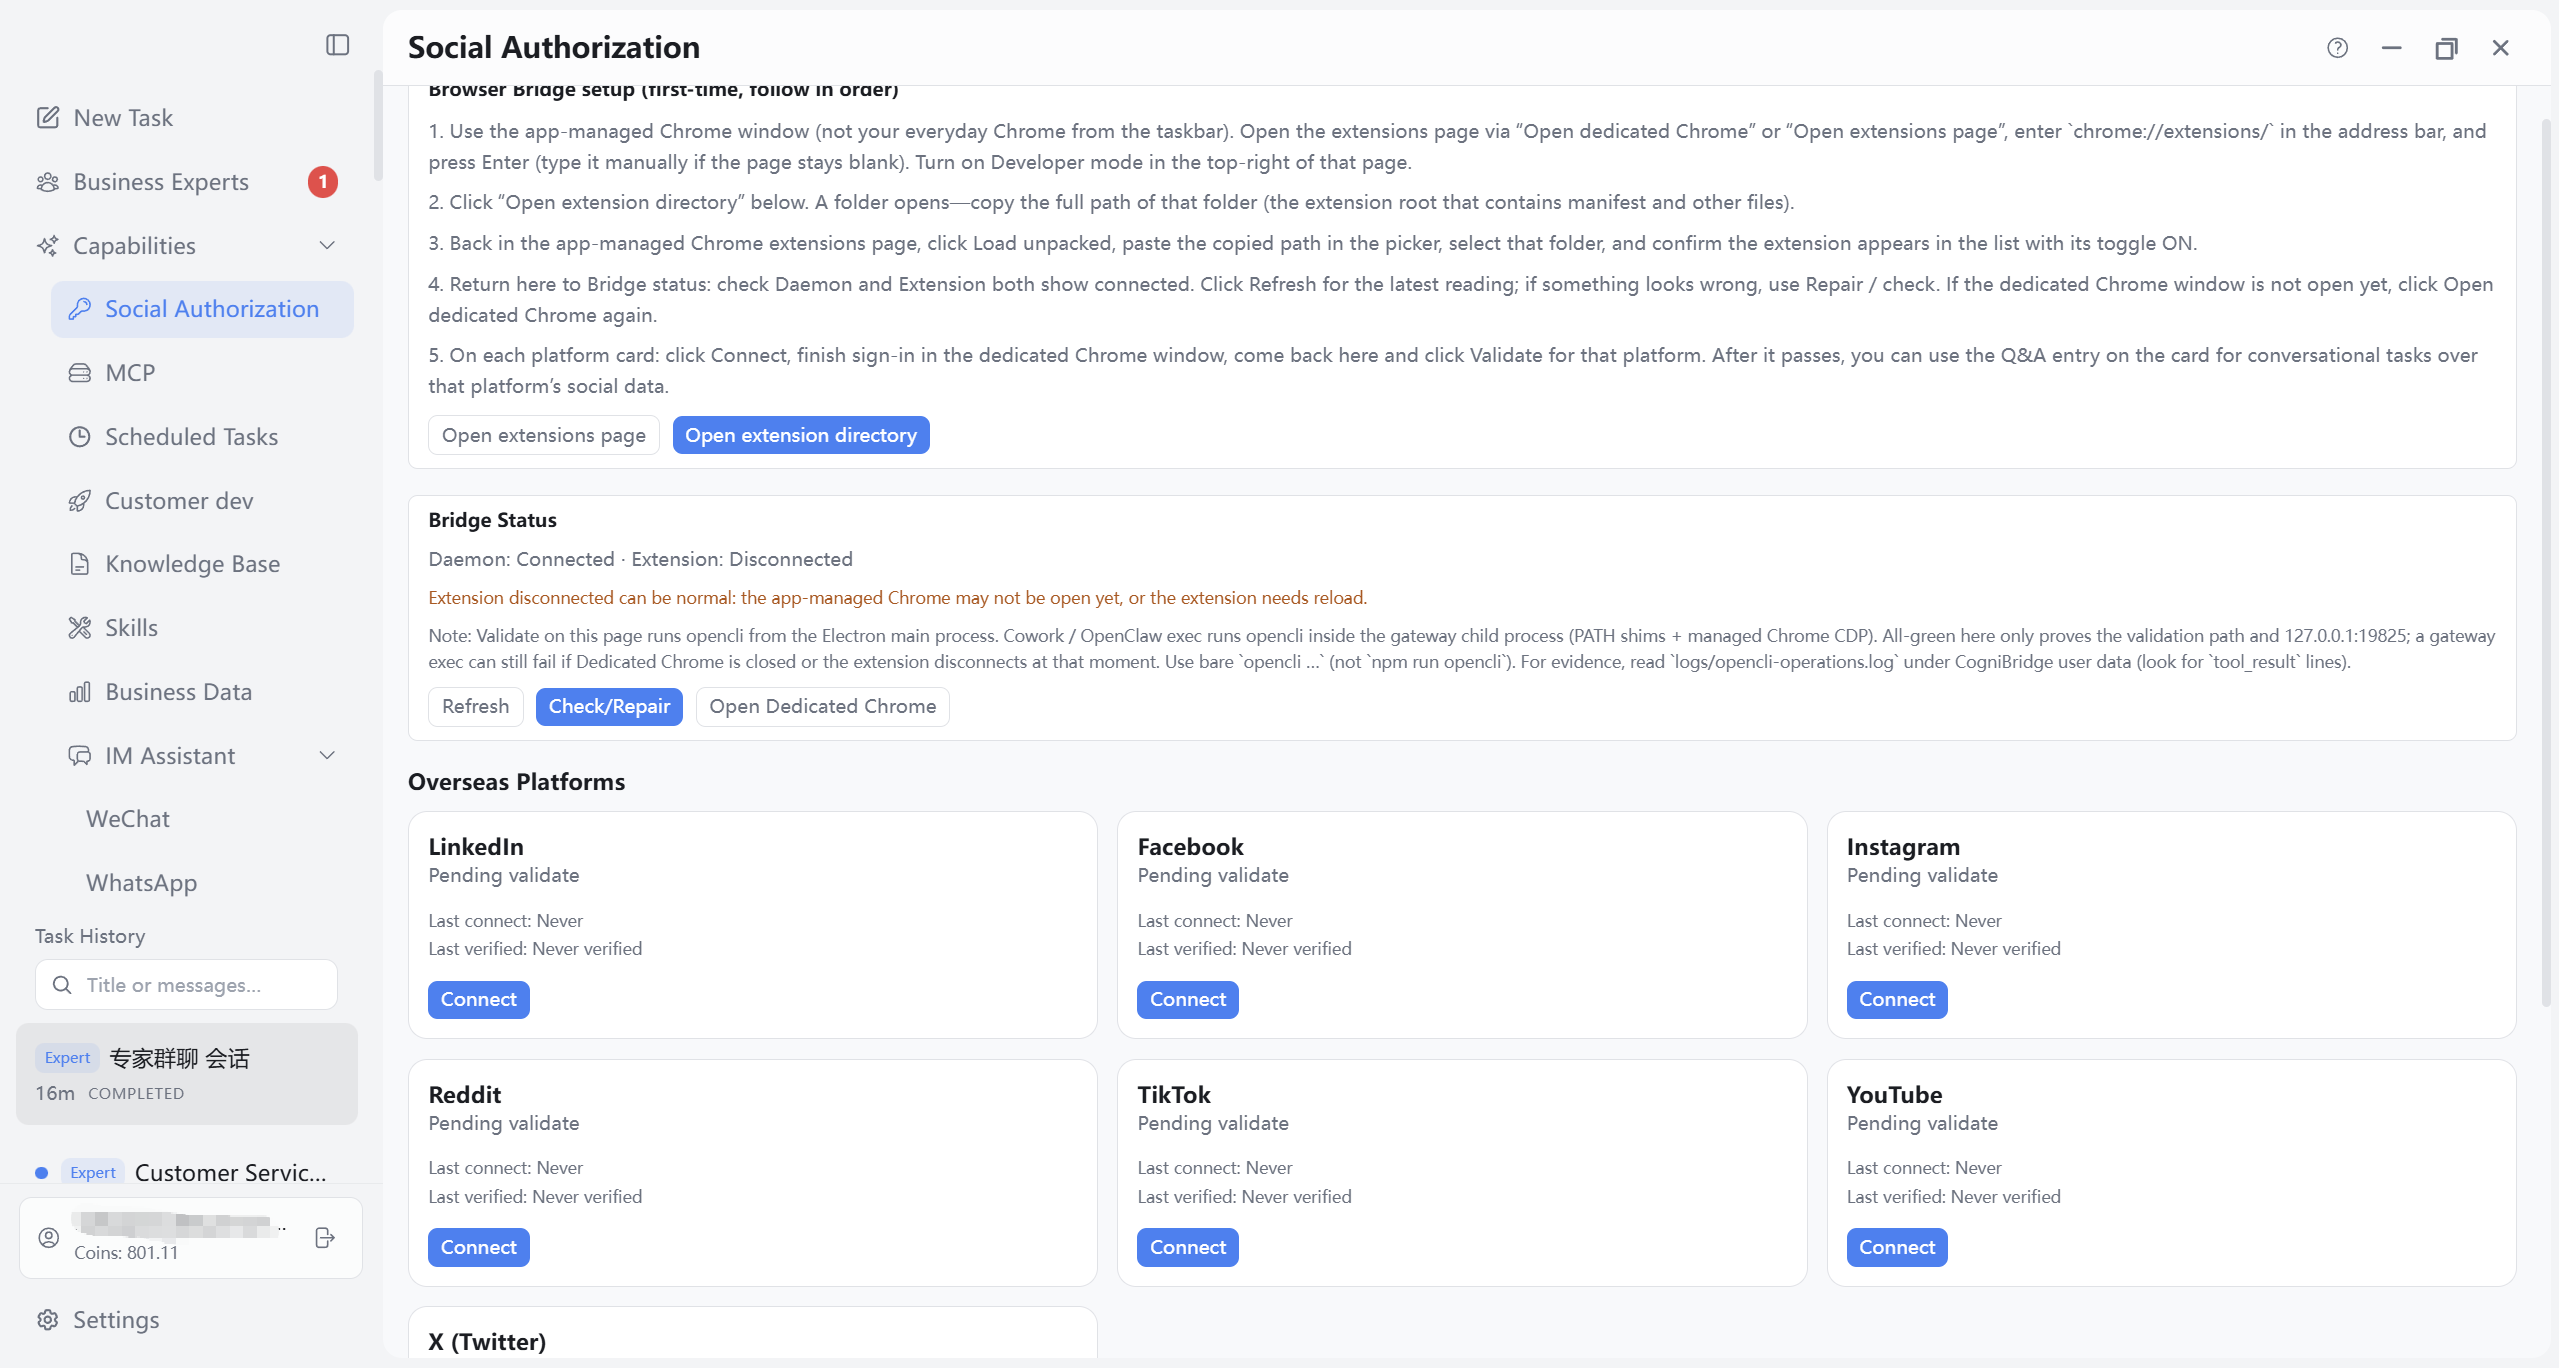
The Social Authorization page ties together local browser bridge (background bridge service + browser extension in dedicated Chrome) and signed-in state on each social platform. The bridge must be ready before the client can complete login and validate sessions in a controlled window; each platform must show Connected before tasks can reliably use that platform. First visit may show a step-by-step guide (extension install and verification); you can skip per Chapter 2 and follow this chapter. One overview screenshot labels main areas; detailed steps are in the text below.
9.1 Page Structure: Bridge First, Then Platforms
After opening “Social Authorization” in the left sidebar, check authorization bridge status at the top: Bridge service means the local background service is running; Extension means the browser extension in dedicated Chrome is connected to the client. When both show “Connected,” handle platform cards below to avoid “Connect did nothing” false alarms.
Each platform card usually includes: platform name, connection/verification status, Connect (launch dedicated Chrome and platform login), Verify (check login validity back in the client), and when connected and supported, Q&A. Some platforms have extra notes or switches (UI may vary).
9.2 First Use: Enable Browser Extension (matches in-client guide)
When the client expands “Browser extension enablement guide (recommended order on first use)” or the bridge area shows extension not connected while bridge service is running, do not install the extension in everyday Chrome from the taskbar—use this app’s dedicated Chrome (separate login state from your daily browser). Steps match the in-app guide:
- Open extensions management and enable Developer mode: In dedicated Chrome, open the extensions management page (via “Open dedicated Chrome,” “Open extensions page,” etc.). Turn on “Developer mode” top-right on the extensions page.
- Locate extension root folder: On this page click “Open extension folder”; Explorer opens the built-in extension folder. Copy the full path (the folder that contains the extension manifest—root level).
- Load unpacked extension: Back in dedicated Chrome extensions page → “Load unpacked” → paste/select that folder → confirm the browser extension appears with switch on.
- Verify bridge on this page: In authorization bridge status, check bridge service and extension both Connected. After install/reload, click “Refresh status”; if still wrong, try “One-click check/fix”, keep the app open, and reopen dedicated Chrome.
- Then connect and verify platforms: On the target platform card click “Connect”, complete site login only in dedicated Chrome; back on this page click “Verify” until Connected. If “Q&A” appears, you can start conversation tasks with that platform’s context.
9.3 Daily Use: Extension Already Ready
After completing section 9.2 with bridge service = Connected and extension = Connected long term, you usually do not repeat “Load unpacked” or reinstall. To authorize a new platform or re-login:
- Open Social Authorization; after reboot, click “Refresh status” to confirm bridge still Connected (extension not connected sometimes means dedicated Chrome is not open—not necessarily a fault).
- If dedicated Chrome did not open and login needs a browser, click “Open dedicated Chrome” so login stays in the controlled window.
- On the target platform card click “Connect”, complete login or 2FA in the same dedicated window—do not switch to everyday Chrome or Verify often fails.
- After login keep the window or return here per prompts, then click “Verify”; the card should show Connected. Auto-verify success may appear if the client detects login in the window (wording may vary).
- To confirm an old connection: click “Verify” only—no need to Connect again.
- For social-data conversation on connected supported platforms, use “Q&A” on the card.
9.4 Multiple Platforms and Re-authorization
- One platform at a time: connect through verify before the next, to avoid overlapping login windows.
- After each platform succeeds, save the status screen; when all are done, verify each once more.
- If a platform offers “Not using for now,” checking it hides the entry; uncheck before Connect when needed (UI may vary).
9.5 Failure Triage Order (fixed sequence)
- Confirm login happened in dedicated Chrome opened by this app’s Connect, not everyday browser from the taskbar.
- Check authorization bridge status: bridge service/extension disconnected? Try refresh status → one-click check/fix → reopen dedicated Chrome.
- Keep the login browser window open, return here, click “Verify”; retry verify on timeout.
- If still failing: copy the full error text, screenshot this page and bridge status, record per 9.6, then contact your administrator.
9.6 Authorization Incident Record Format
- Platform name
- Operation time
- Exact error message
- Bridge status values (bridge service / extension)
- Whether login completed in dedicated Chrome
10. Business Data Page
The Business Data page centralizes business assets, customers, leads, opportunities, orders, mail, and dashboards. This chapter is organized by module: each module explains filters, refresh, Ask expert, and export-related capabilities. Business assets is the overview and conversation-completion page (Figure 10-31); toolbar “Export Excel” and filters for Customers, Leads, Opportunities, Mail list tabs are in Figure 10-03; the Dashboard tab does not offer toolbar “Export Excel,” but table views within modules may offer “Export CSV”—see 10.8.1. Ask expert navigation is Figure 10-12; button placement Figure 10-01; list tab main views Figure 10-02. Figures below use the numbered labels.
10.1 Overview: Overall Layout
Shows the overall frame of Business Data: top tab bar (Business assets, Customers, Leads, Opportunities, Orders, Mail, Dashboard, etc.), toolbar below (filter, refresh, Export Excel on list tabs, Ask expert, mail sync and compose, etc.), and central main content (card overview, lists, or dashboard). If empty, confirm Chapter 4 Tasks page working directory is selected and backend has data. Toolbar Ask expert matches list tabs; click to open the Tasks page with current tab and filters.
- Tabs: Switch datasets; Business assets and Dashboard use card/module layout; others are mostly lists.
- Toolbar: Tab-specific list operations and context actions.
- Main content: Data under current conditions; rows may offer view, edit, etc.
10.2 Overview: Main View per Module Tab
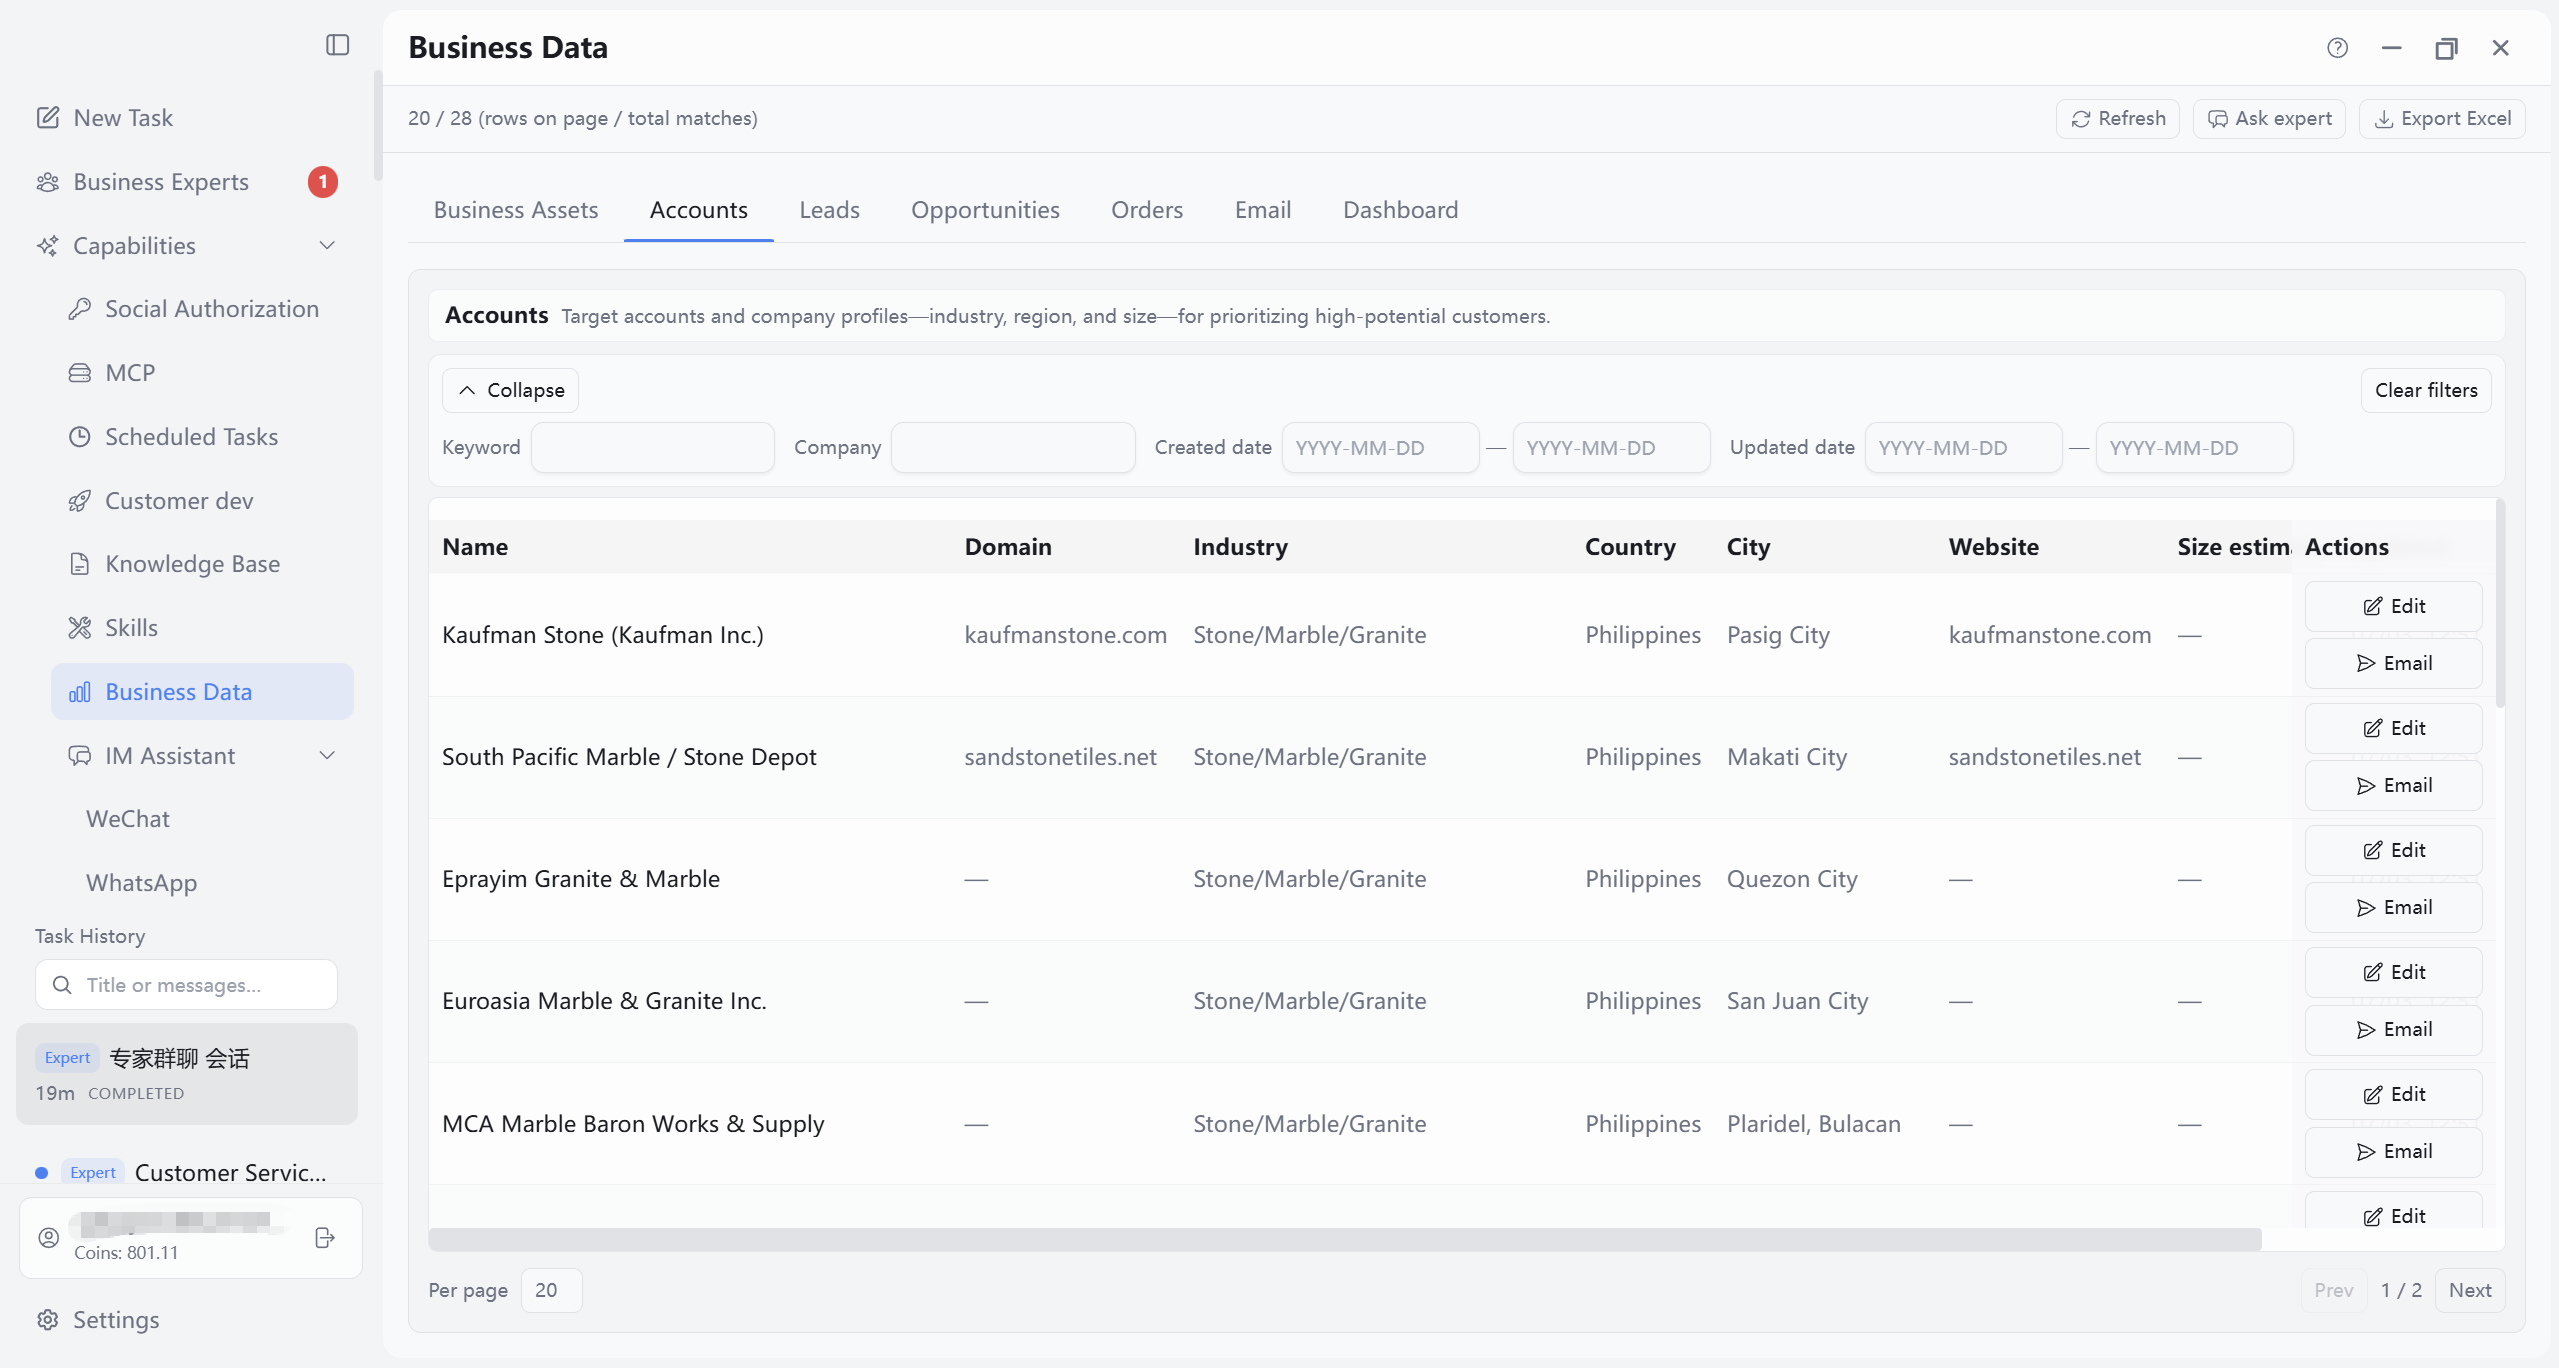
Five sub-images top to bottom show typical main views for five tabs; match each to the areas called out below.
- Sub-image 1 (Customers): Customer list and toolbar with filter, refresh, Export Excel, Ask expert.
- Sub-image 2 (Leads): Leads list and toolbar.
- Sub-image 3 (Opportunities): Opportunity pipeline list and toolbar.
- Sub-image 4 (Mail – Inbox): Inbox list and toolbar with Sync, Compose (single-module views also Figure 10-06, 10-08).
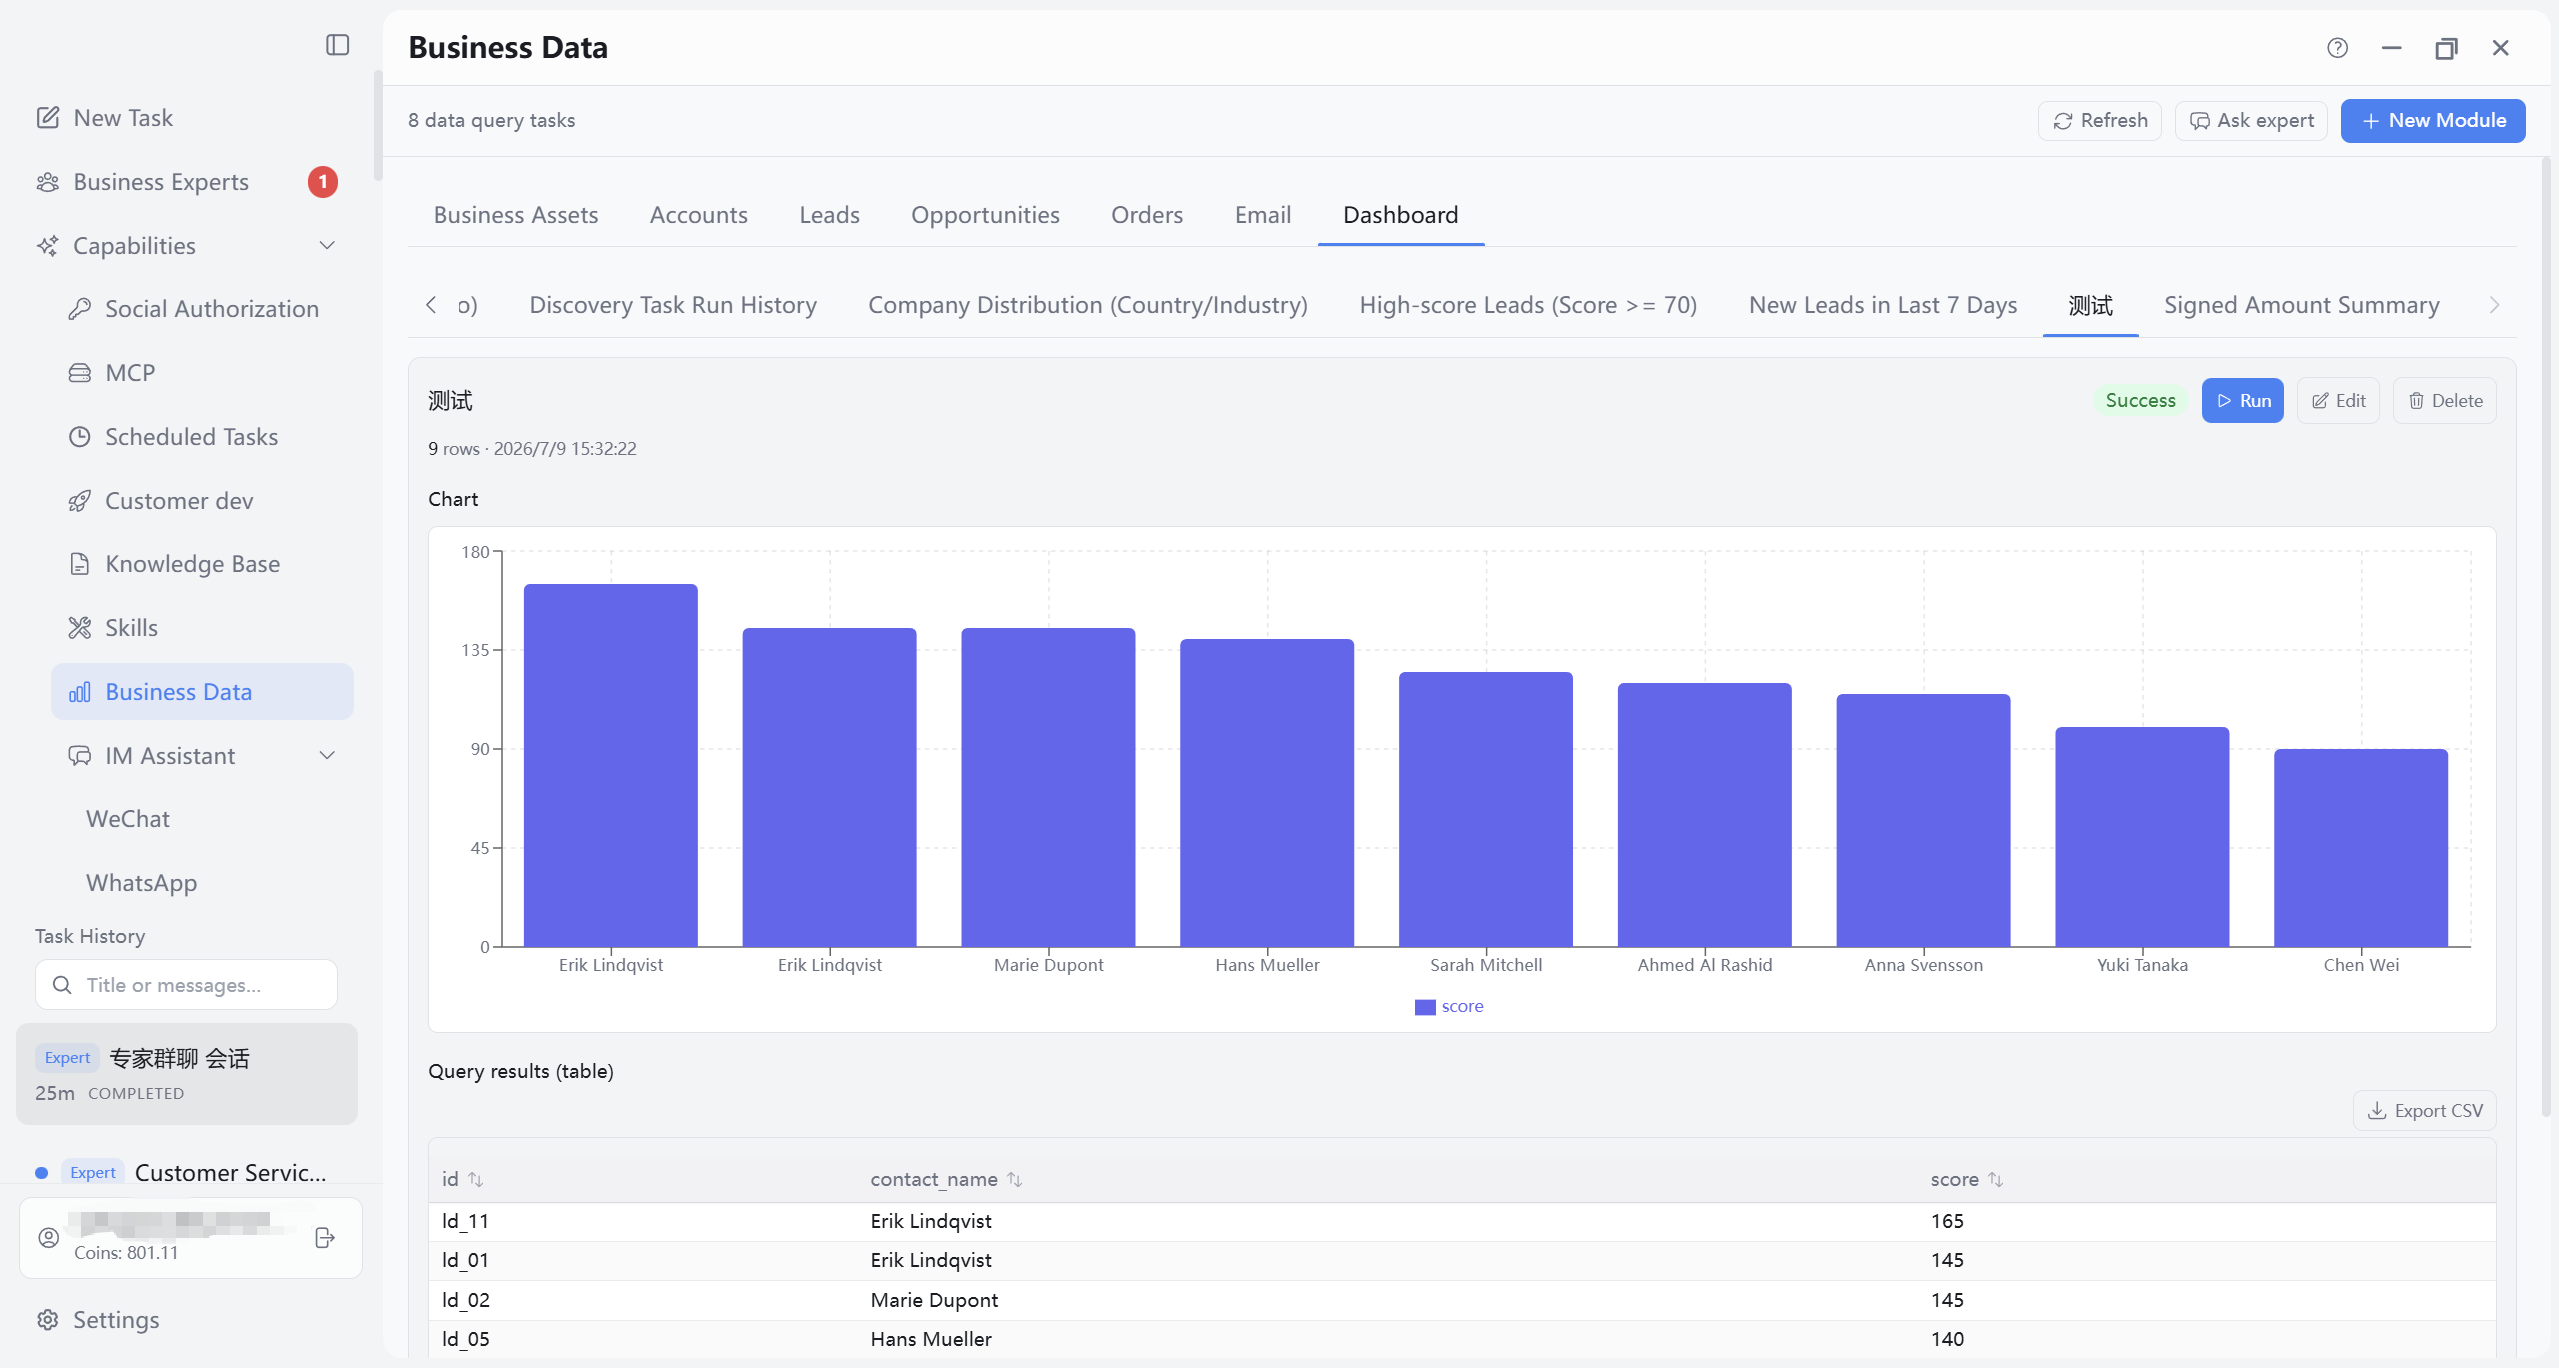
- Sub-image 5 (Dashboard): Dashboard main area with multiple modules; preset/custom modules Figure 10-13.
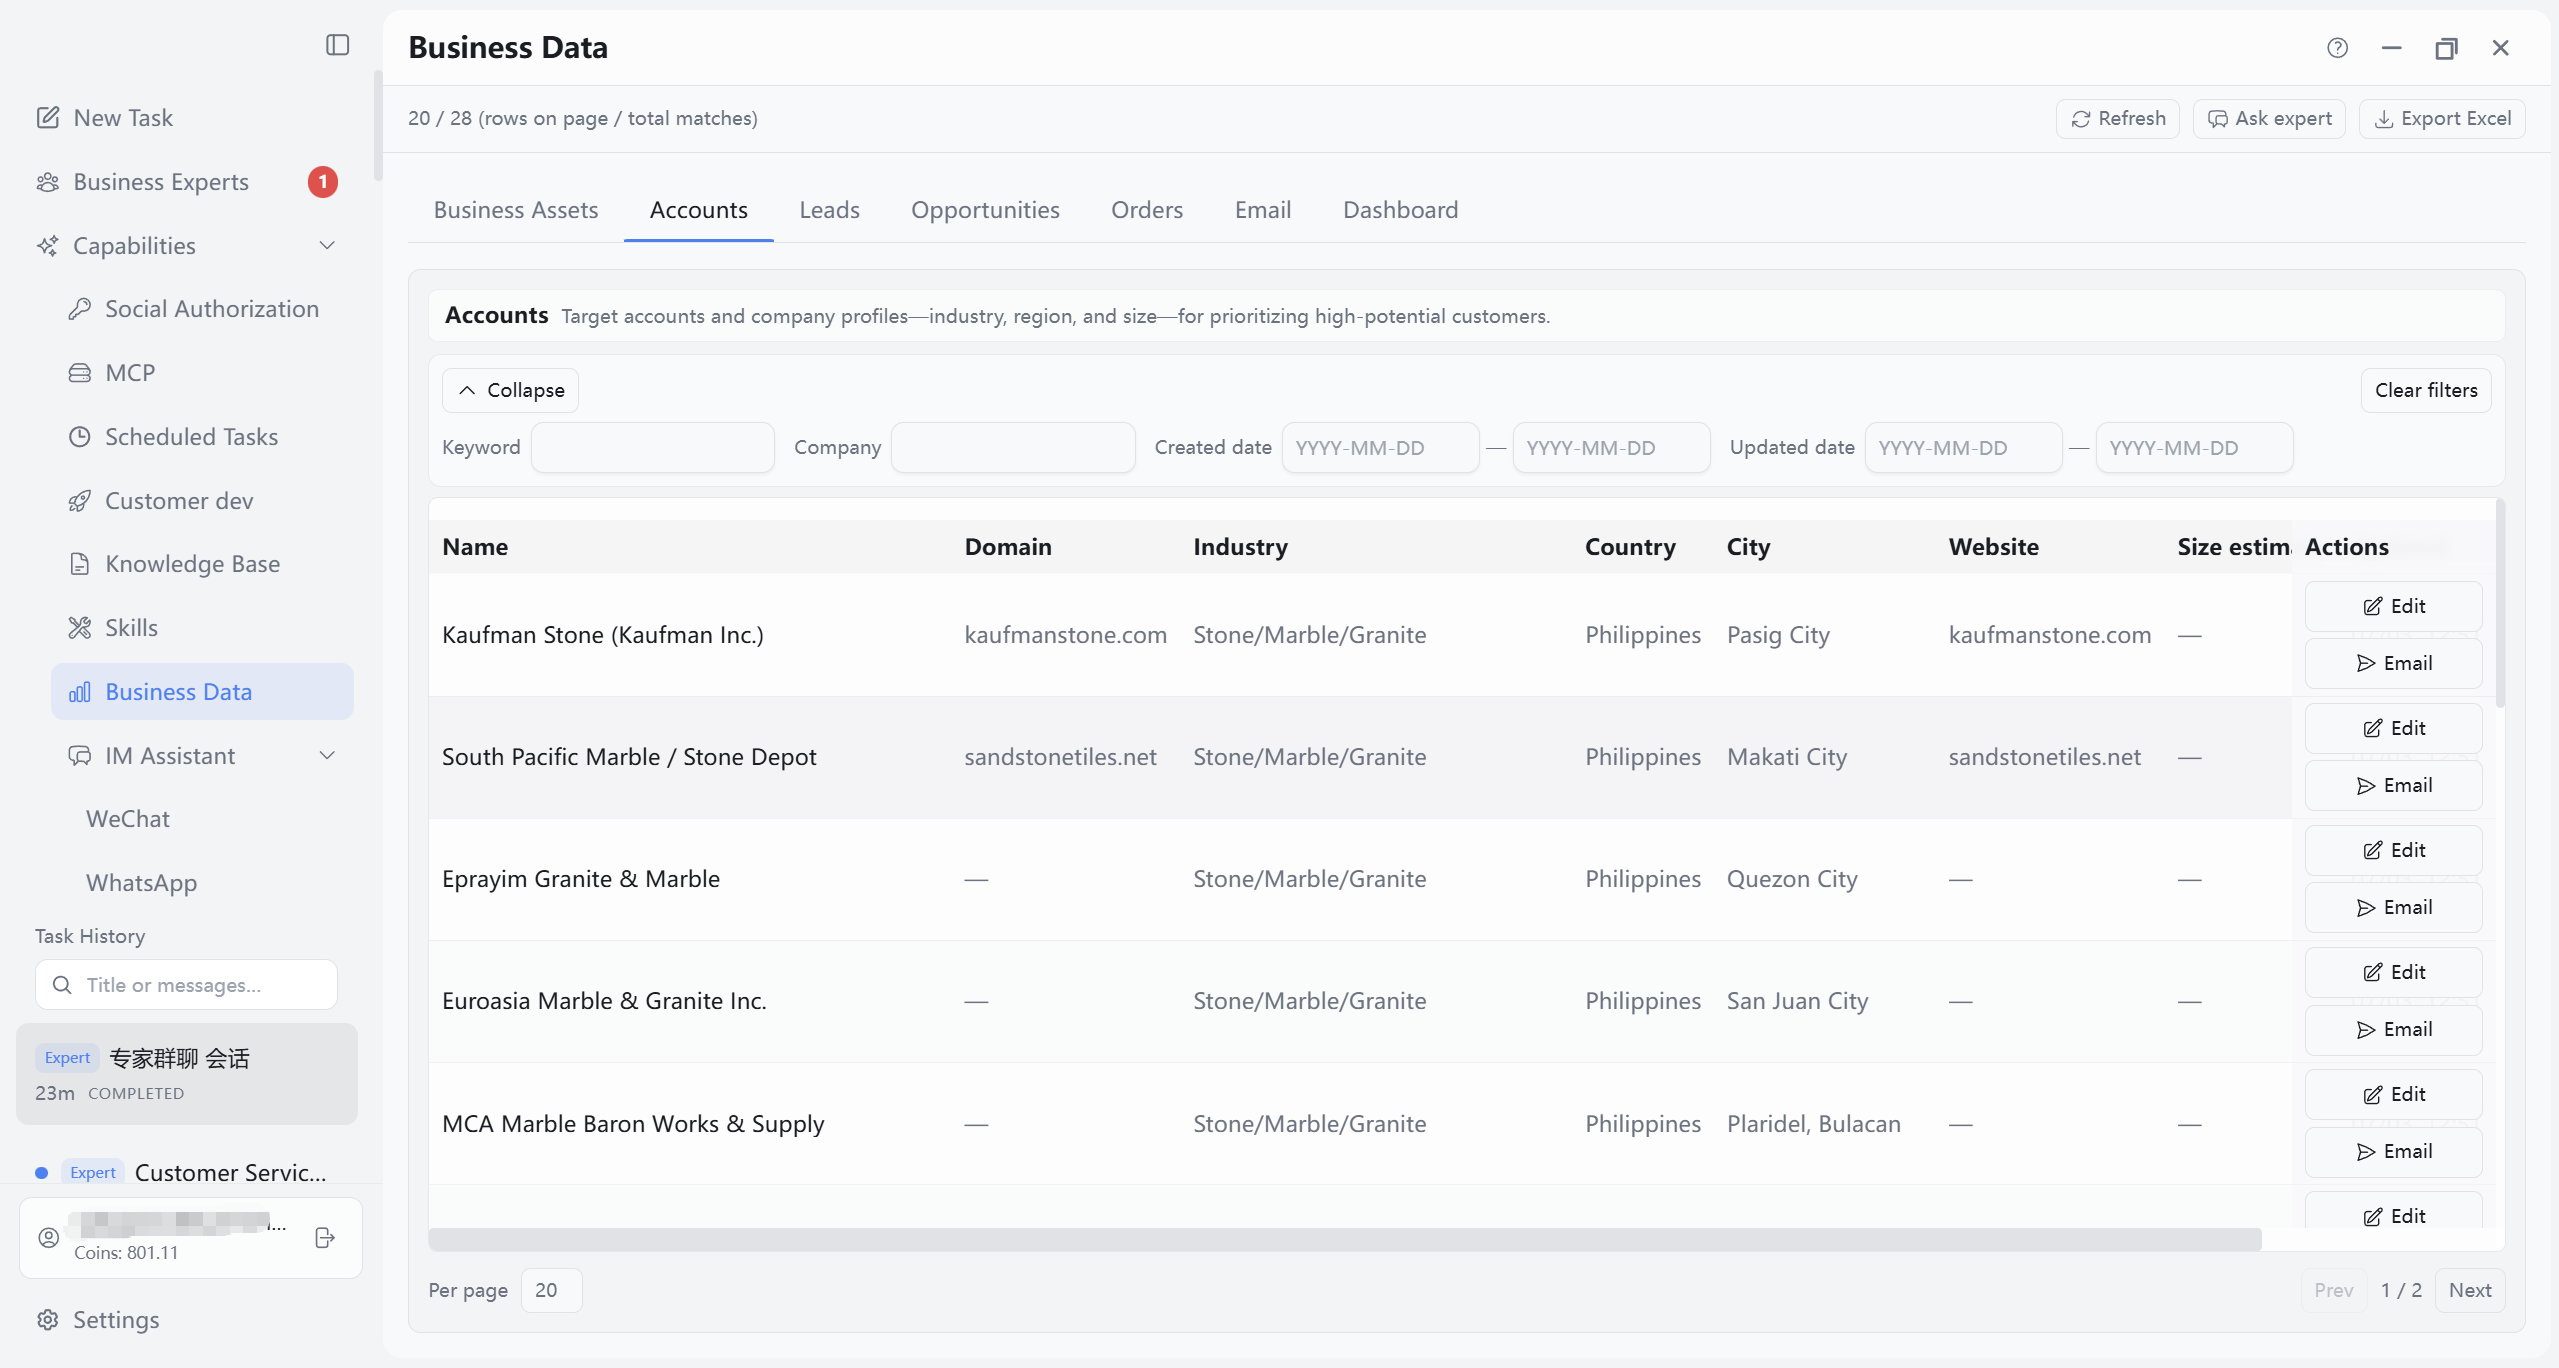
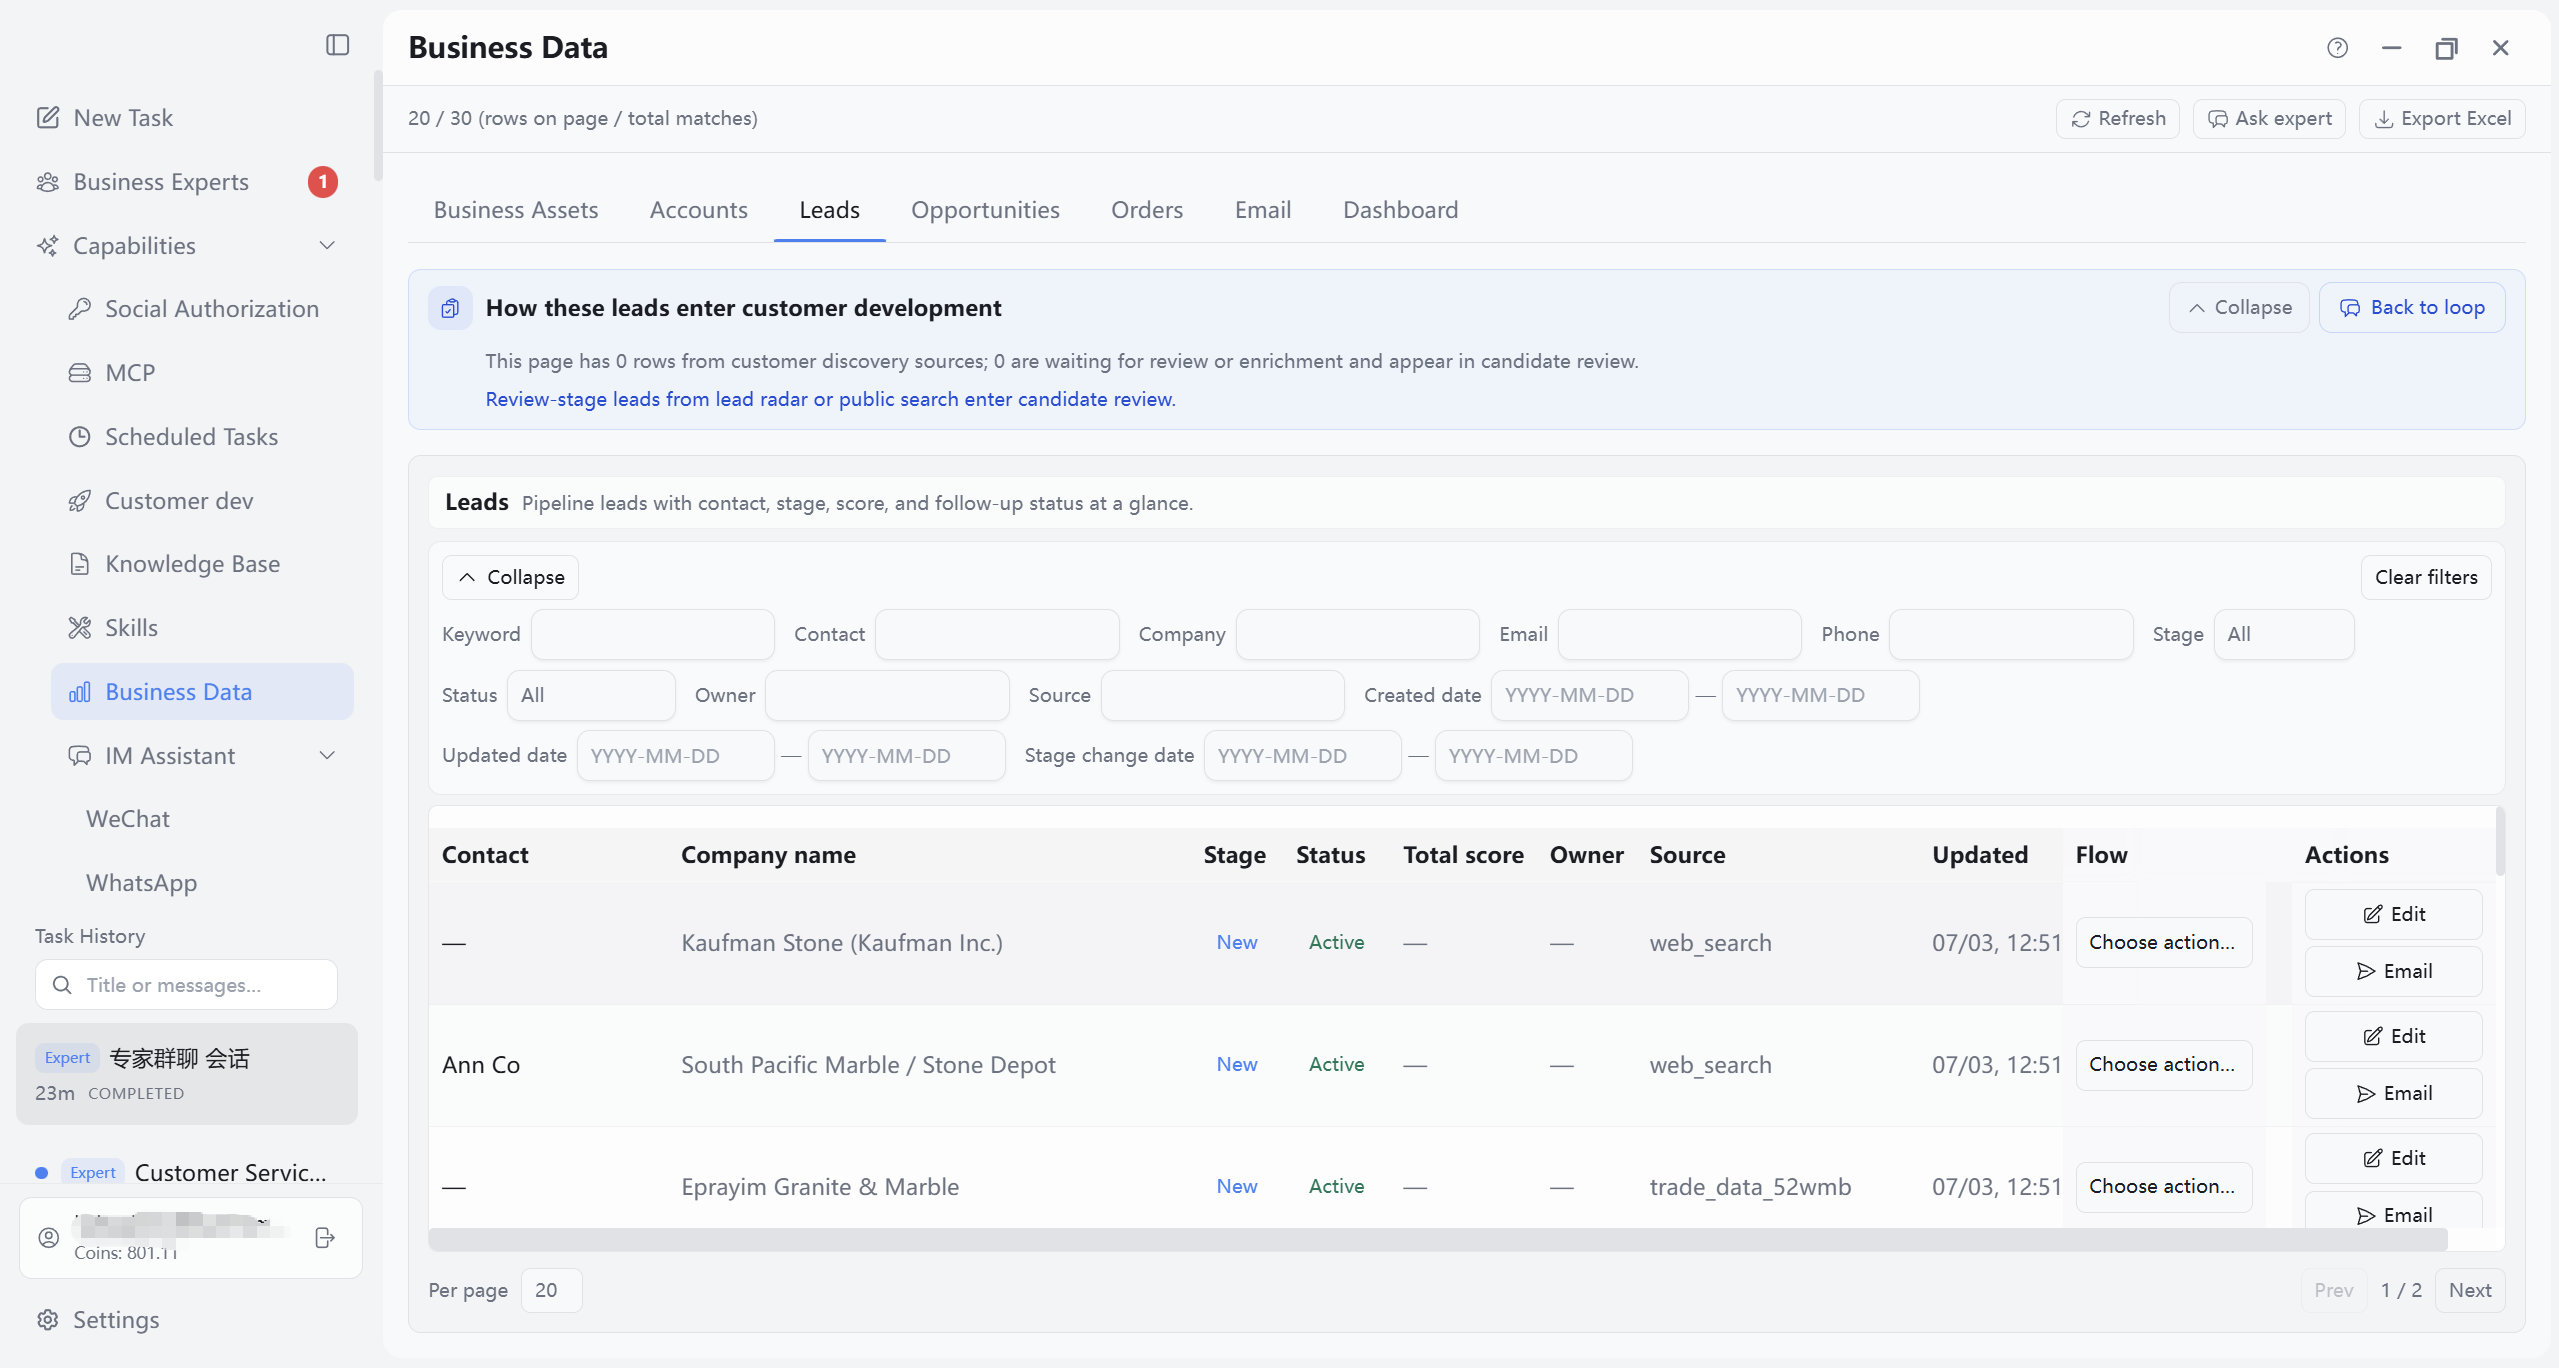
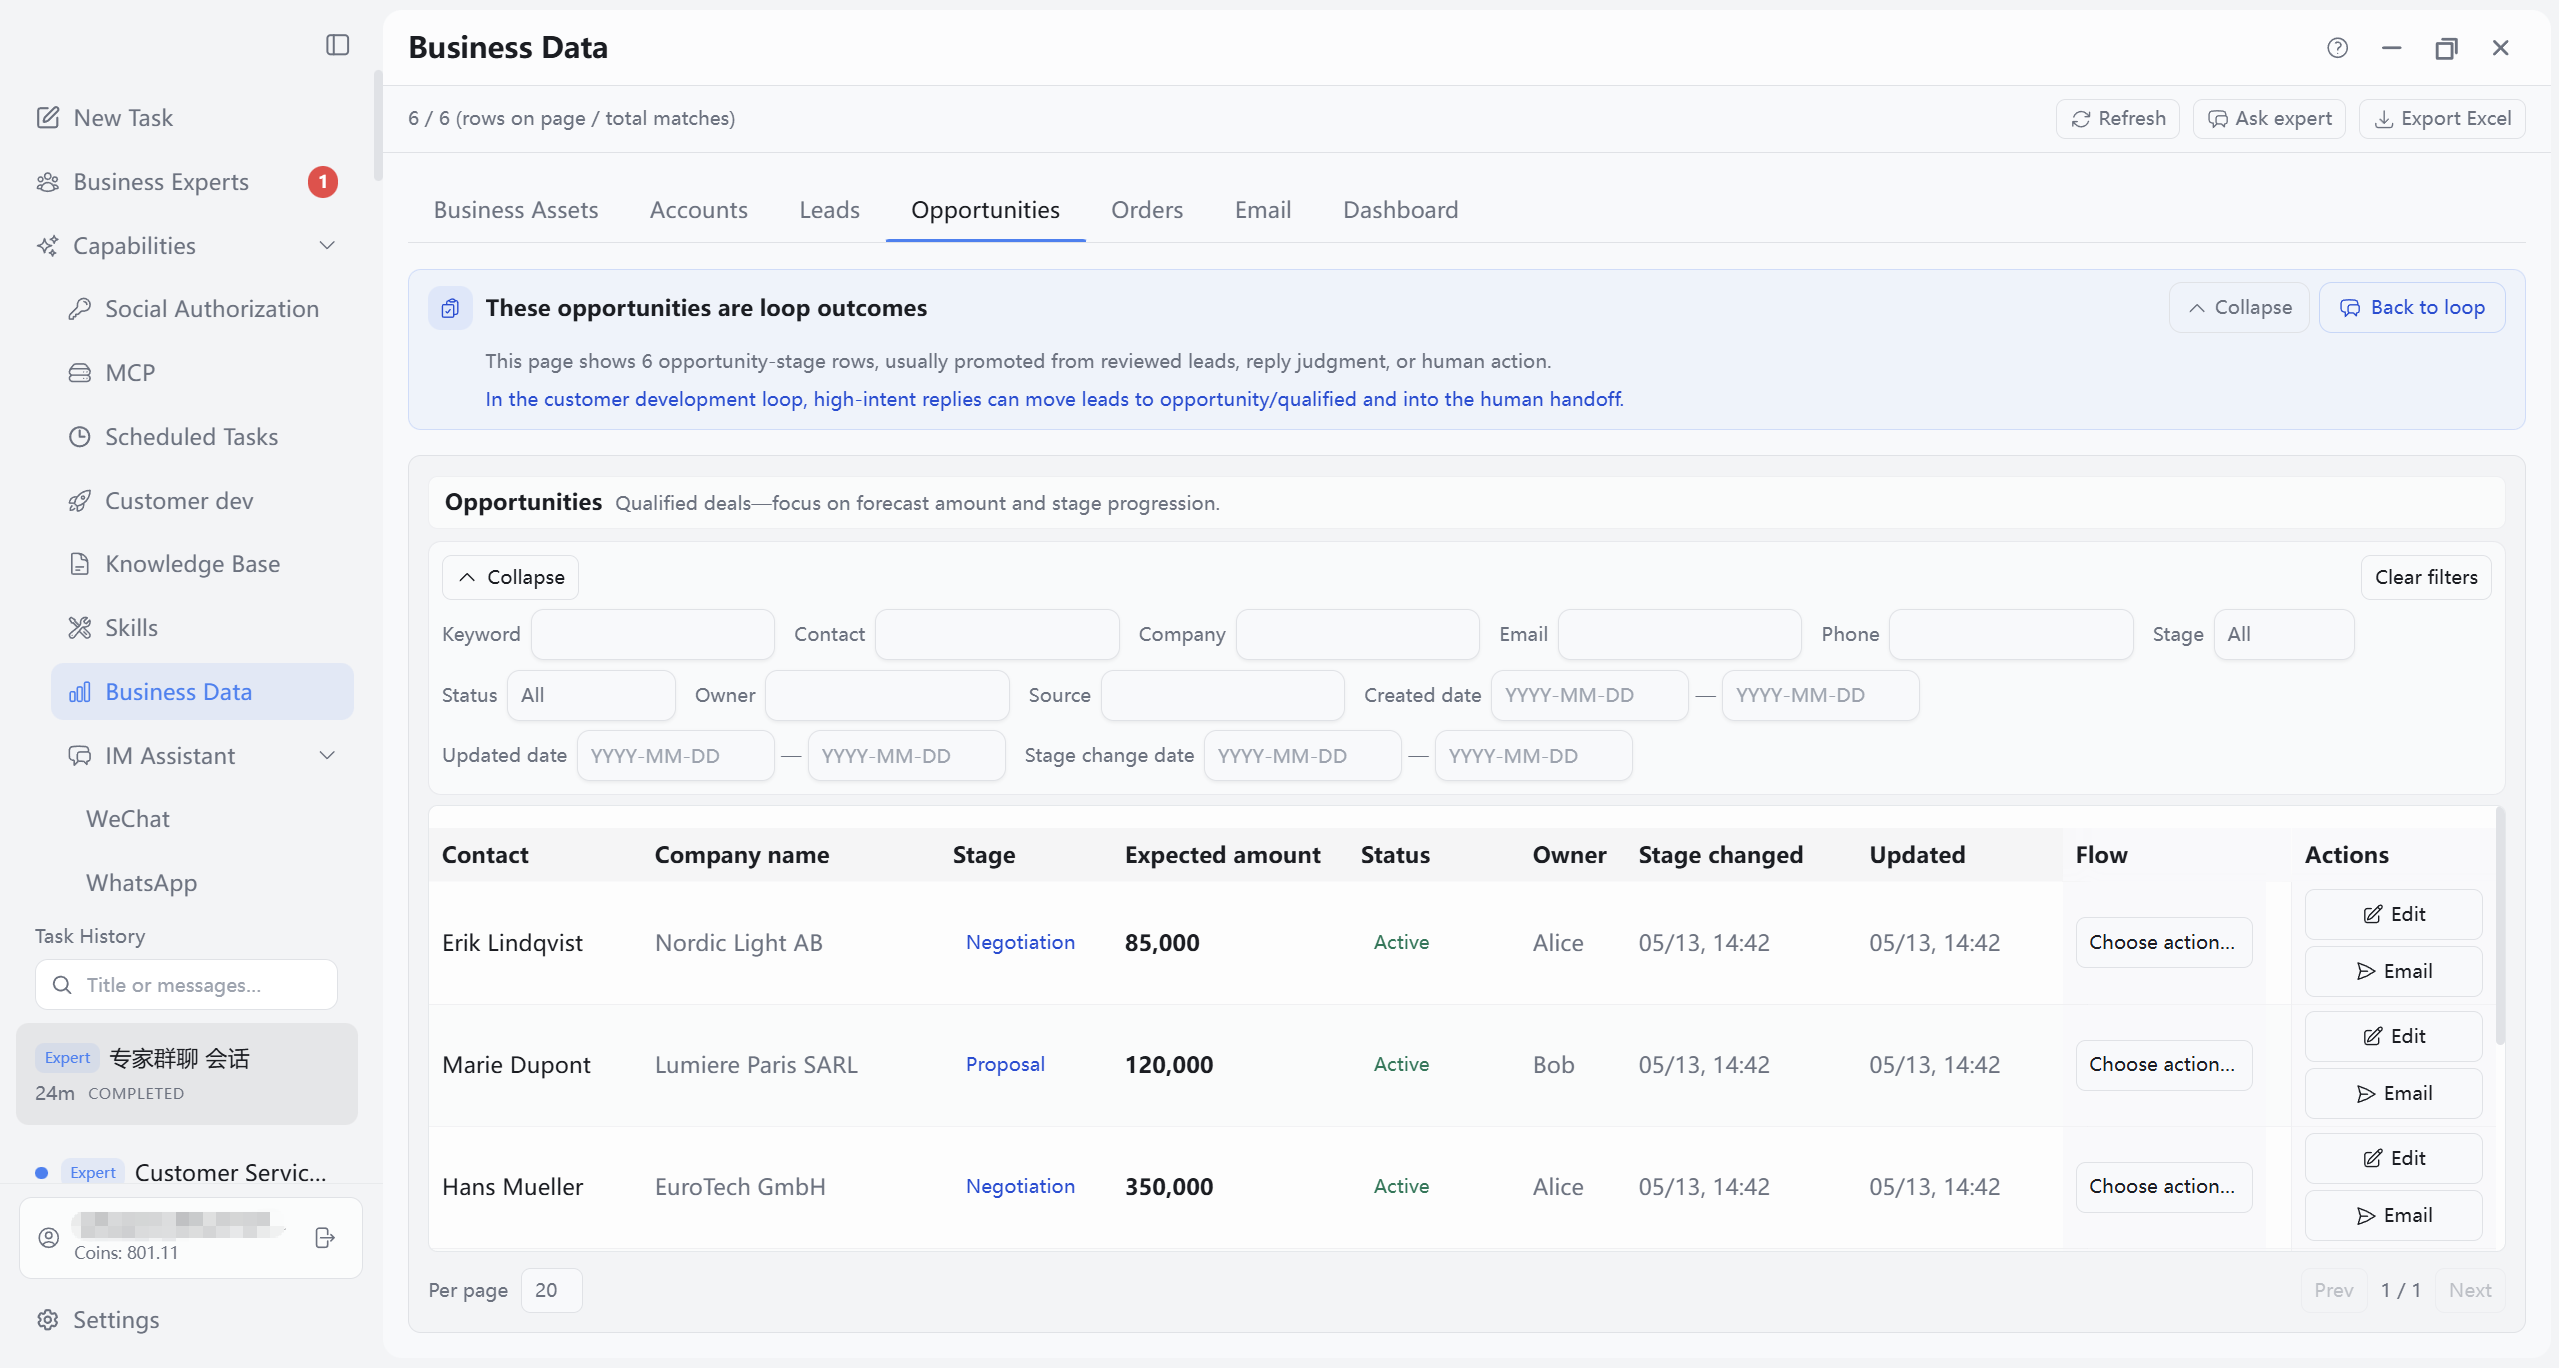
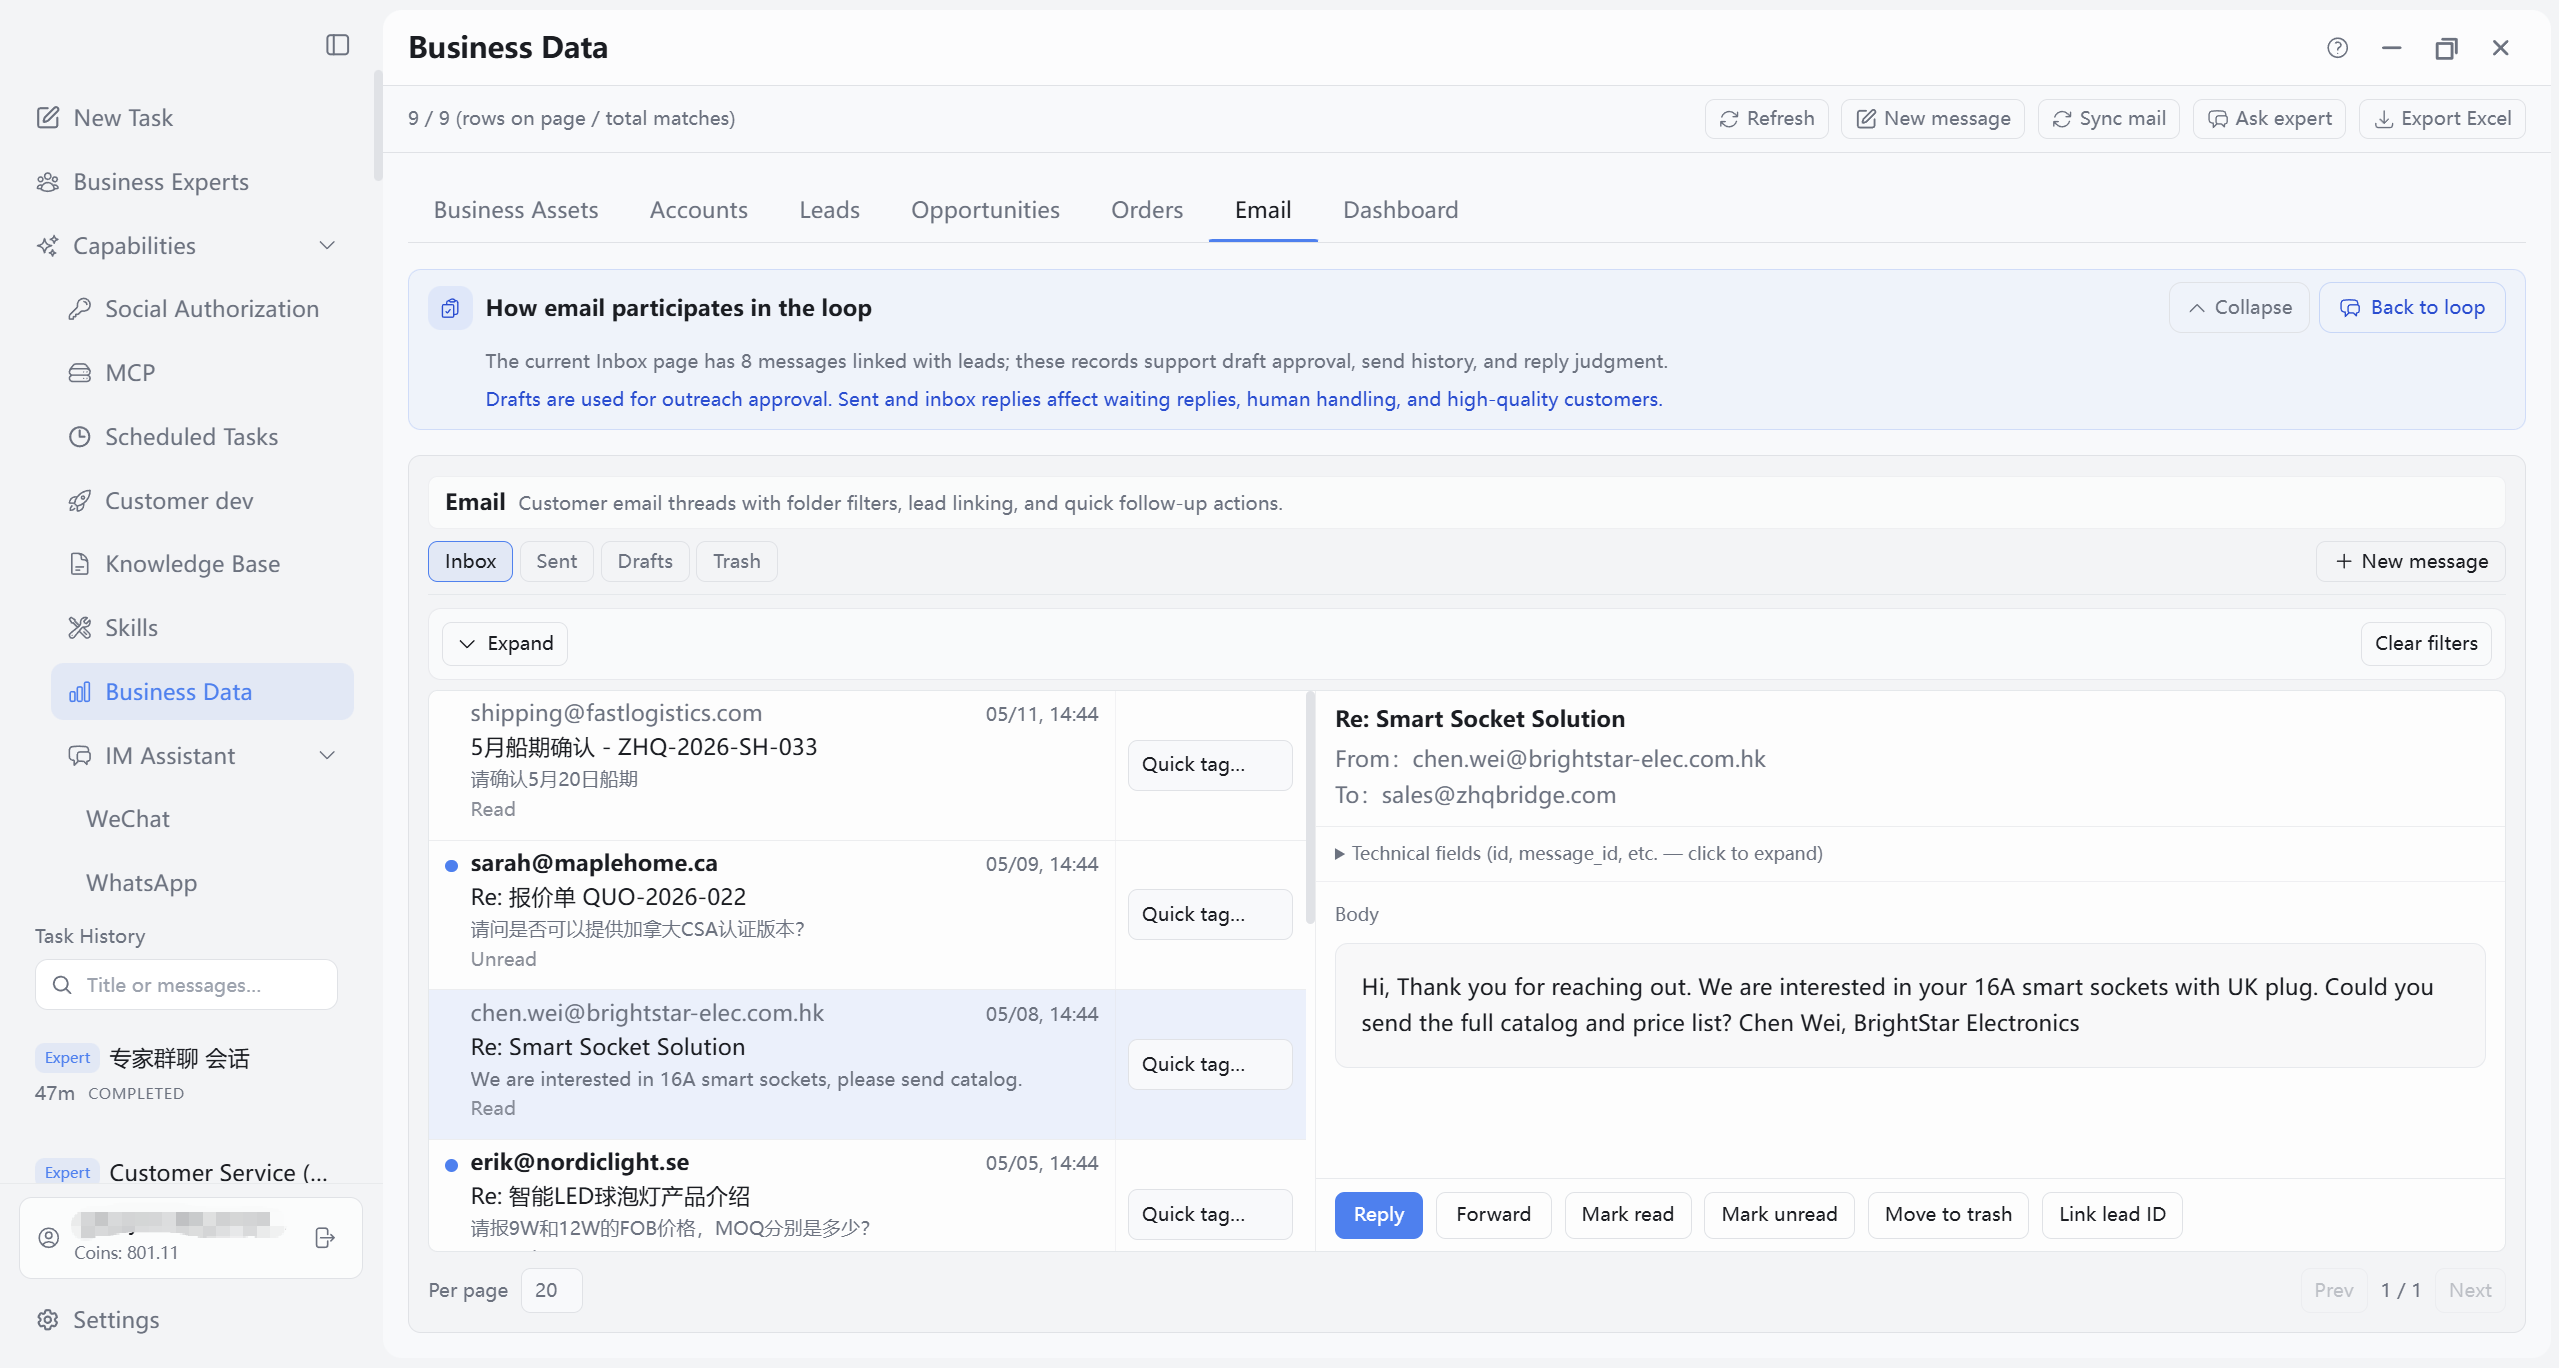
10.3 Business Assets Module
Click Business assets on the tab bar to view your company, product positioning, and customer development summary in the working-directory business library. Not a list page: no filter or Export Excel—mainly overview, conversation completion, jump to customer development loop. Gaps can be filled via conversation into the library; after save, this page and Chapter 7 customer development loop update together.
10.3.1 Business assets overview and top actions
Top of main area: Business assets overview card describing data source and purpose; common right-side actions:
- Complete company profile: Open Tasks page with company context to fill company name, industry, size, introduction, core strengths, etc.
- Complete product analysis: Open with product materials and latest product diagnosis to fill positioning completeness, pricing judgment, core value, target customer persona, etc.
- Open customer development loop: Jump to Chapter 7 workbench from positioning baseline or current blocker.
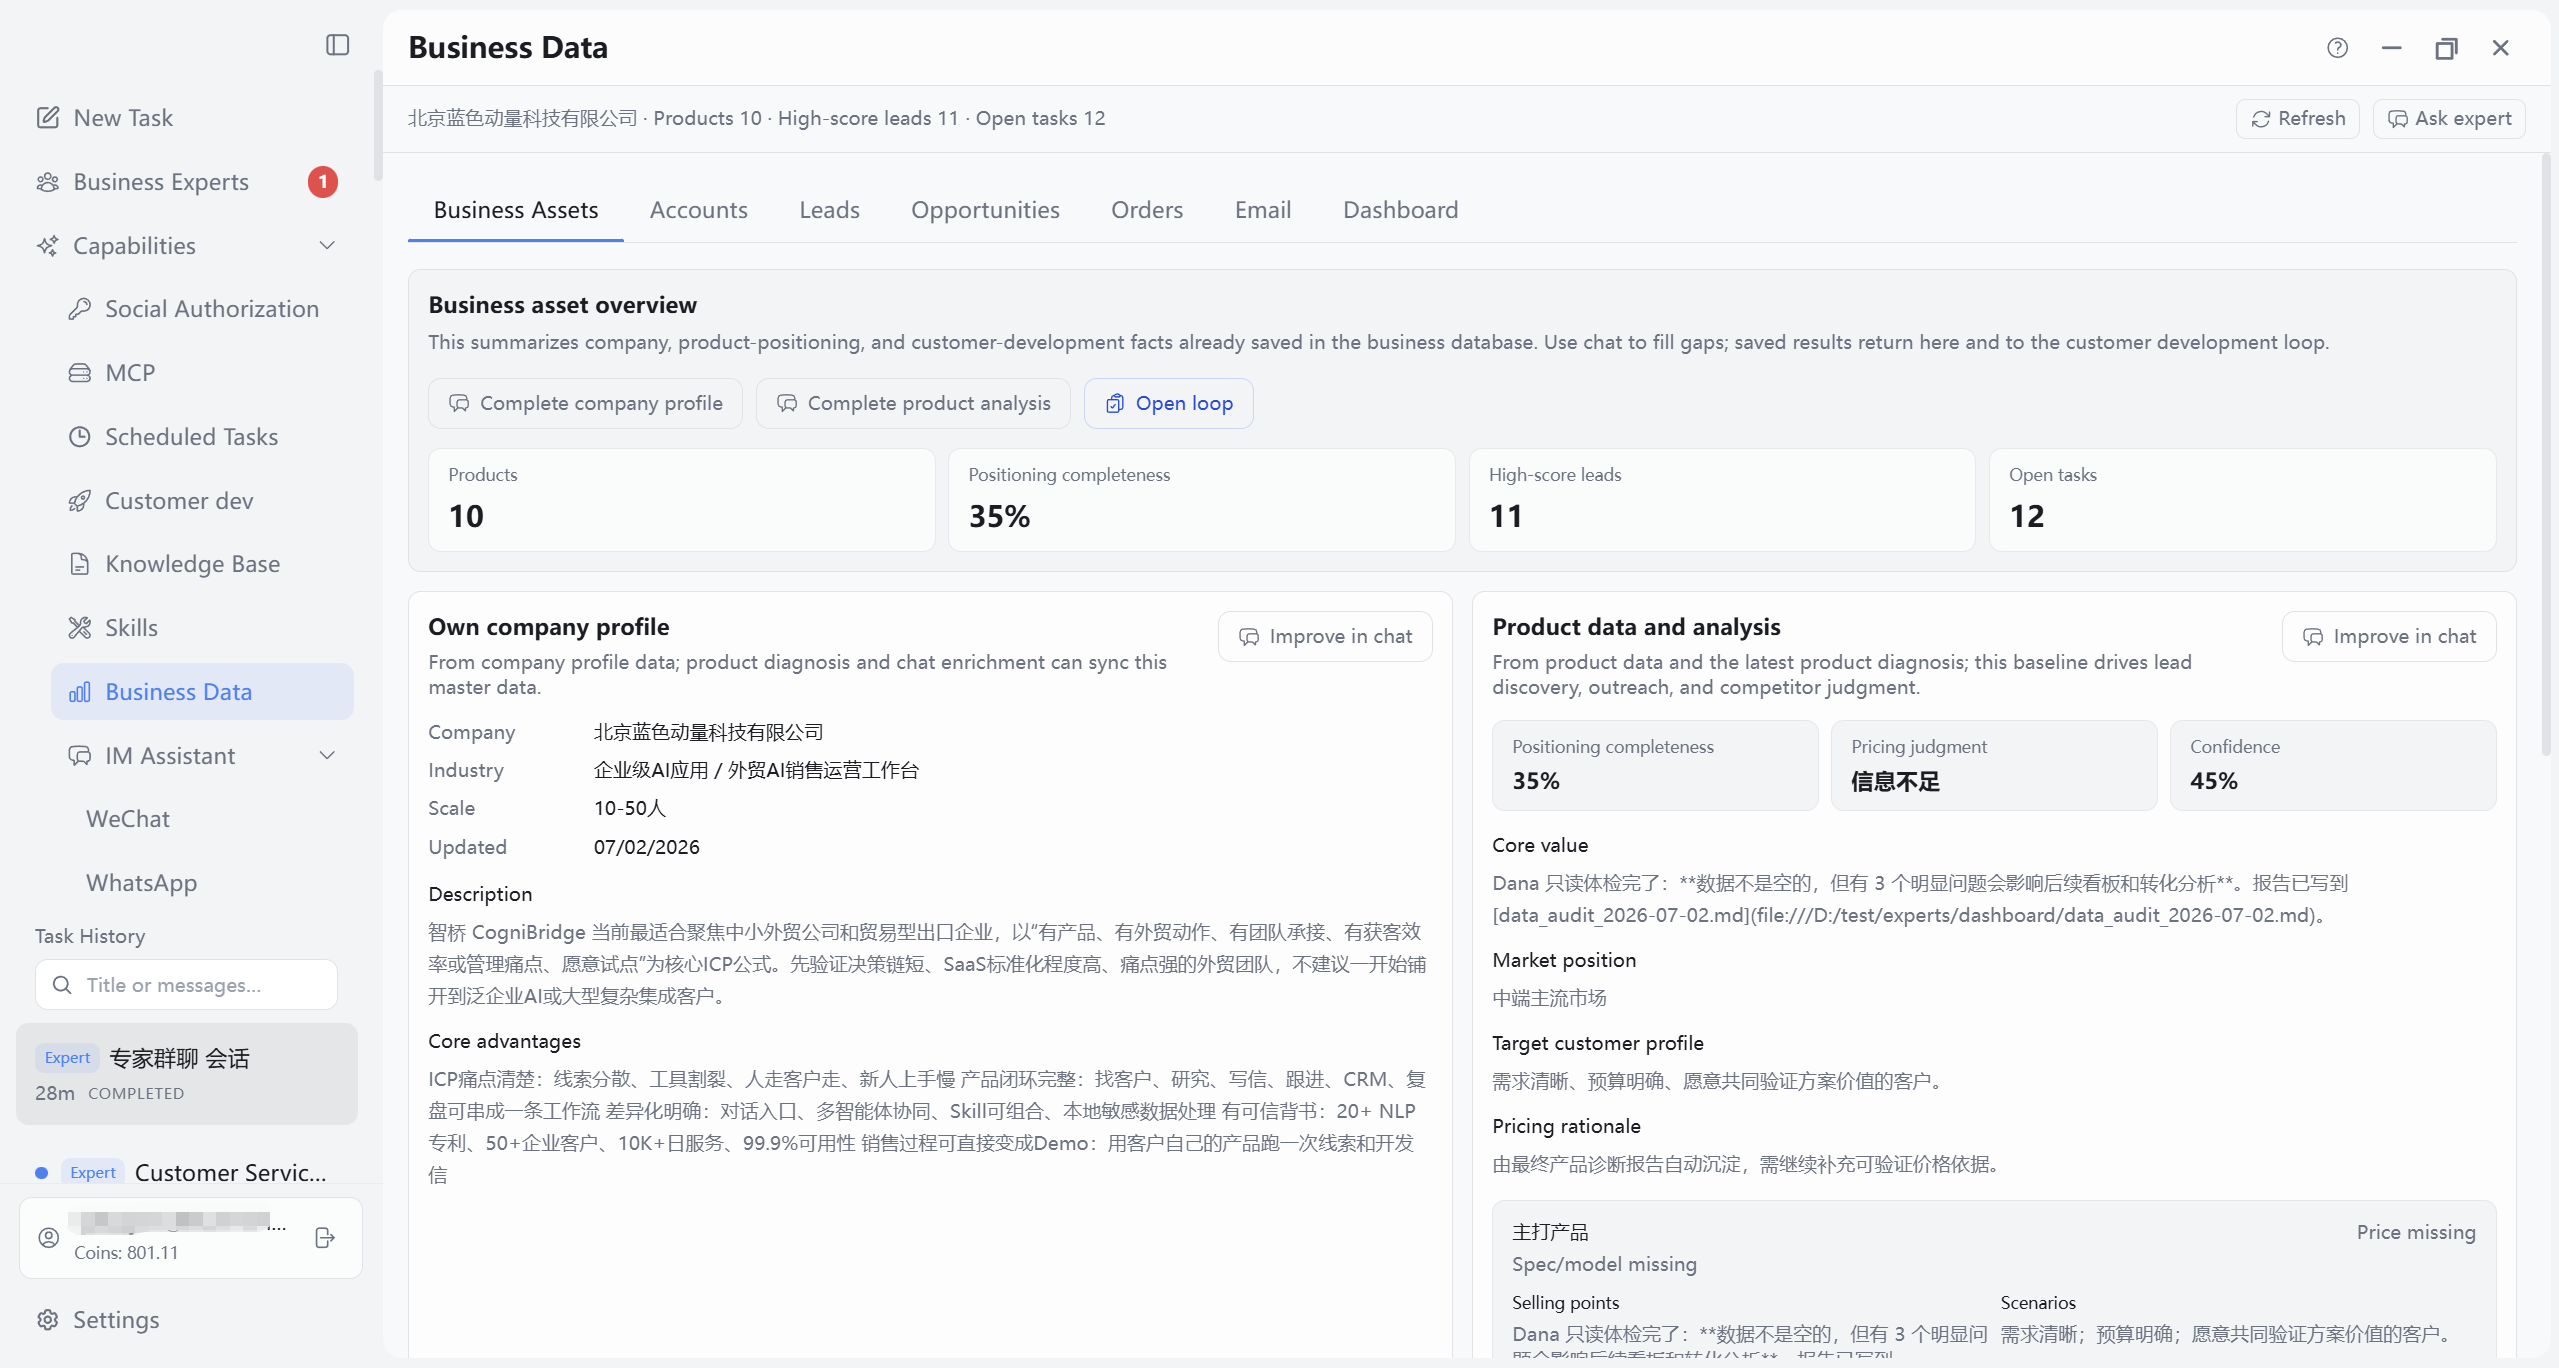
Four metric cards below overview often include: Product count, Positioning completeness, High-score leads, Pending (pending task count). Toolbar still offers Refresh and Ask expert (Business assets tab context, matched business expert for analysis or completion).
10.3.2 Your company profile
Left card shows from company materials: company name, industry, size, last updated, plus company introduction and core strengths. Empty fields show “To be added”; top-right Complete via conversation matches toolbar “Complete company profile.”
10.3.3 Product materials and analysis
Right card summarizes product materials and latest product diagnosis—positioning baseline for finding customers and writing mail. Often shows positioning completeness, pricing judgment, confidence; below lists core value, market positioning, target persona, pricing basis, and up to four product cards (selling points, use cases, etc.). No products yet prompts “Complete product analysis” into the library.
10.3.4 Customer development information
Bottom Customer development information shows loop summary (not detail lists): up to three each for high-score leads, recent candidates, recent research. Details on Leads, Mail tabs or Chapter 7 workbench; click Complete customer development information to update via conversation.
10.4 Customers Module
10.4.1 List capabilities in this module
Filter: On Customers tab, toolbar Expand filter, fill time, owner, keywords, stage, etc., then Apply/Query; table keeps matching rows. Clear filters and re-apply to widen.
Refresh: Toolbar Refresh re-fetches customers under current filters.
Export Excel: After confirming filter results, toolbar Export Excel. Disabled when no matching data—adjust filters first. Retrieve Excel per UI prompt; open and verify headers and row count.
Ask expert: Ask expert writes current tab (Customers) and current filters to task context and opens Tasks page with the configured business expert; effect Figure 10-12.
10.4.2 Edit single customer record
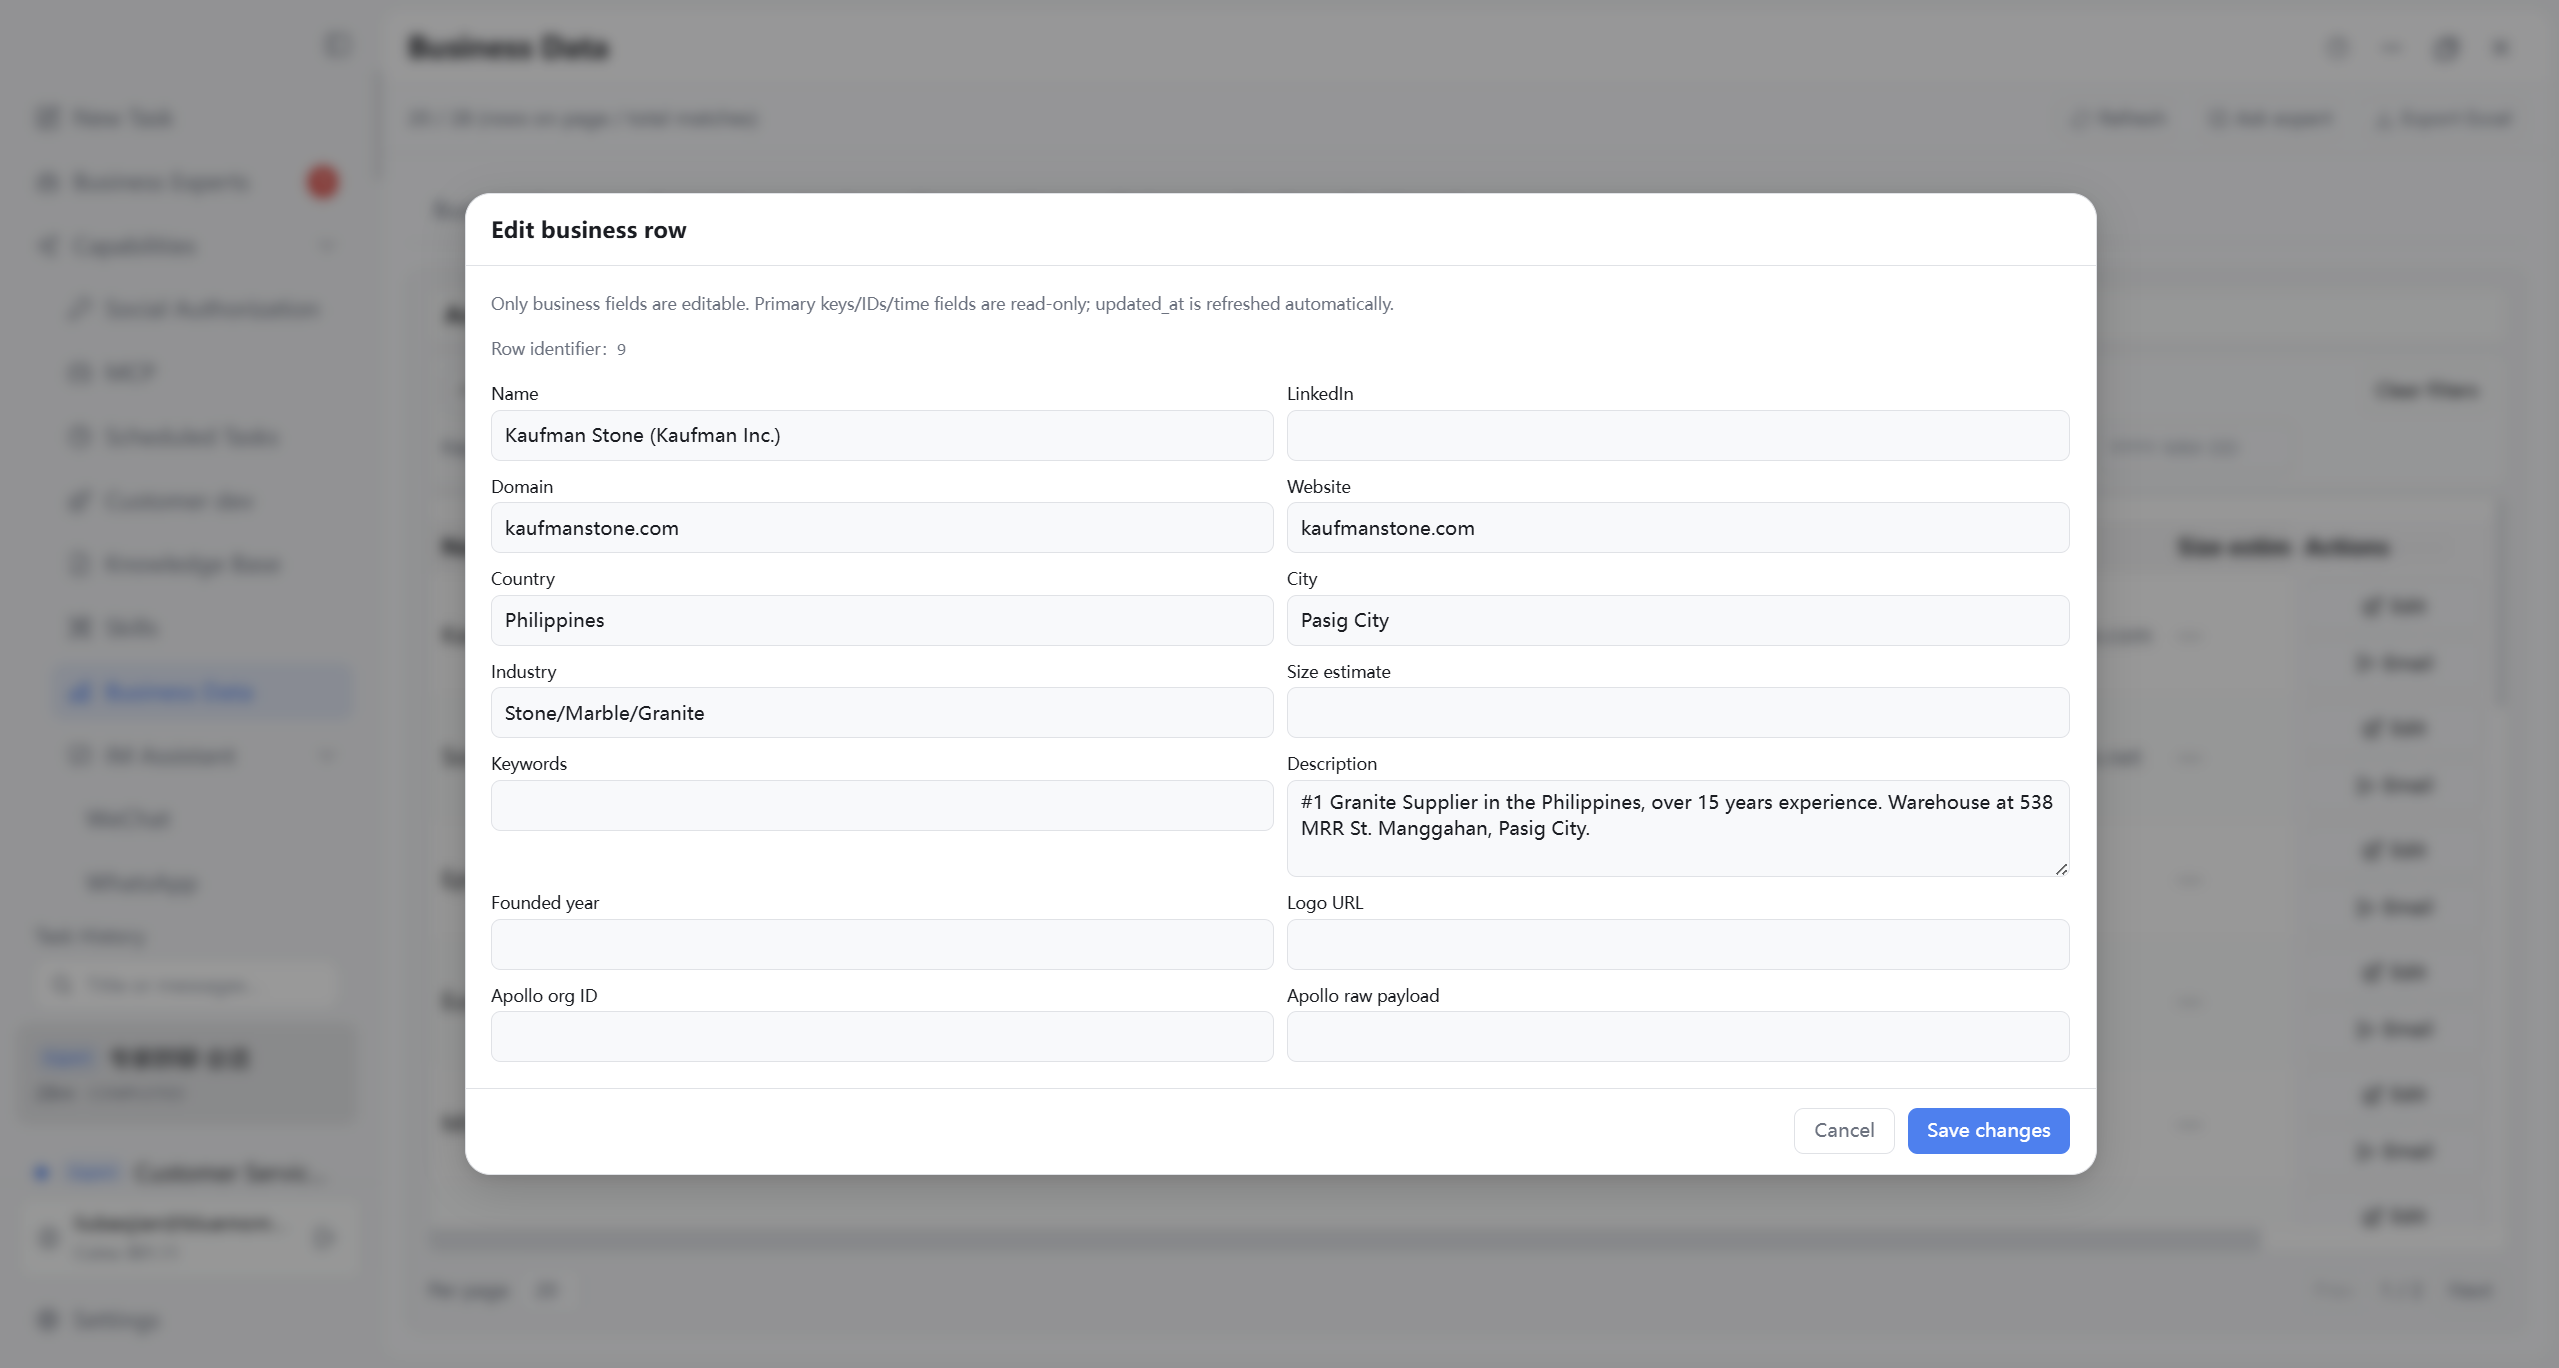
Open edit panel or sidebar for a customer; maintain basics, tags, owner, etc.; list should show updates after save.
10.5 Leads Module
10.5.1 List capabilities in this module
On Leads tab, capabilities match Customers interaction pattern; only filter fields and column meanings differ.
Filter: Expand filter; narrow by stage, status, owner, time, keywords; Apply/Query.
Refresh: Refresh reloads leads under current filters.
Export Excel: Export after confirming filter results.
Ask expert: Opens Tasks page with Leads tab and current filters.
Leads main view: Figure 10-02 sub-image 2; filter, export, Ask expert placement: Figure 10-03, 10-01.
10.5.2 Edit single lead
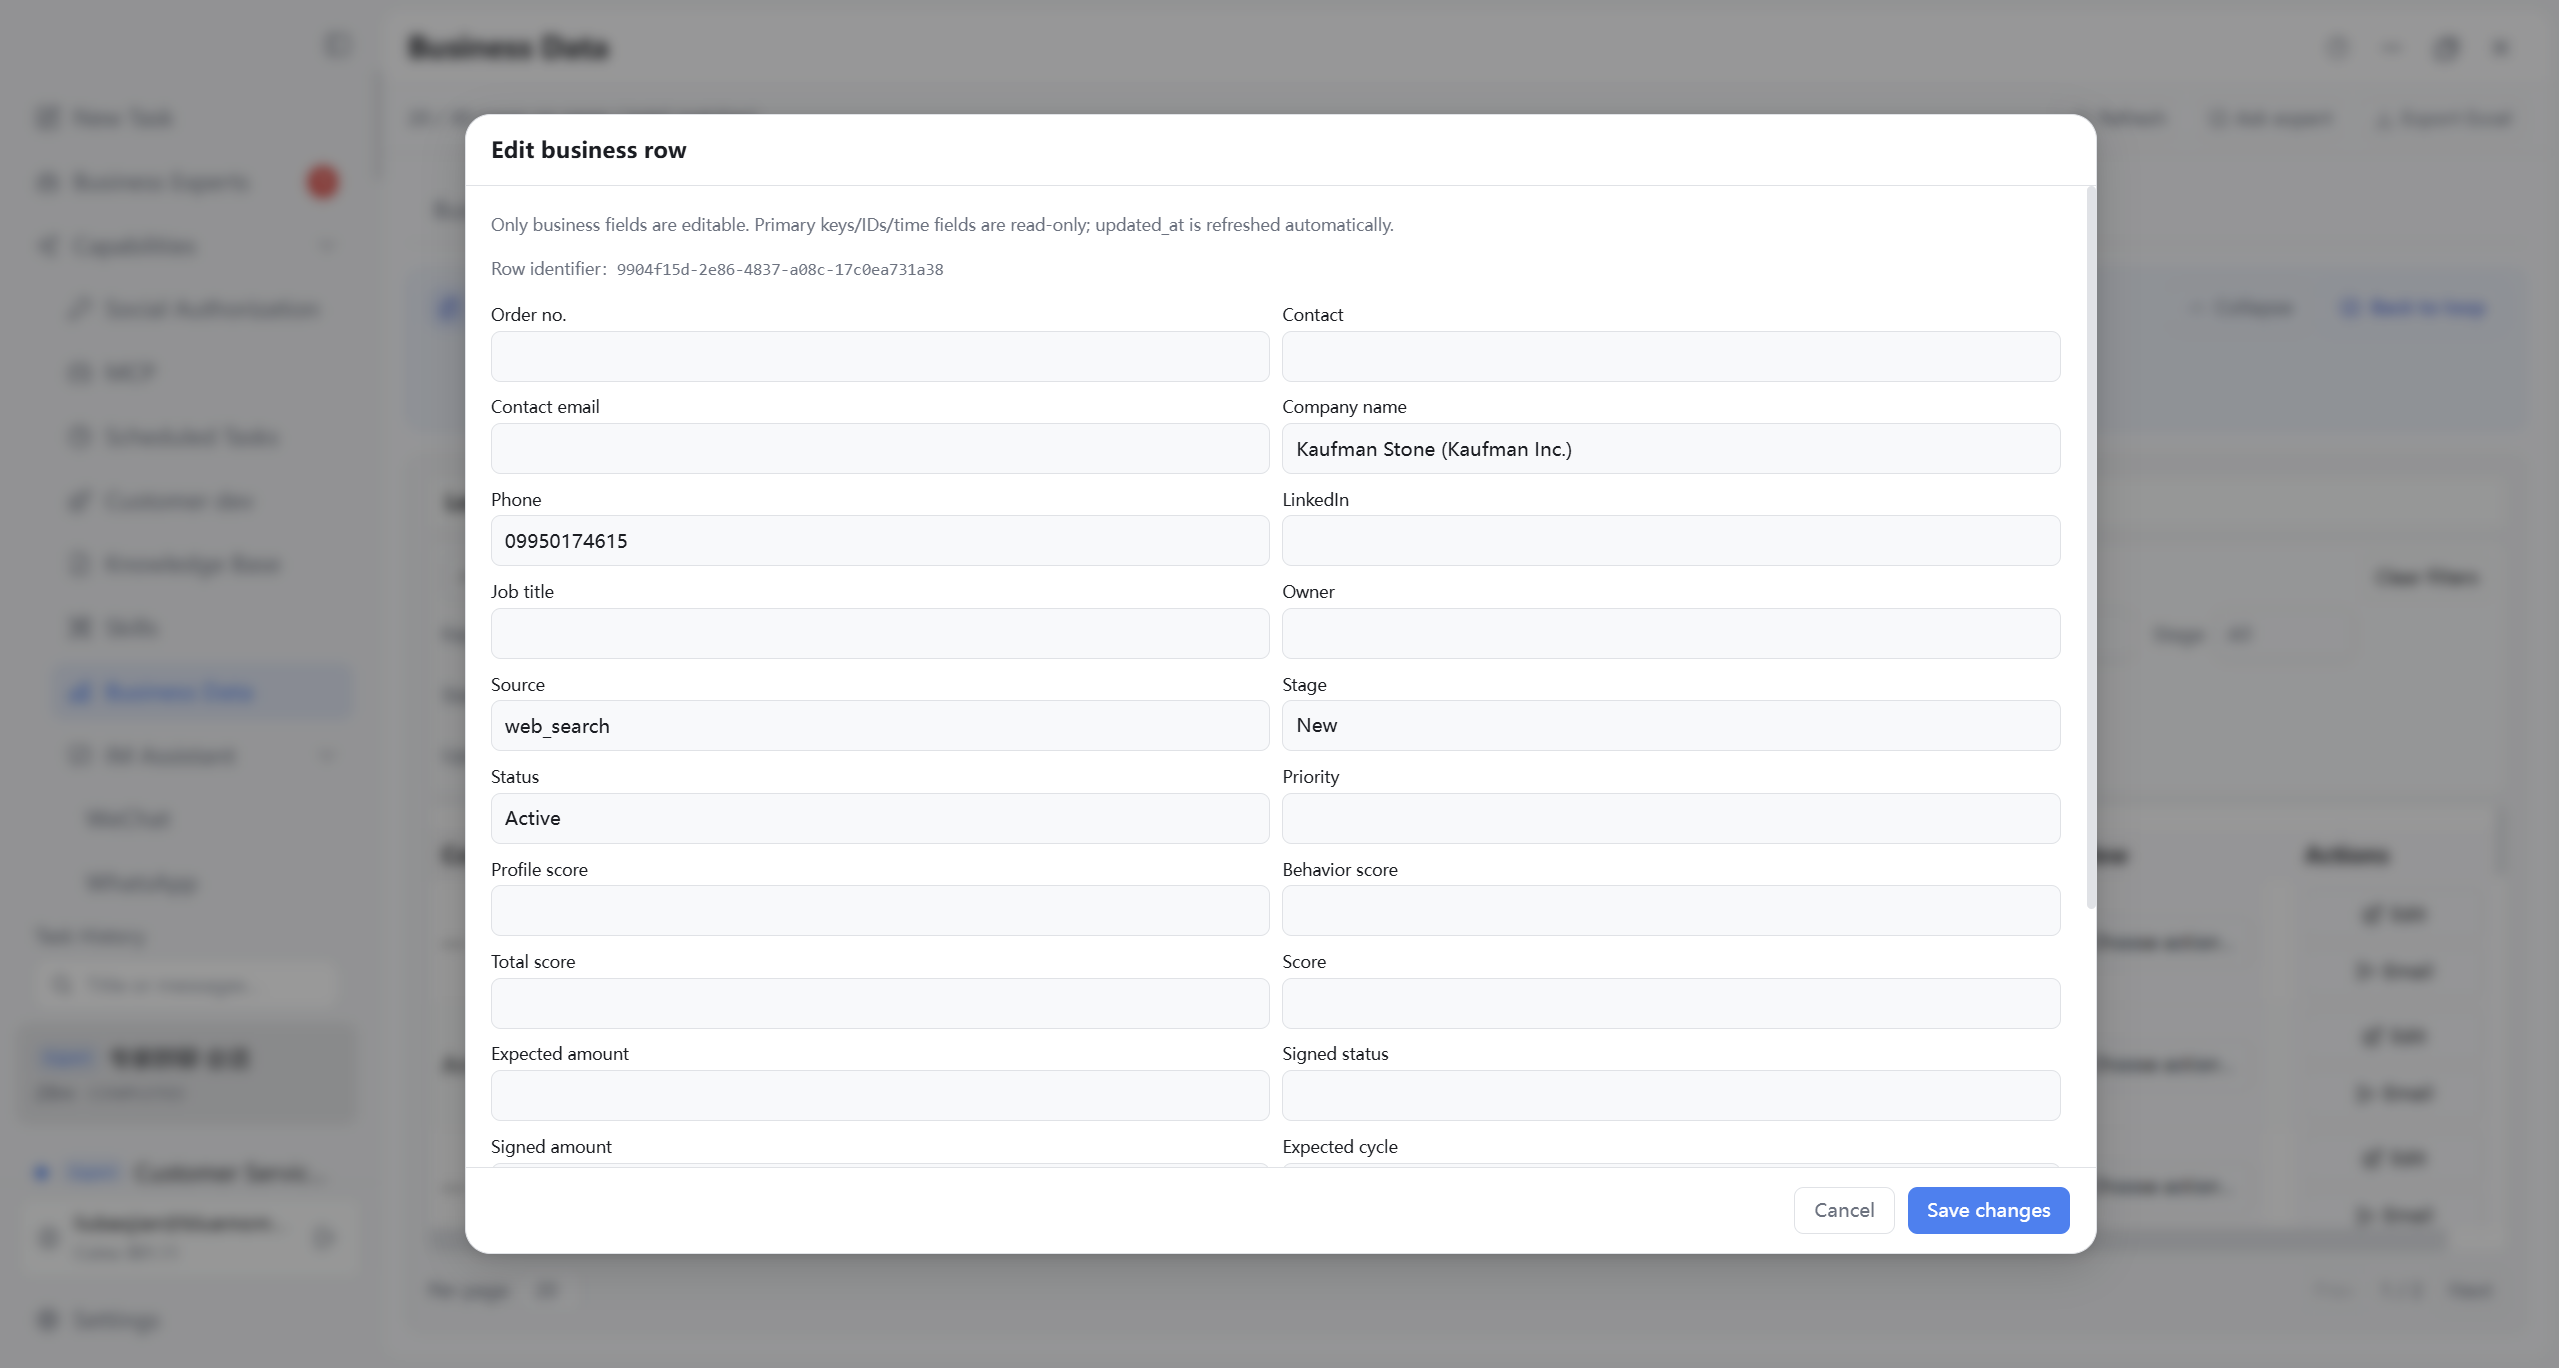
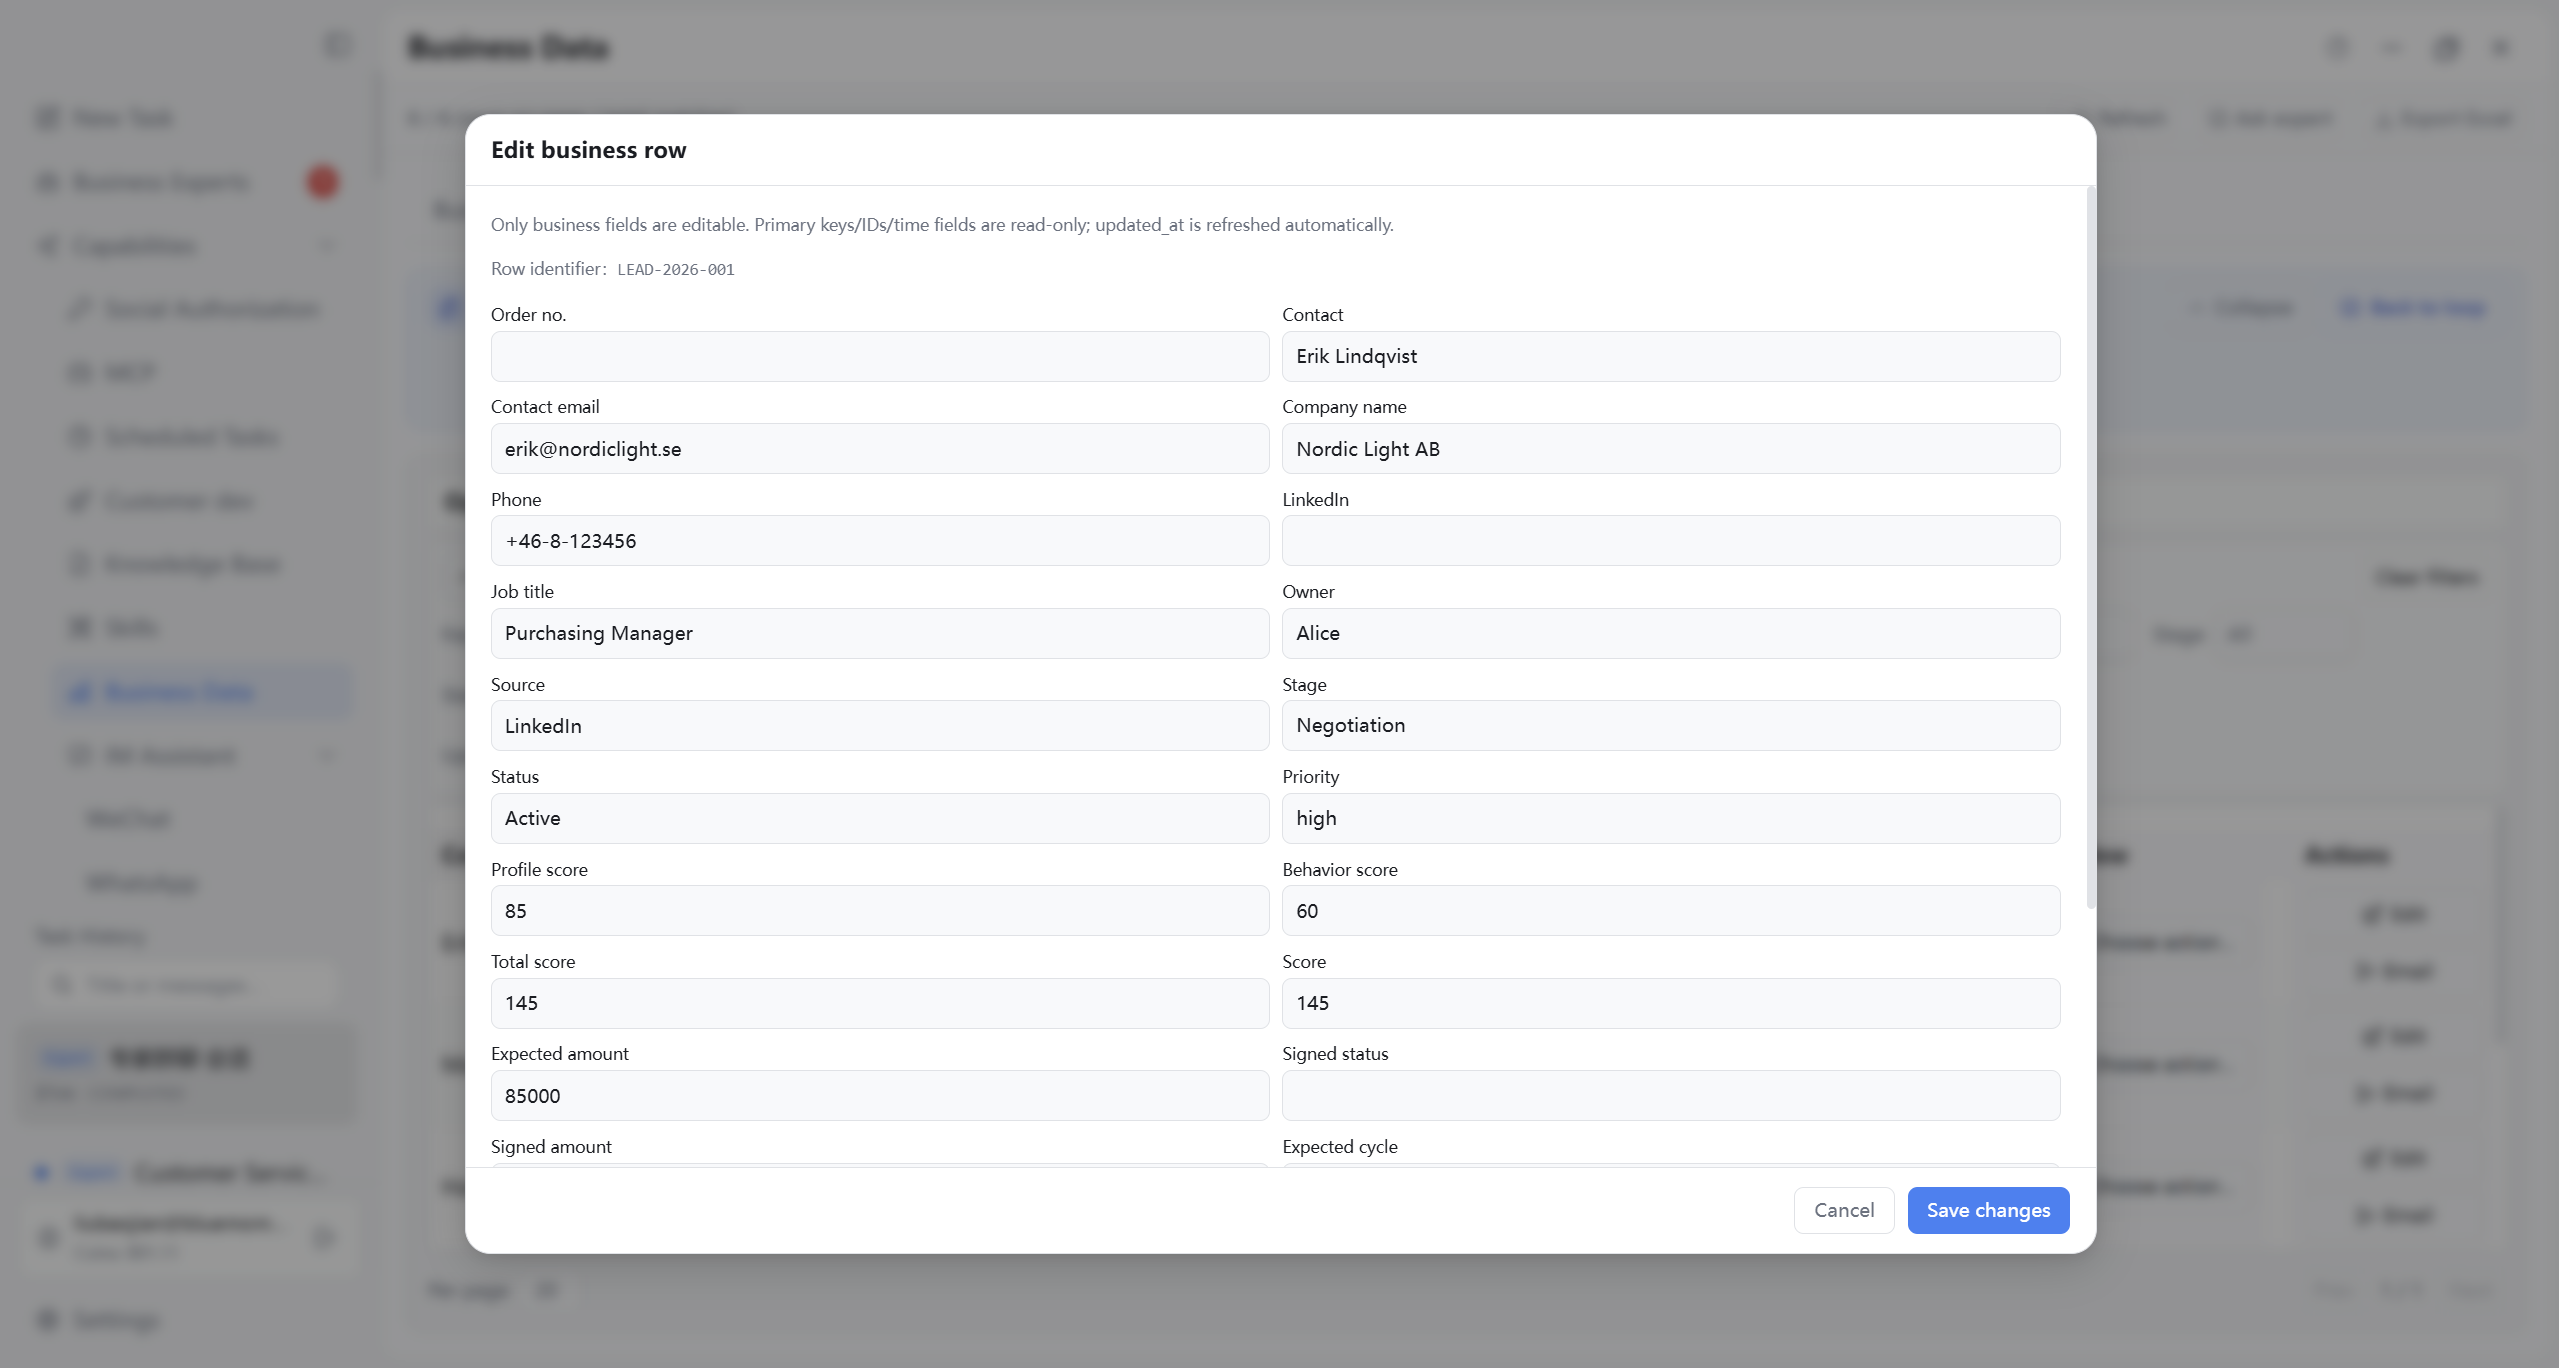
Field-level edit (amount, next follow-up, etc.)—distinct from “transition” below.
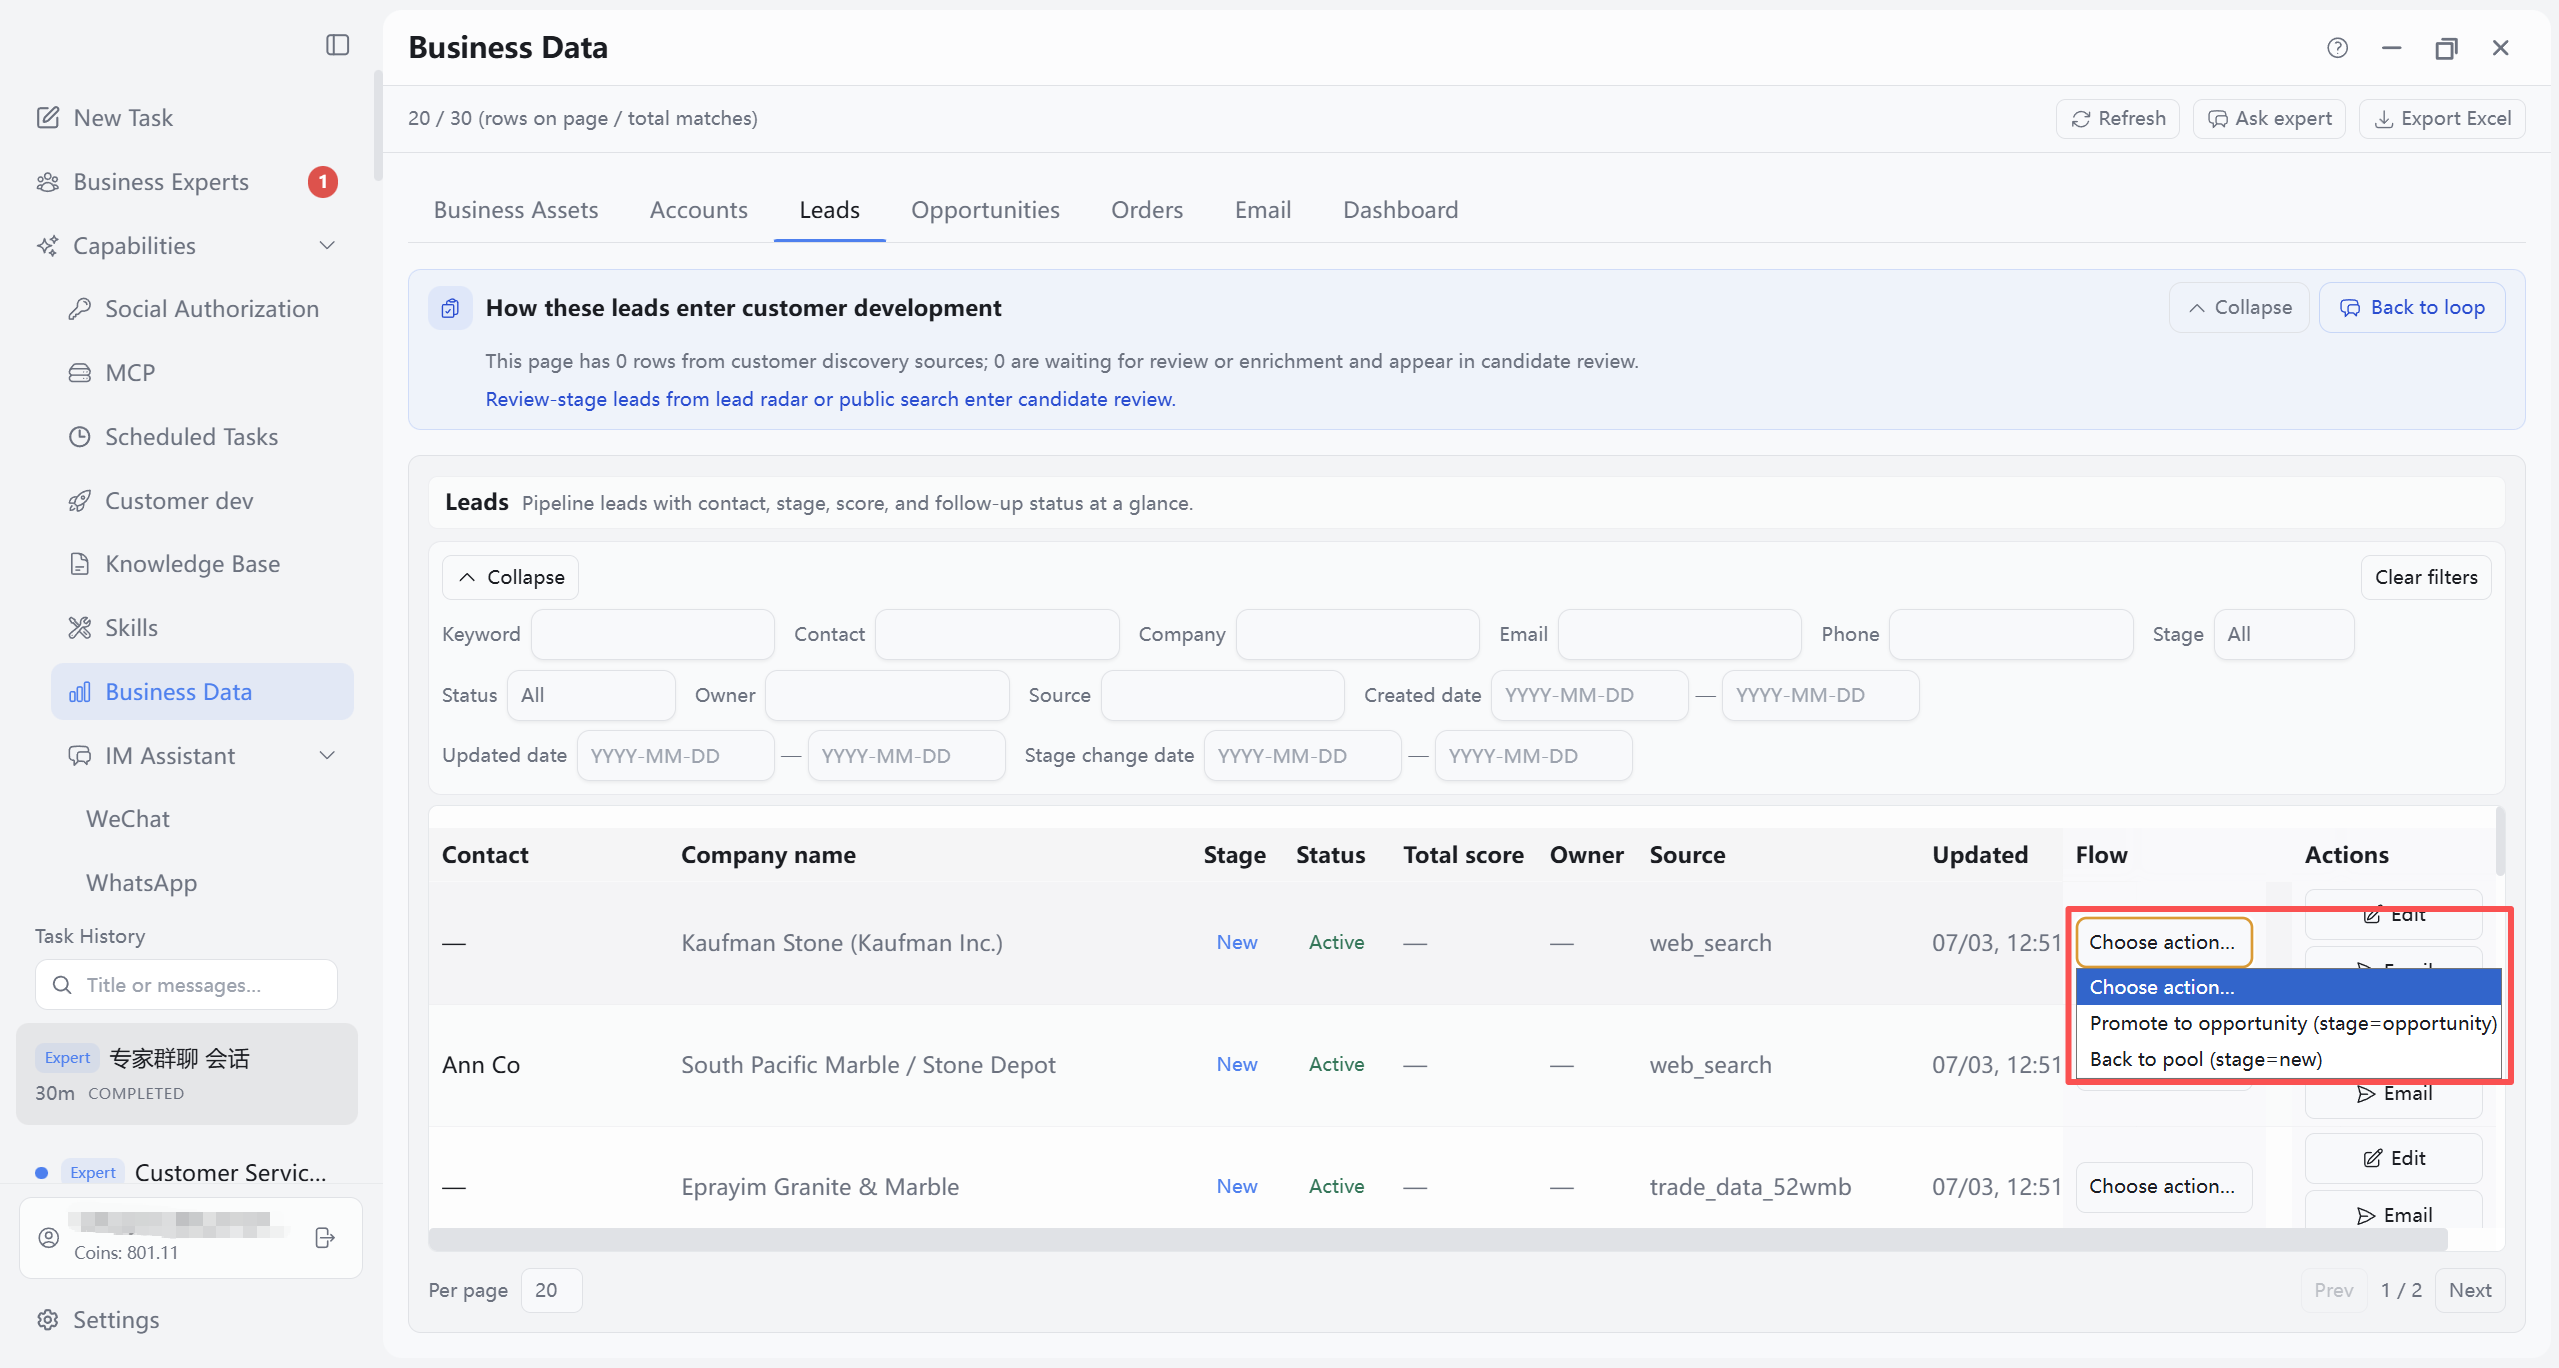
10.5.3 Lead stage transition
Move leads between pipeline stages forward or back; UI explains conflicts with rules.
10.6 Opportunities Module
10.6.1 List capabilities in this module
On Opportunities tab:
Filter: Expand filter; narrow by pipeline stage, expected close date, owner, amount range; Apply.
Refresh: Refresh reloads opportunities under current filters.
Export Excel: Export current opportunity set after confirming filters.
Ask expert: Opens Tasks page with Opportunities tab and current filters.
Opportunities main view: Figure 10-02 sub-image 3; filter, export, Ask expert: Figure 10-03, 10-01.
10.6.2 Edit single opportunity
Open edit UI for amount, expected close date, key contacts, etc.; return to list after save.
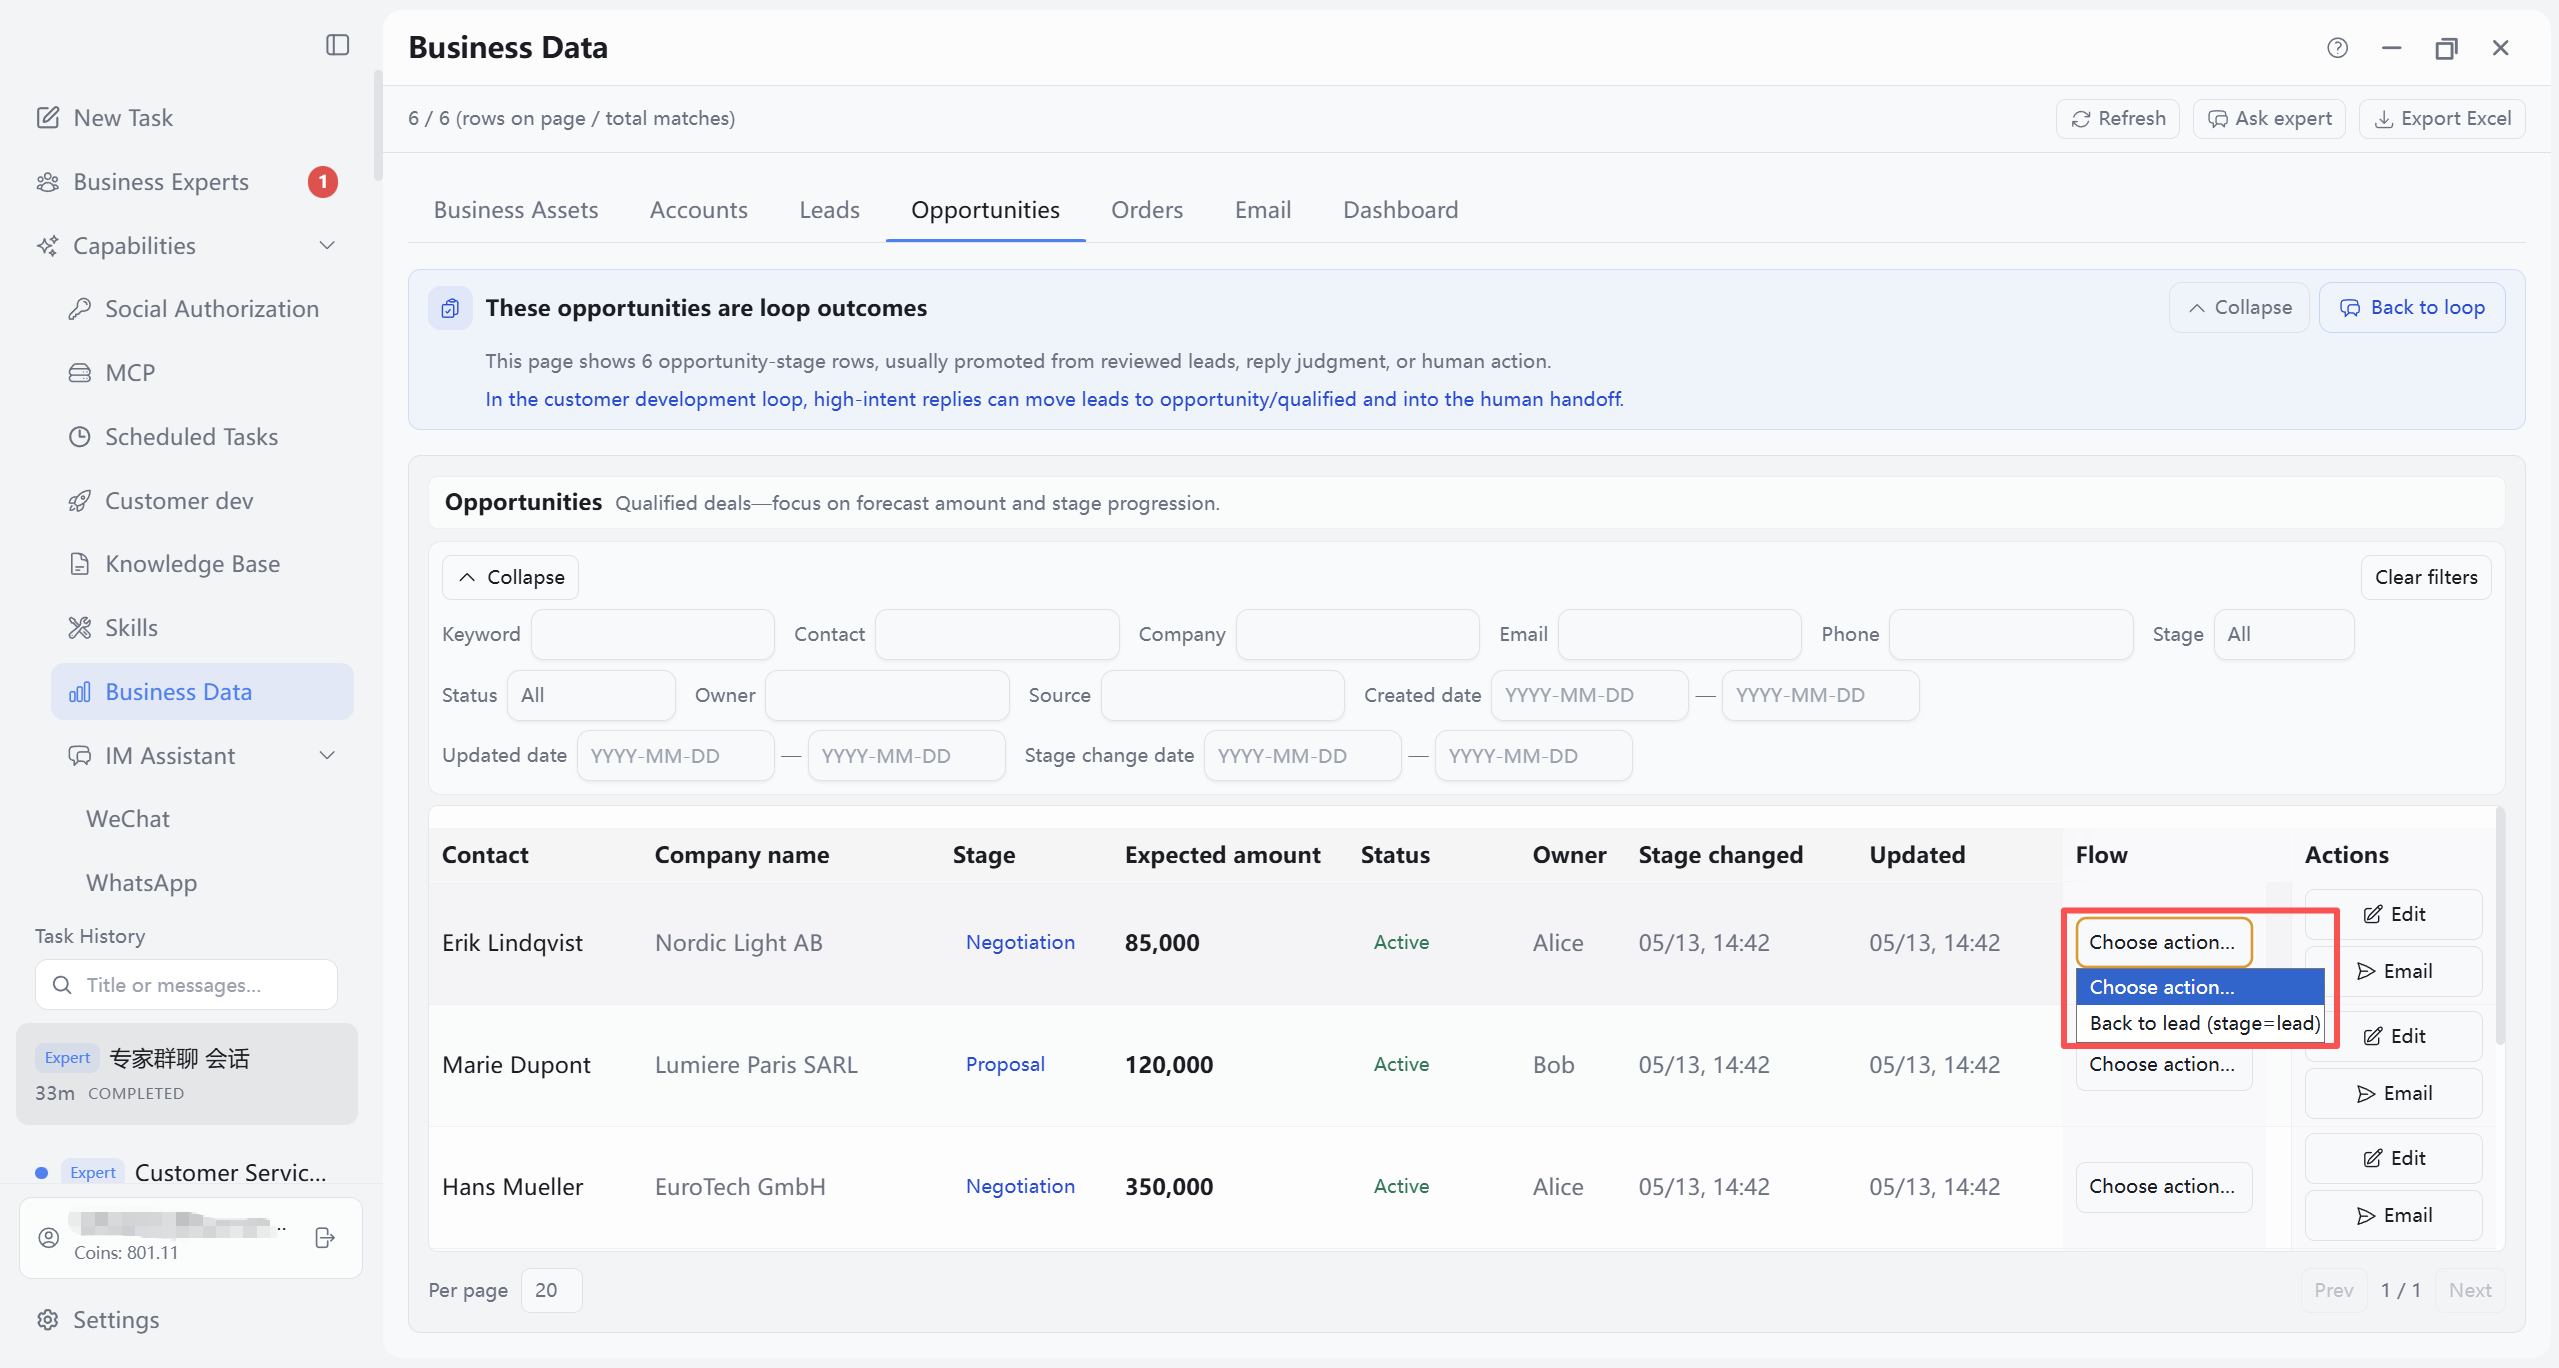
10.6.3 Opportunity stage transition
Adjust stage in pipeline; stage column updates in list after save.
10.7 Mail Module
10.7.1 General capabilities in this module
Complete Chapter 4 email setup and connectivity test before using mail.
Sync: Sync pulls updates from the mail server and refreshes the current folder list; button shows loading or “Syncing” during sync.
Refresh: Toolbar Refresh reloads the mail list for the current folder.
Subfolders: Switch Inbox, Sent, Drafts, Trash within Mail tab.
Filter, export, Ask expert: Same as Customers, Leads, Opportunities: apply filters, then “Export Excel” or “Ask expert”; toolbar placement Figure 10-03, 10-01.
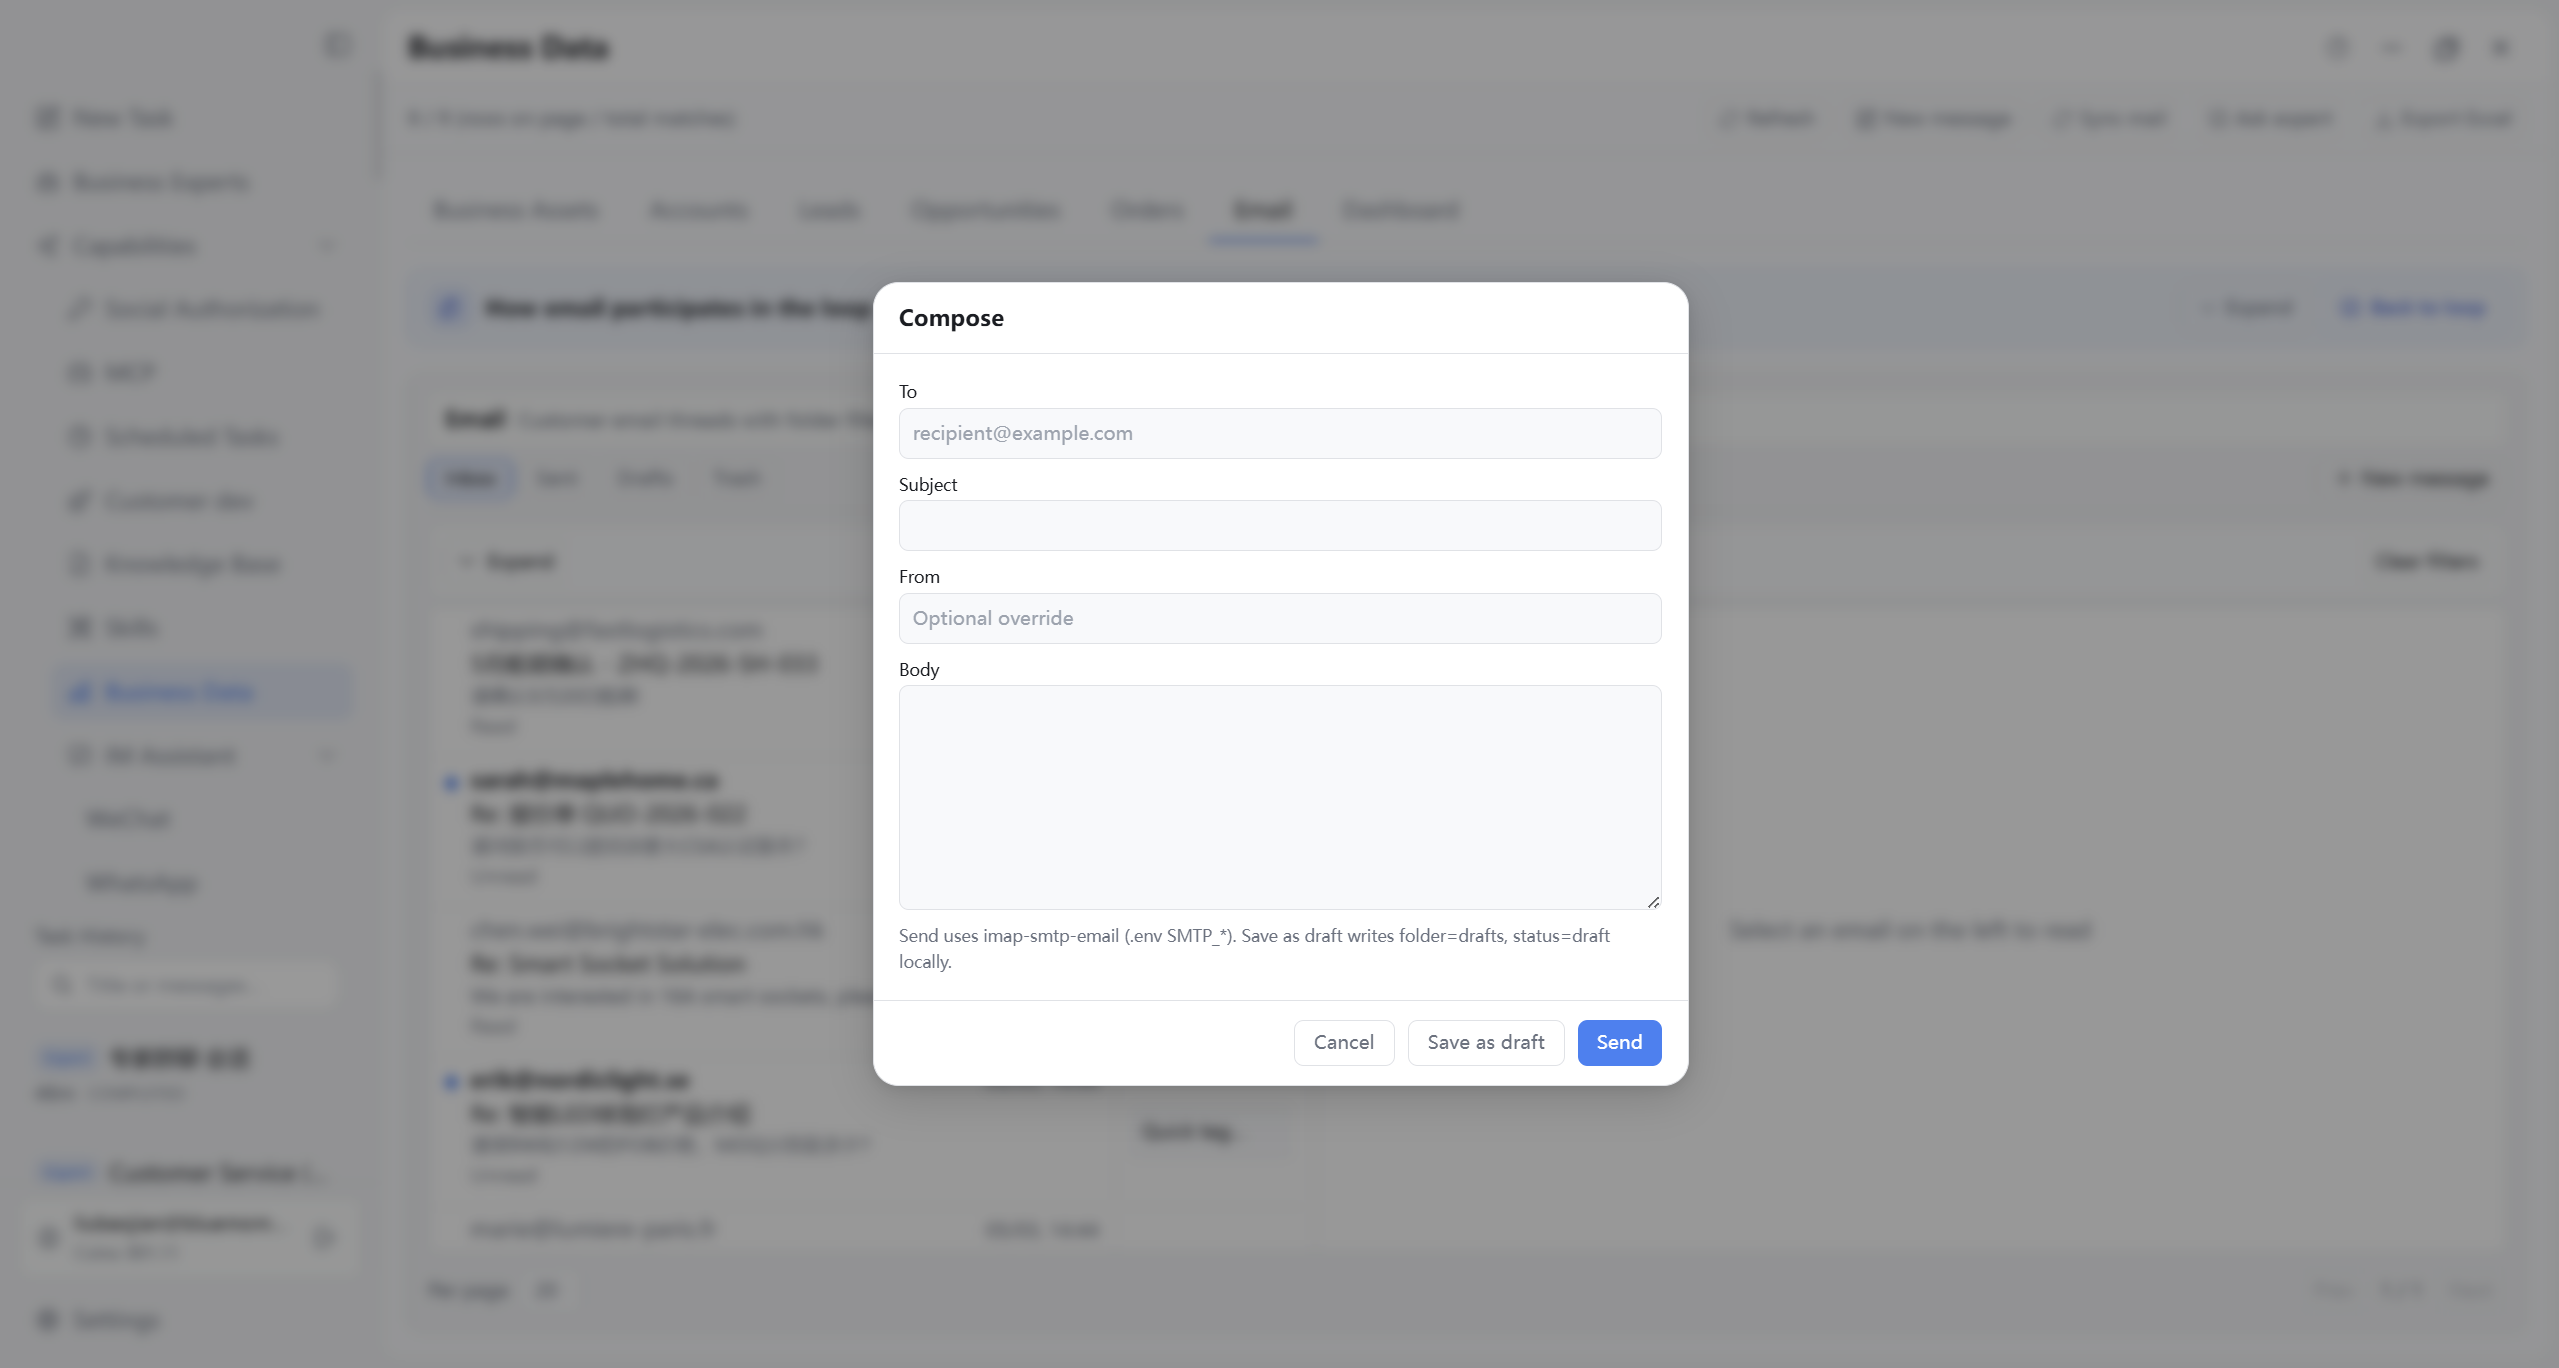
Next two figures: inbox and sync, then compose.
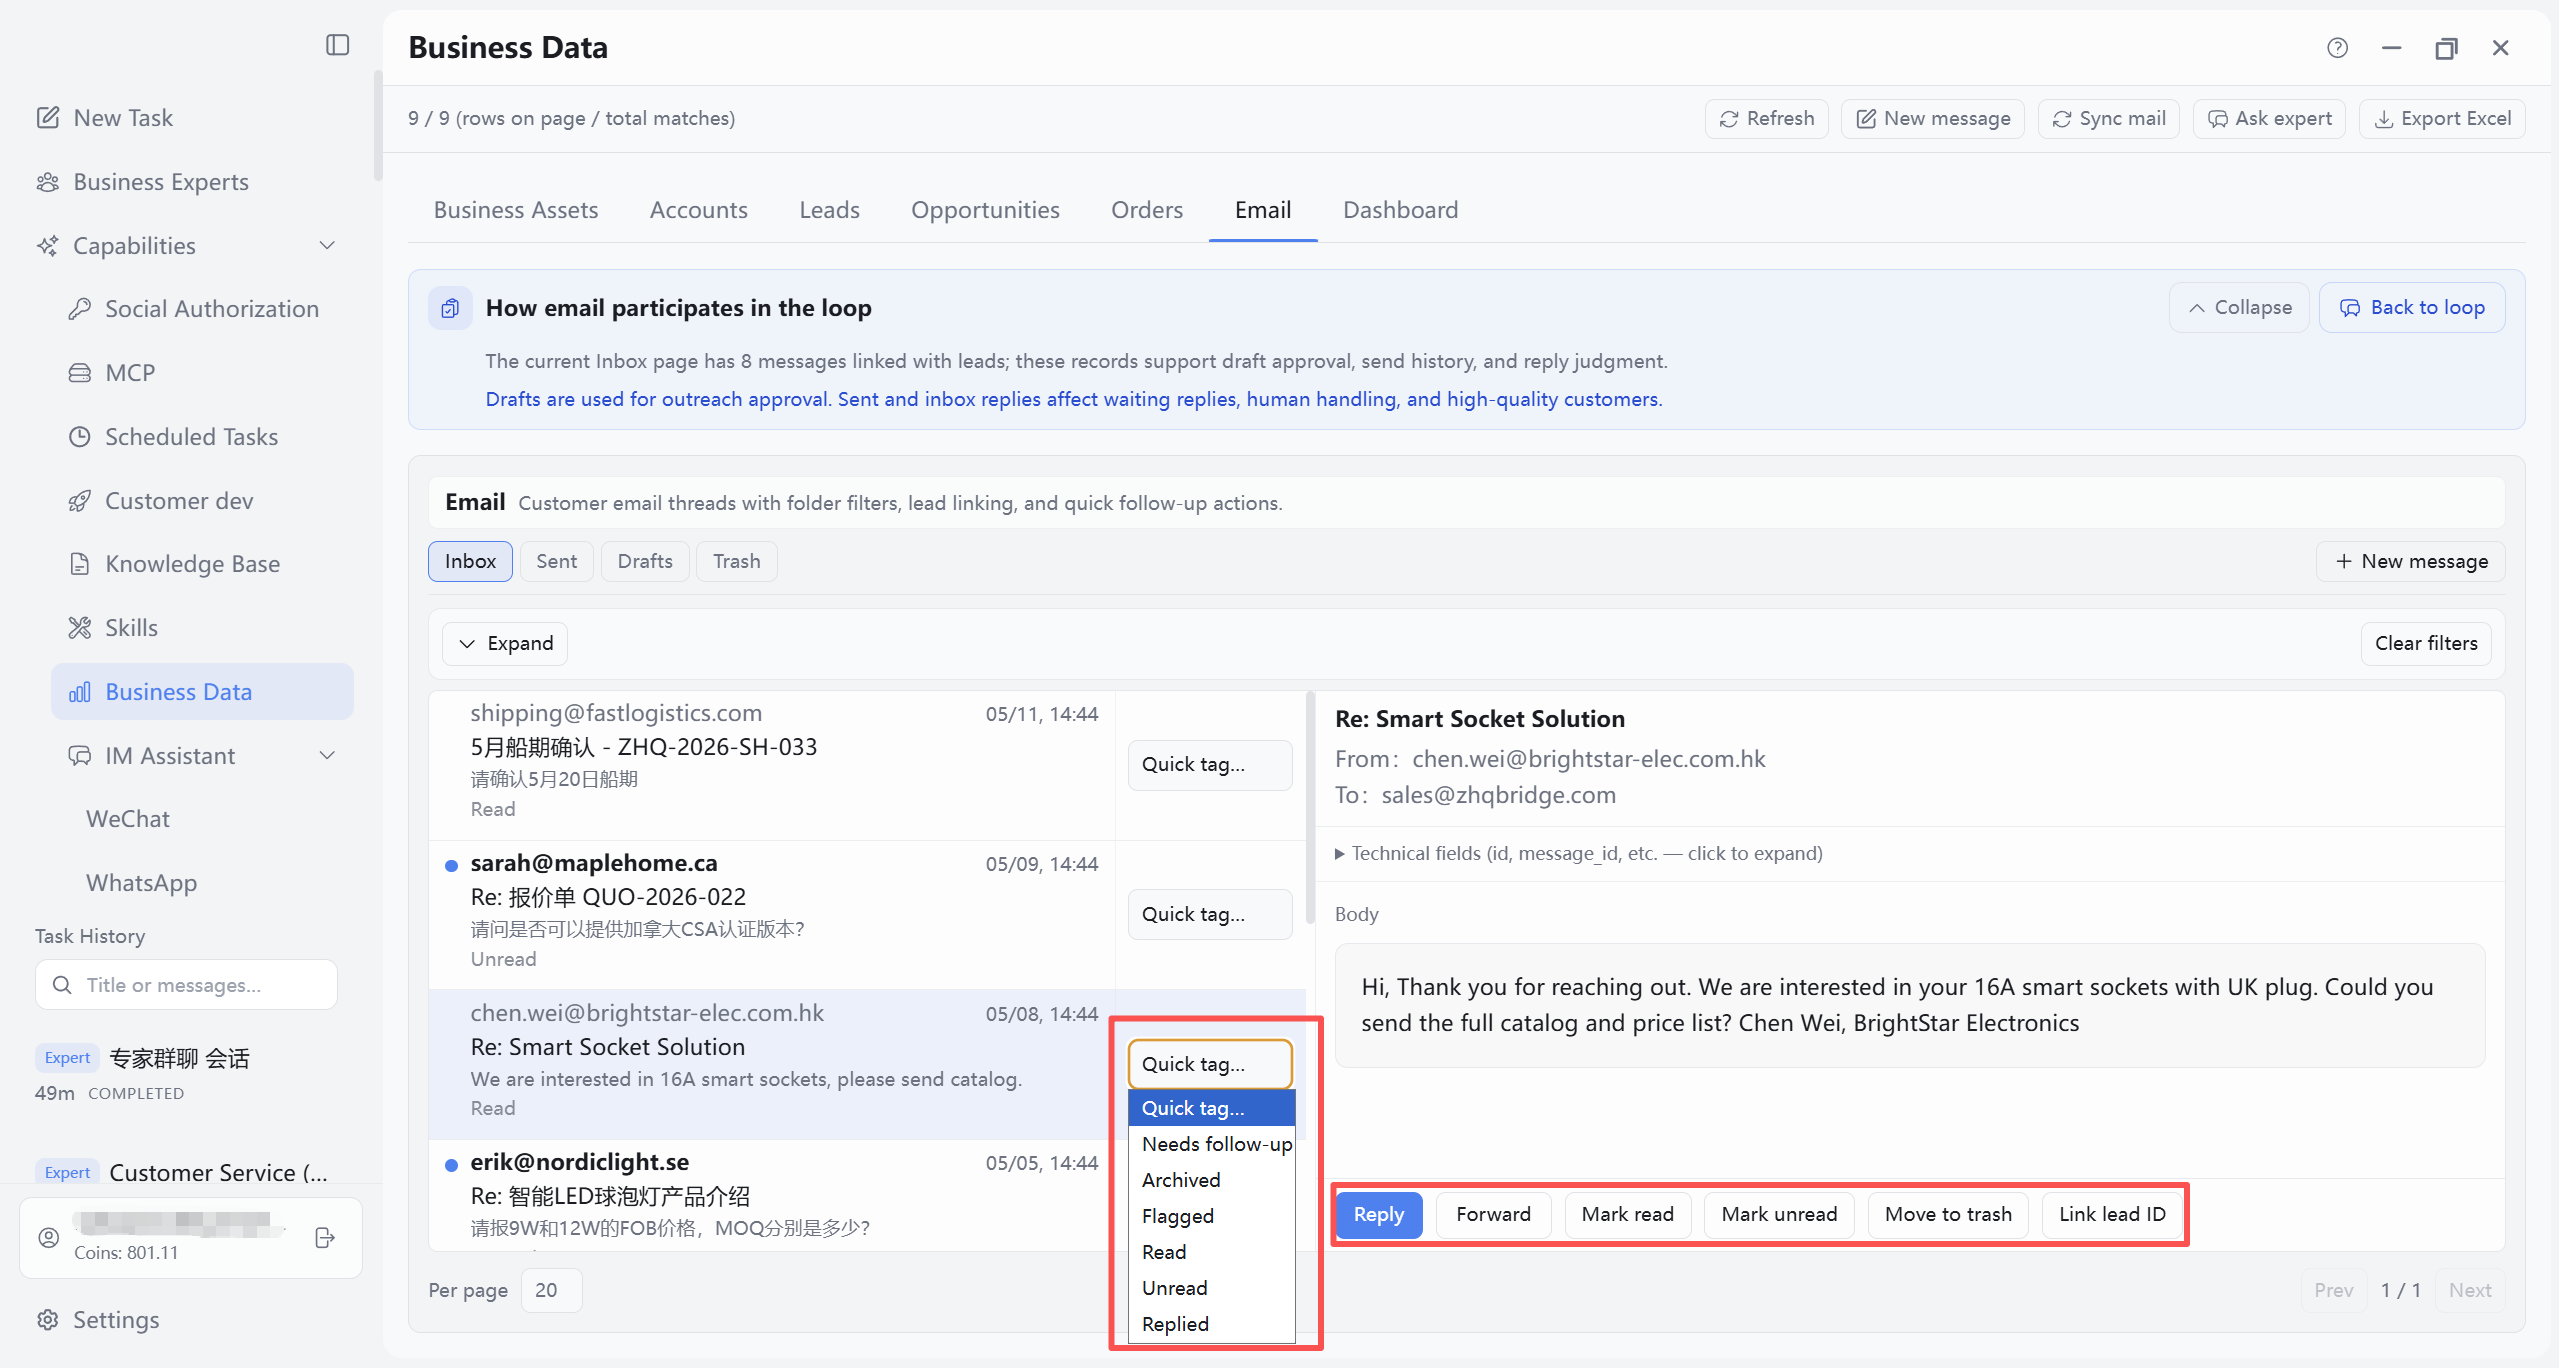
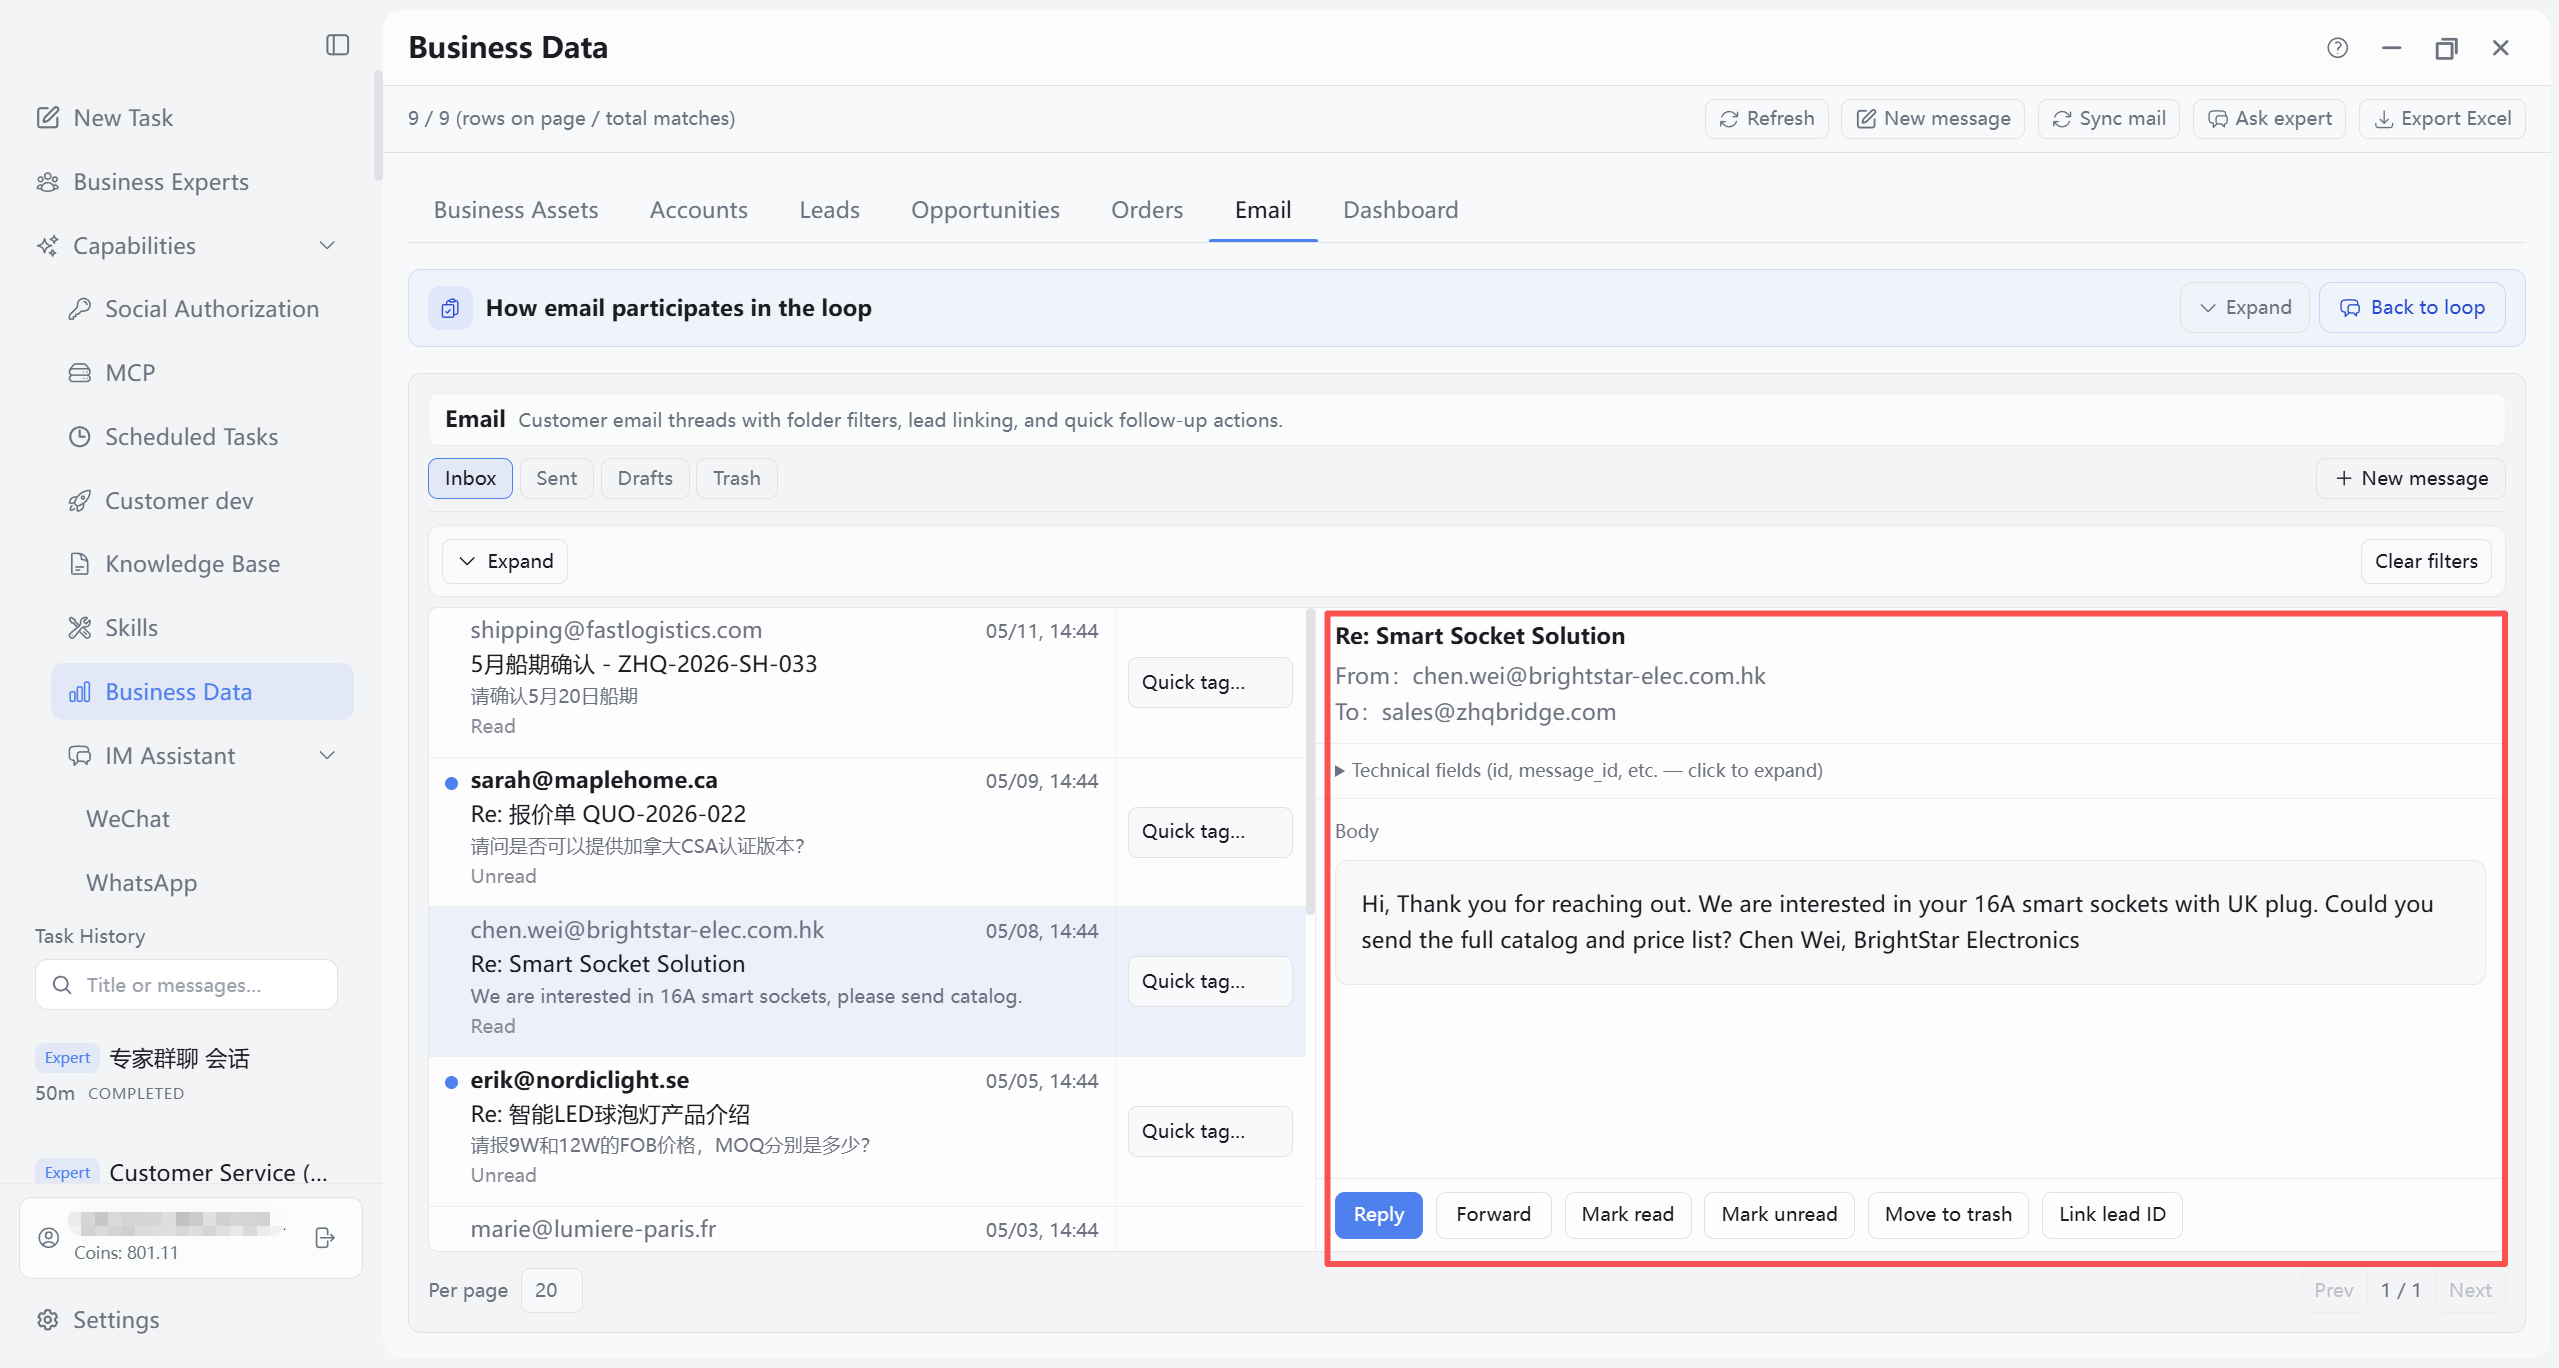
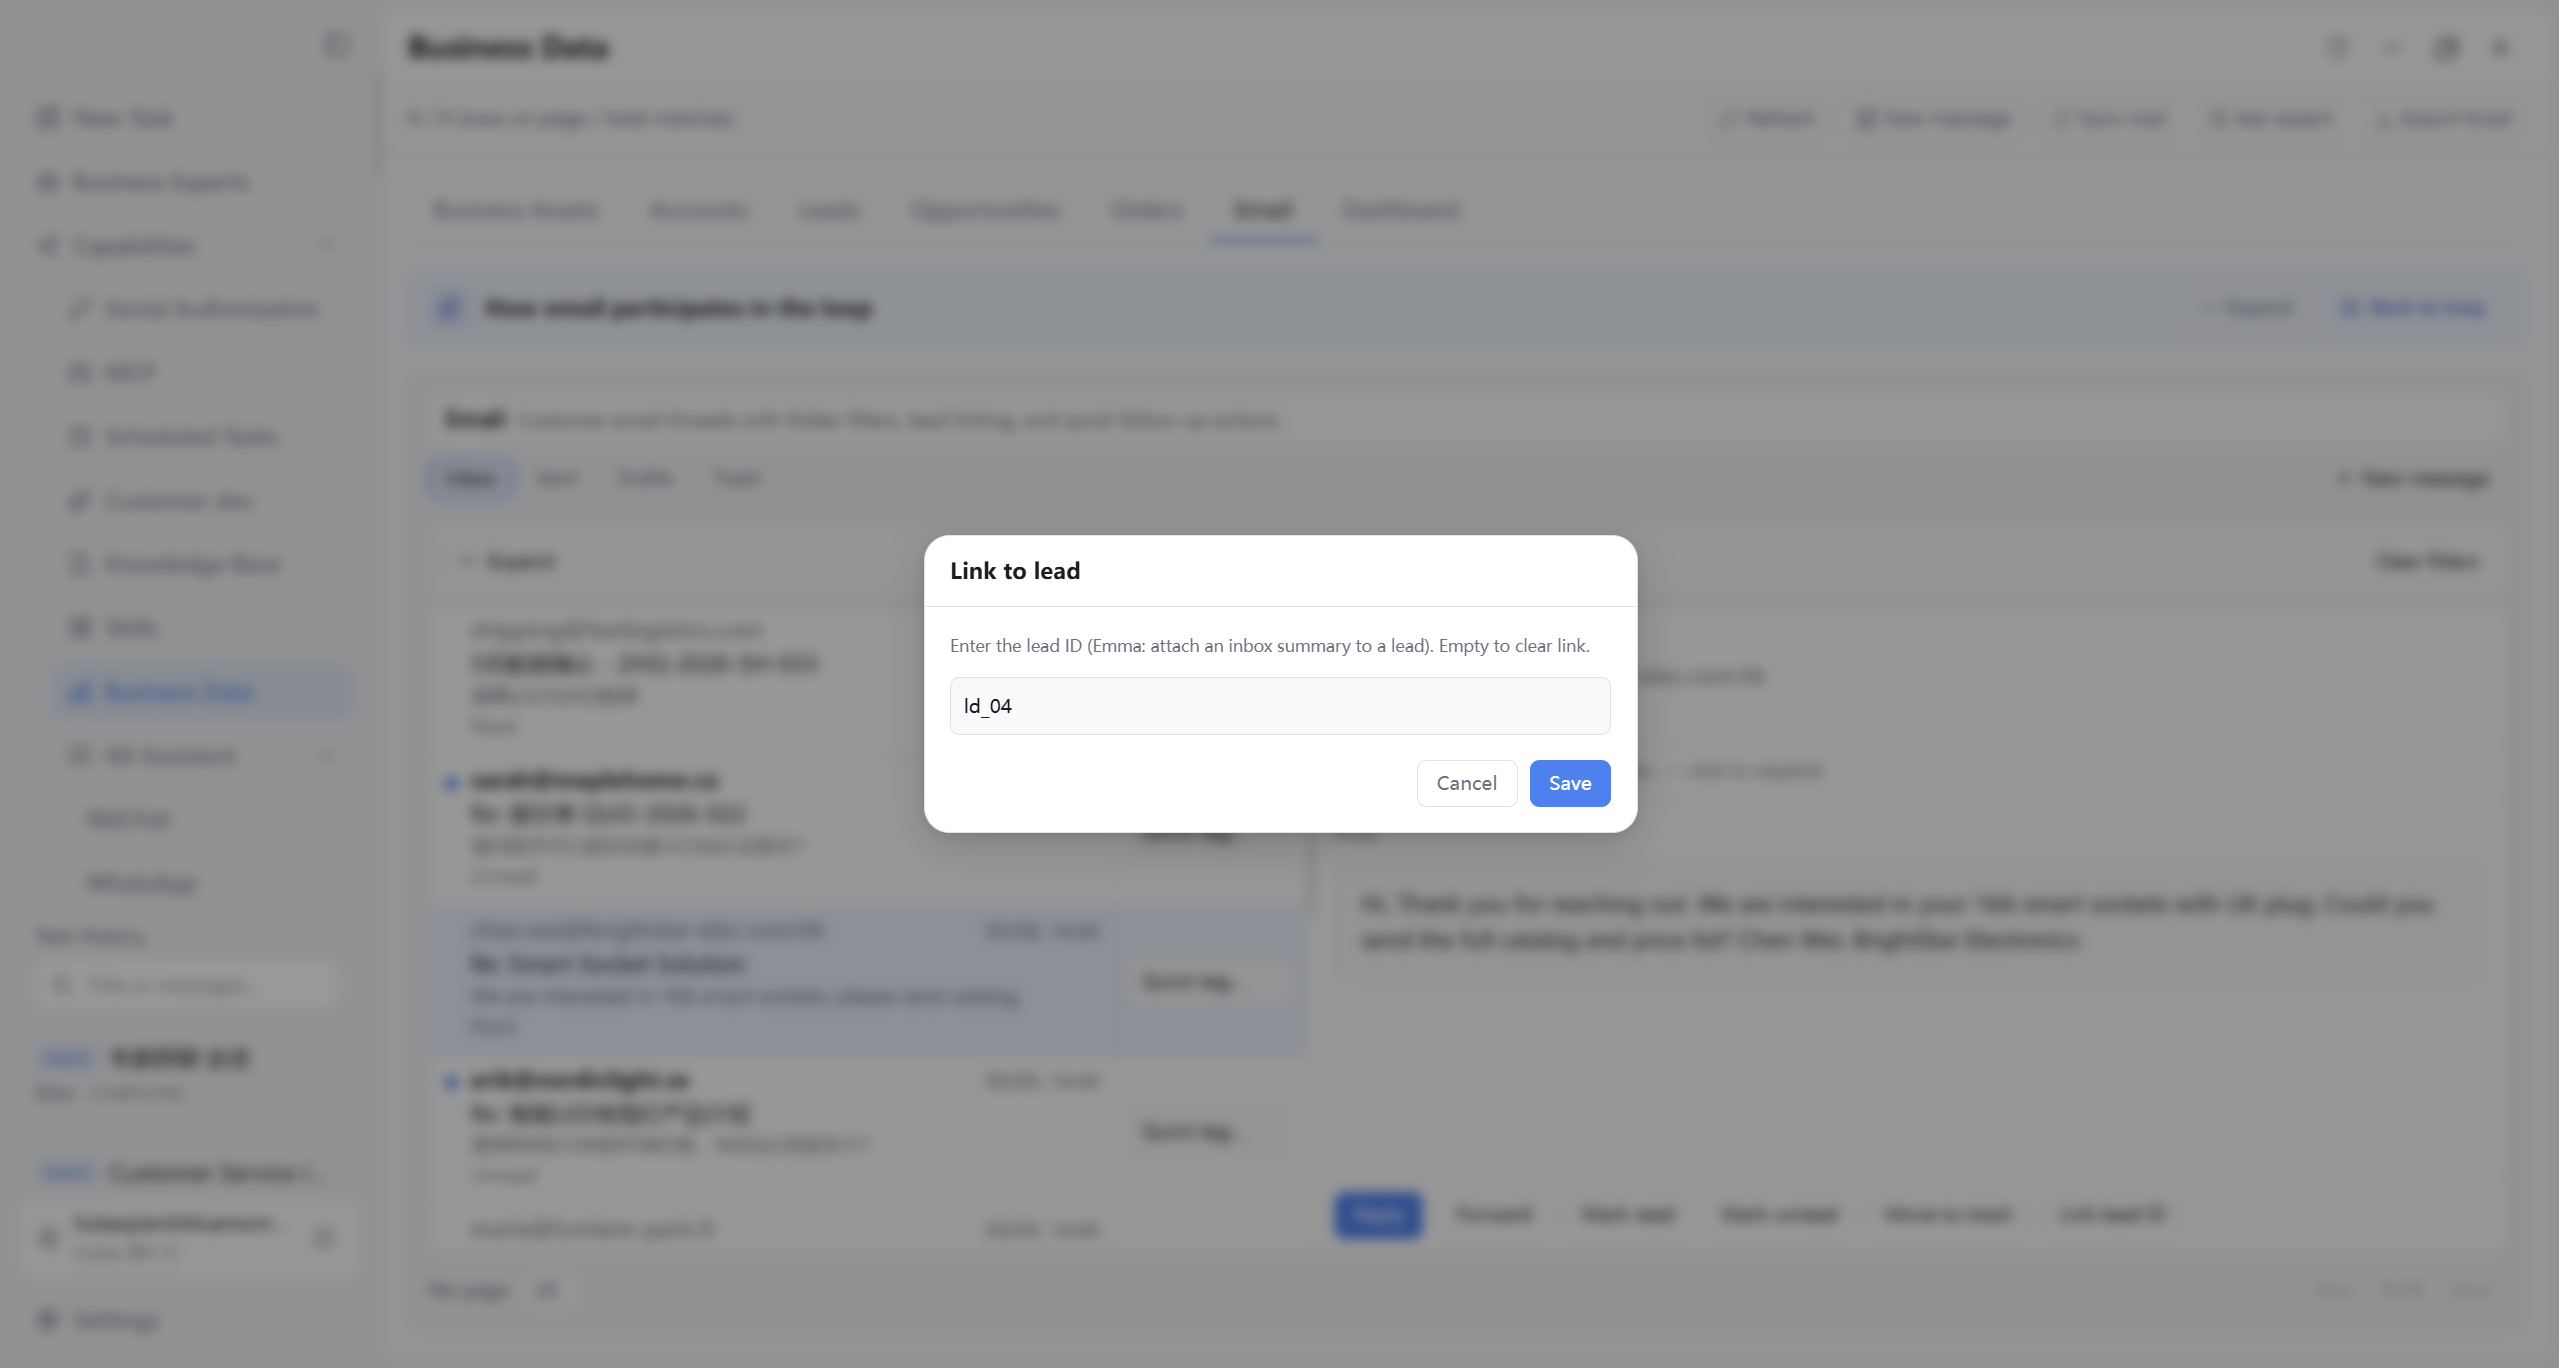
10.7.2 Inbox: quick tags, detail, link lead
In Inbox, quick-tag messages; open detail for body and attachments; link to lead in detail to tie to customer assets. Three figures below.
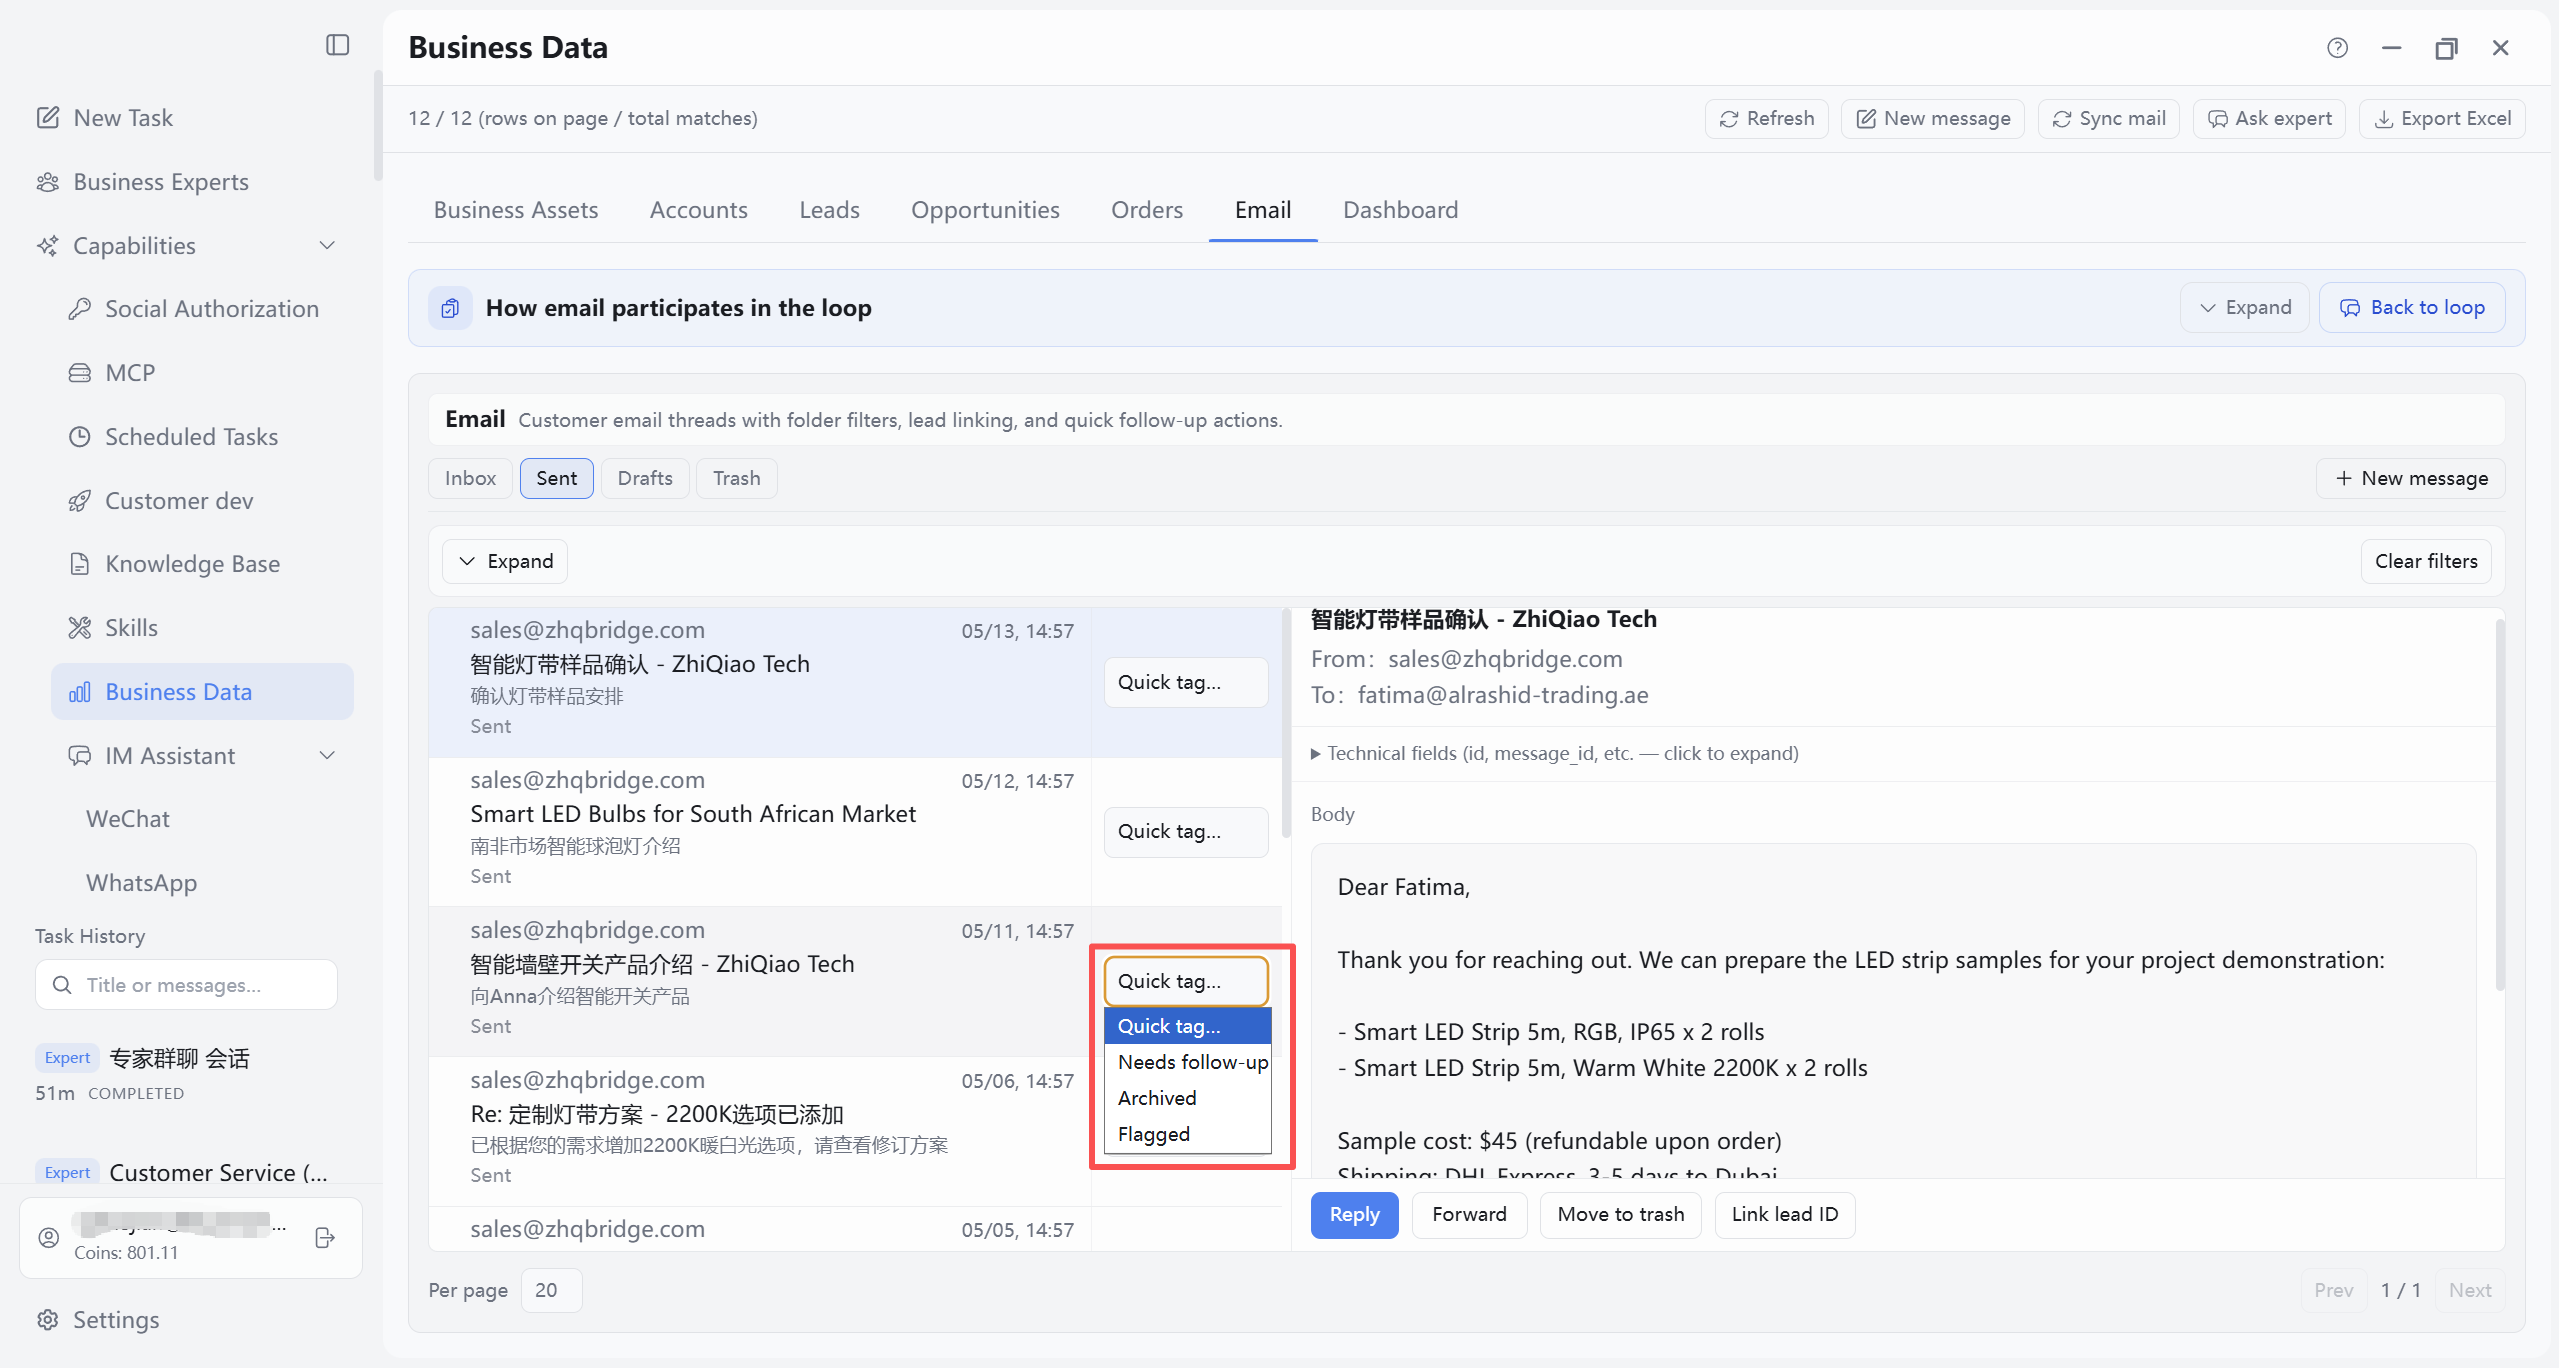
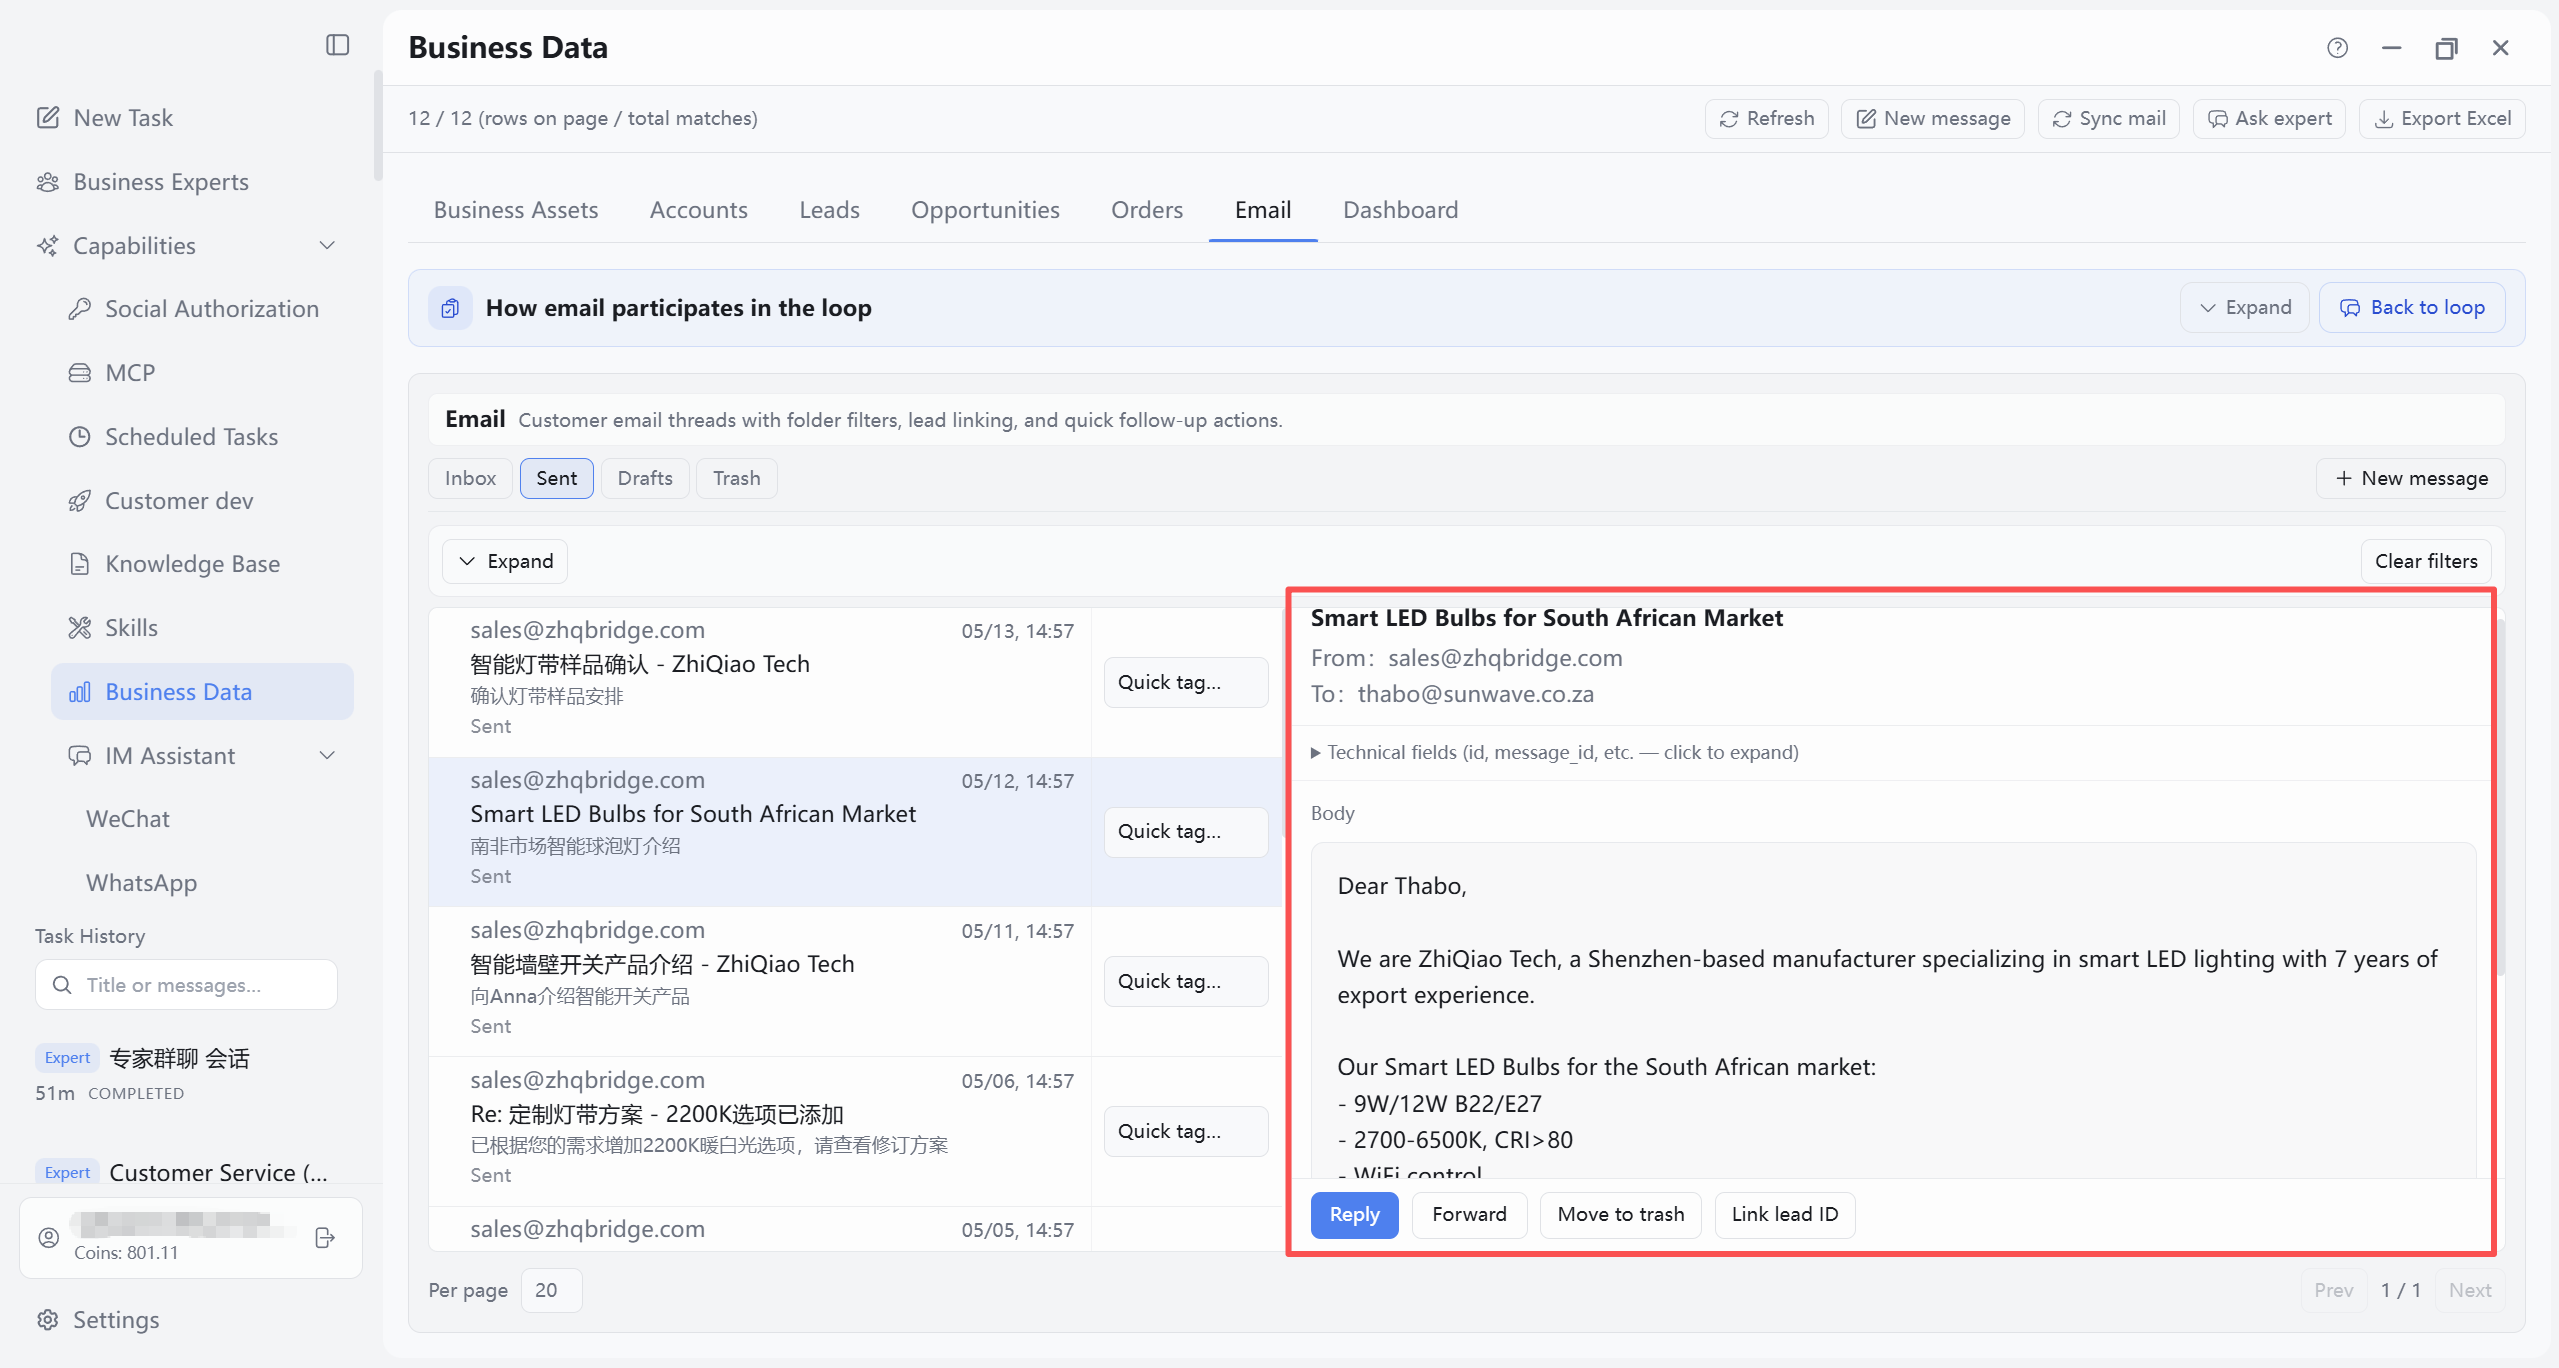
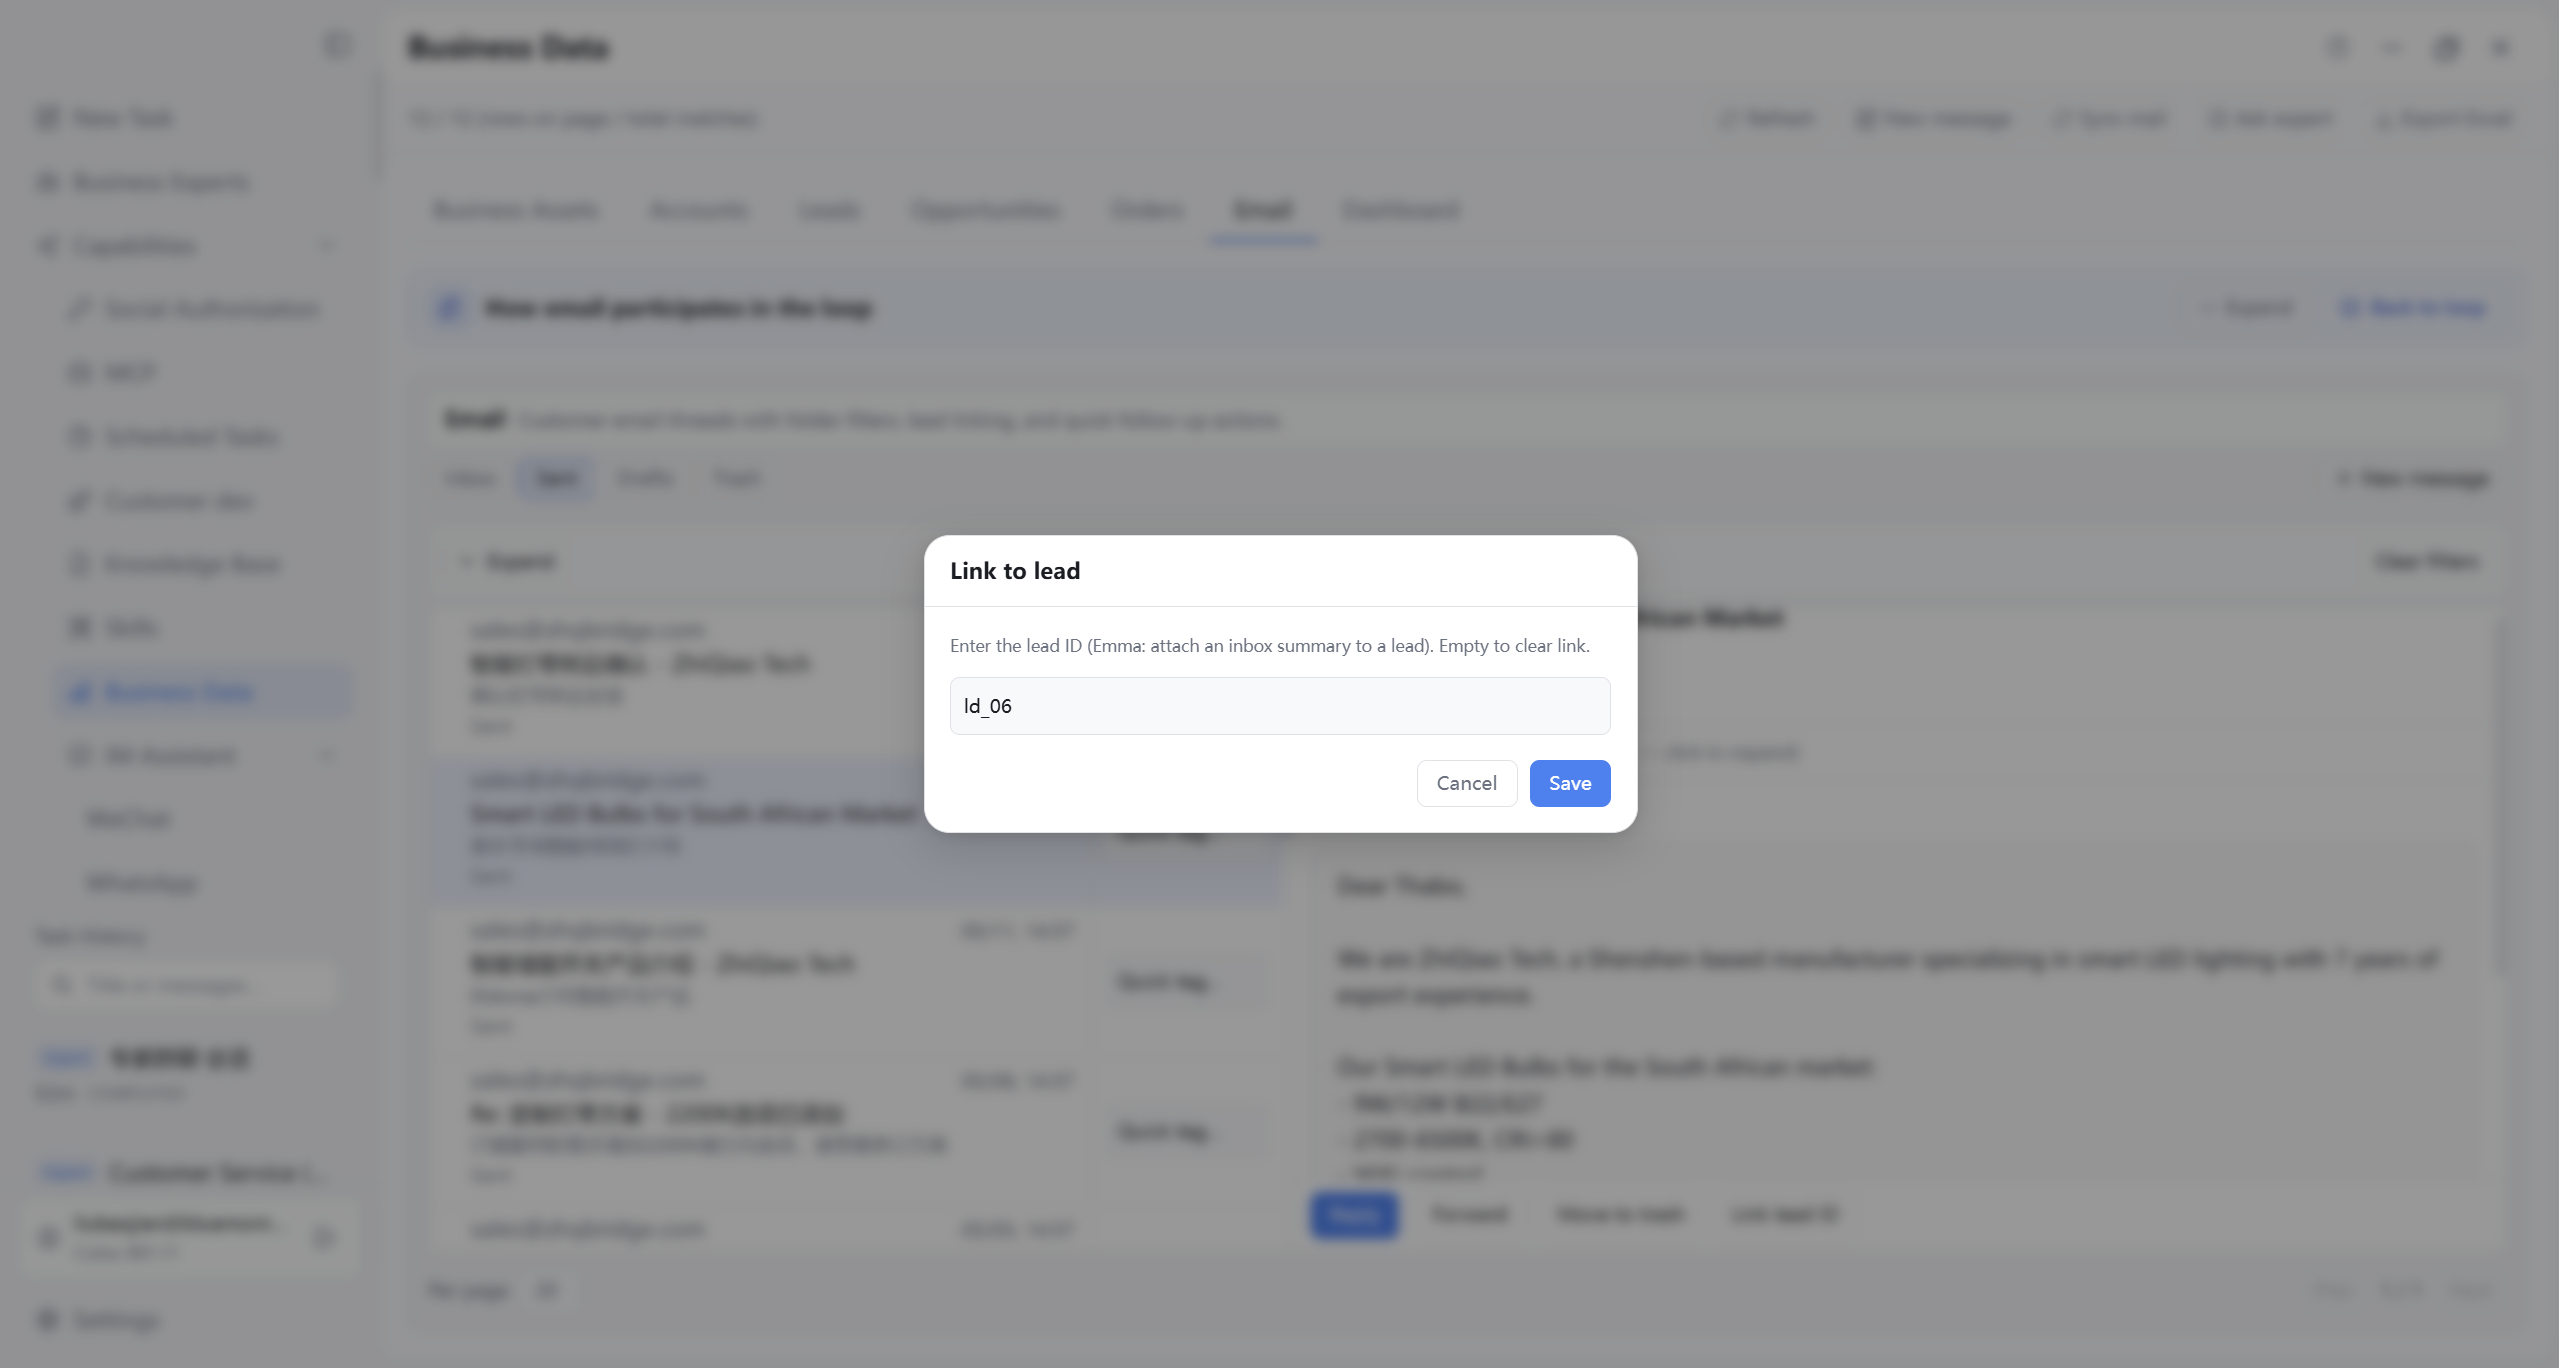
10.7.3 Sent: list, tags, detail, link lead
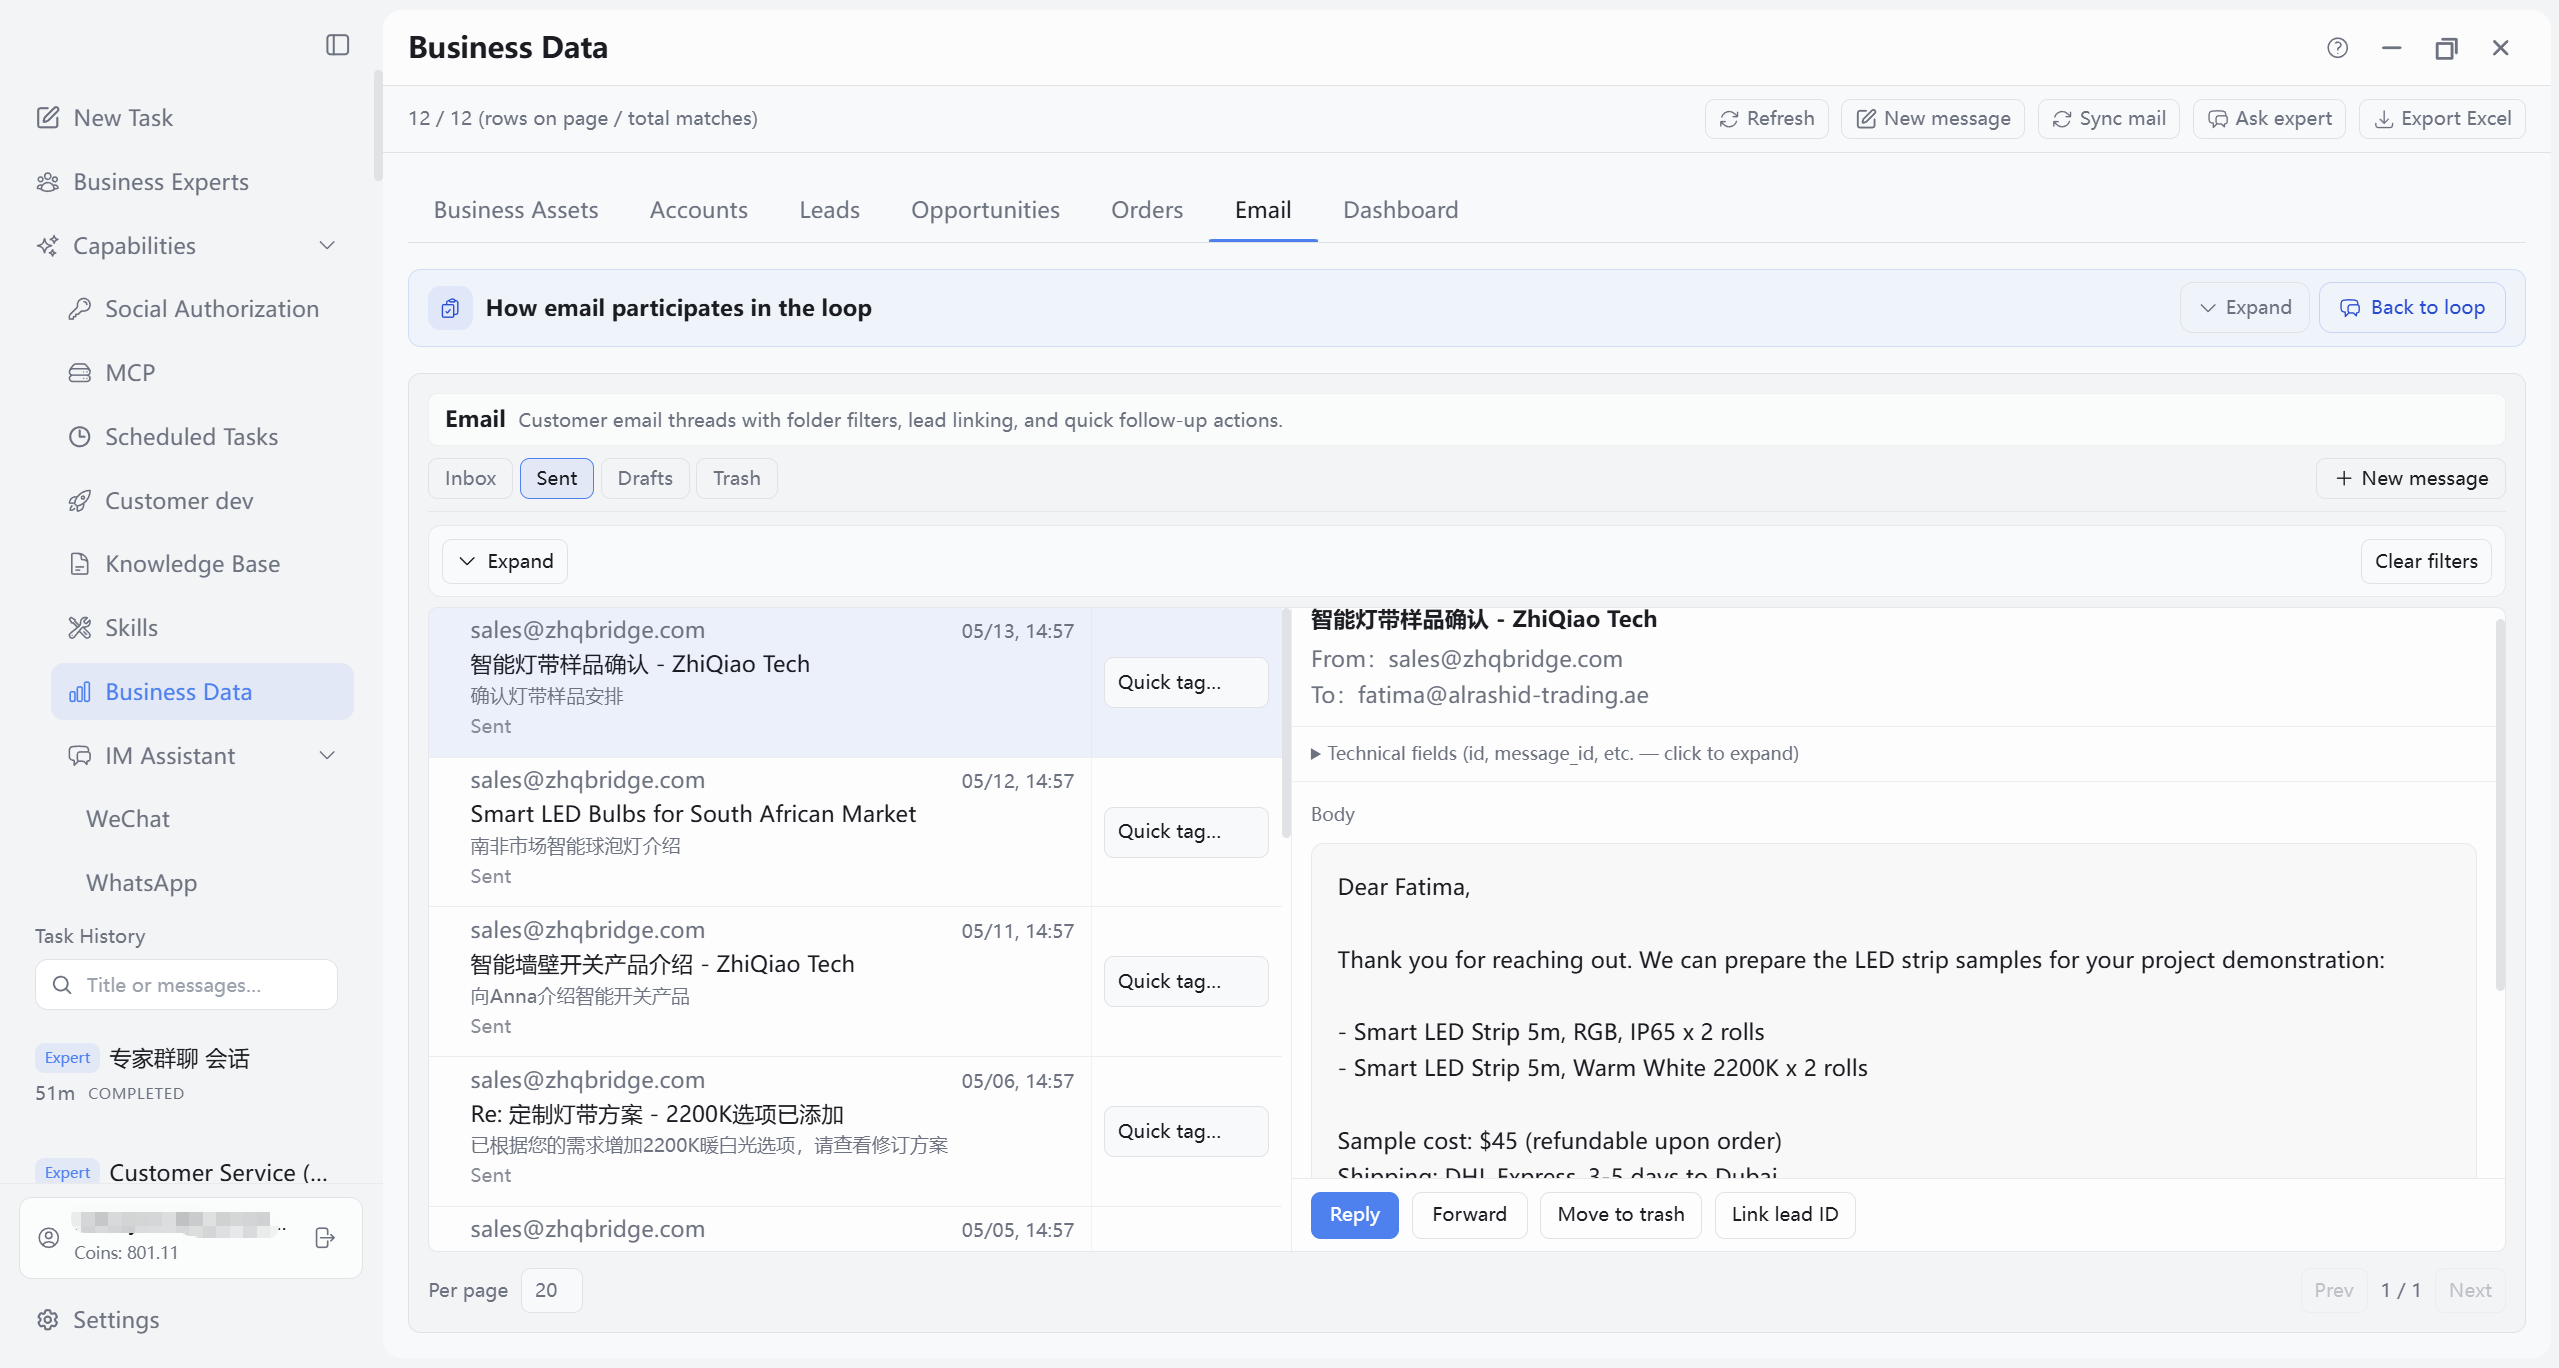
Sent lists outbound mail; quick tags, detail, and lead linking same as inbox. Four figures: list → quick tags → detail → link lead.
10.7.4 Drafts: list, detail edit, link lead
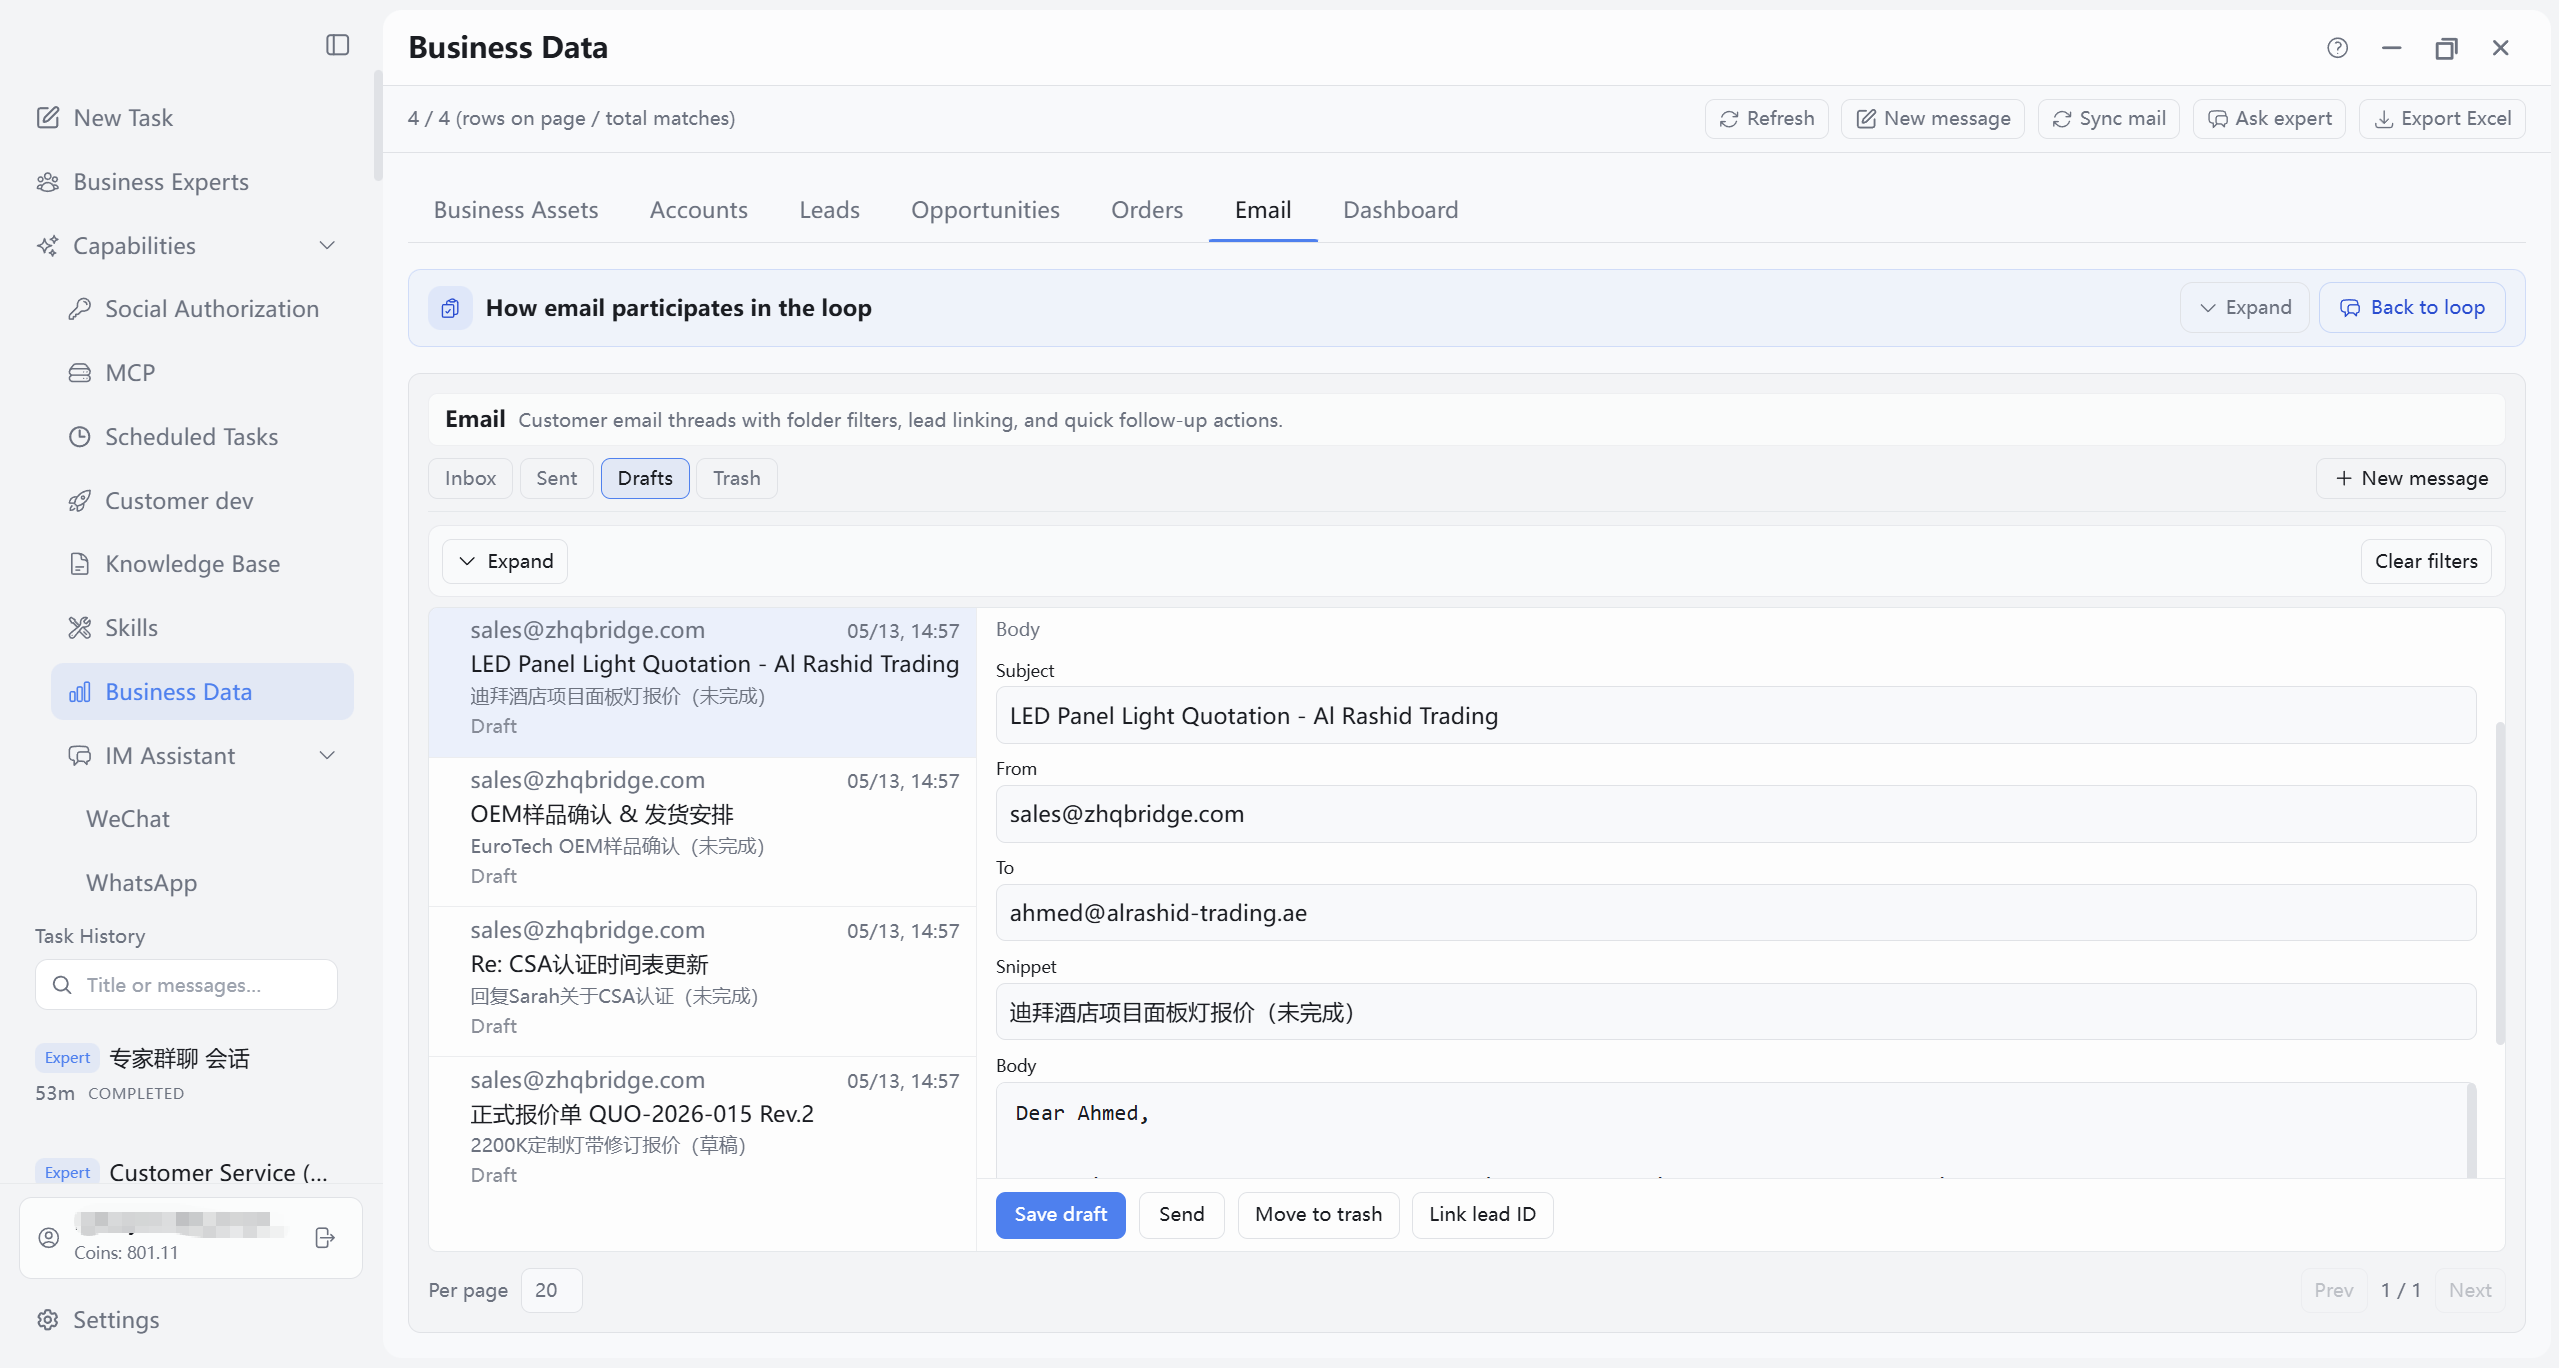
Drafts holds unsent mail; open to edit recipients, subject, body, attachments; bind lead before send. Three figures: list → detail edit → link lead.
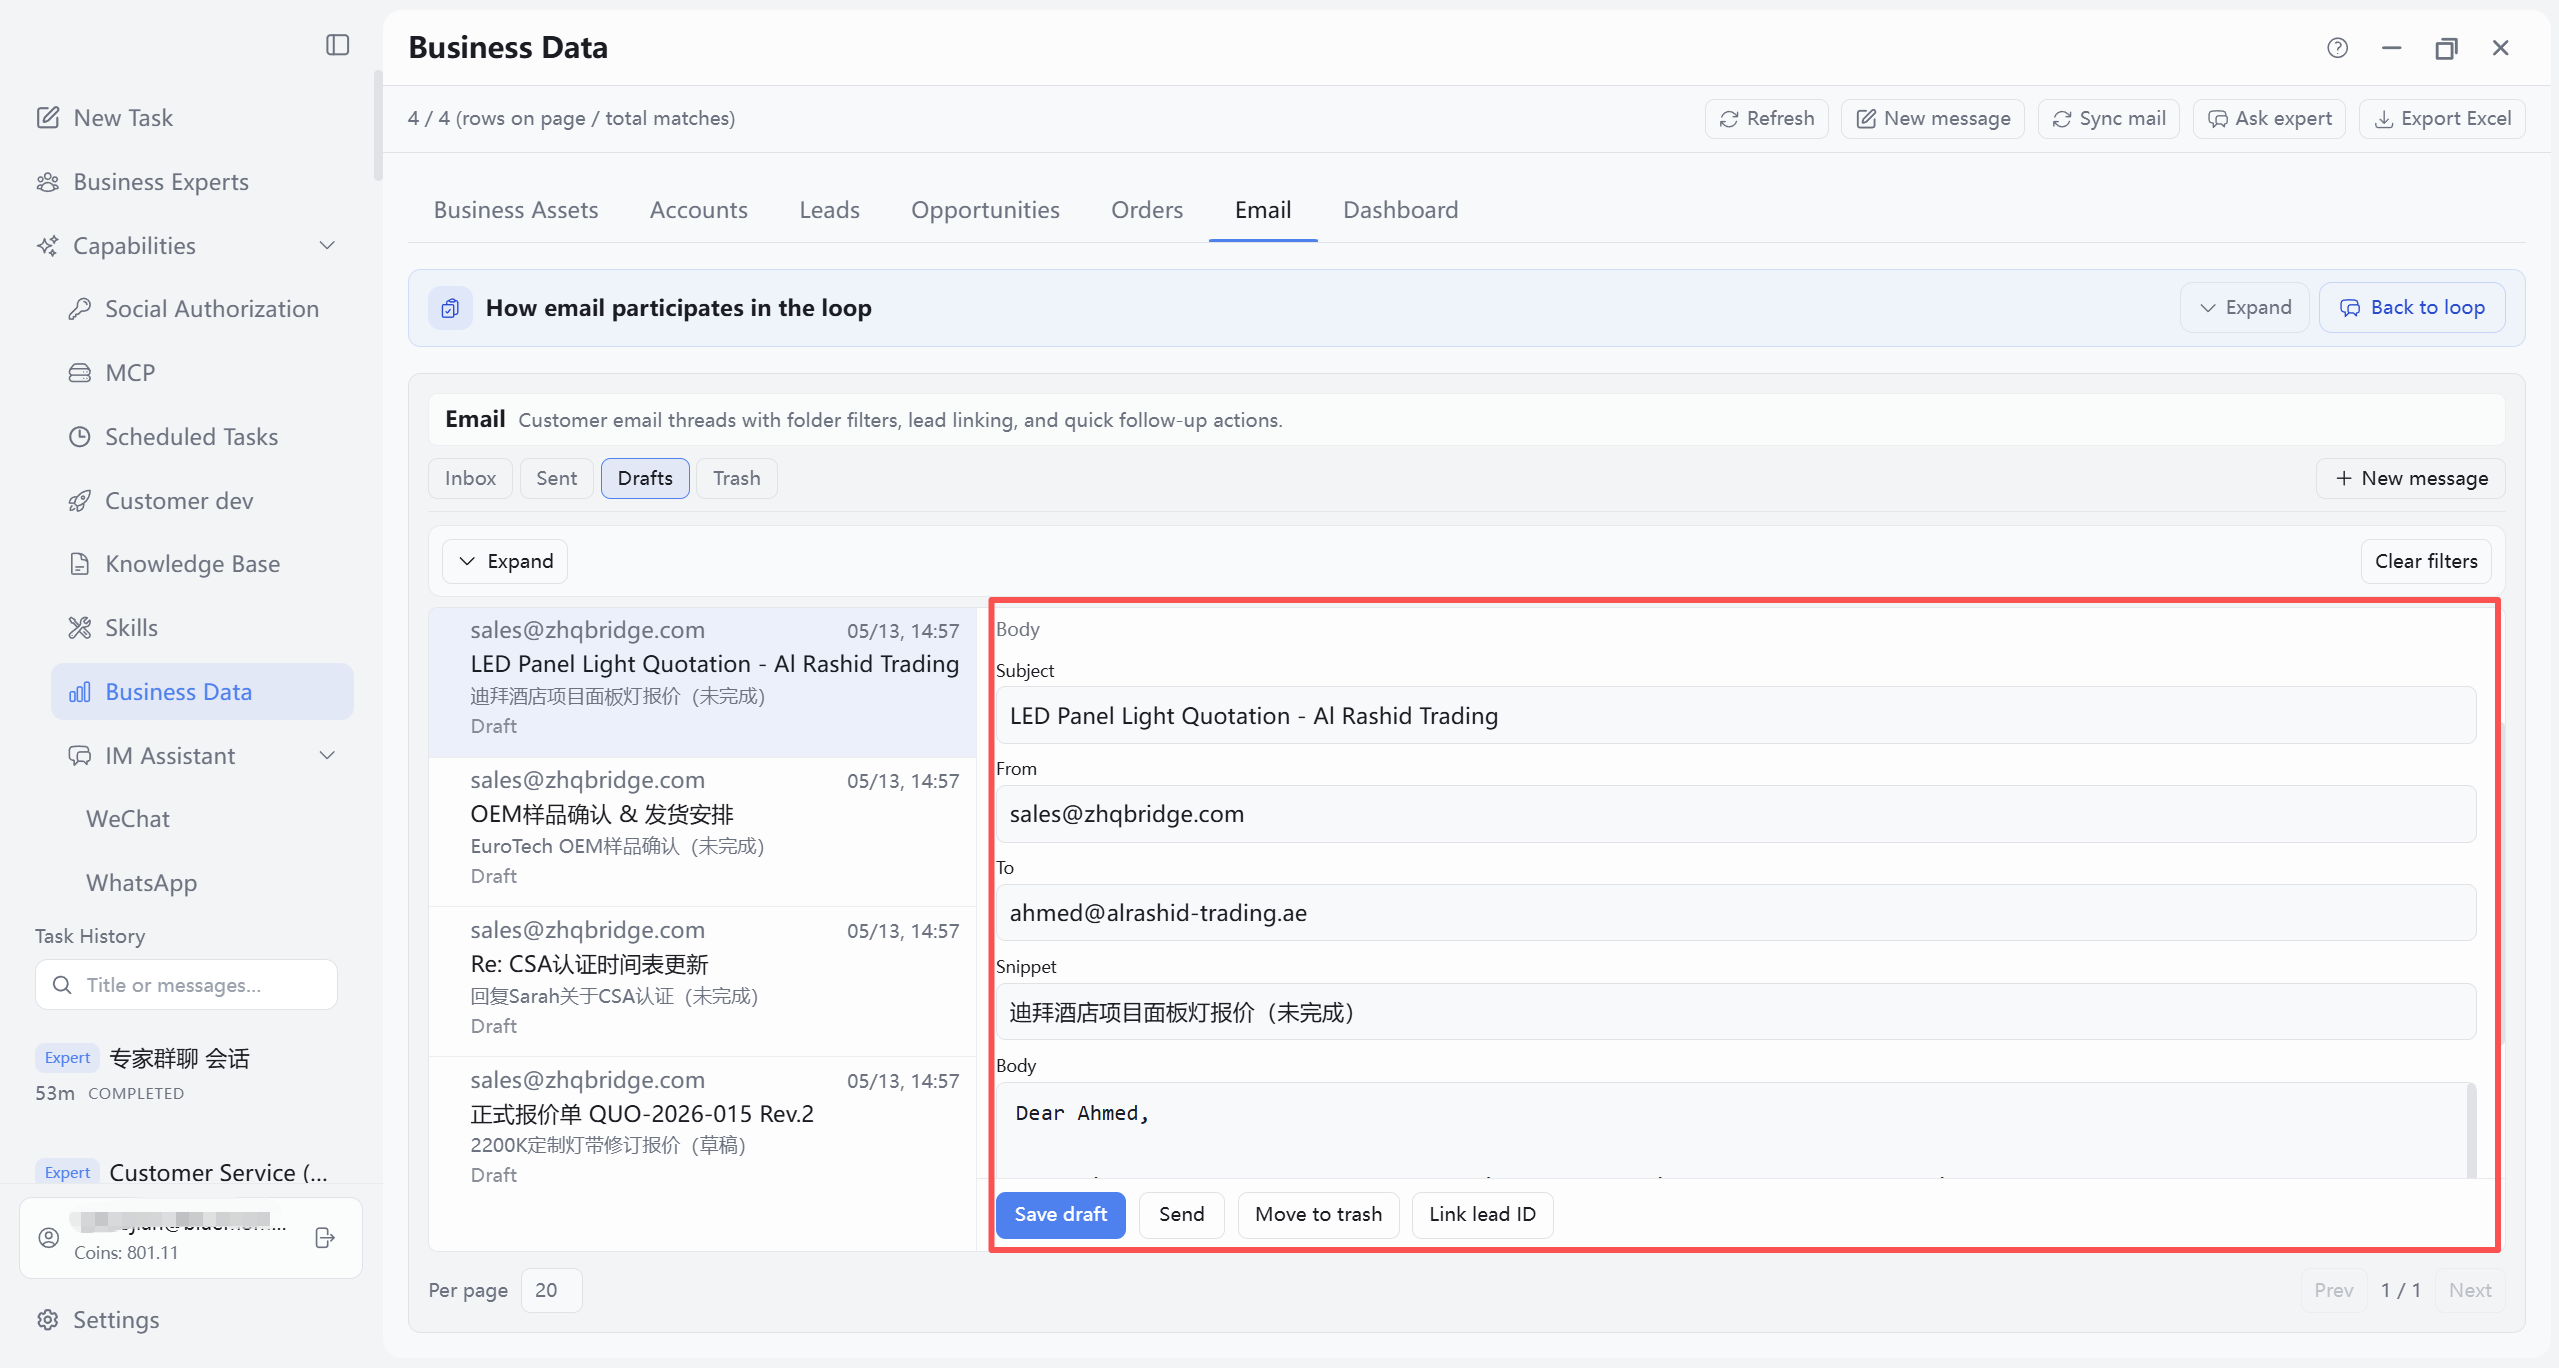
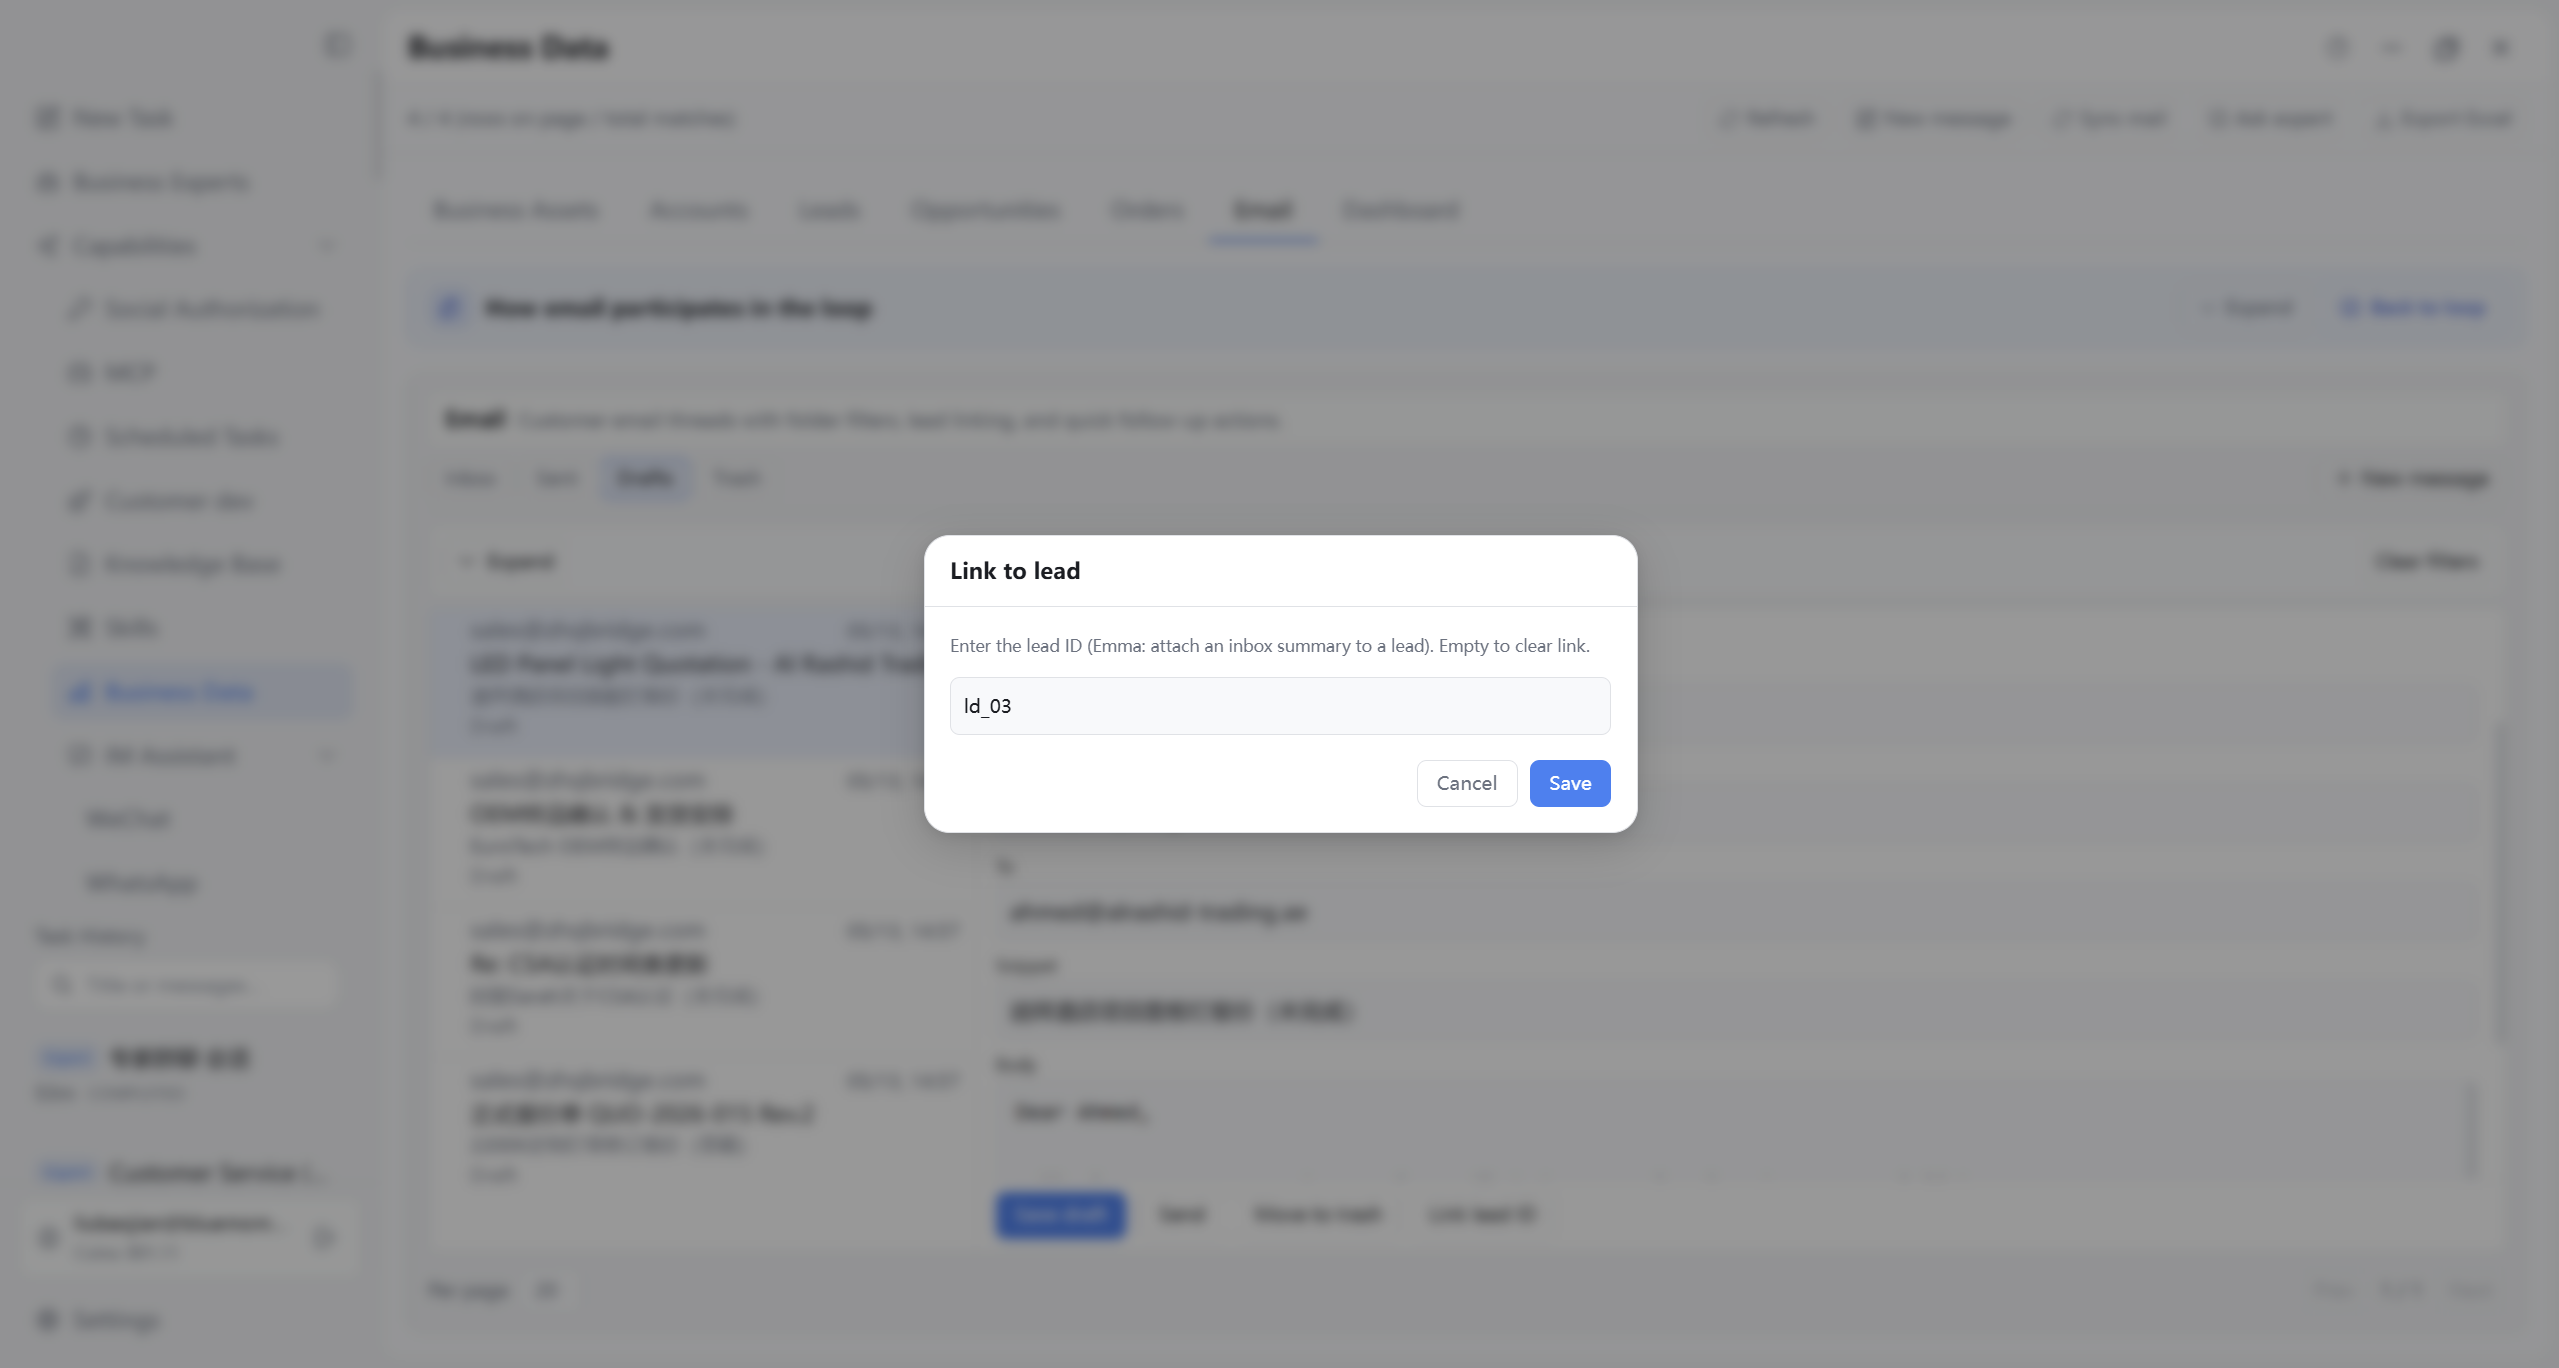
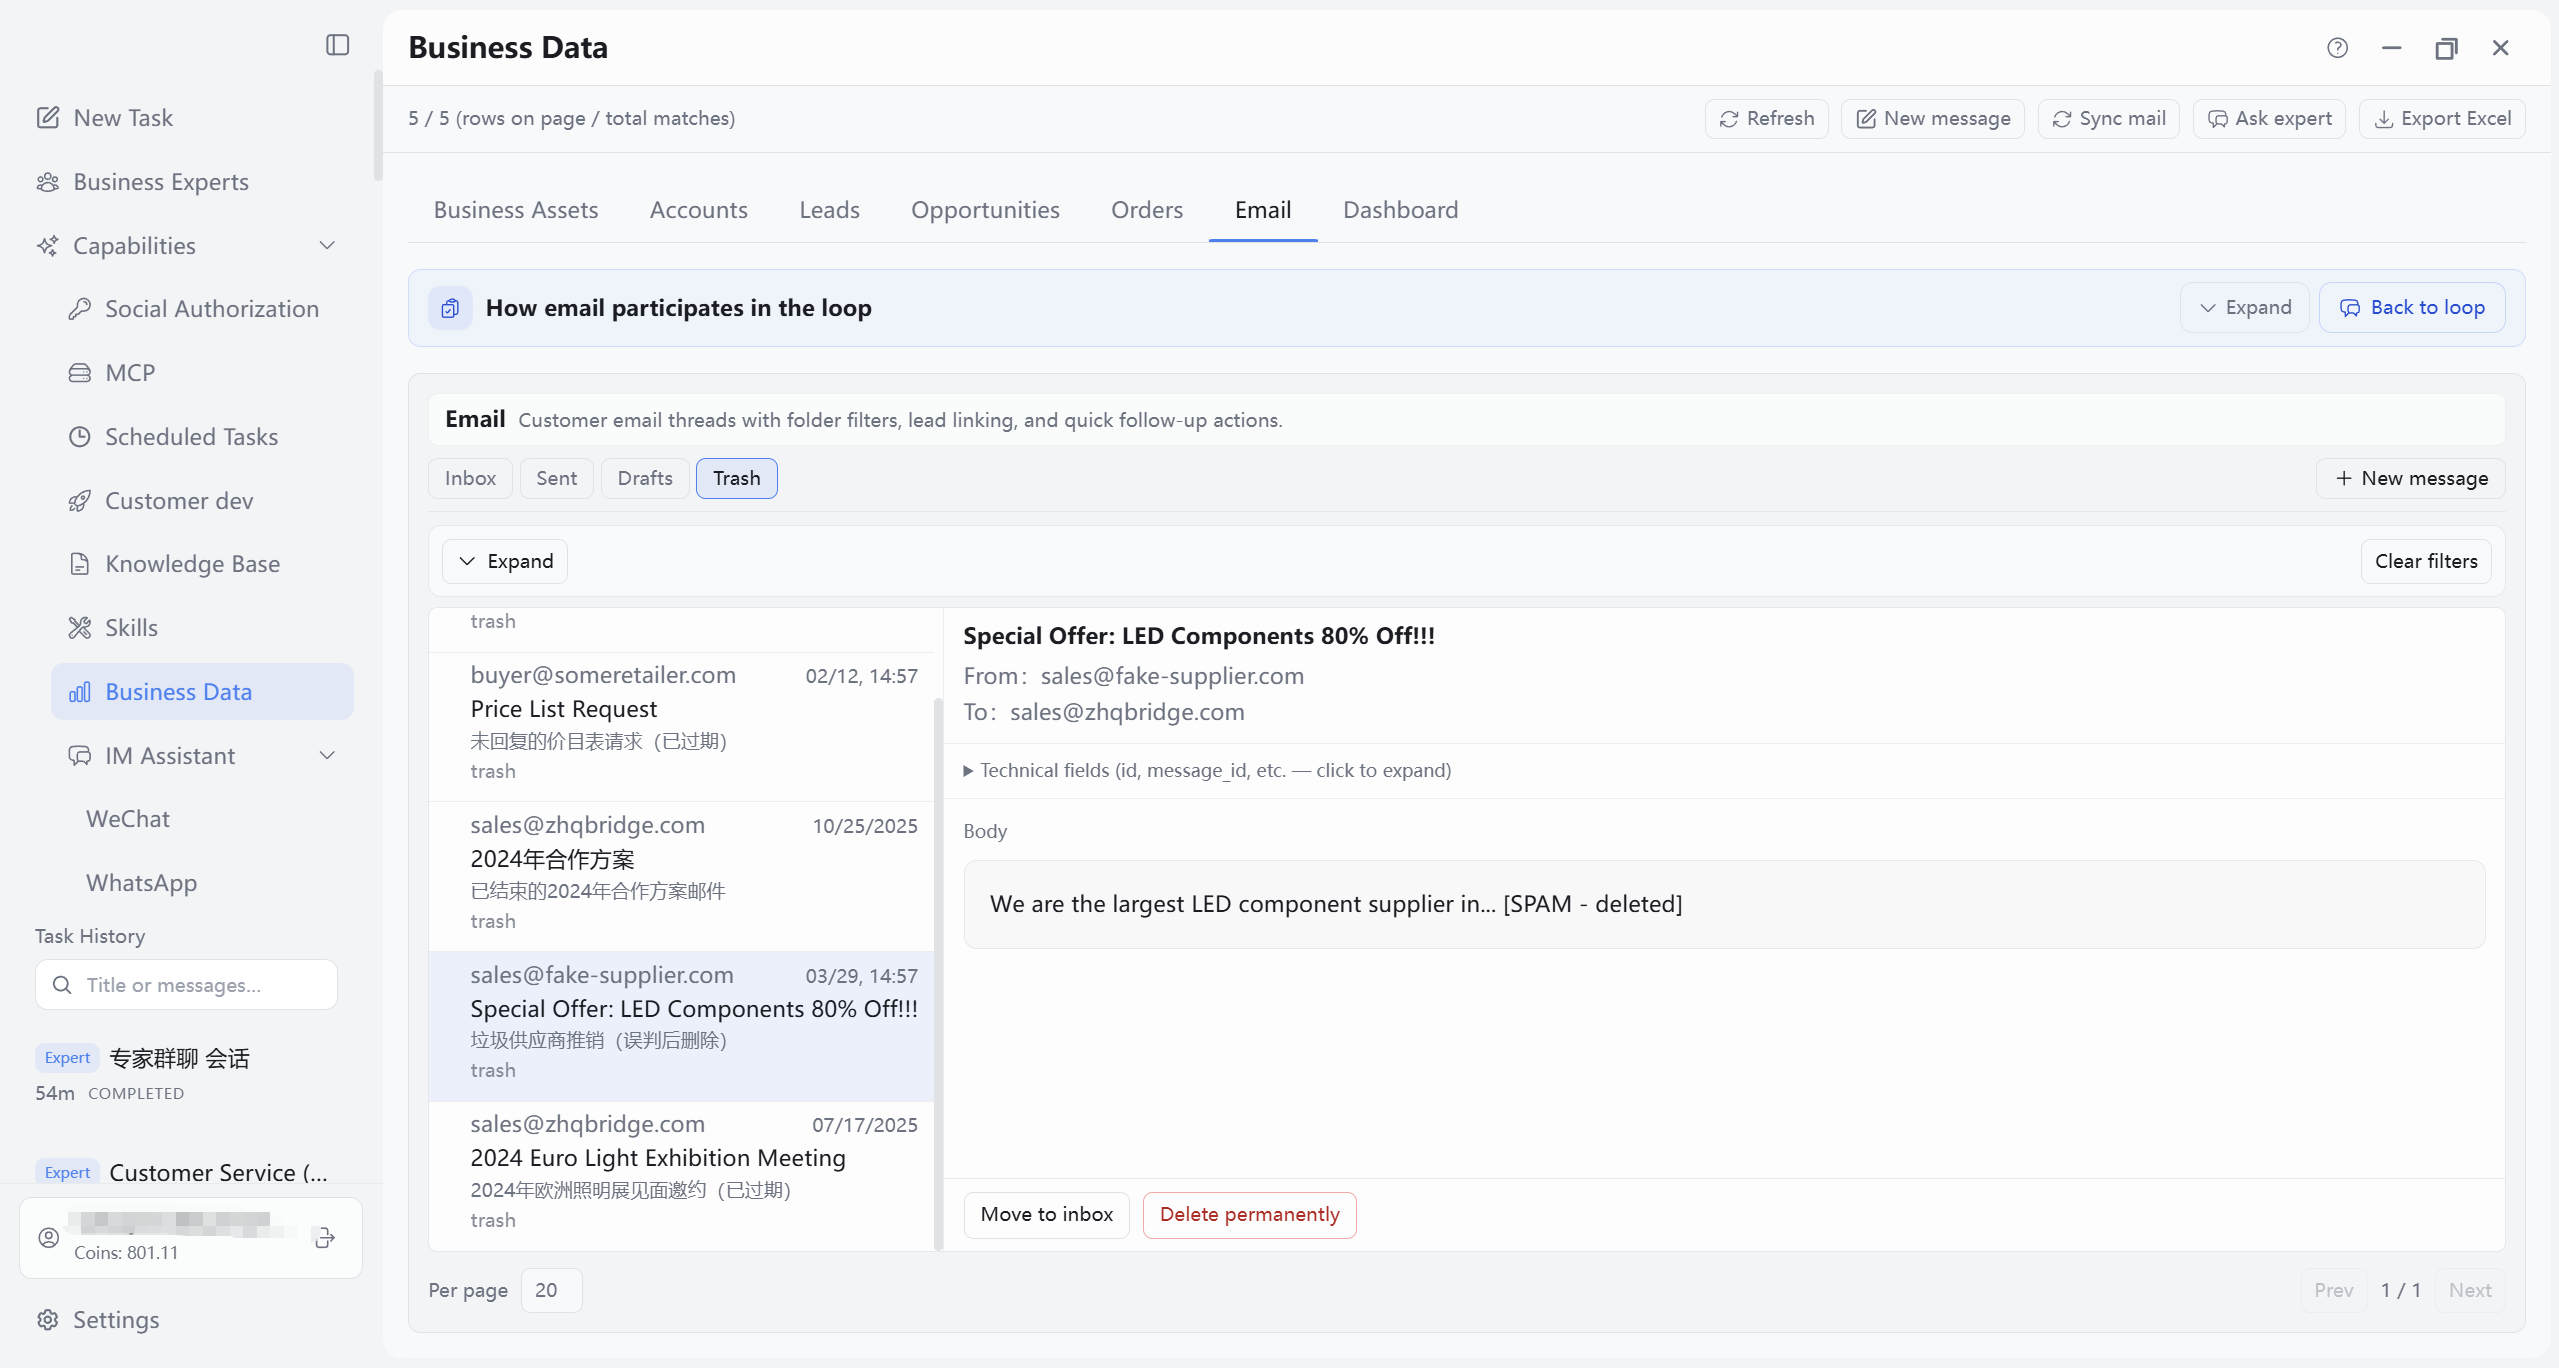
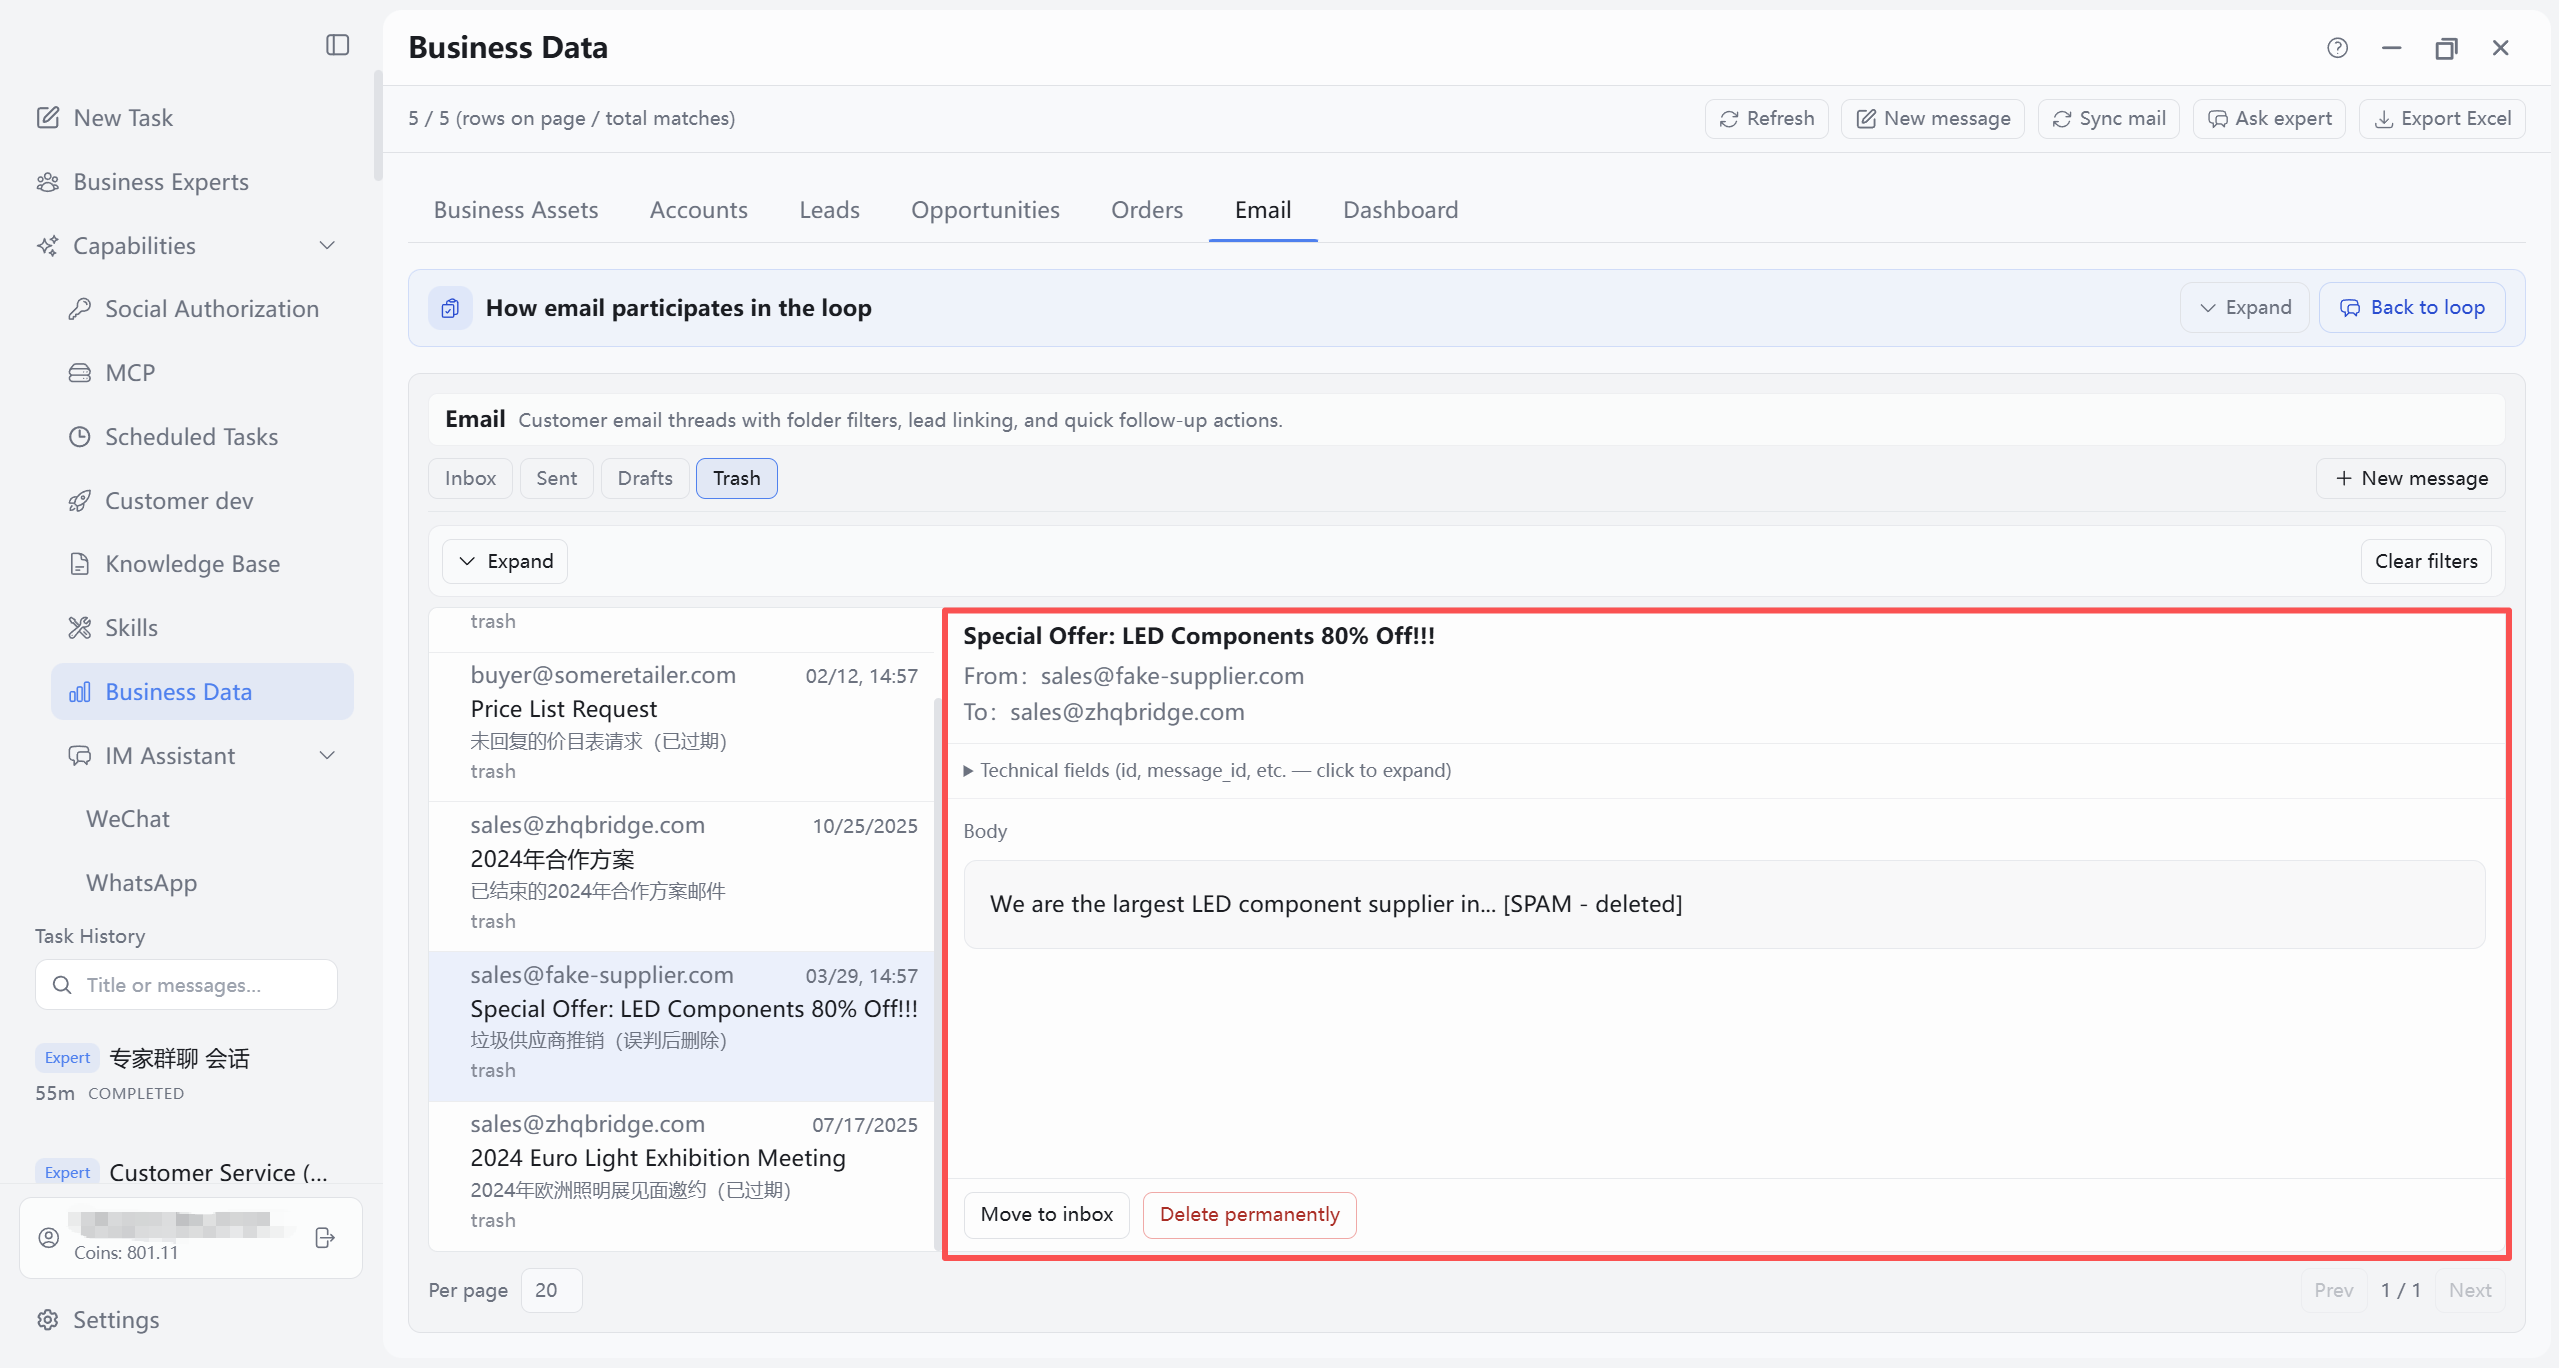
10.7.5 Trash: list and detail
Trash lists deleted mail; open for body/attachments, then Restore or Delete permanently. Two figures: list → detail.
10.8 Dashboard Module
10.8.1 General capabilities in this module
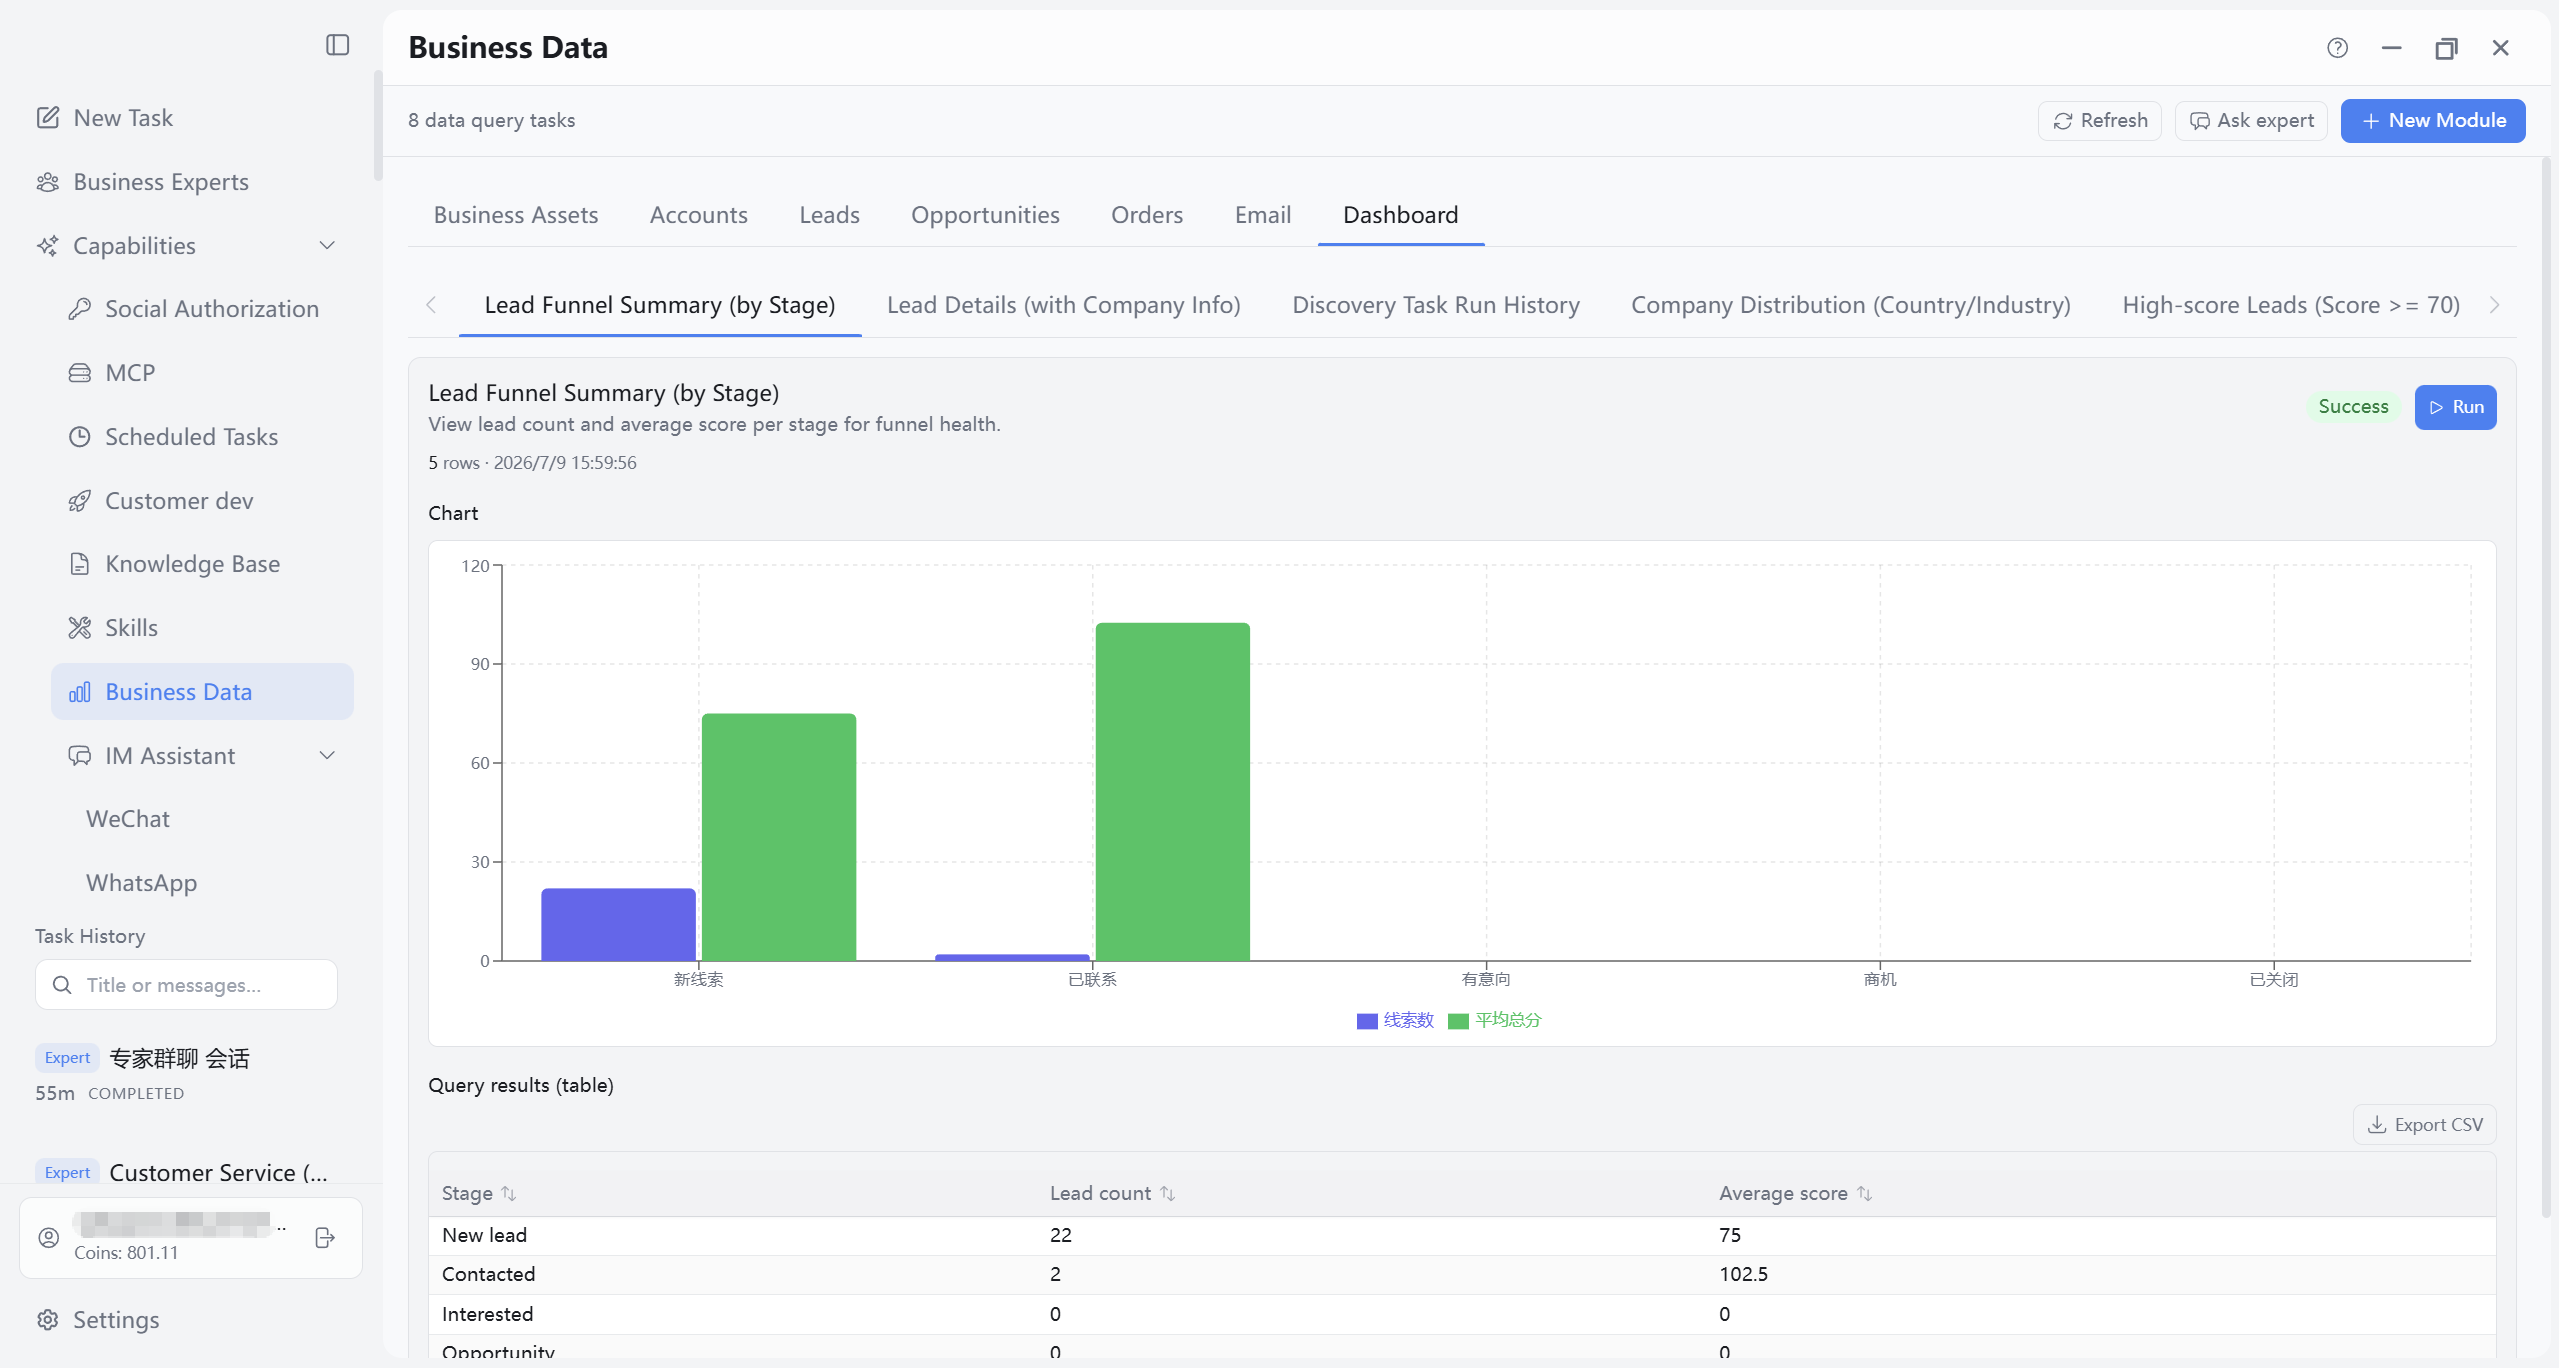
Refresh: On Dashboard tab, toolbar Refresh reloads the module list and runs queries for every module currently listed, refreshing each result.
“Run” in module detail: After opening a module from a main-area card, “Run” on the module title bar (shows “Running…” and is disabled while executing). Built-in and custom modules both provide it. Click runs read-only SQL for only the module you are viewing and updates table, chart, or metric cards below. vs. toolbar Refresh: Refresh reloads the list and runs all modules; Run reruns current module only—good for updating one block or retrying after an error.
Ask expert: Dashboard toolbar Ask expert opens Tasks page with current tab and dashboard view and the configured business expert; placement Figure 10-01, effect Figure 10-12.
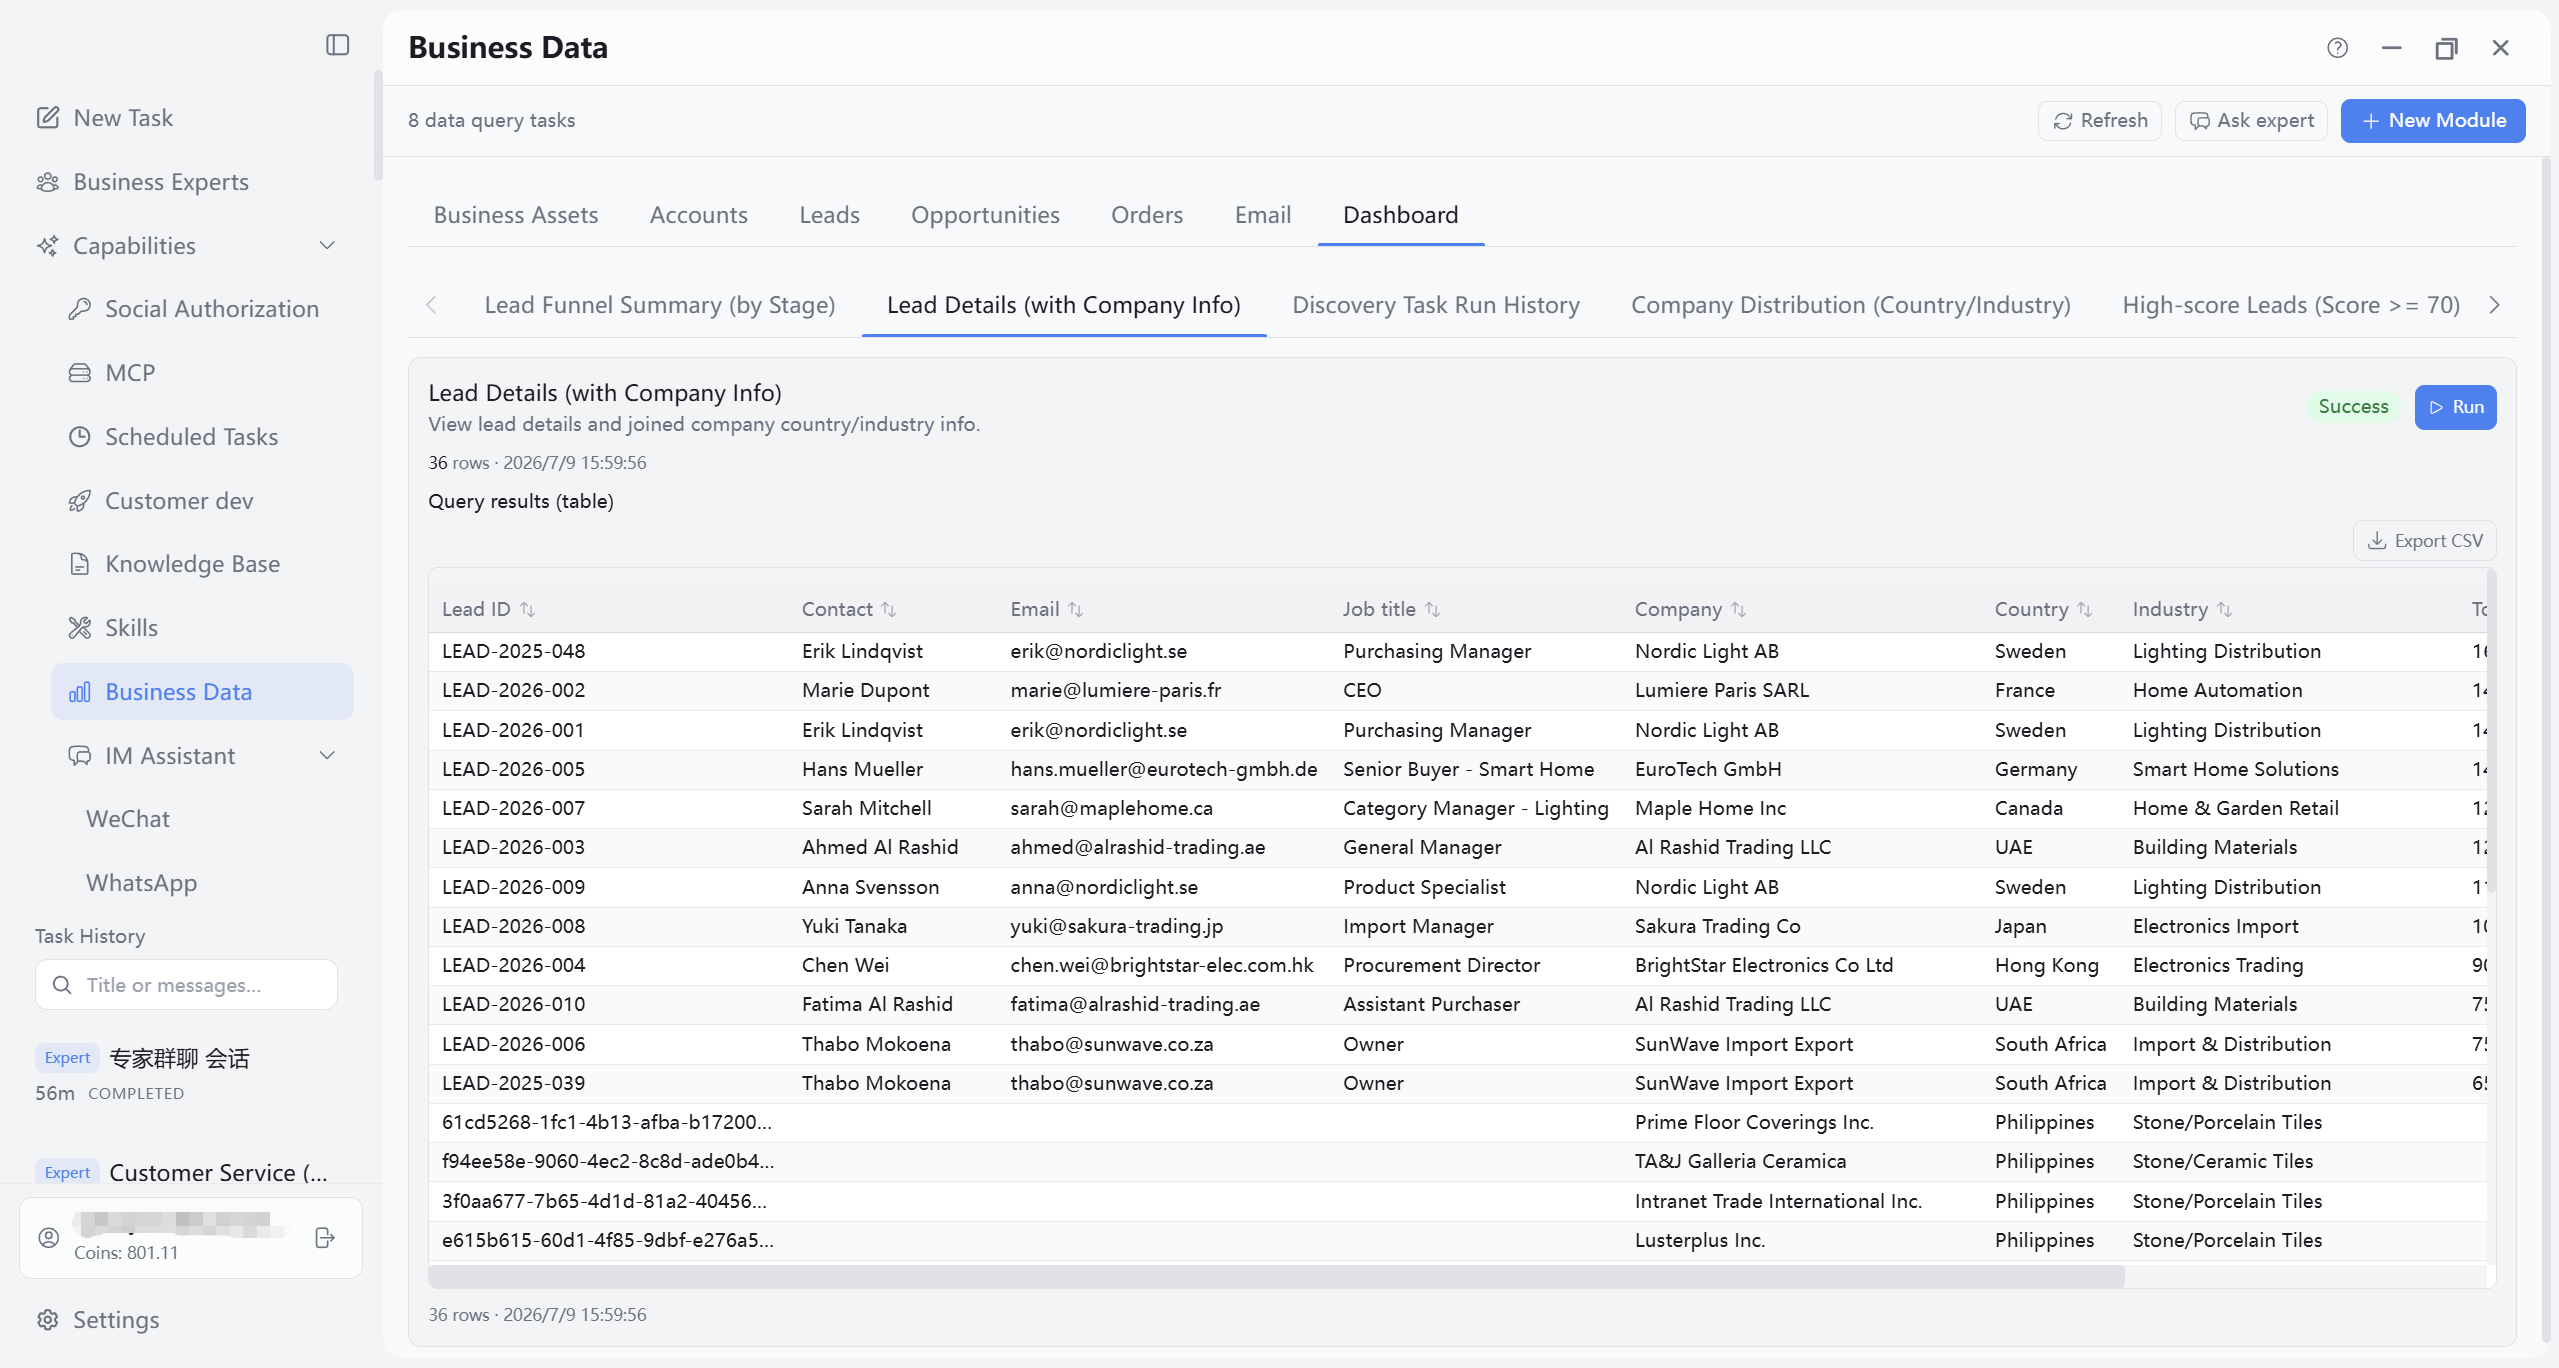
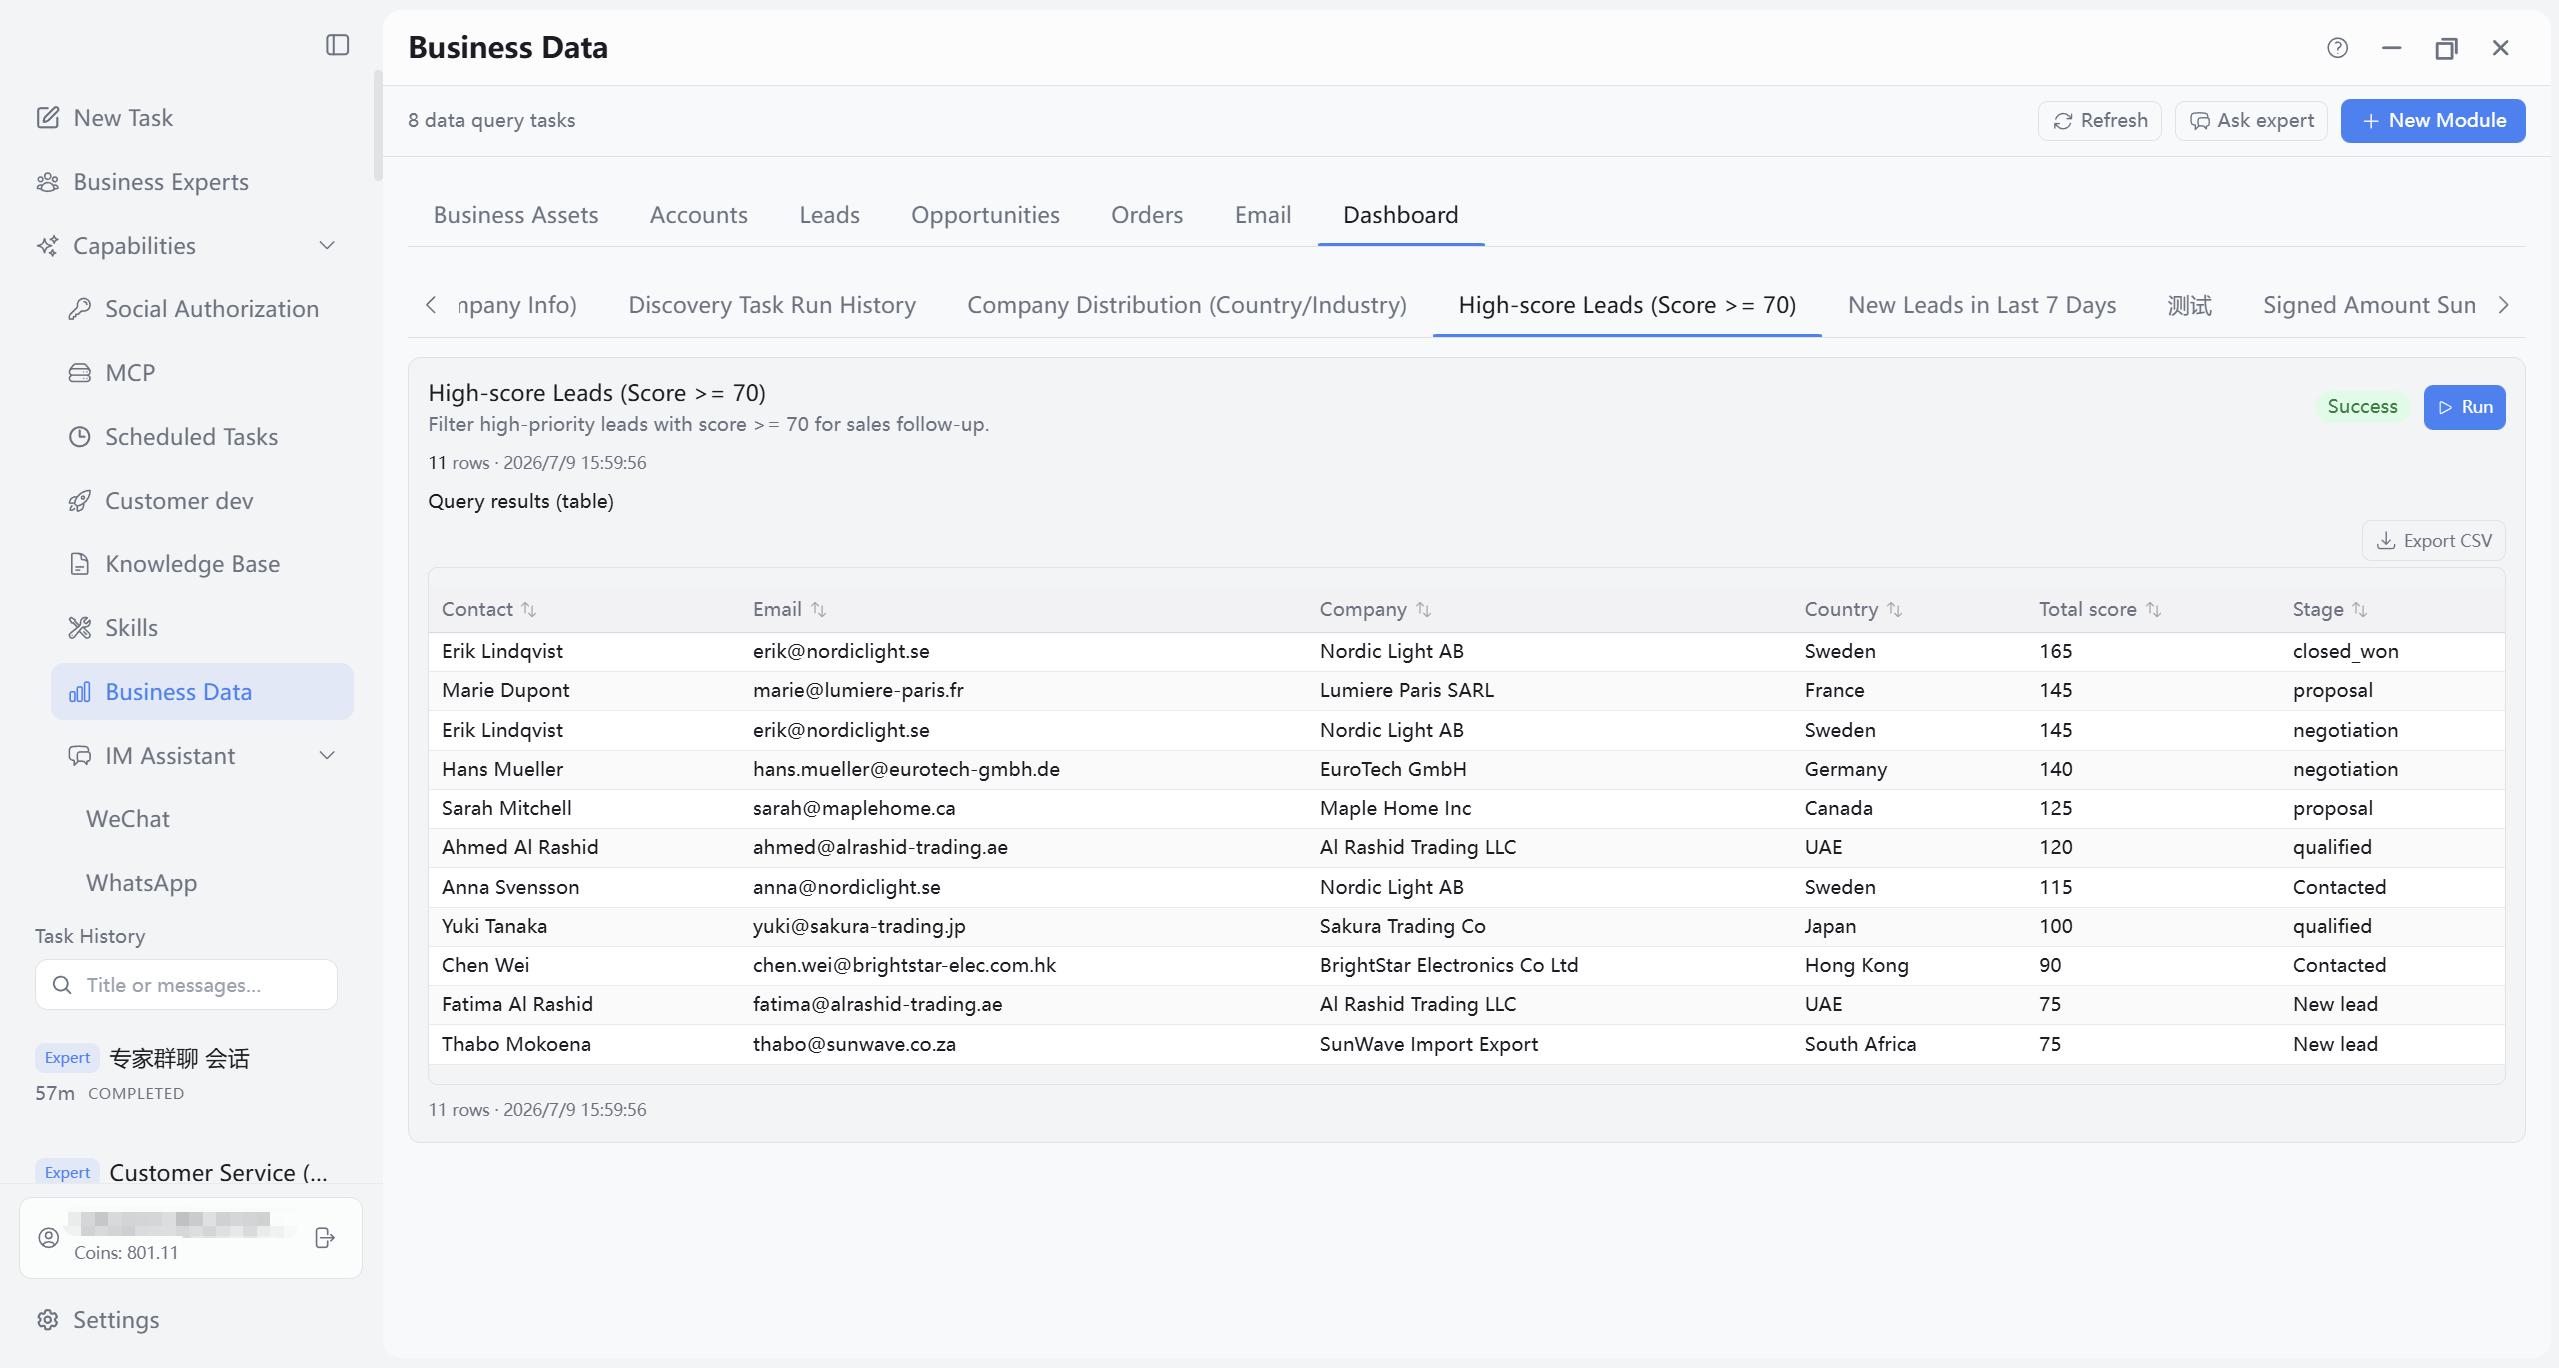
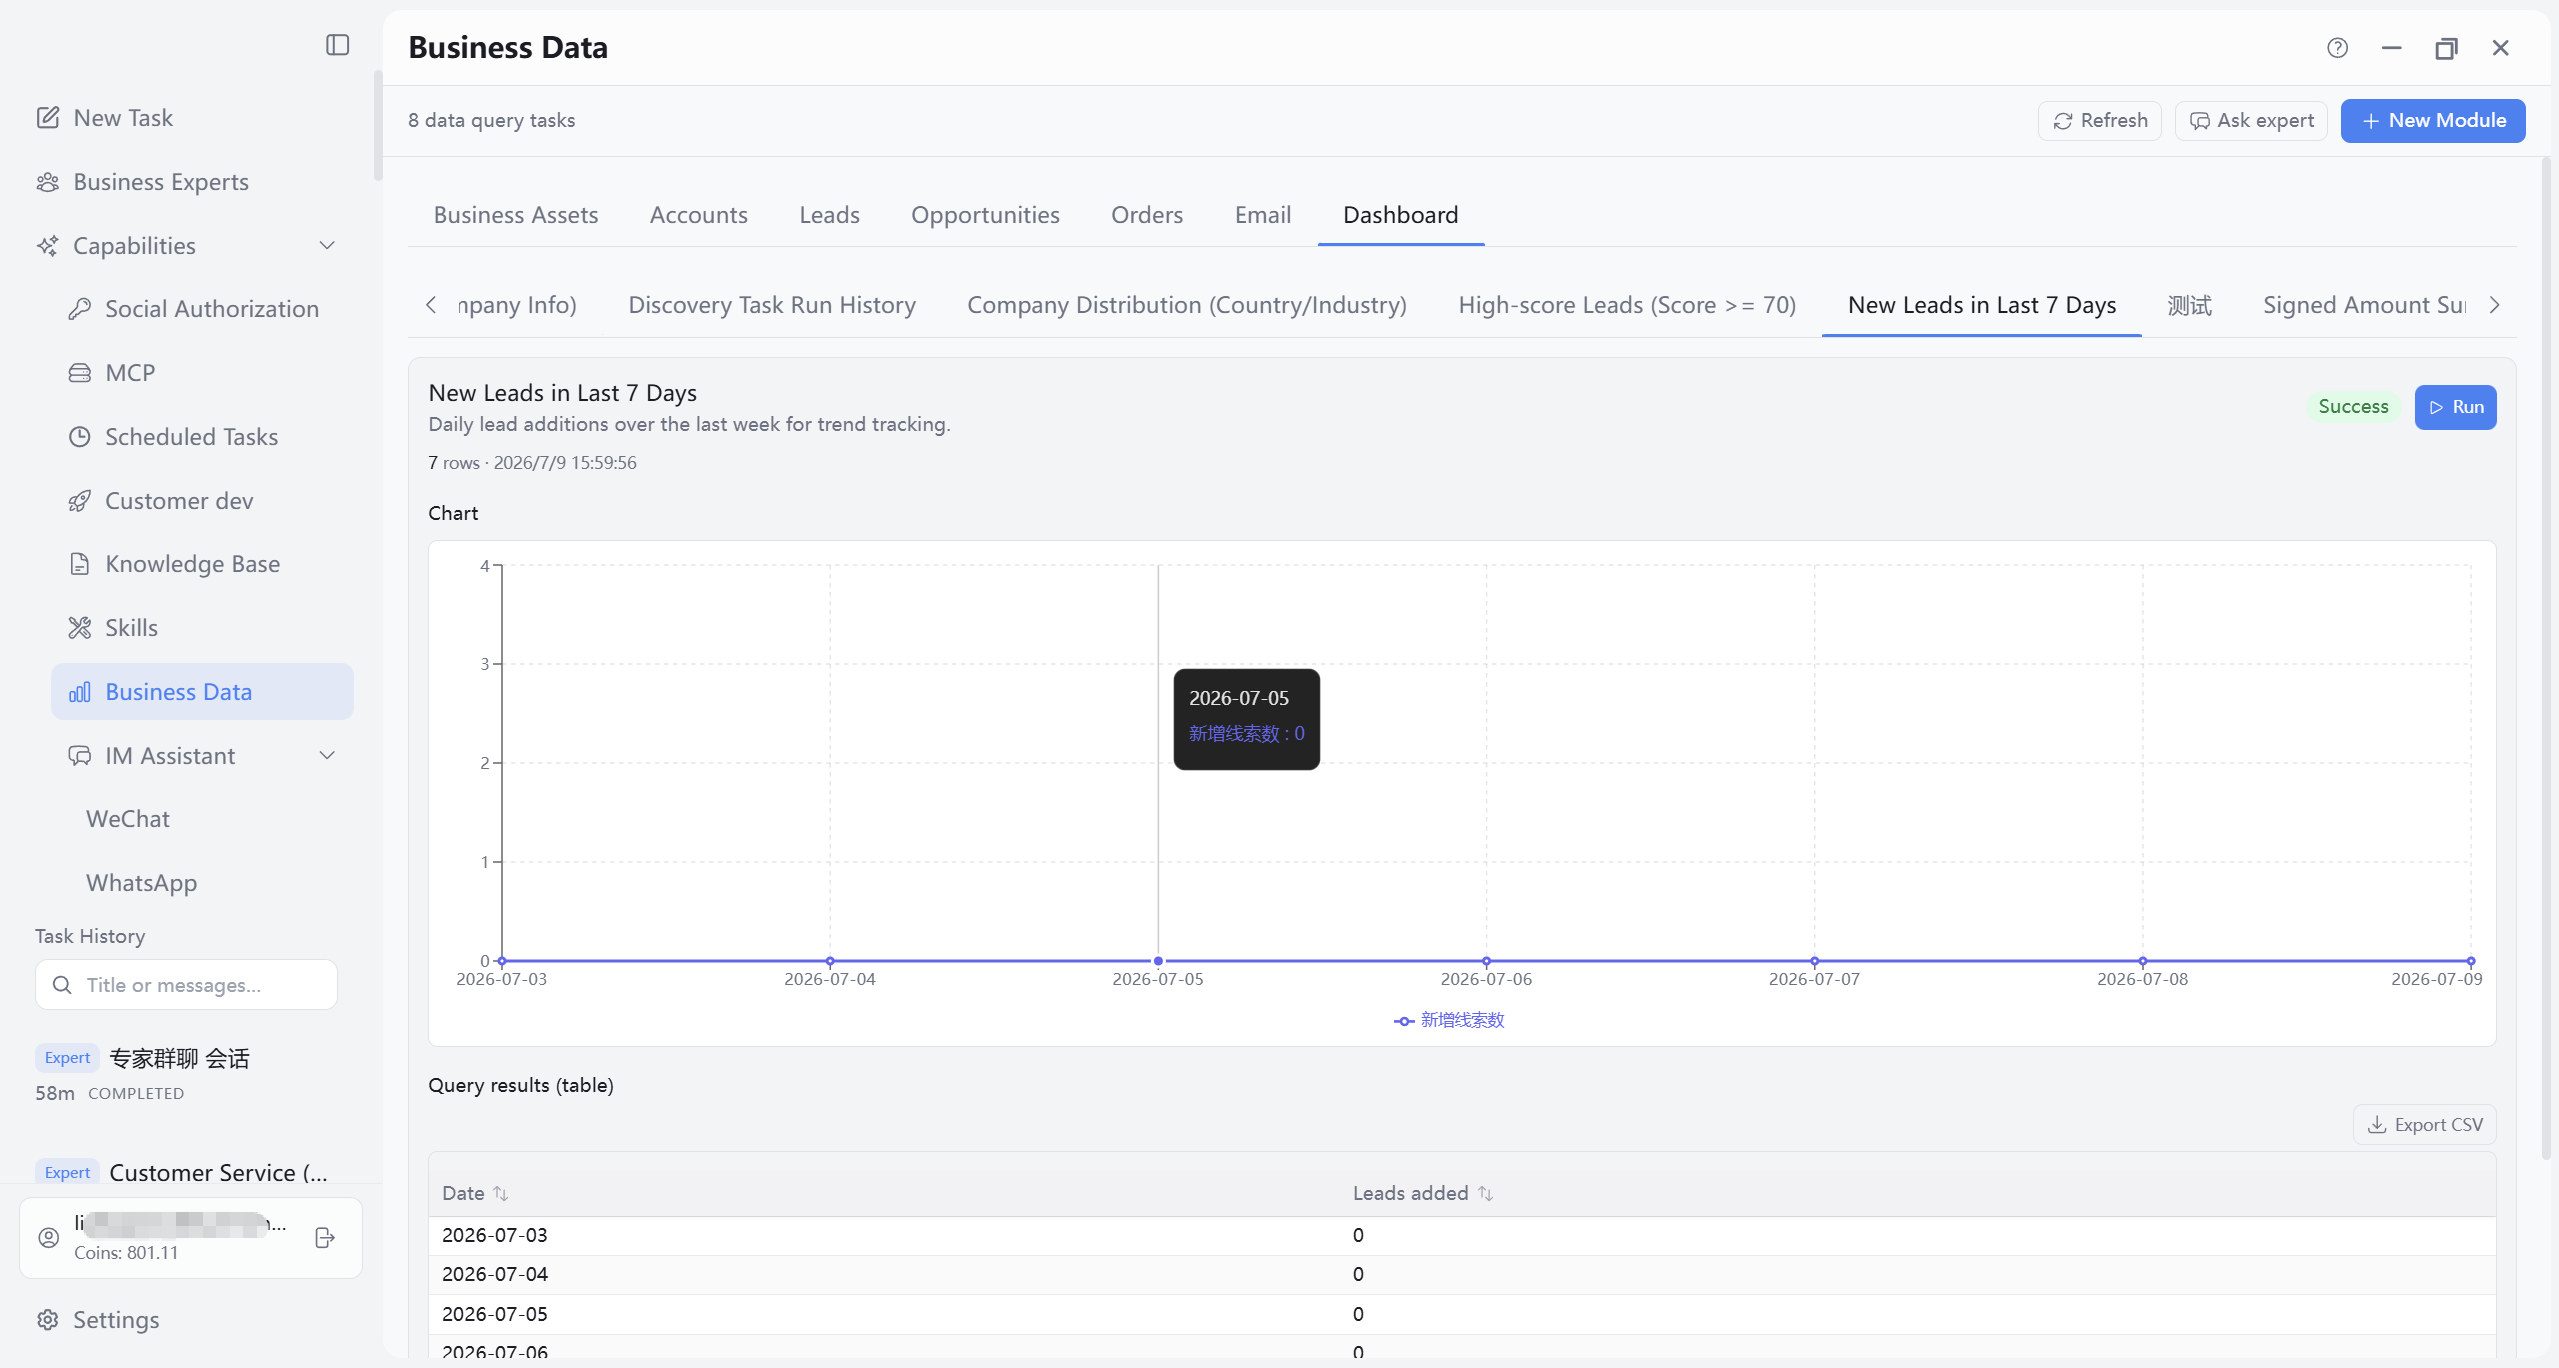
Export (vs. list tabs): Toolbar “Export Excel” only on Customers, Leads, Opportunities, Mail list tabs for filtered Excel export (Figure 10-03). On Dashboard, toolbar has no clickable “Export Excel.” When a module shows results as a table (including result tables under chart/metric modules), the table area offers “Export CSV” for current table data (disabled when no columns or no exportable data).
10.8.2 Dashboard main area
Main area shows data query modules in a card grid: scroll horizontally for titles and summaries; click for detail view. Toolbar: Refresh (reload list and run all queries) and New module (custom SQL module wizard).
10.8.3 Built-in data query modules
These are built-in query result views with fixed names and metrics. In module detail, Run reruns the query (per 10.8.1); toolbar Refresh updates with other dashboard modules. Common built-ins: lead funnel by stage, lead details with company info, high-score leads, new leads in last 7 days, company distribution (country or industry), customer discovery task run history, etc.
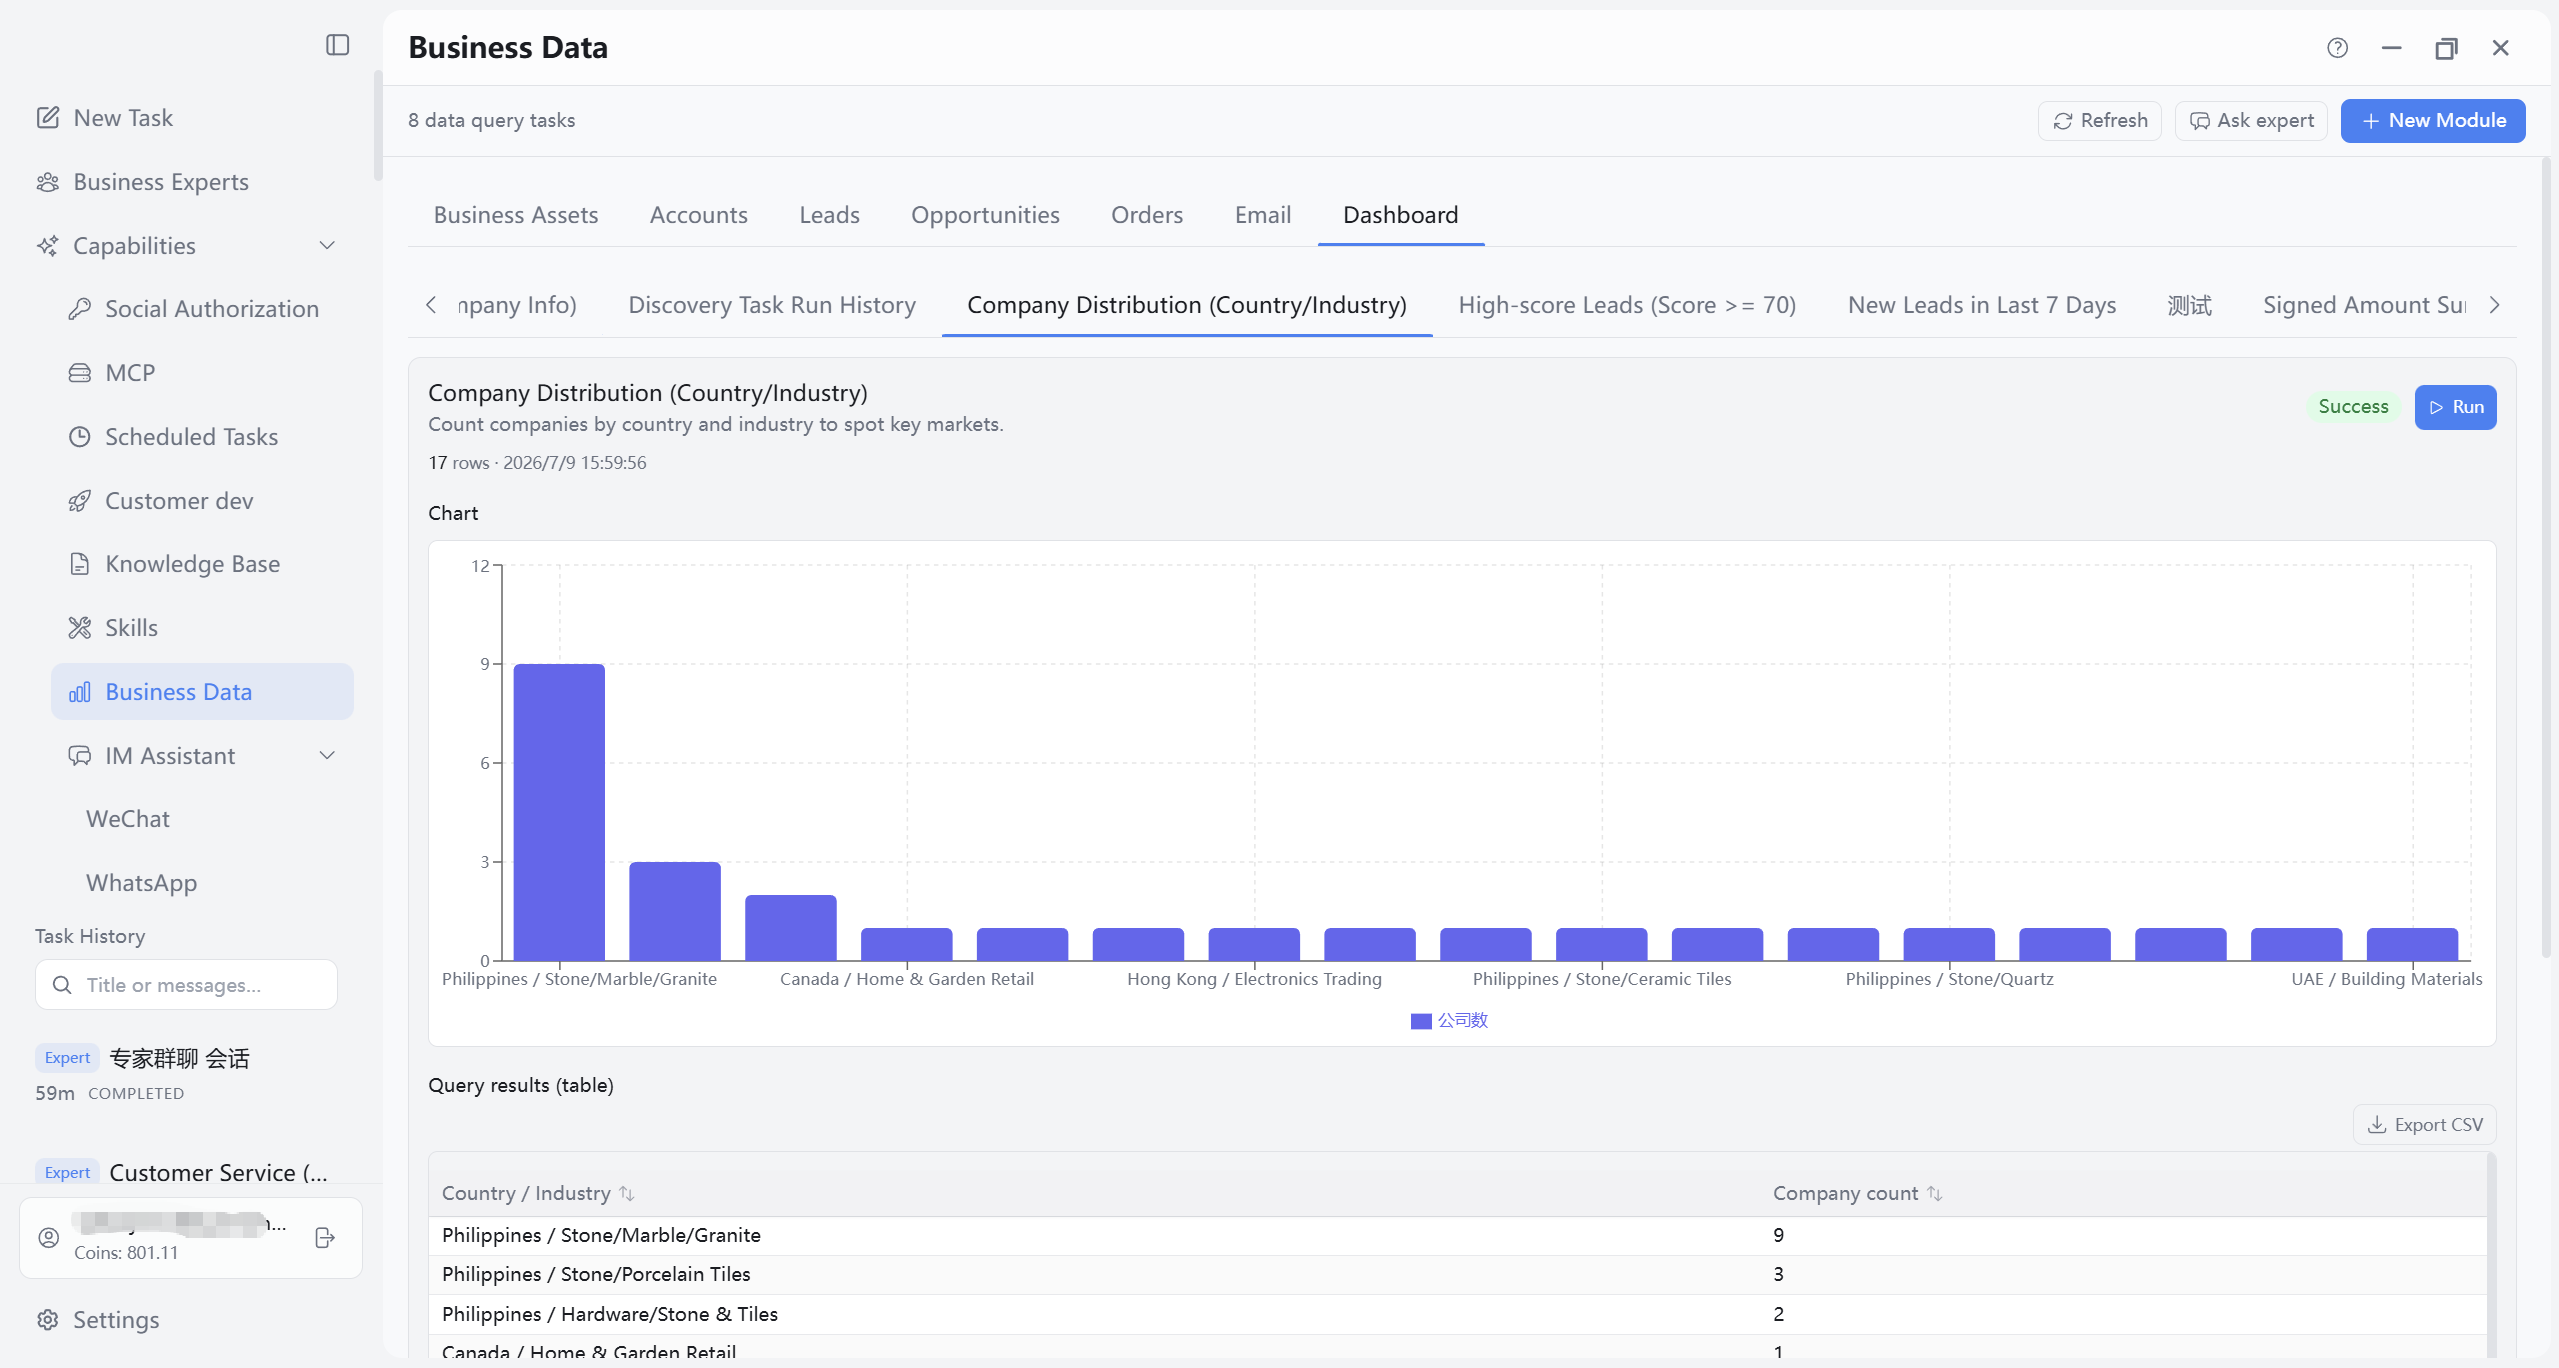
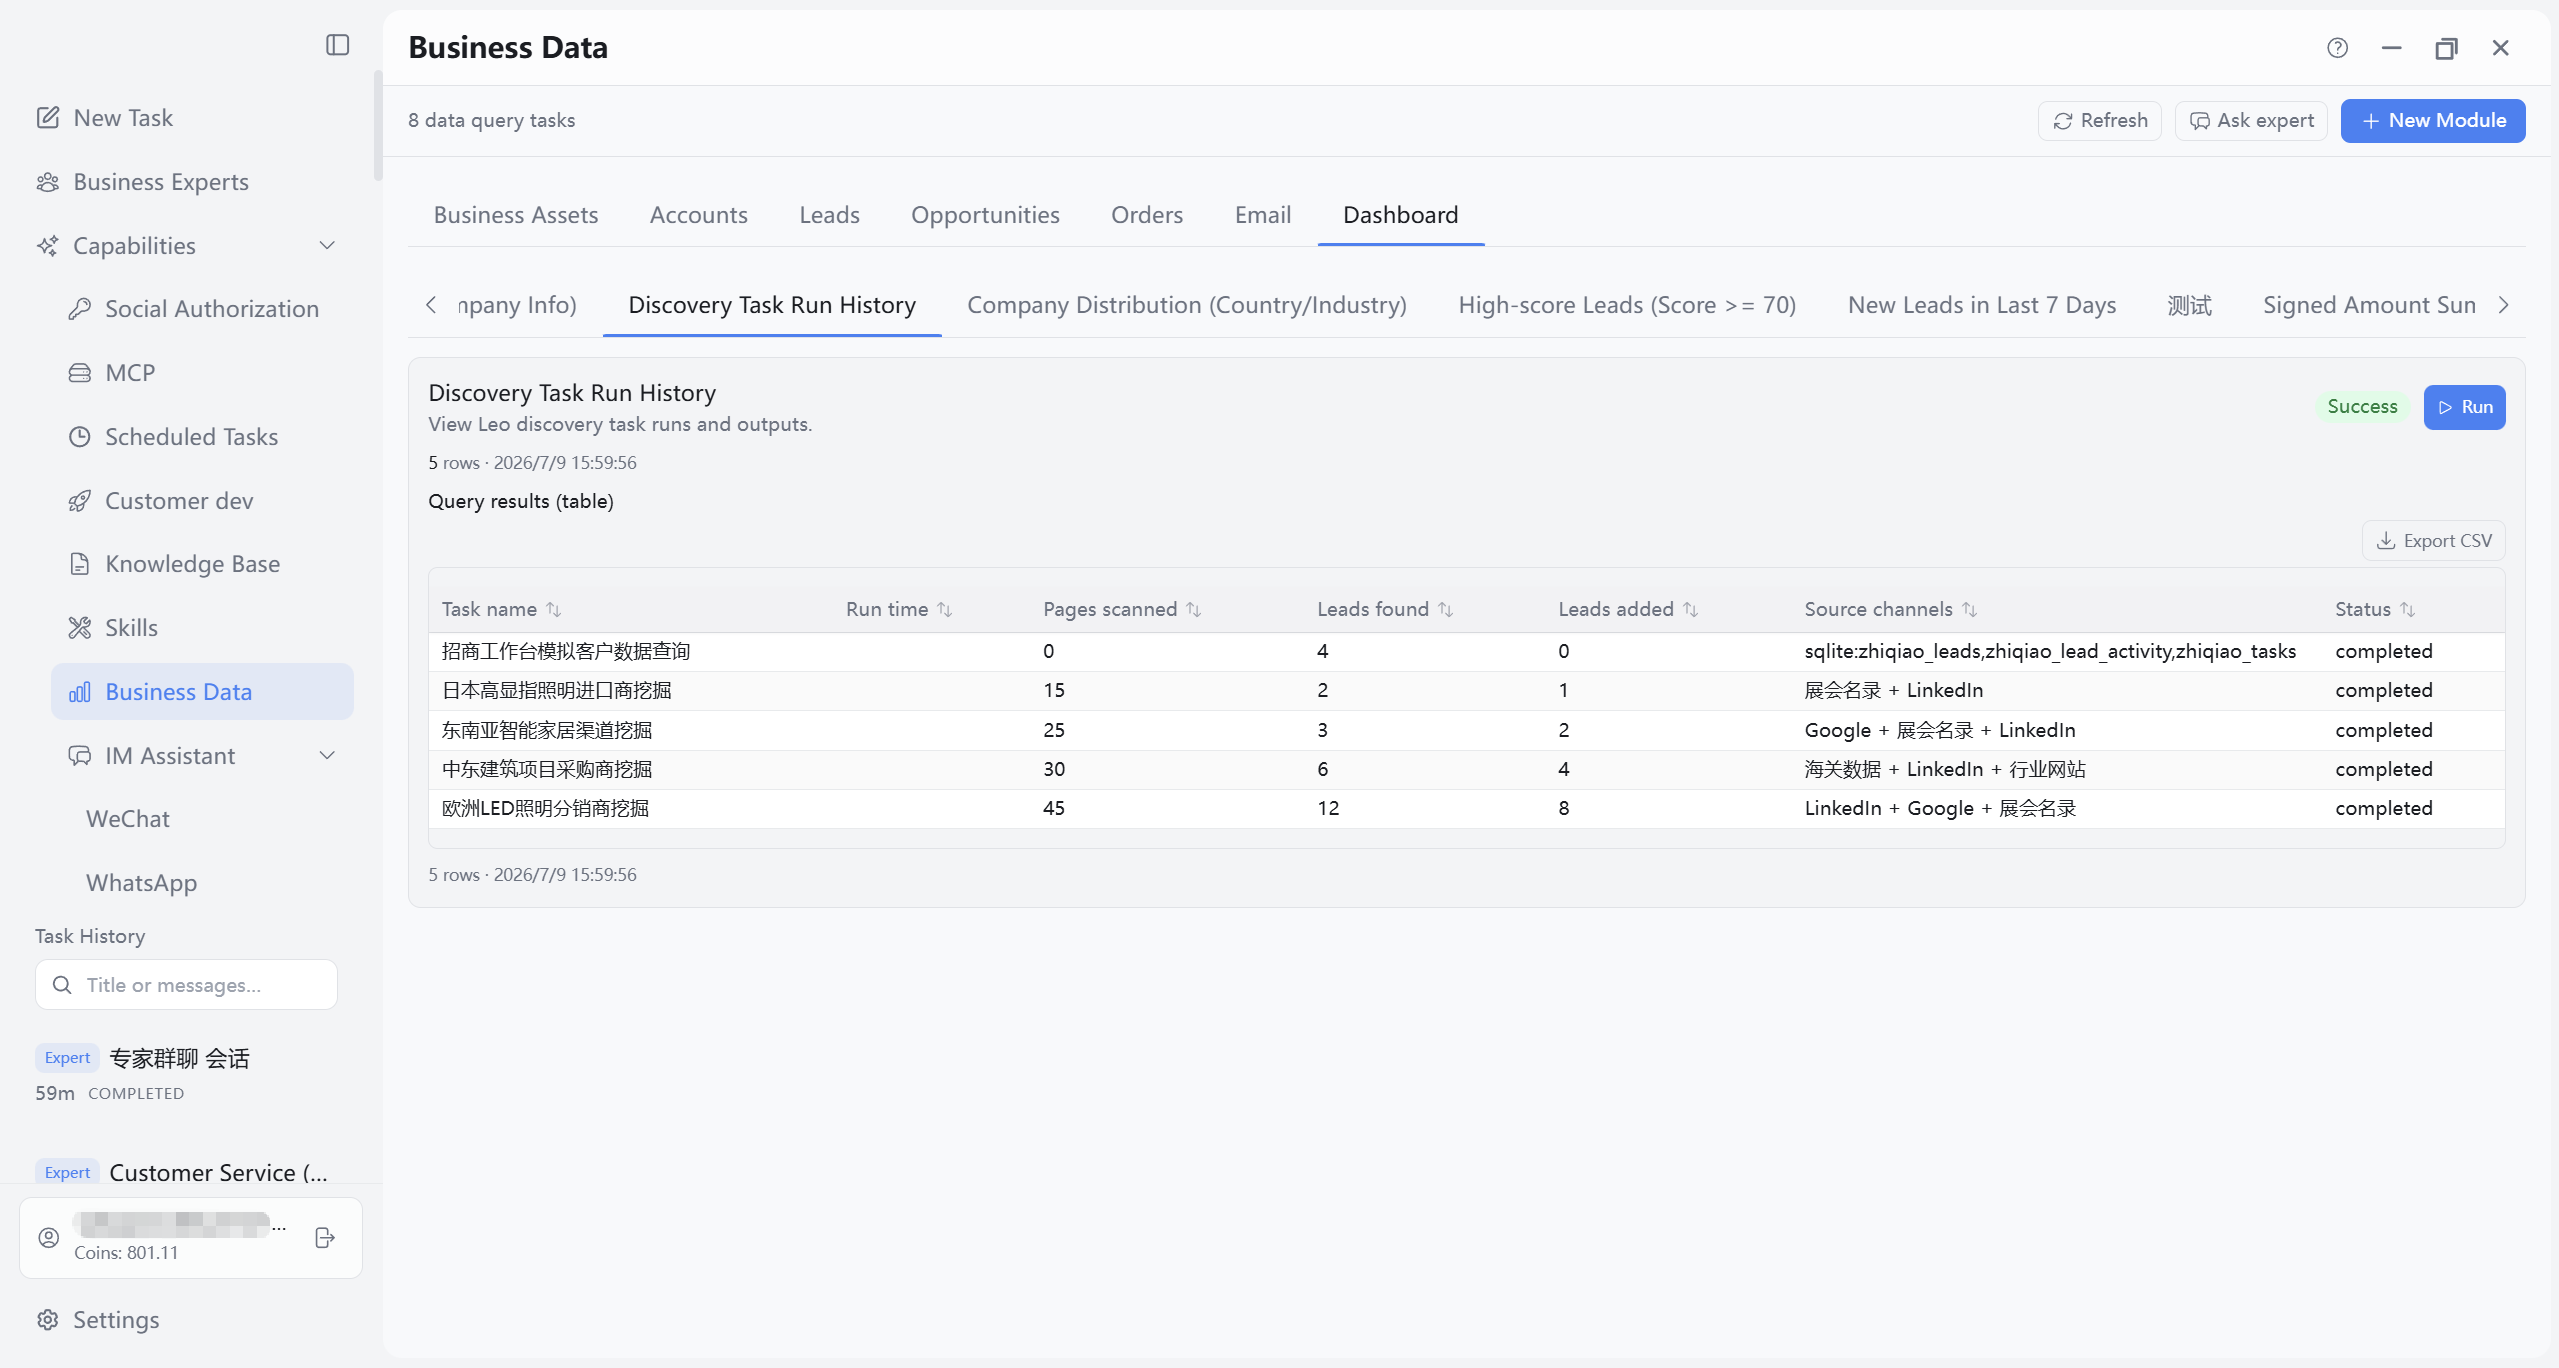
10.8.4 Custom dashboard and self-built modules
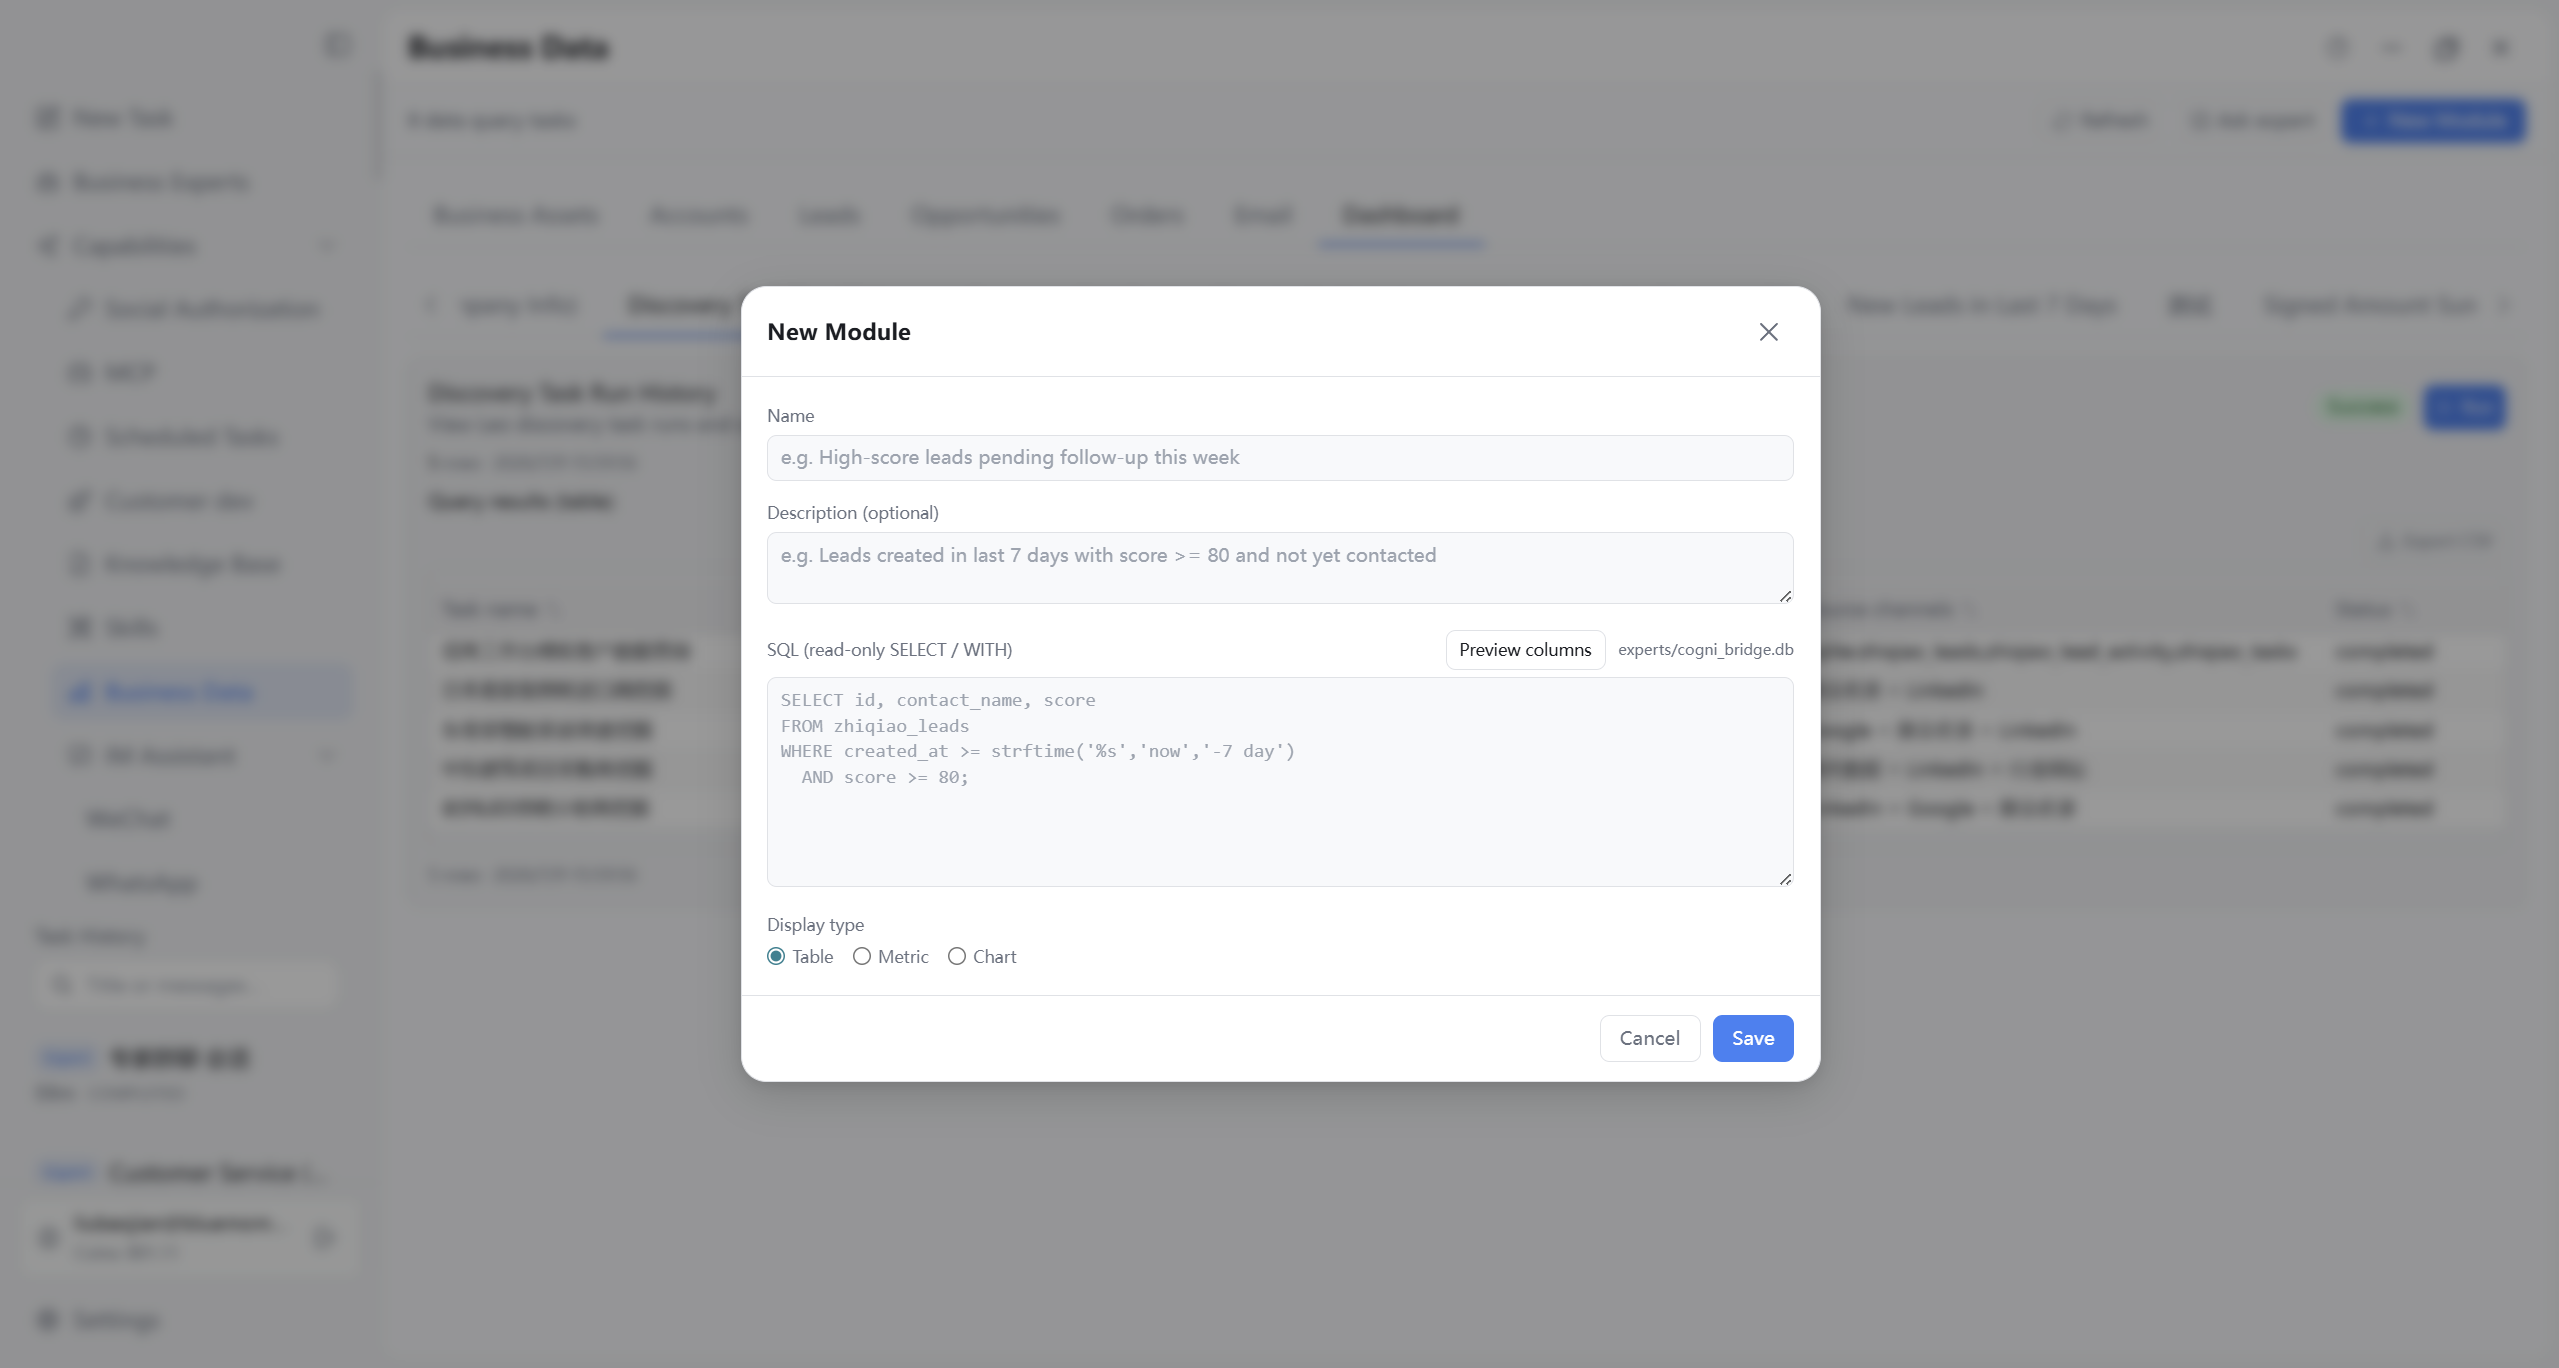
Beyond built-ins, create custom SQL query modules for the dashboard. Run and Refresh distinction in 10.8.1. Other common actions:
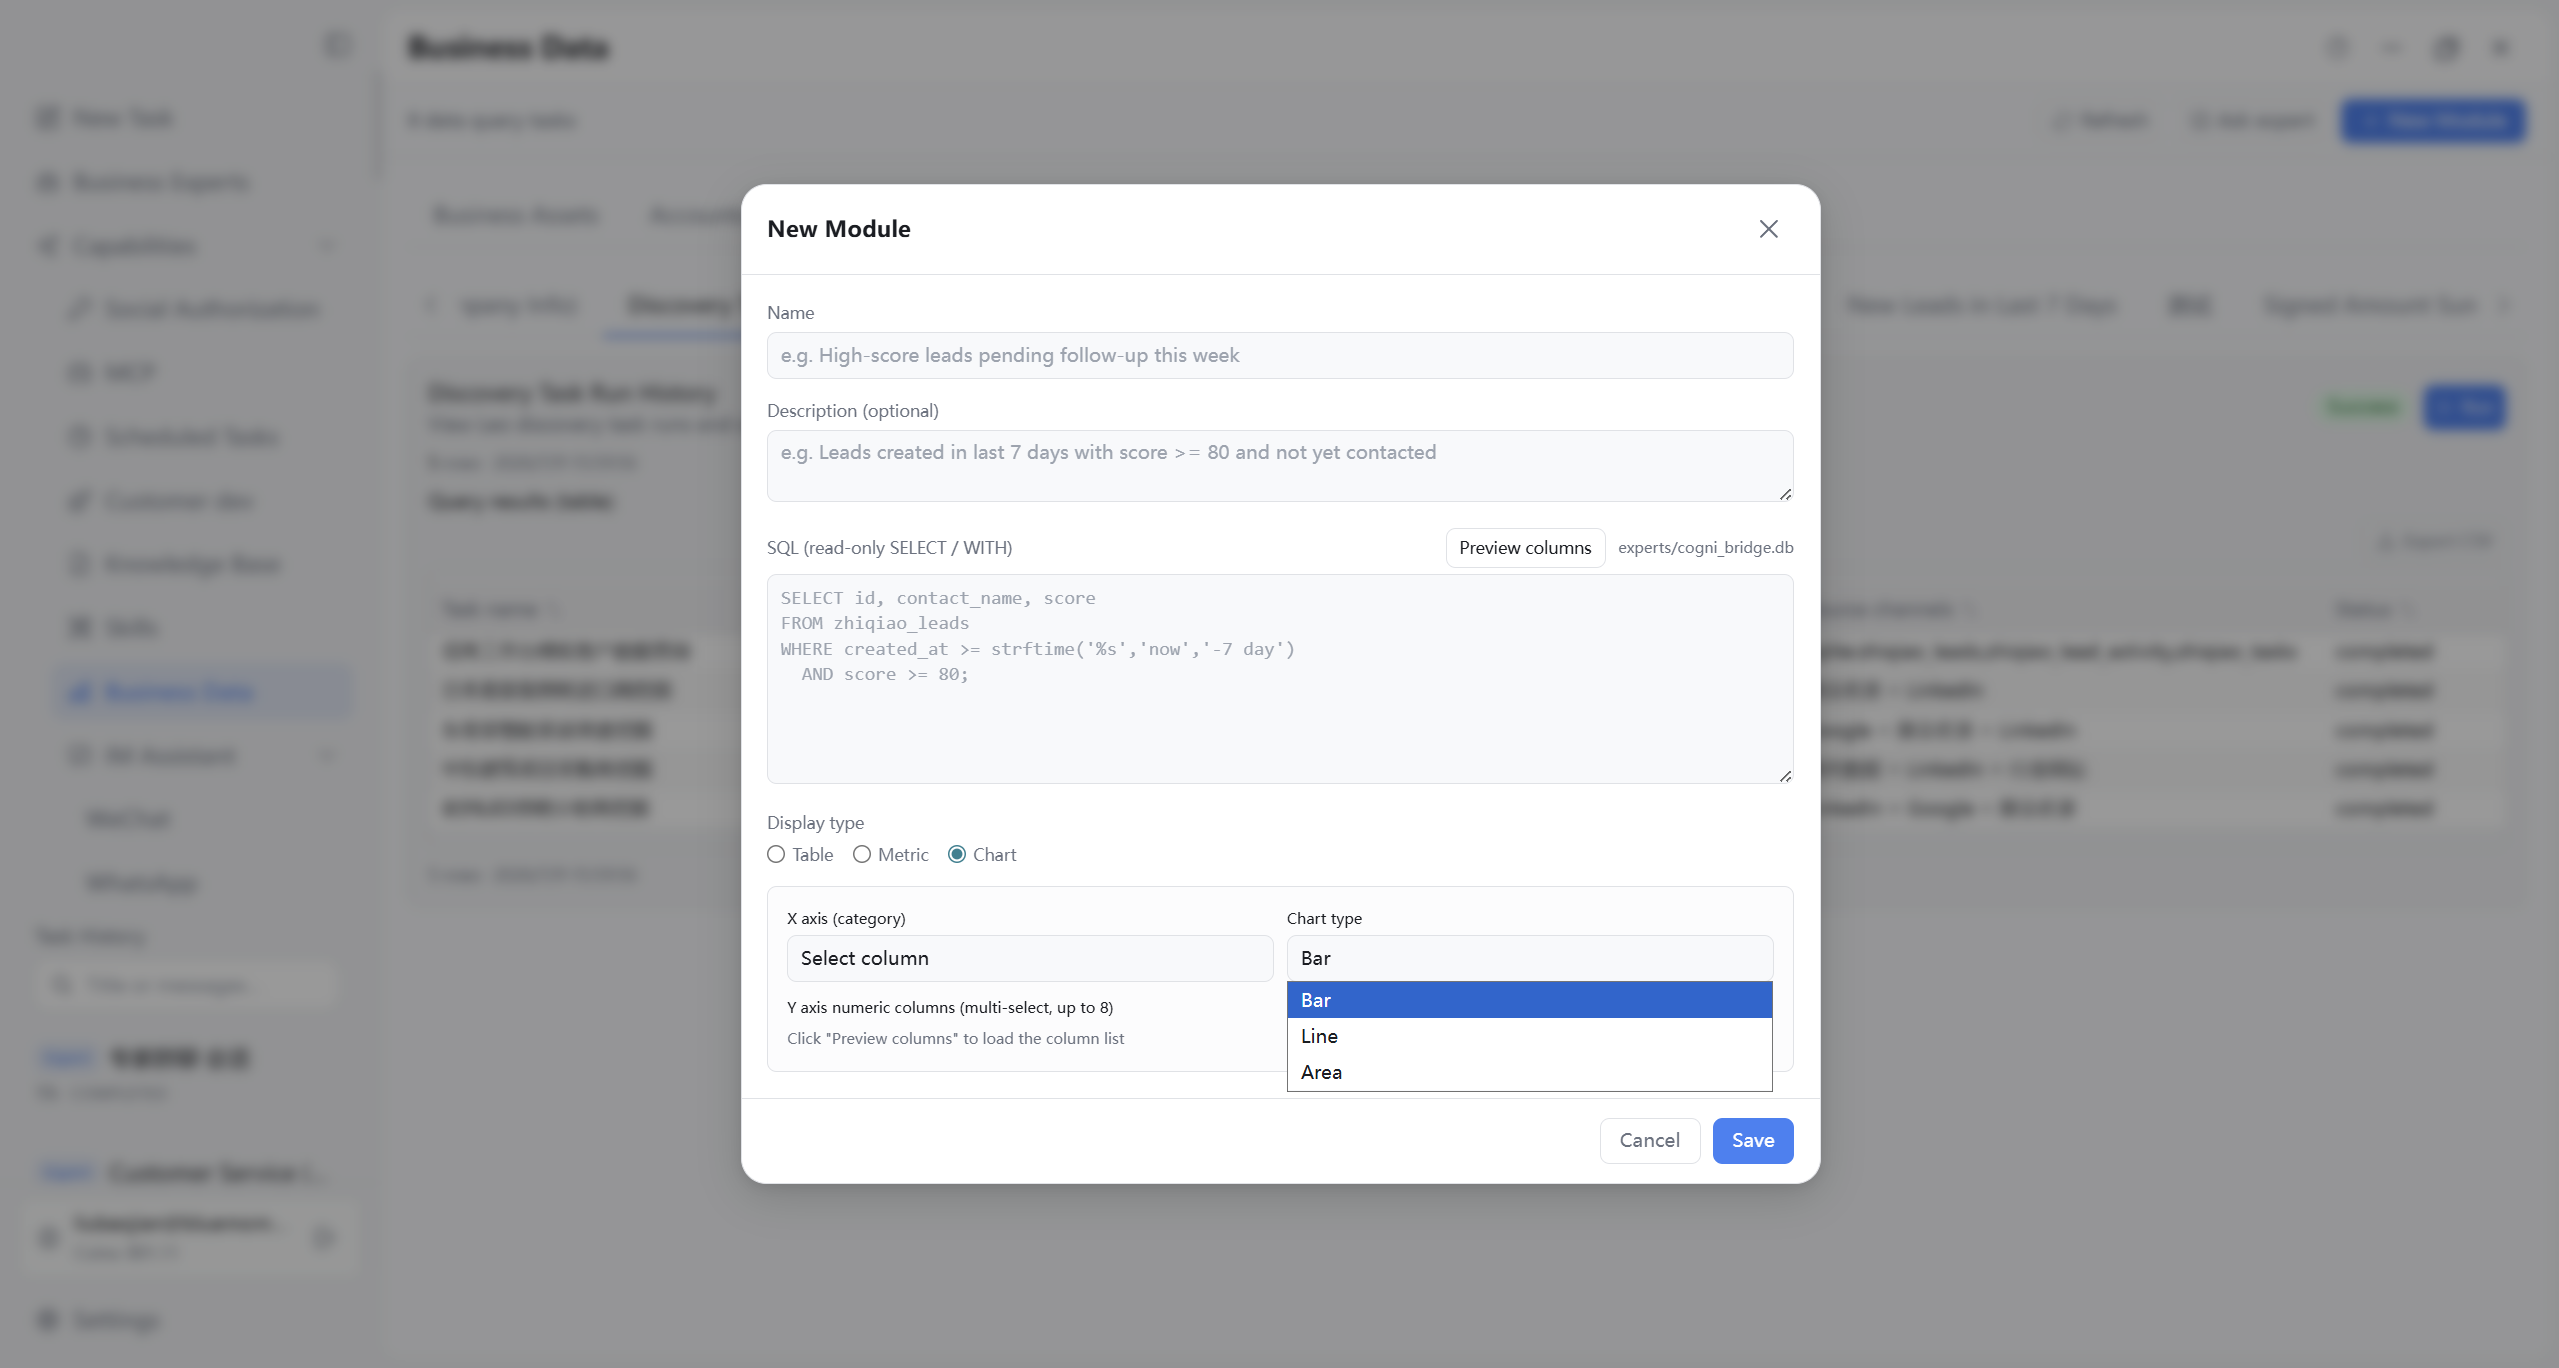
- New module: Toolbar “New module,” name, description, read-only SQL, display as table, chart, or metric card; preview column names, then save.
- Edit: Custom modules—title bar Edit to change name, description, read-only SQL, display type (table, chart, metric card); for chart/metric, configure chart fields, metric card fields, etc. Module card layout and size are not user-draggable (product-fixed).
- Delete: Custom modules—title bar Delete removes from dashboard.
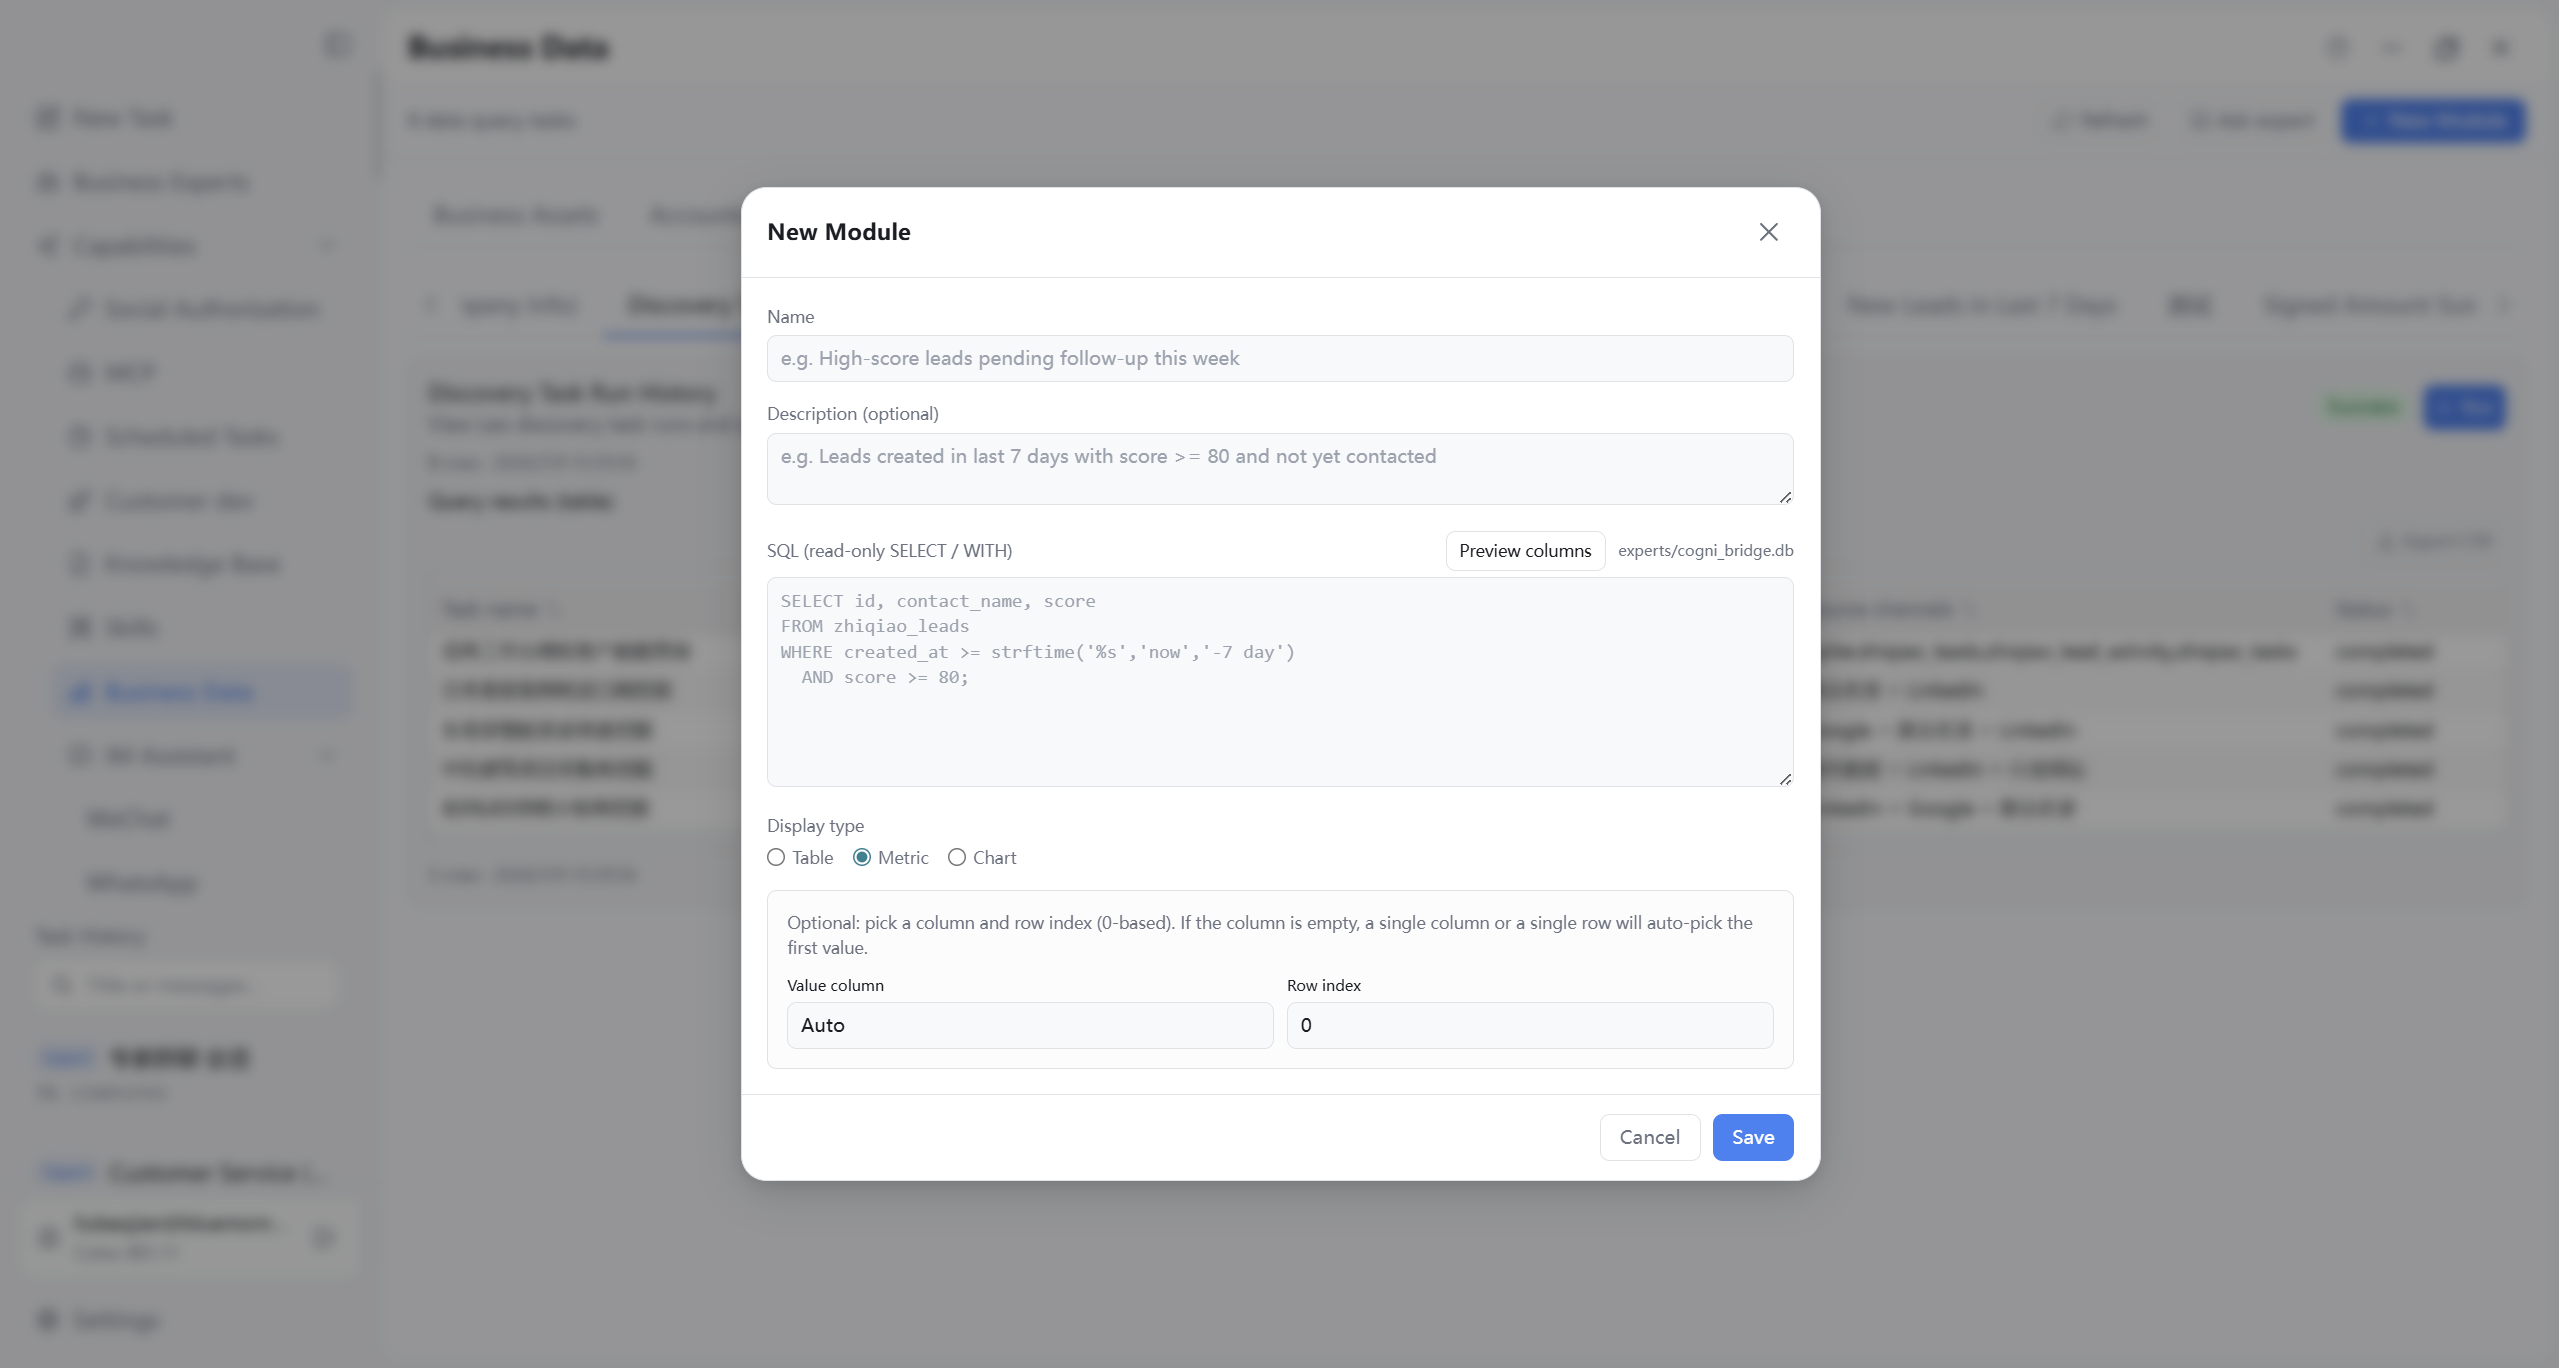
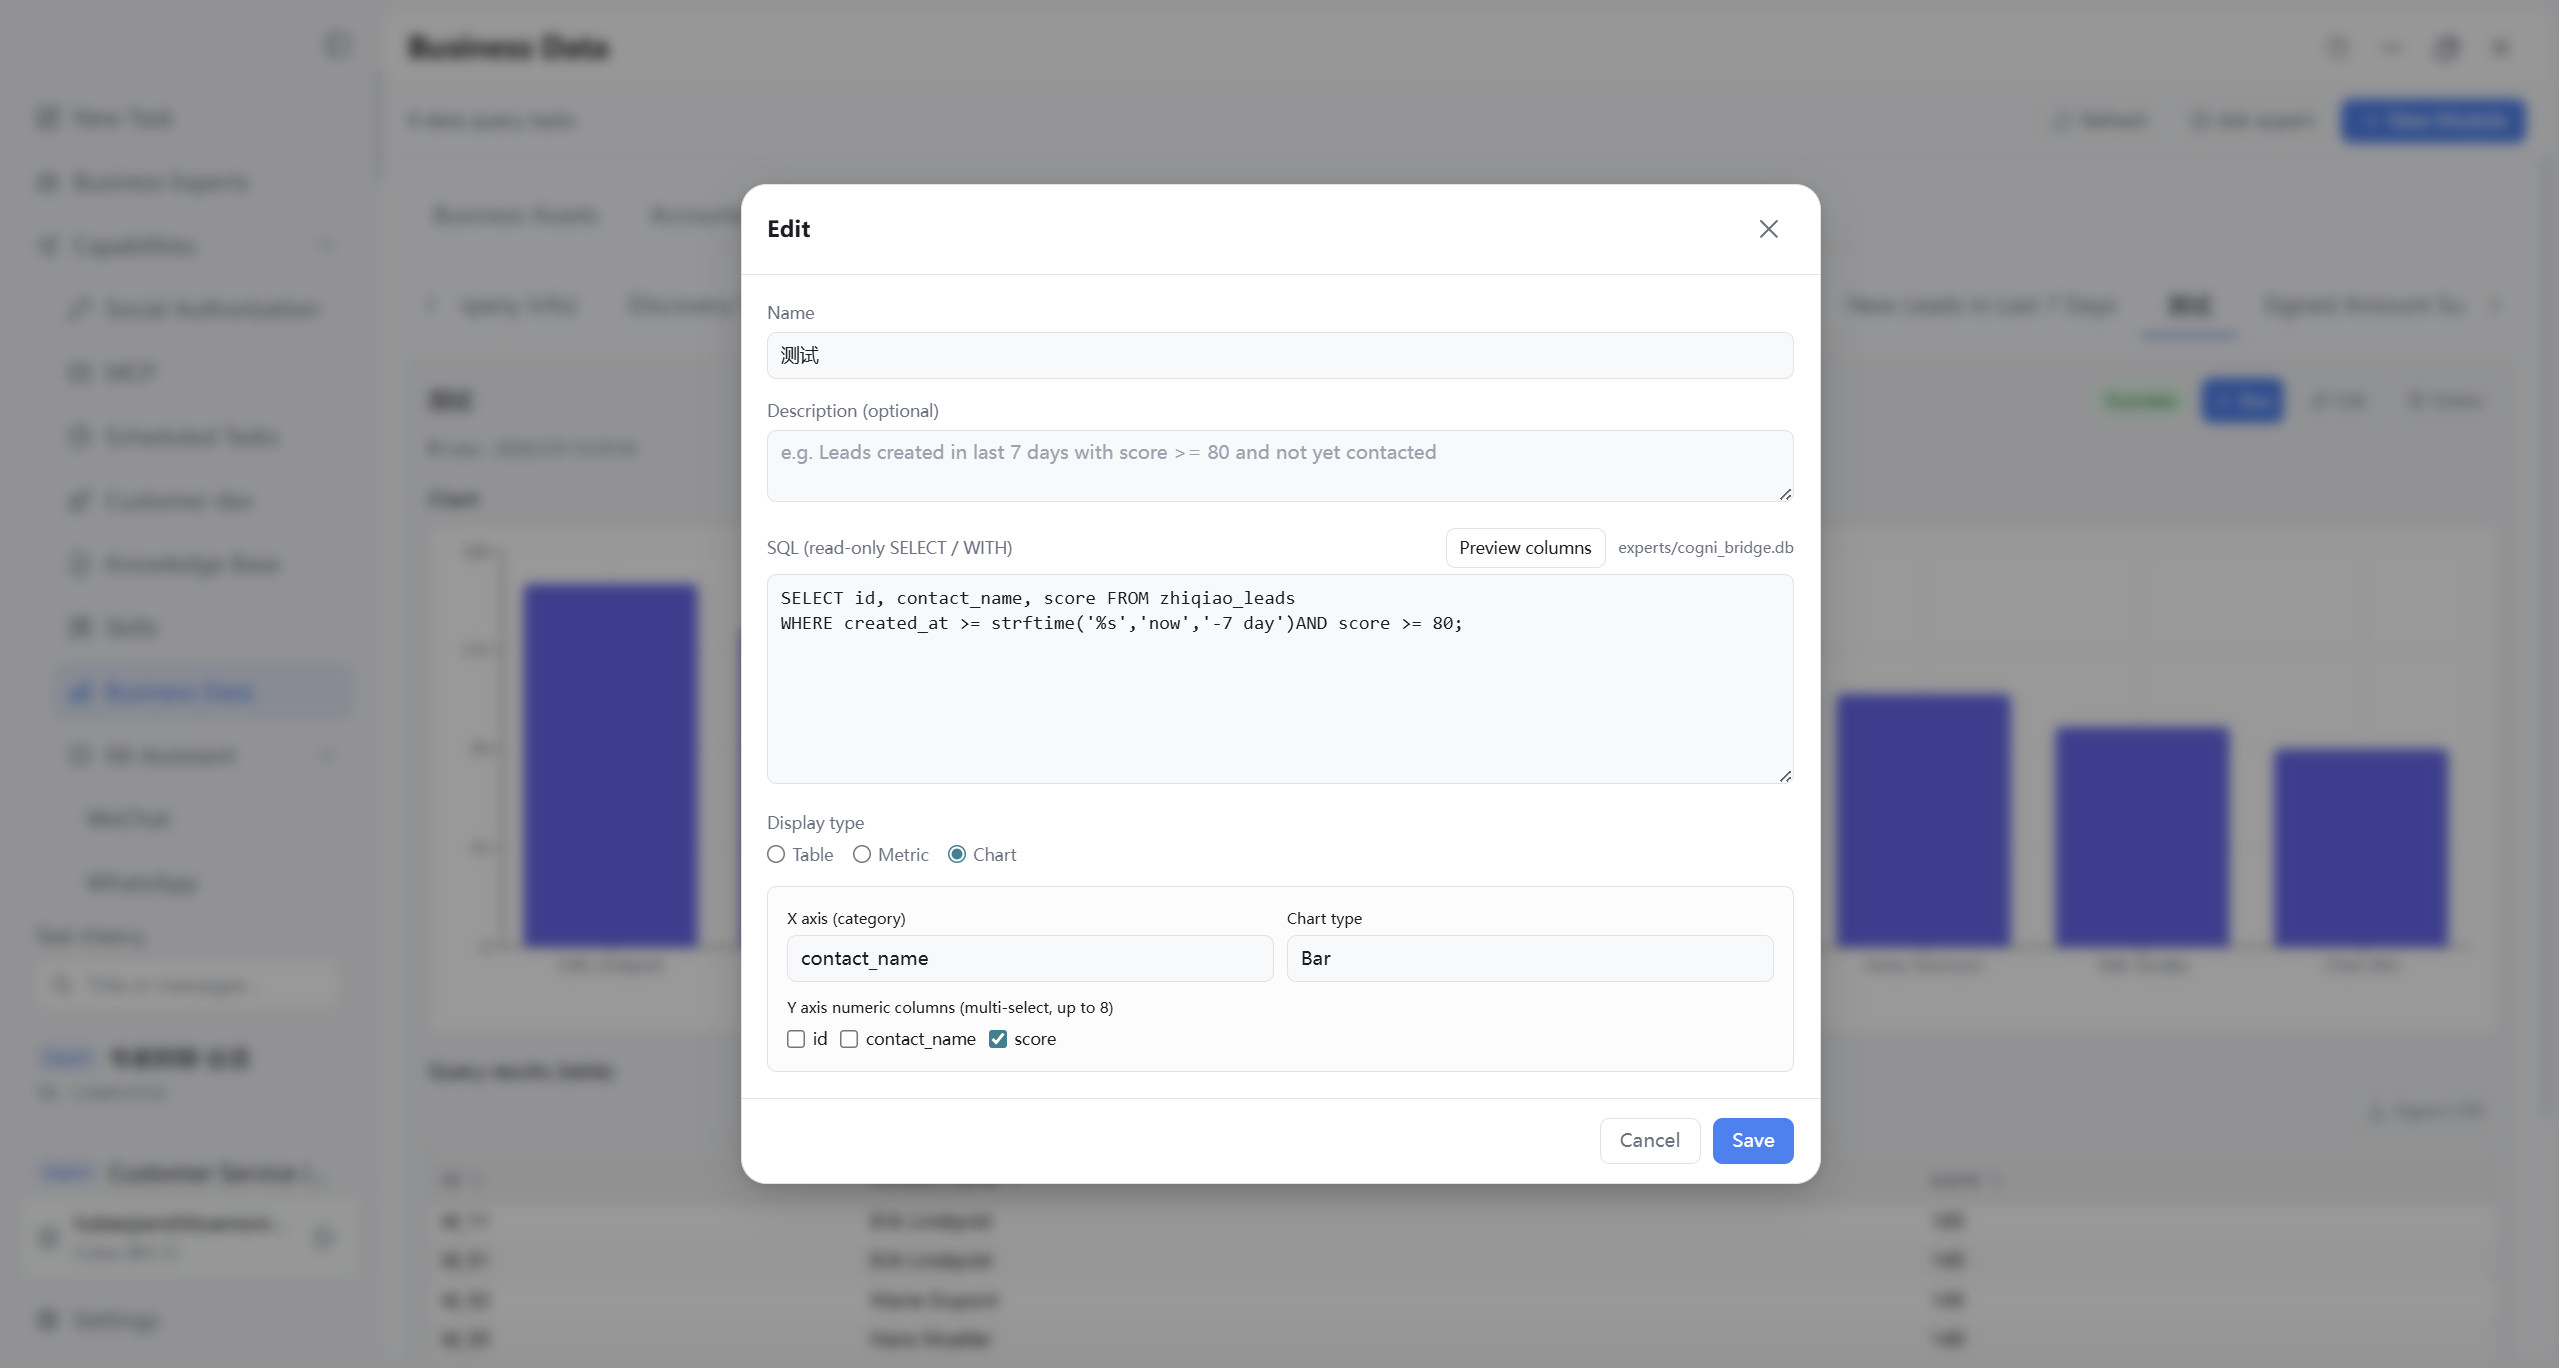
10.10 Orders Module
10.10.1 List capabilities in this module
On Orders tab:
Filter: Expand filter; narrow by order status, time range, customer, amount range, owner; Apply.
Refresh: Refresh reloads orders under current filters.
Export Excel: After confirming filters, toolbar Export Excel; disabled when no data. Path and format match Customers/Leads lists (10.4).
Ask expert: Opens Tasks page with Orders tab and current filters for interpreting orders or drafting follow-up.
Orders list layout similar to other list tabs in Figure 10-02; filter, export, Ask expert: Figure 10-03, 10-01.
10.10.2 View and edit single order
Open order detail or edit panel; maintain order number, customer, amount, status, delivery date, etc.; list updates after save. Orders sync with business library under current working directory; empty list—confirm working directory and existing order data.
10.9 Cross-Module Tips
- Baseline before prospecting: Before customer development or Ask expert, confirm company profile and product positioning on Business assets (10.3, Figure 10-31); fill gaps via “Complete company profile / Complete product analysis” or enter Chapter 7 loop from that page.
- Filter before action: On Customers, Leads, Opportunities, Orders lists, apply filters before Export Excel or Ask expert (10-03, 10-01, 10-12).
- Filter examples: Last 7 days, active status, owner = self, keyword = industry or product, sort by recent activity descending.
- Mail and lists together: Complete mail sync (Figure 10-06), then compare business lists.
- Self-check: Filter results match criteria; export opens; Ask expert brings expected context to Tasks page.
11. Scheduled Tasks Page
From Capabilities in the left sidebar, open Scheduled Tasks to trigger the AI assistant on a background schedule, manage task templates, and view run history. Unlike ordinary tasks that end when the chat ends, scheduled tasks suit long-running, repeating work without you present each time: competitor monitoring, customer radar, mail triage, weekly reports, follow-up reminders, etc. CogniBridge can keep running after you close the main window (client must stay running in the background—see Chapter 16 tray notes).
Two ways to create: (1) On the Tasks page (or Business Experts, Customer Development conversation) describe “when” and “what to do automatically” in natural language—the AI assistant creates scheduled tasks and can split large goals into sub-steps + periodic rollups (11.1); (2) On this page manually New Task or from a template (11.2, 11.4). Top level has three tabs: Tasks, History, Templates (matches client labels). When you enter New Task, Edit task, or task detail, tabs and New Task button hide—use top-left Back to return to the tabbed main view.
11.1 Create via Conversation
You need not open Scheduled Tasks and fill the form first. In the Tasks page bottom input (or Business Experts, Customer Development conversation) describe in everyday language, for example:
- “Every morning at 9:00 check unread mail and summarize key points”
- “Every Monday at 10:00 generate a customer radar weekly report”
- “Tomorrow at 3:00 PM remind me to follow up with customer X”
- “Enable scheduled customer radar on Shanghai timezone, run weekly”
After send, the AI assistant parses what to run and schedule (one-time, daily, weekly, custom interval, etc.) and creates matching scheduled tasks. Messages may show scheduled task step hints; if permission or action confirmation appears, read the planned schedule and content before allowing.
After creation: Open Capabilities → Scheduled Tasks → Tasks to see new tasks, toggle enable/disable, or Edit, Run now from the More menu. Verify Scheduled for and Execution content; to tweak, say in conversation “change that scheduled task to every Wednesday” or edit manually in 11.2.
Good for: ad-hoc reminders, periodic checks, customer development cadence, competitor tracking, etc. For complex delivery rules or template fields, combine 11.4 template create, then edit in the list.
Planning long work: break down + scheduled rollup
Scheduled tasks turn a “big goal” into an automatic rhythm without daily reminders. Recommended flow on the Tasks page in one or a few conversations:
- Define the goal: Duration and final deliverable (e.g. “Track 5 competitors this quarter; weekly comparison brief”).
- Ask the AI assistant to split: Subtasks, frequency, output per step (subtask A: daily site/social changes; subtask B: Friday rollup with suggested actions).
- Create scheduled tasks in batch: After agreeing on the split, say “Create scheduled tasks for those subtasks” or specify each (“Customer radar every Monday 10:00,” “Summarize leads every Friday 17:00”). The AI assistant writes them to the plan list.
- Verify and enable: Open Capabilities → Scheduled Tasks → Tasks; check Scheduled for, Execution content, and switches; Run now for a trial, then rely on schedule.
- Review and iterate: History tab or per-task detail for success per run; adjust rollup format in the original task conversation or edit the scheduled task.
Example prompt (send as one block): “I want competitor tracking: split into daily checks and weekly rollup, then create scheduled tasks—weekdays 9:00 AM check competitor sites and LinkedIn, Fridays 5:00 PM summarize changes into a one-page brief in the working directory.”
11.2 “Tasks” Tab
Purpose: View and manage scheduled tasks; start New Task here or open detail / edit from the list.
- Task list: Columns Title, Scheduled for (schedule summary), Status, More. Click title row for detail. Row switch enables/disables.
- More menu (⋮): Run now—execute once without waiting for next schedule (disabled while running); Edit—open form; Delete—remove after confirmation.
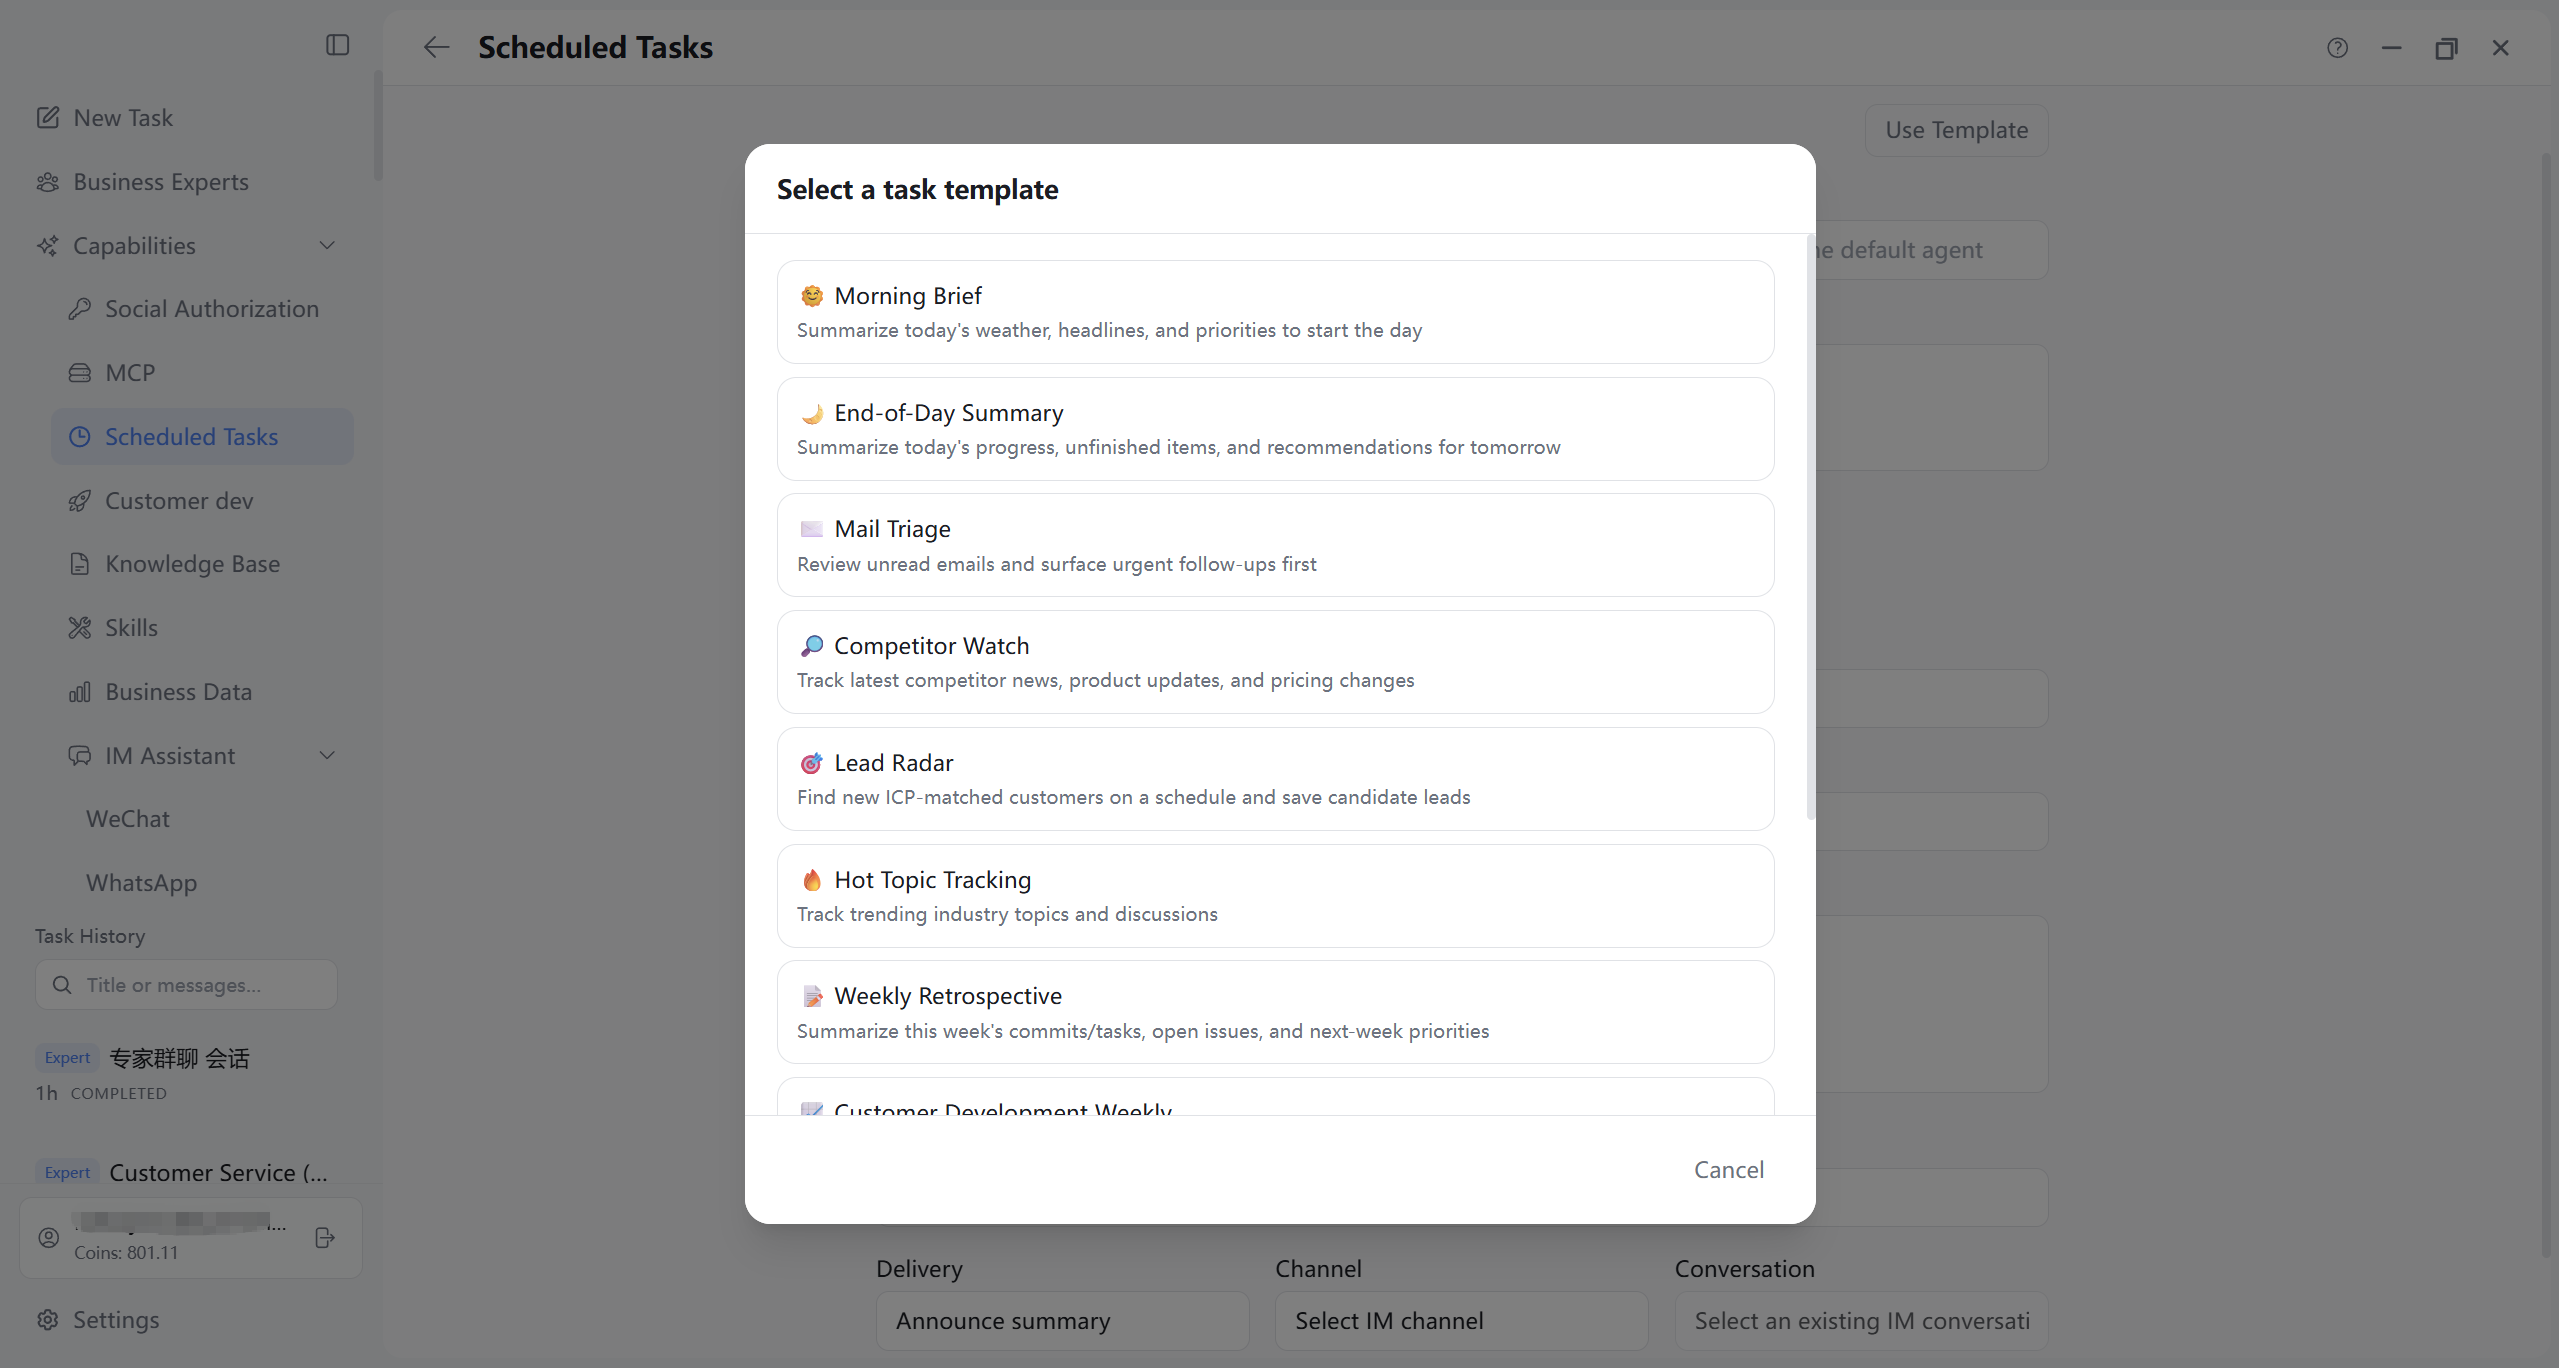
- New Task: Shown top-right on Tasks tab in list main view only. Form fields: name, description, schedule type (interval, specific date/time, advanced cron/timezone), enabled, session target (main session / isolated session), wake mode, execution content, timeout, result notification, etc.; save returns to list. Form may offer Use template to pick a template.
- Result notification (delivery): Whether to push results outside CogniBridge after each run. Form “Delivery method” dropdown—three options (UI may vary):
- No delivery (default): Task runs; results stay in CogniBridge—view in task detail and History; no external message. Good for background checks, writing to working directory, no instant alert.
- Broadcast summary: On success, send a text summary to configured IM channels (DingTalk, Feishu, WeChat, WeCom, QQ, Telegram, Discord, WhatsApp, etc.—enable in Settings → IM Bots). Also fill:
- Delivery channel: Pick IM platform; empty list—configure IM in Settings first.
- Send target: Recipient ID (conversation ID, user ID, group ID per platform); blank may auto-match recent conversation.
- Webhook: HTTP callback to Webhook URL (full URL required) after run—for internal systems, group bots, automation. Webhook and Broadcast summary work without the main window open; client process must still run in background.
- Task detail: Execution prompt, schedule and run config, latest run status, and run history for this task only. History rows with linked session may offer View session. Detail top also has Edit, Run now, Delete icons—same as list menu.
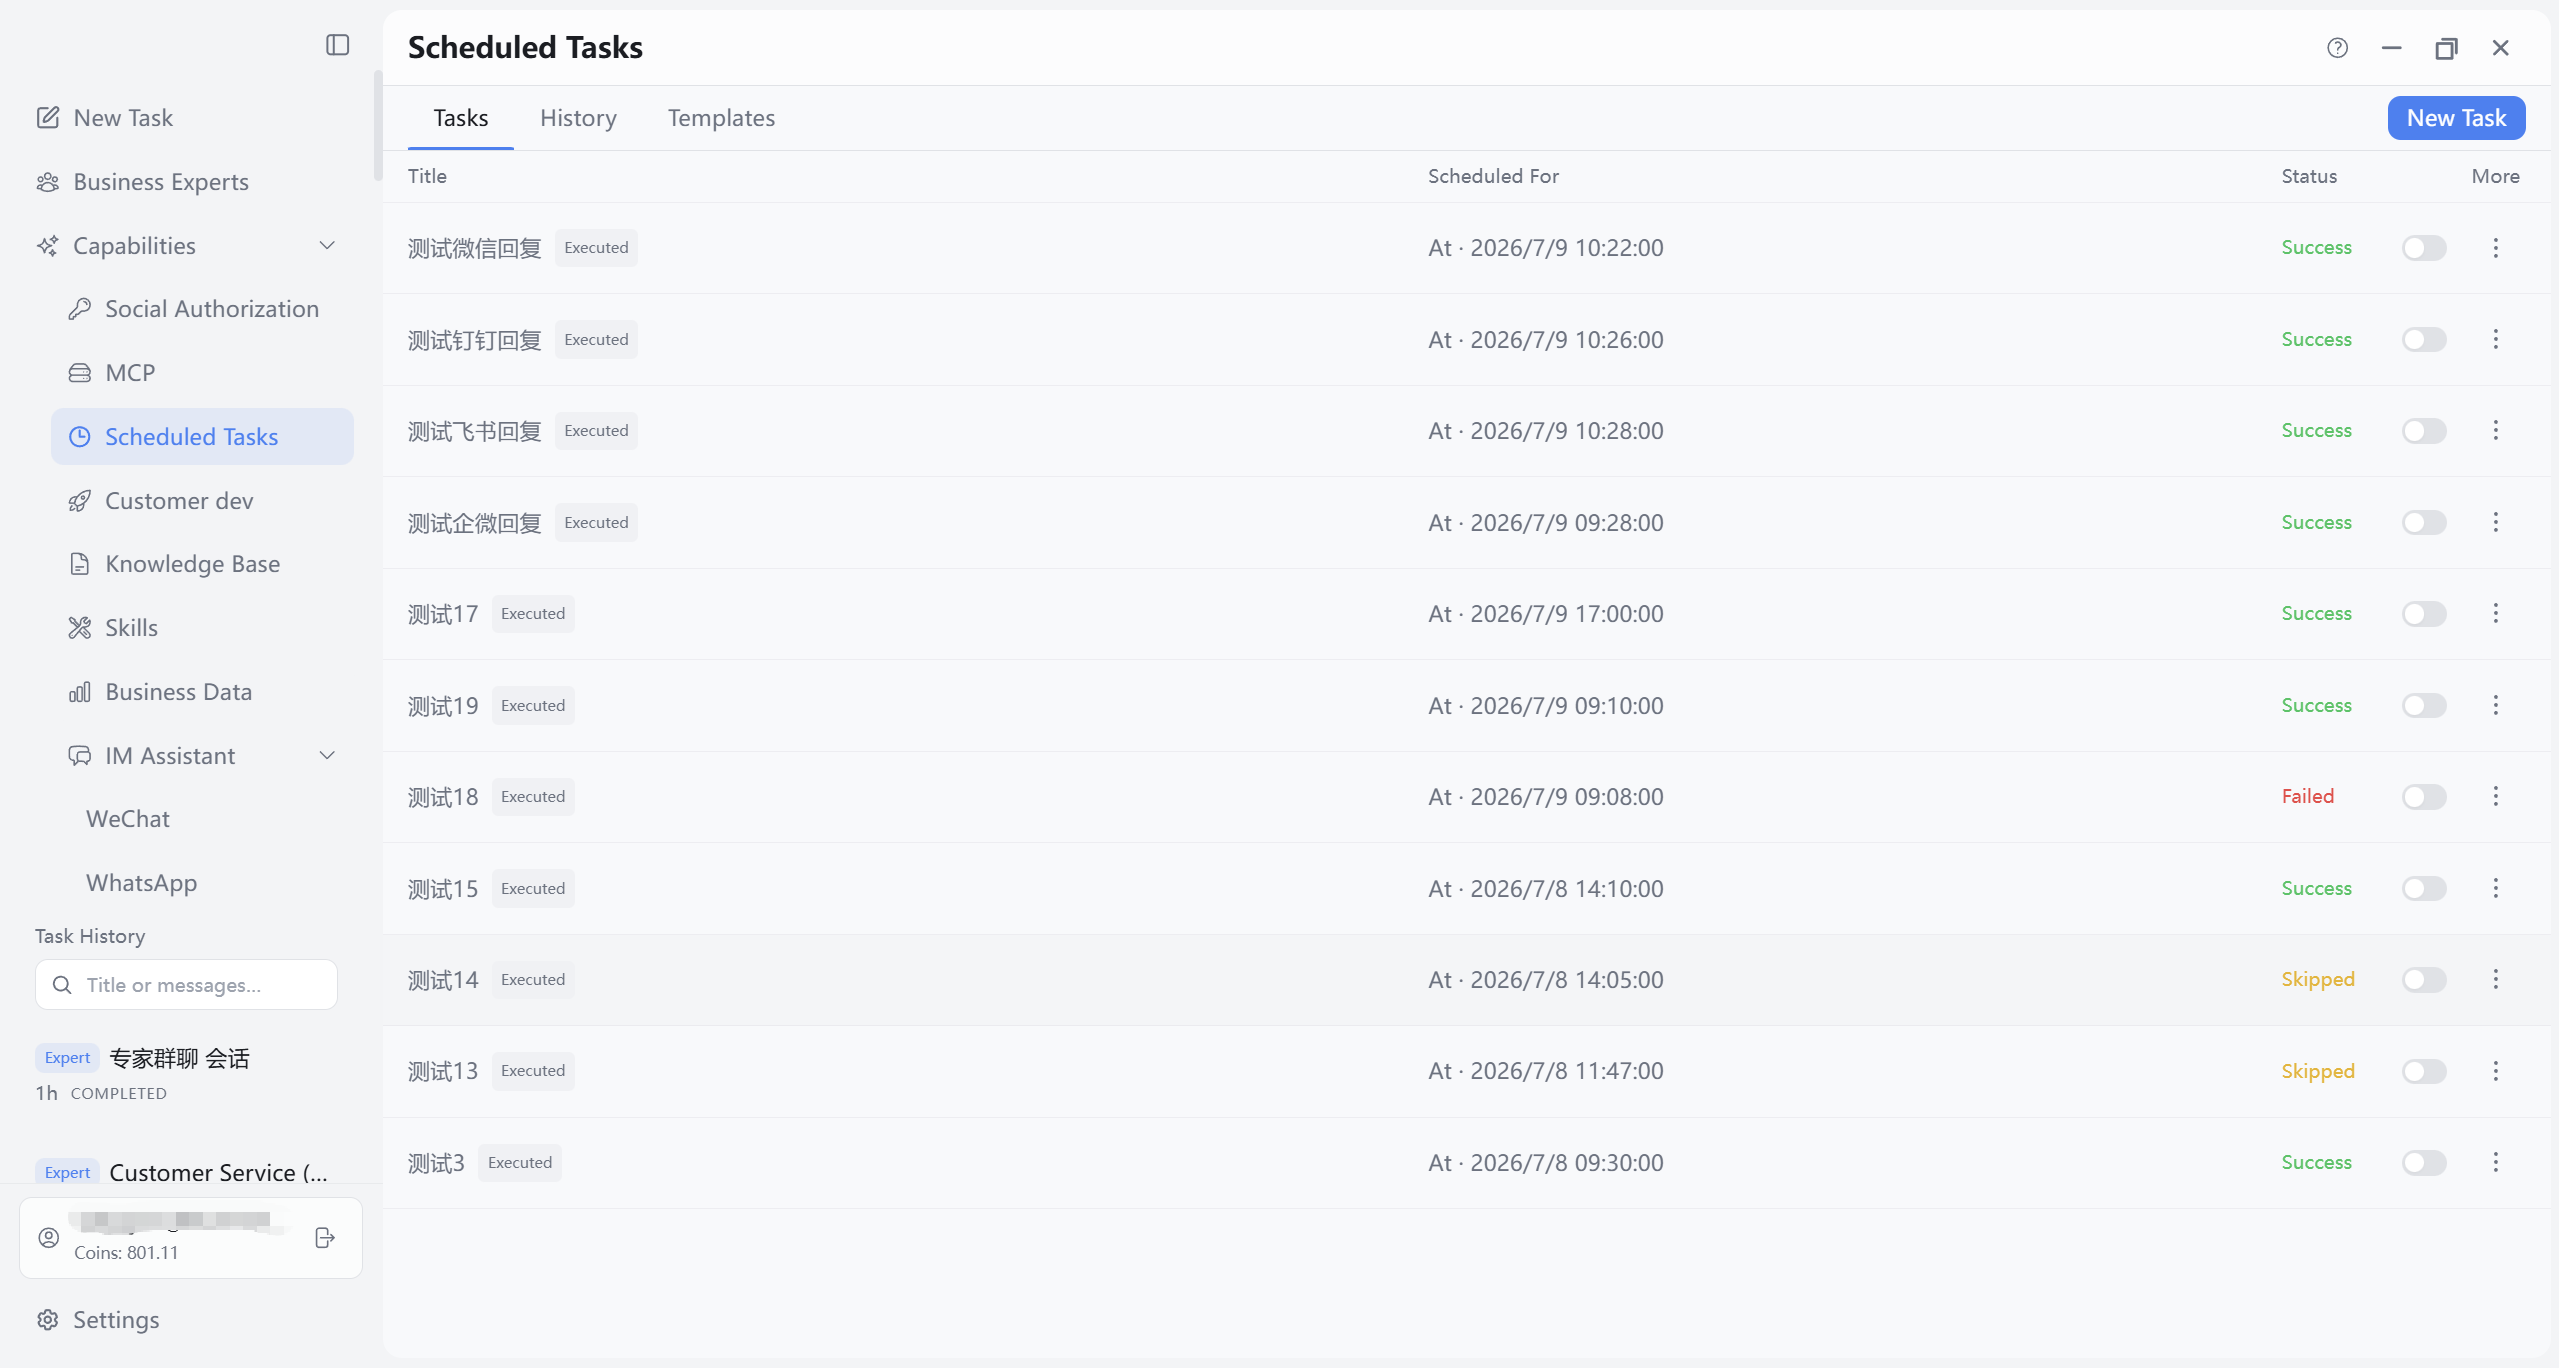
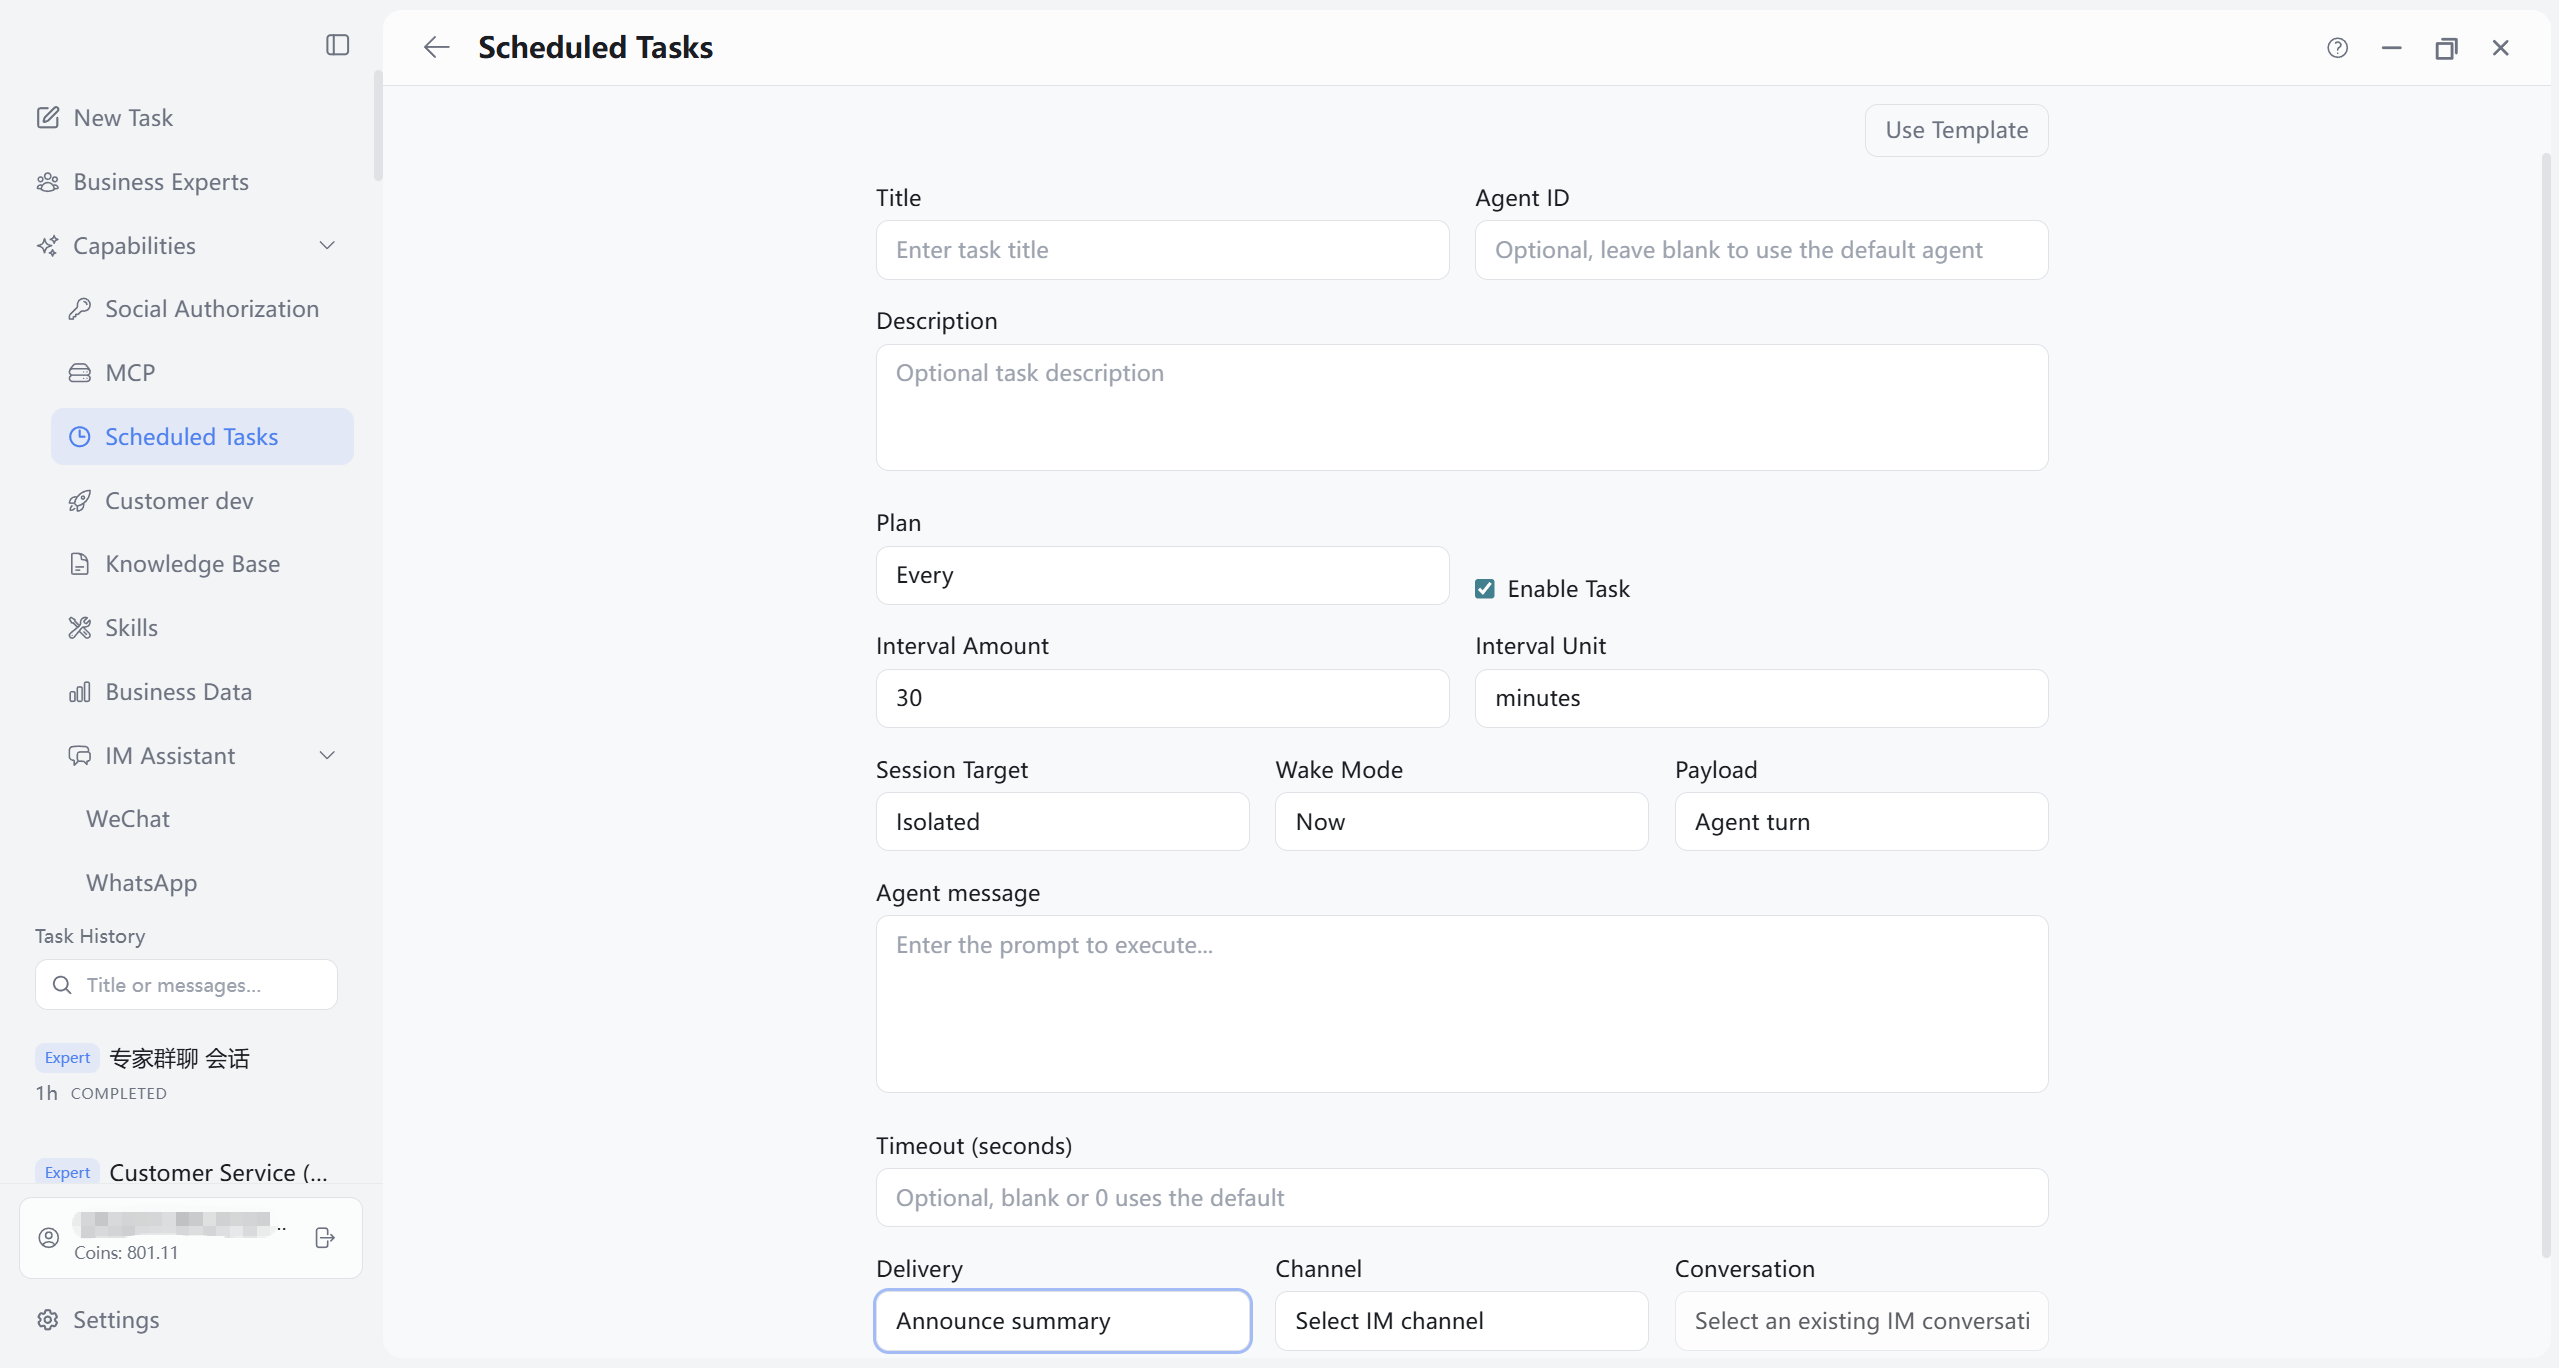
11.3 “History” Tab
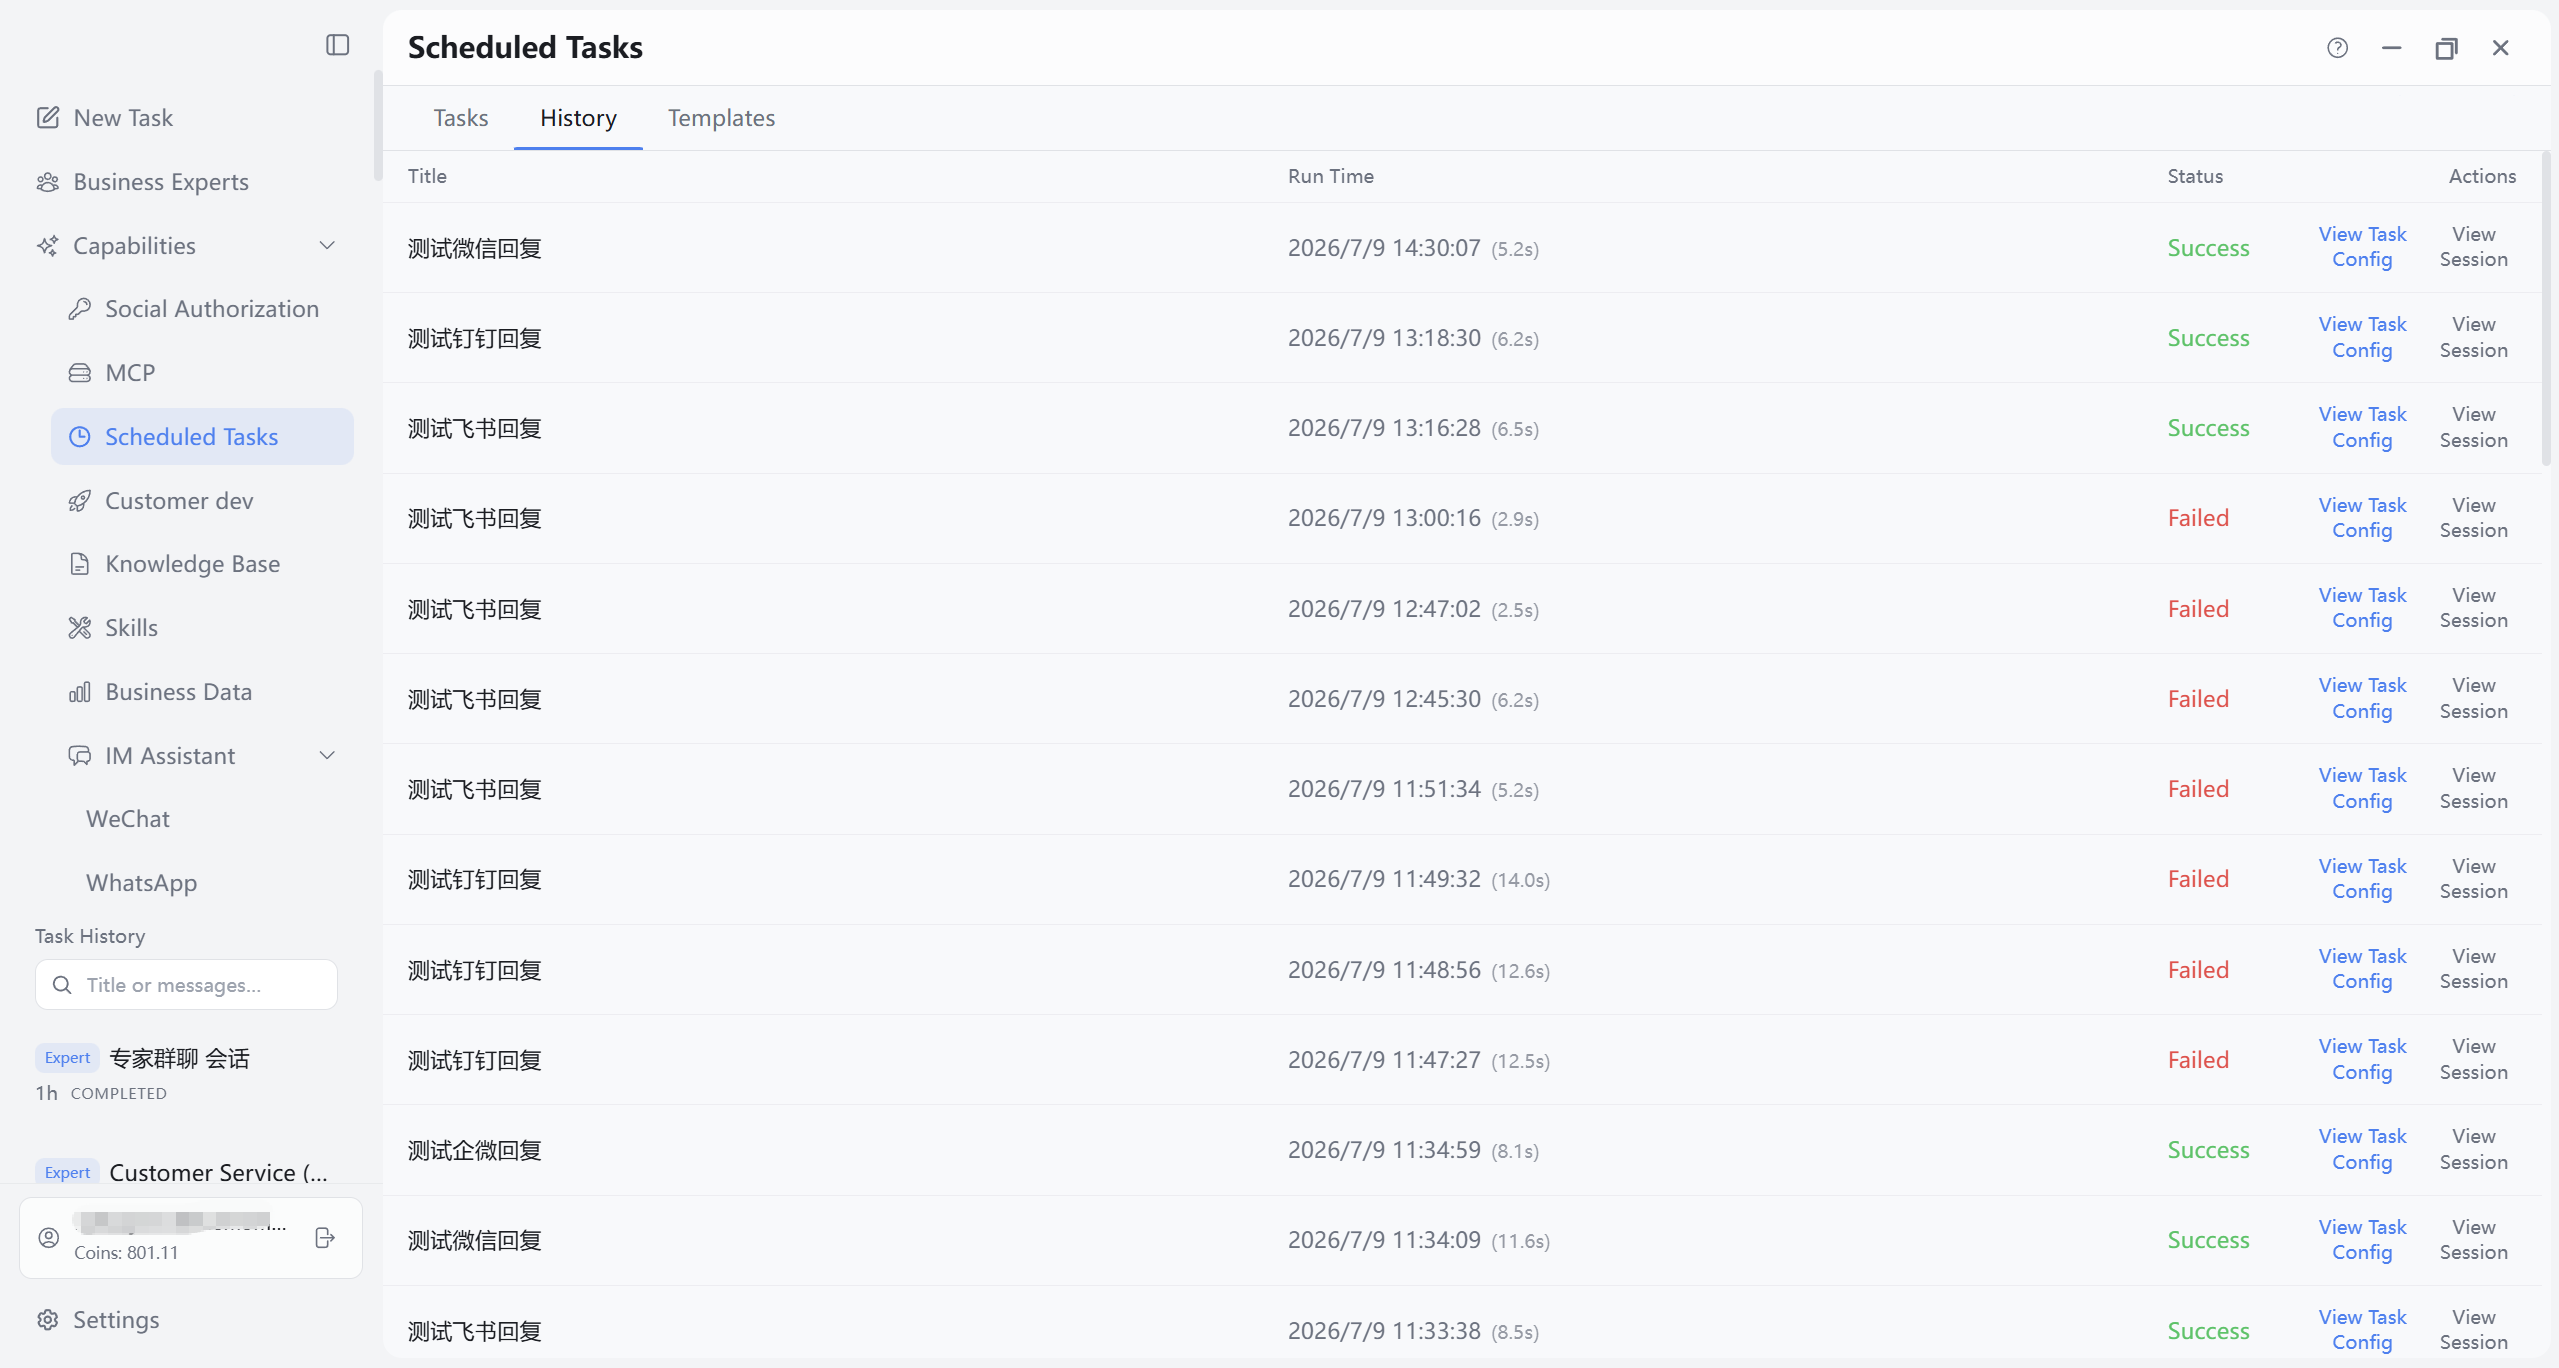
Purpose: Cross-task summary of all scheduled tasks recent runs (unlike per-task history in Tasks detail).
- Columns: Task title, Start time (and duration), Status (success, failed, skipped, running, etc.).
- If a run linked an openable session, click the row for View session in a dialog (retry if session not synced yet).
- Load more at bottom when data is large—for older runs.
11.4 “Templates” Tab
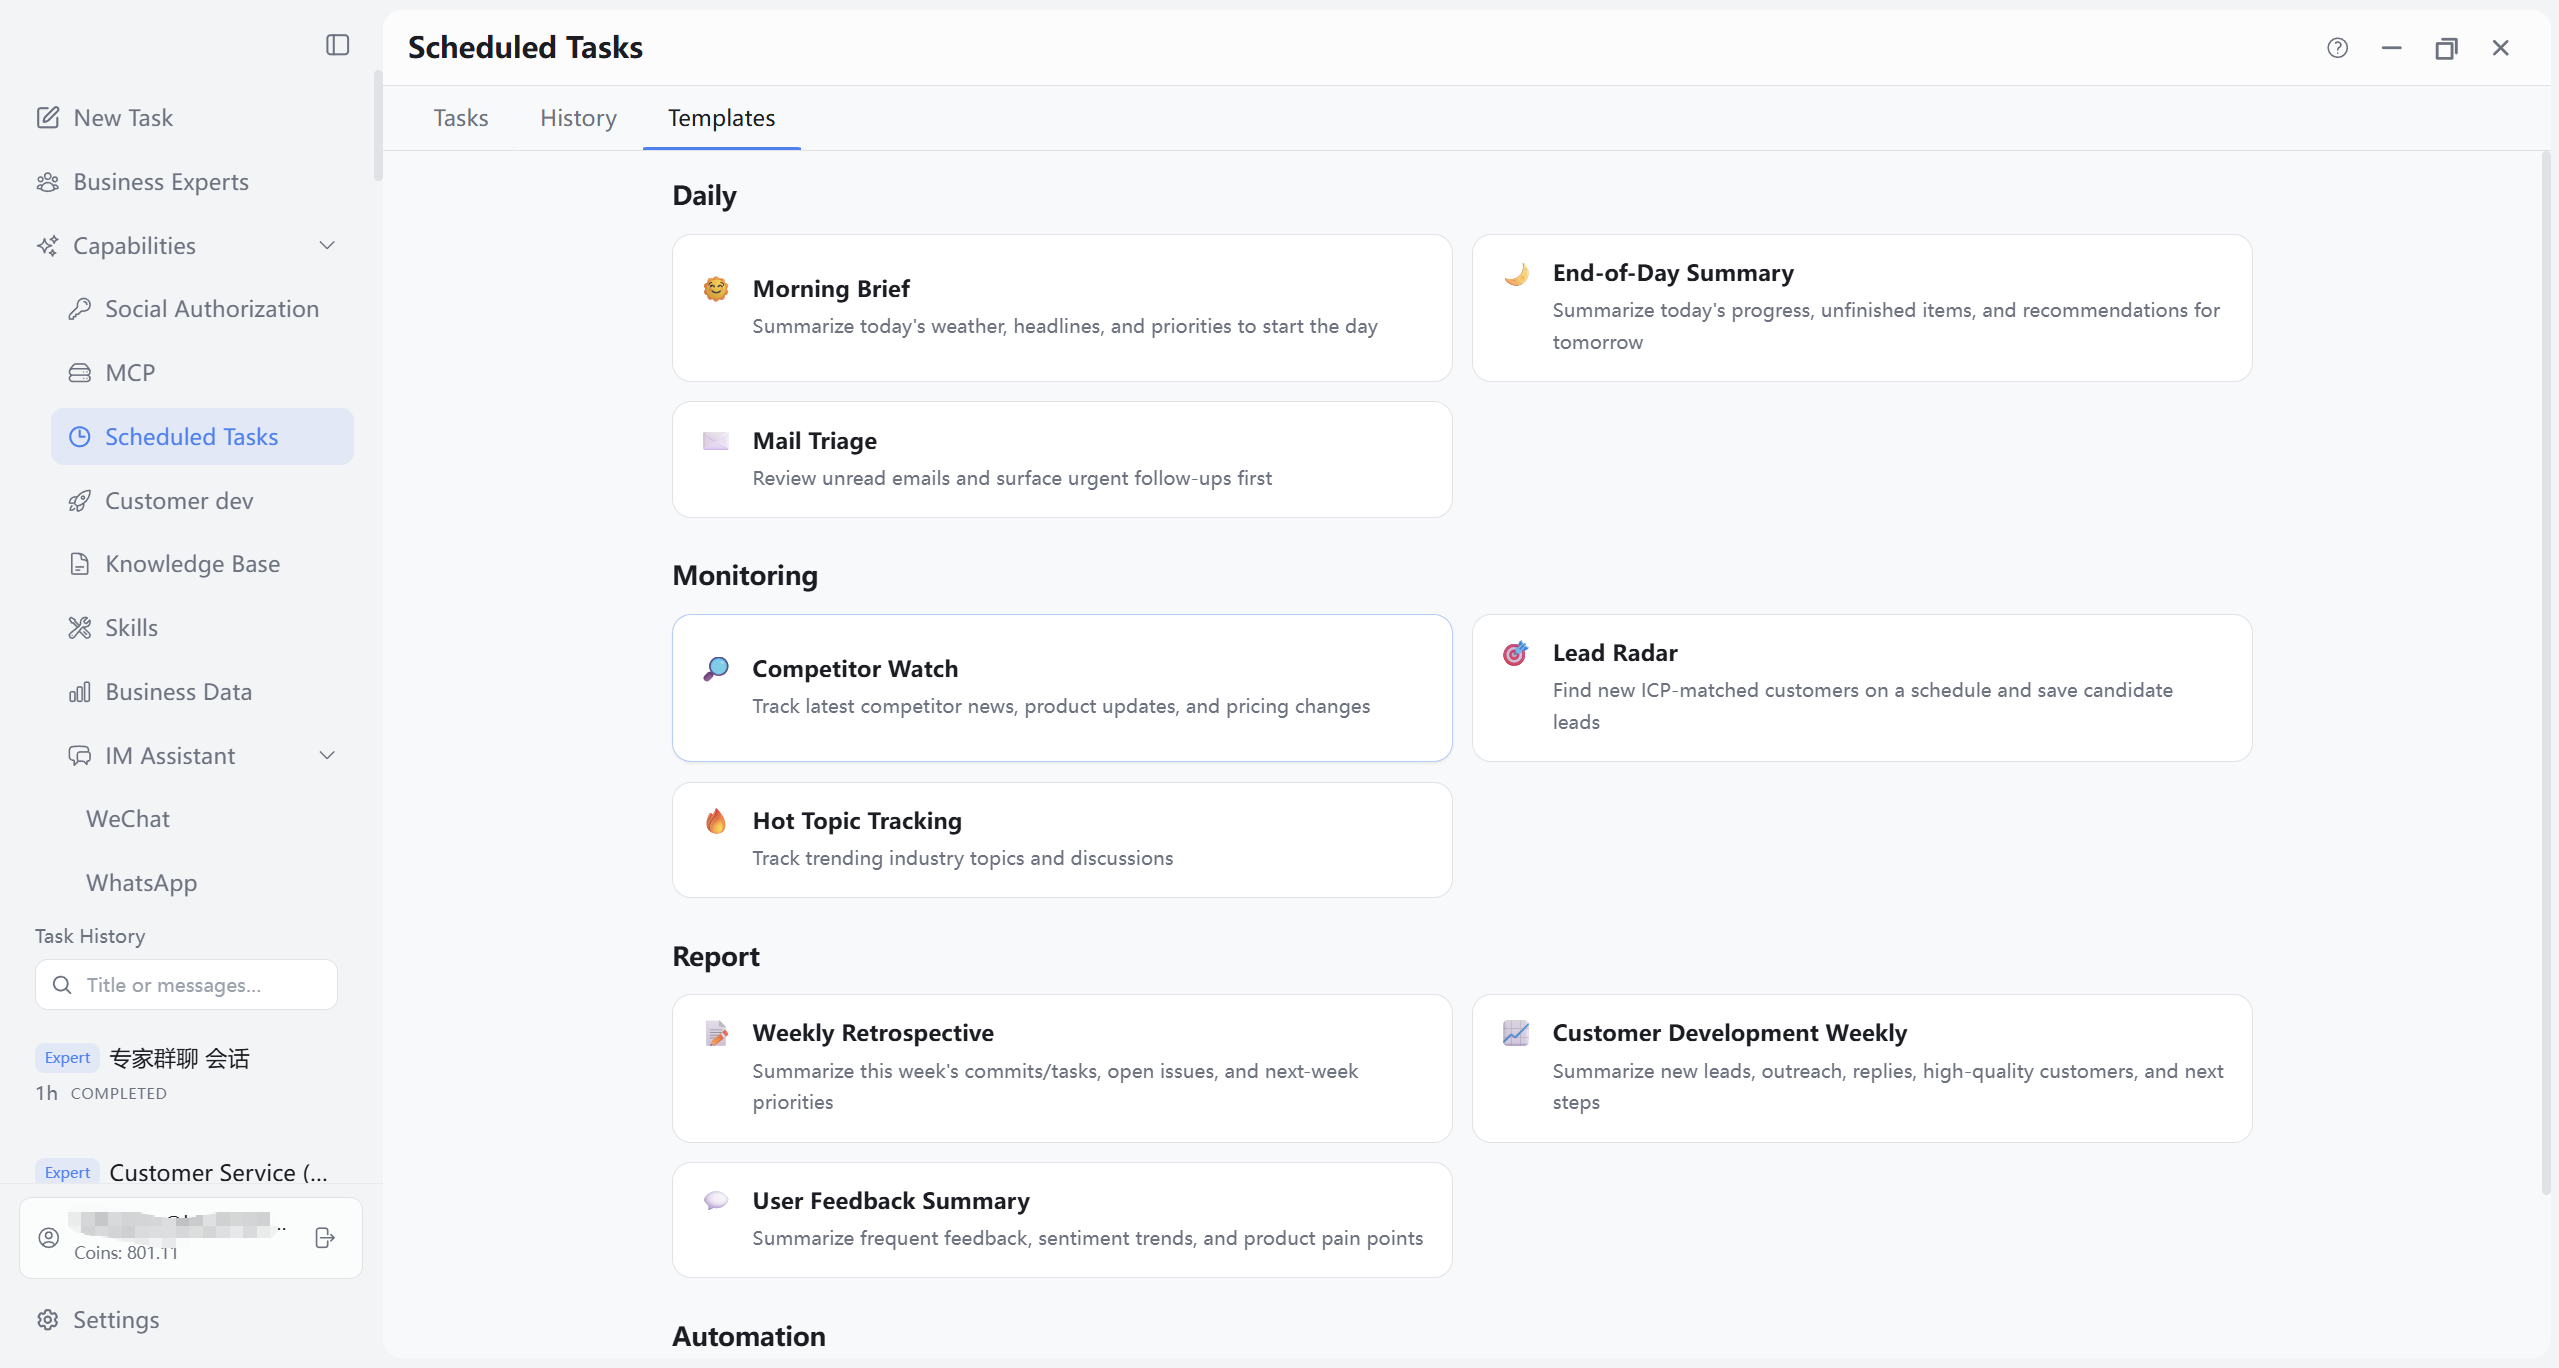
Purpose: Browse preset task templates by category; preview and one-click into New Task form to reduce blank-form work.
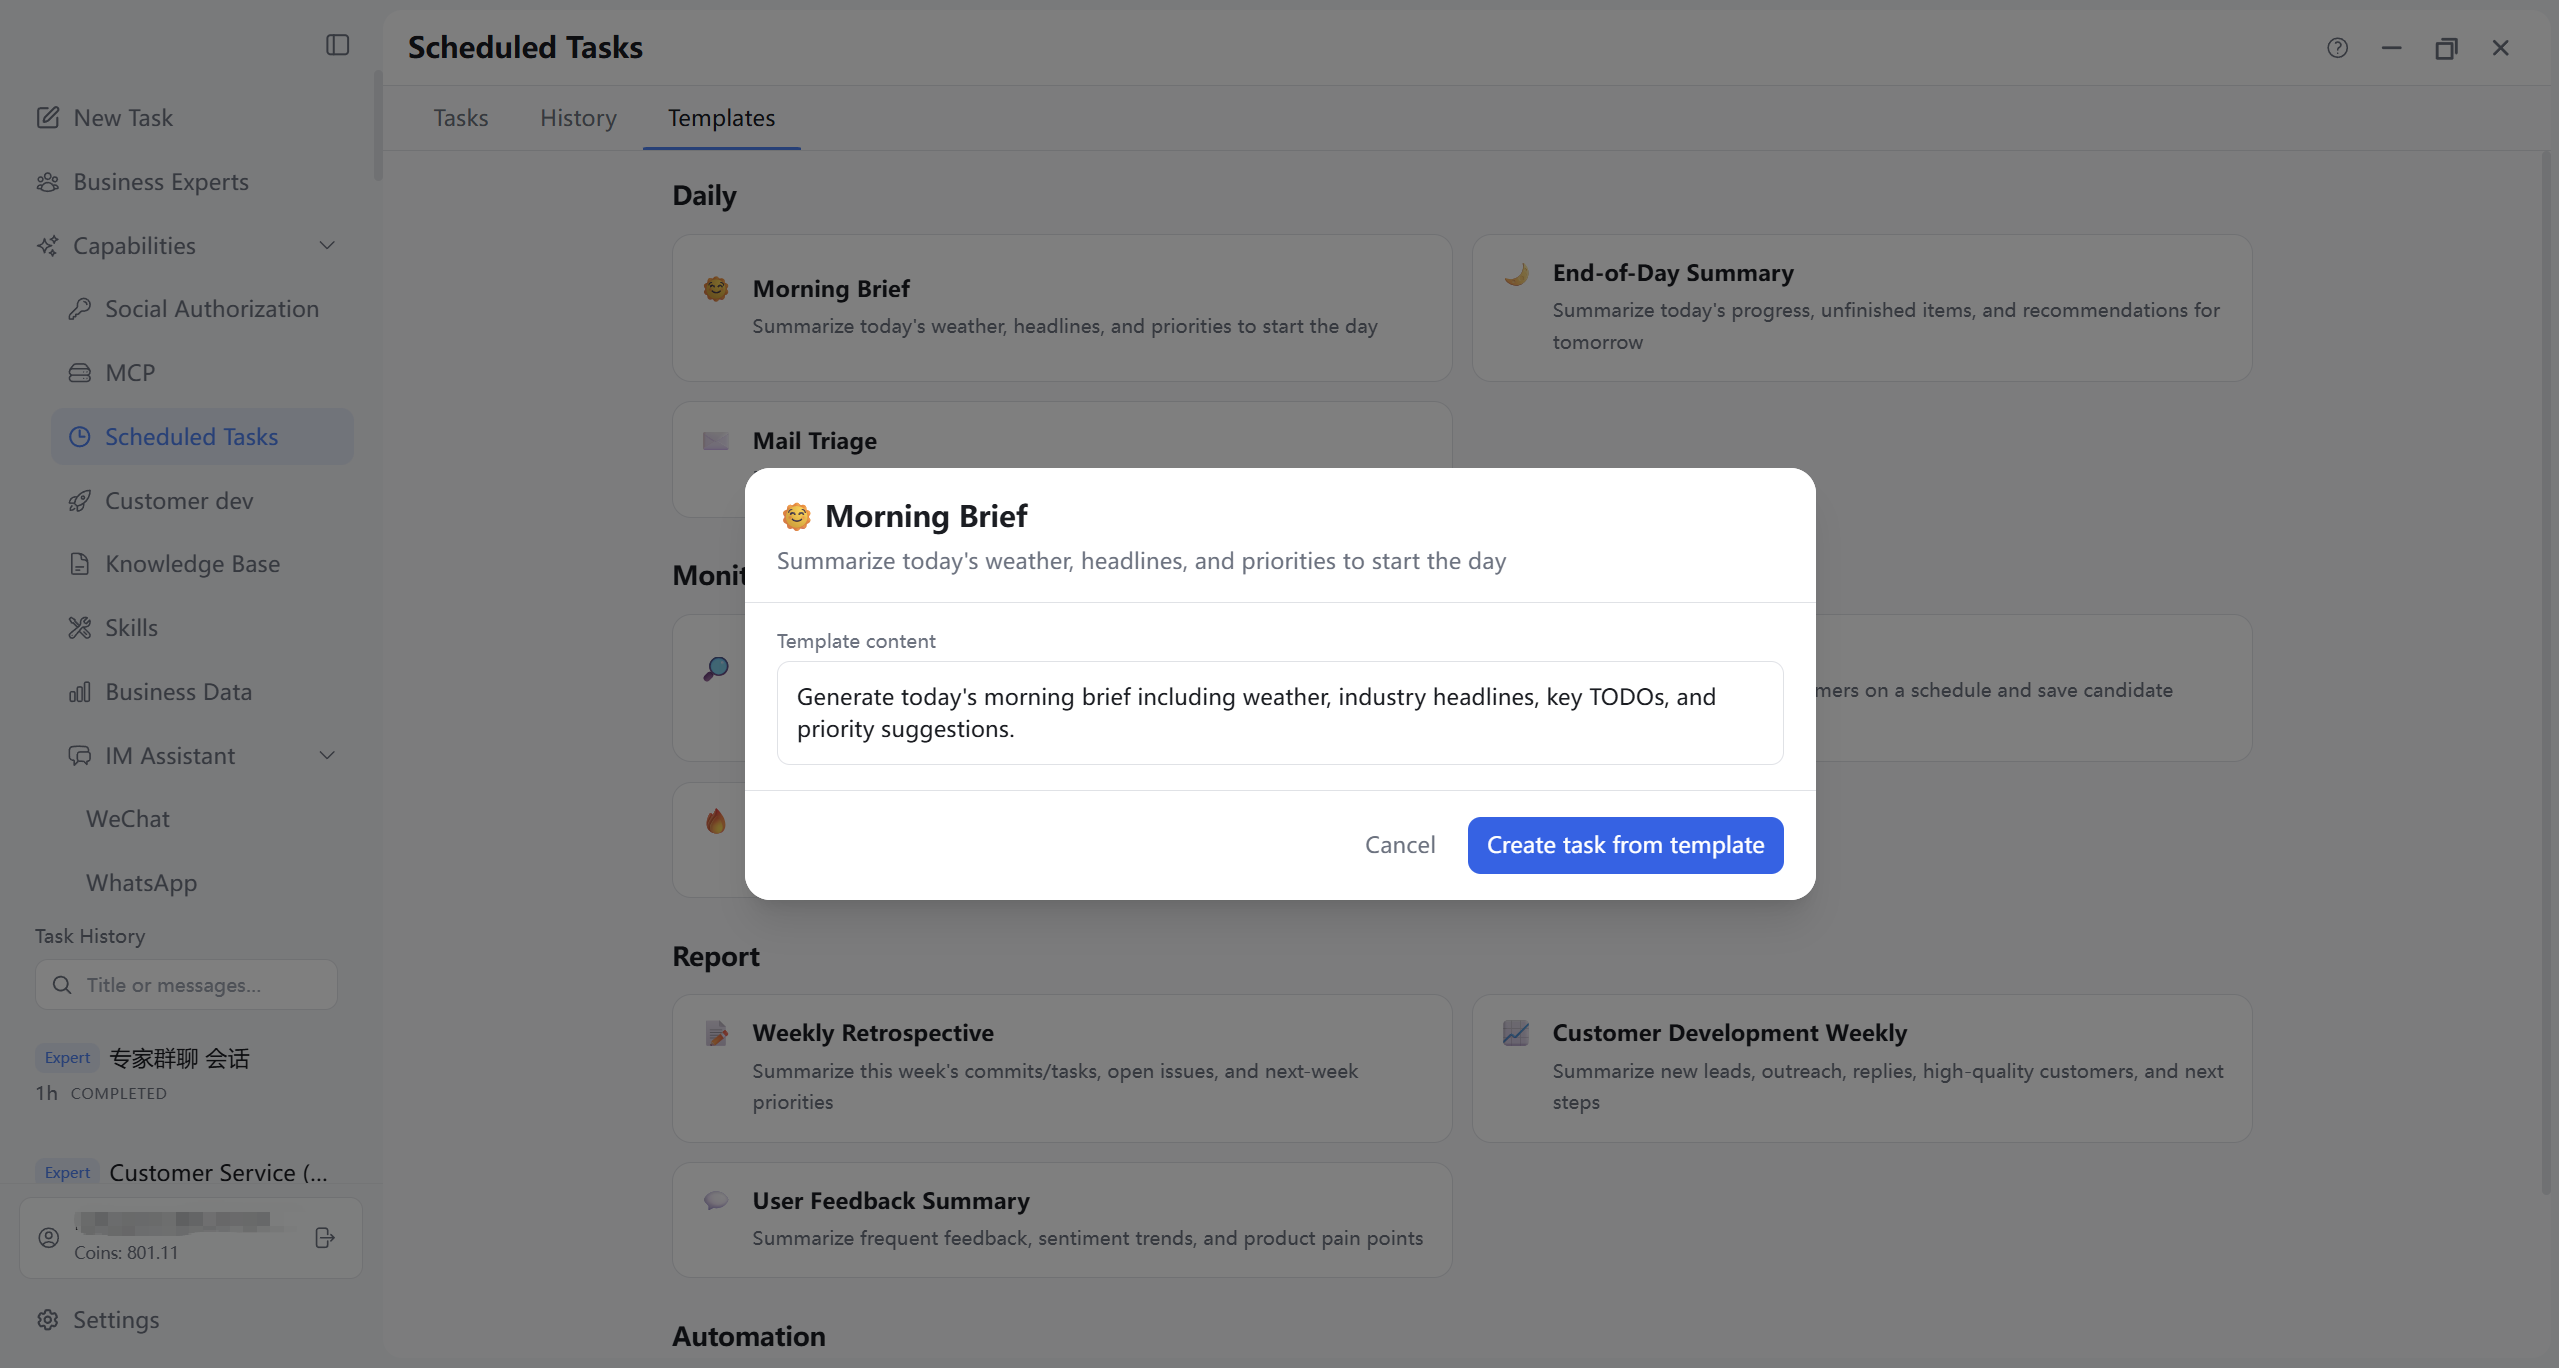
- Templates in category sections; click a card for preview with title, description, template body (prompt structure).
- Preview Create task from template switches to Tasks tab and opens New Task with prefilled fields—adjust schedule and delivery before save.
12. IM Assistant
This chapter covers three IM-related entry points: the multi-platform configuration page under Settings → IM Bots (including WhatsApp Business API); the conversation history panel under sidebar Capabilities → IM Assistant when WhatsApp or WeChat is enabled; and Tasks page sessions linked from IM messages, where you can switch between Via AI assistant and Send directly (12.5).
12.1 Entry and Overview
Settings path: Open Settings, select IM Bots on the left for multi-platform configuration (platform list left, form and status right). WhatsApp Business API is a separate block on the same settings page (12.6).
Sidebar path: When WhatsApp or WeChat is enabled in configuration, IM Assistant may appear under Capabilities; expand and click WhatsApp or WeChat for the platform conversation history panel (12.4)—not the Settings page.
12.2 Page Layout (IM Bots Configuration)
- Left platform list: IM platform icons and names for your region. Click to switch right panel. Far right enable switch per channel; ring color: connected (green), enabled but not connected (yellow), off (gray). WhatsApp may appear as a separate bottom entry when disabled so you can configure before enabling.
- Right title area: Platform icon, “{Platform} settings” label, and Connected / Starting / Not connected badge matching gateway status.
- Right content area: Changes per platform; sections below use WhatsApp as example.
12.3 WhatsApp Example (Right Configuration Area)
With WhatsApp selected on the left, the right side typically includes (matches UI):
- Guided steps: Step cards at top; external link for full integration docs.
- QR connect: Main button Connect WhatsApp via QR. Click shows loading, QR, phone confirmation states; success shows connected message. On failure, error reason and Clear session and retry QR (with confirmation) to restart pairing.
- Usage mode: Switch between Dedicated number (recommended) and Personal number (low barrier) with auto-save; notes explain default low-barrier policy and tightening in advanced settings.
- AI auto-reply: Checkbox. When on, DMs and @mentions in groups get automatic AI assistant replies; when off, messages still arrive (including history panel) but no auto reply.
- Policy banner: When DM policy is “allowlist + wildcard” etc., a prominent security banner suggests tightening.
- Pairing code: In pairing DM policy mode, pairing code input and Approve for new conversations.
- Advanced settings (collapsible): Mode-dependent fields; adjust DM policy and group policy; most fields auto-save on blur.
- Connectivity test: Test connectivity (or Retest) checks WhatsApp gateway; results in a dialog.
- Error display: Recent gateway errors in red below the form for troubleshooting.
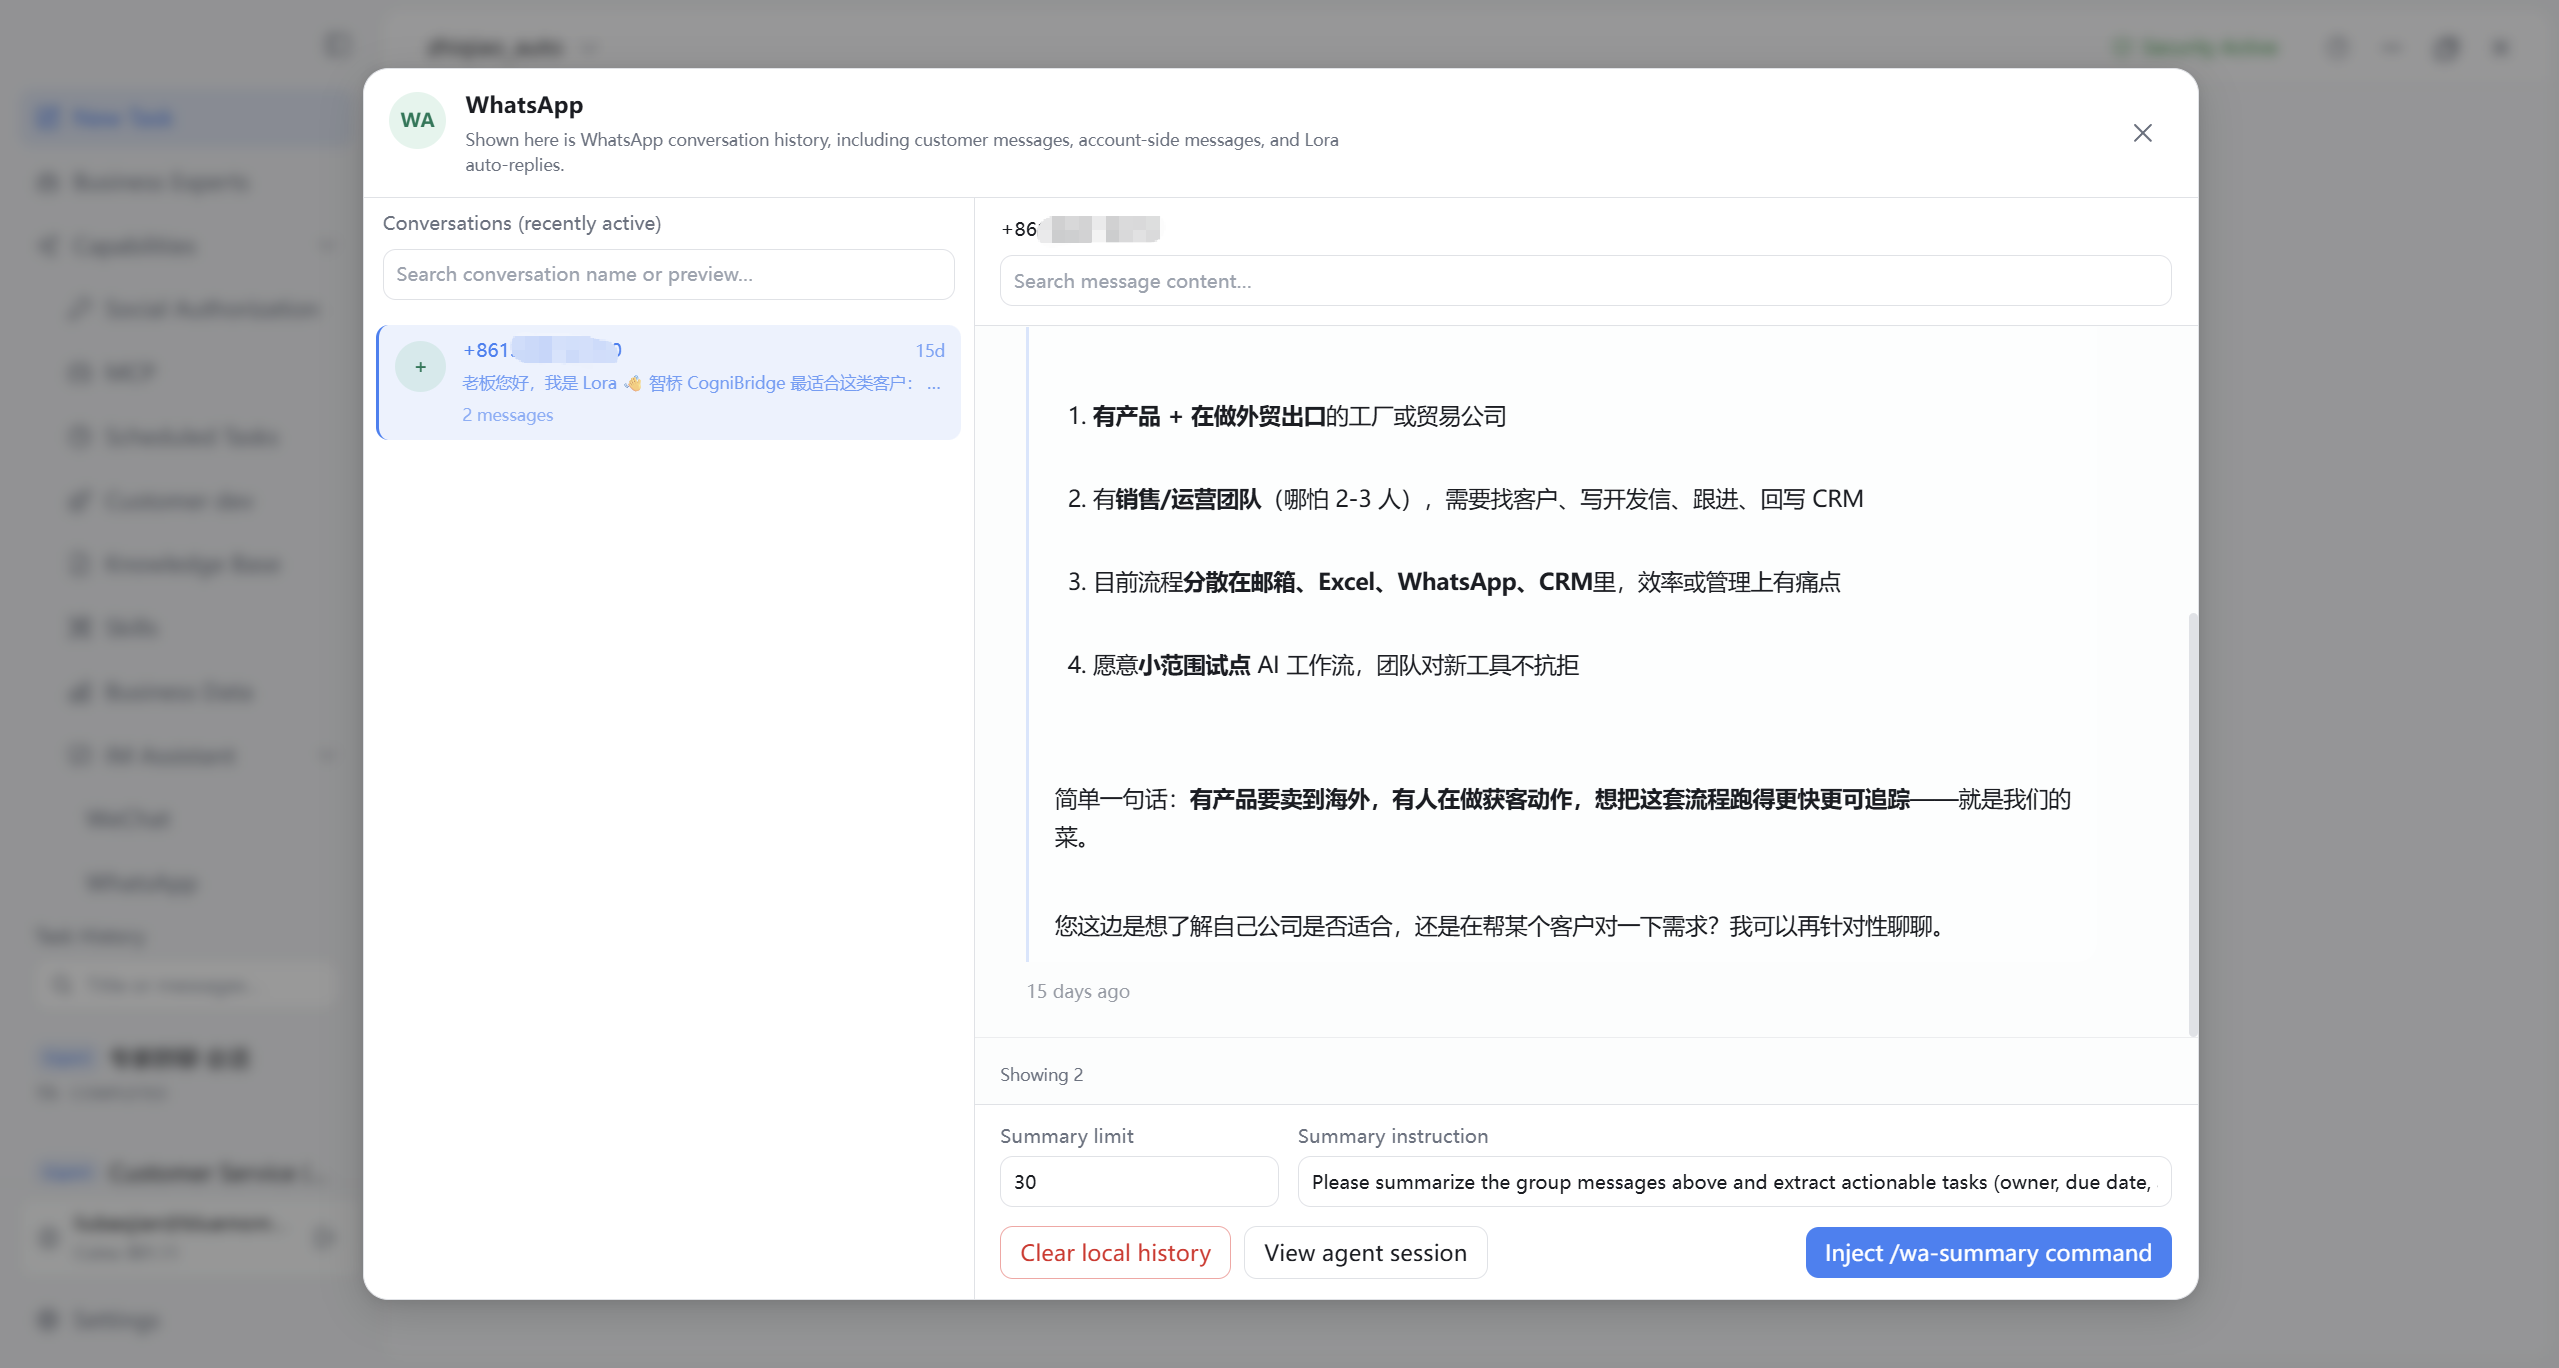
12.4 Sidebar “IM Assistant” — WhatsApp / WeChat Conversation History
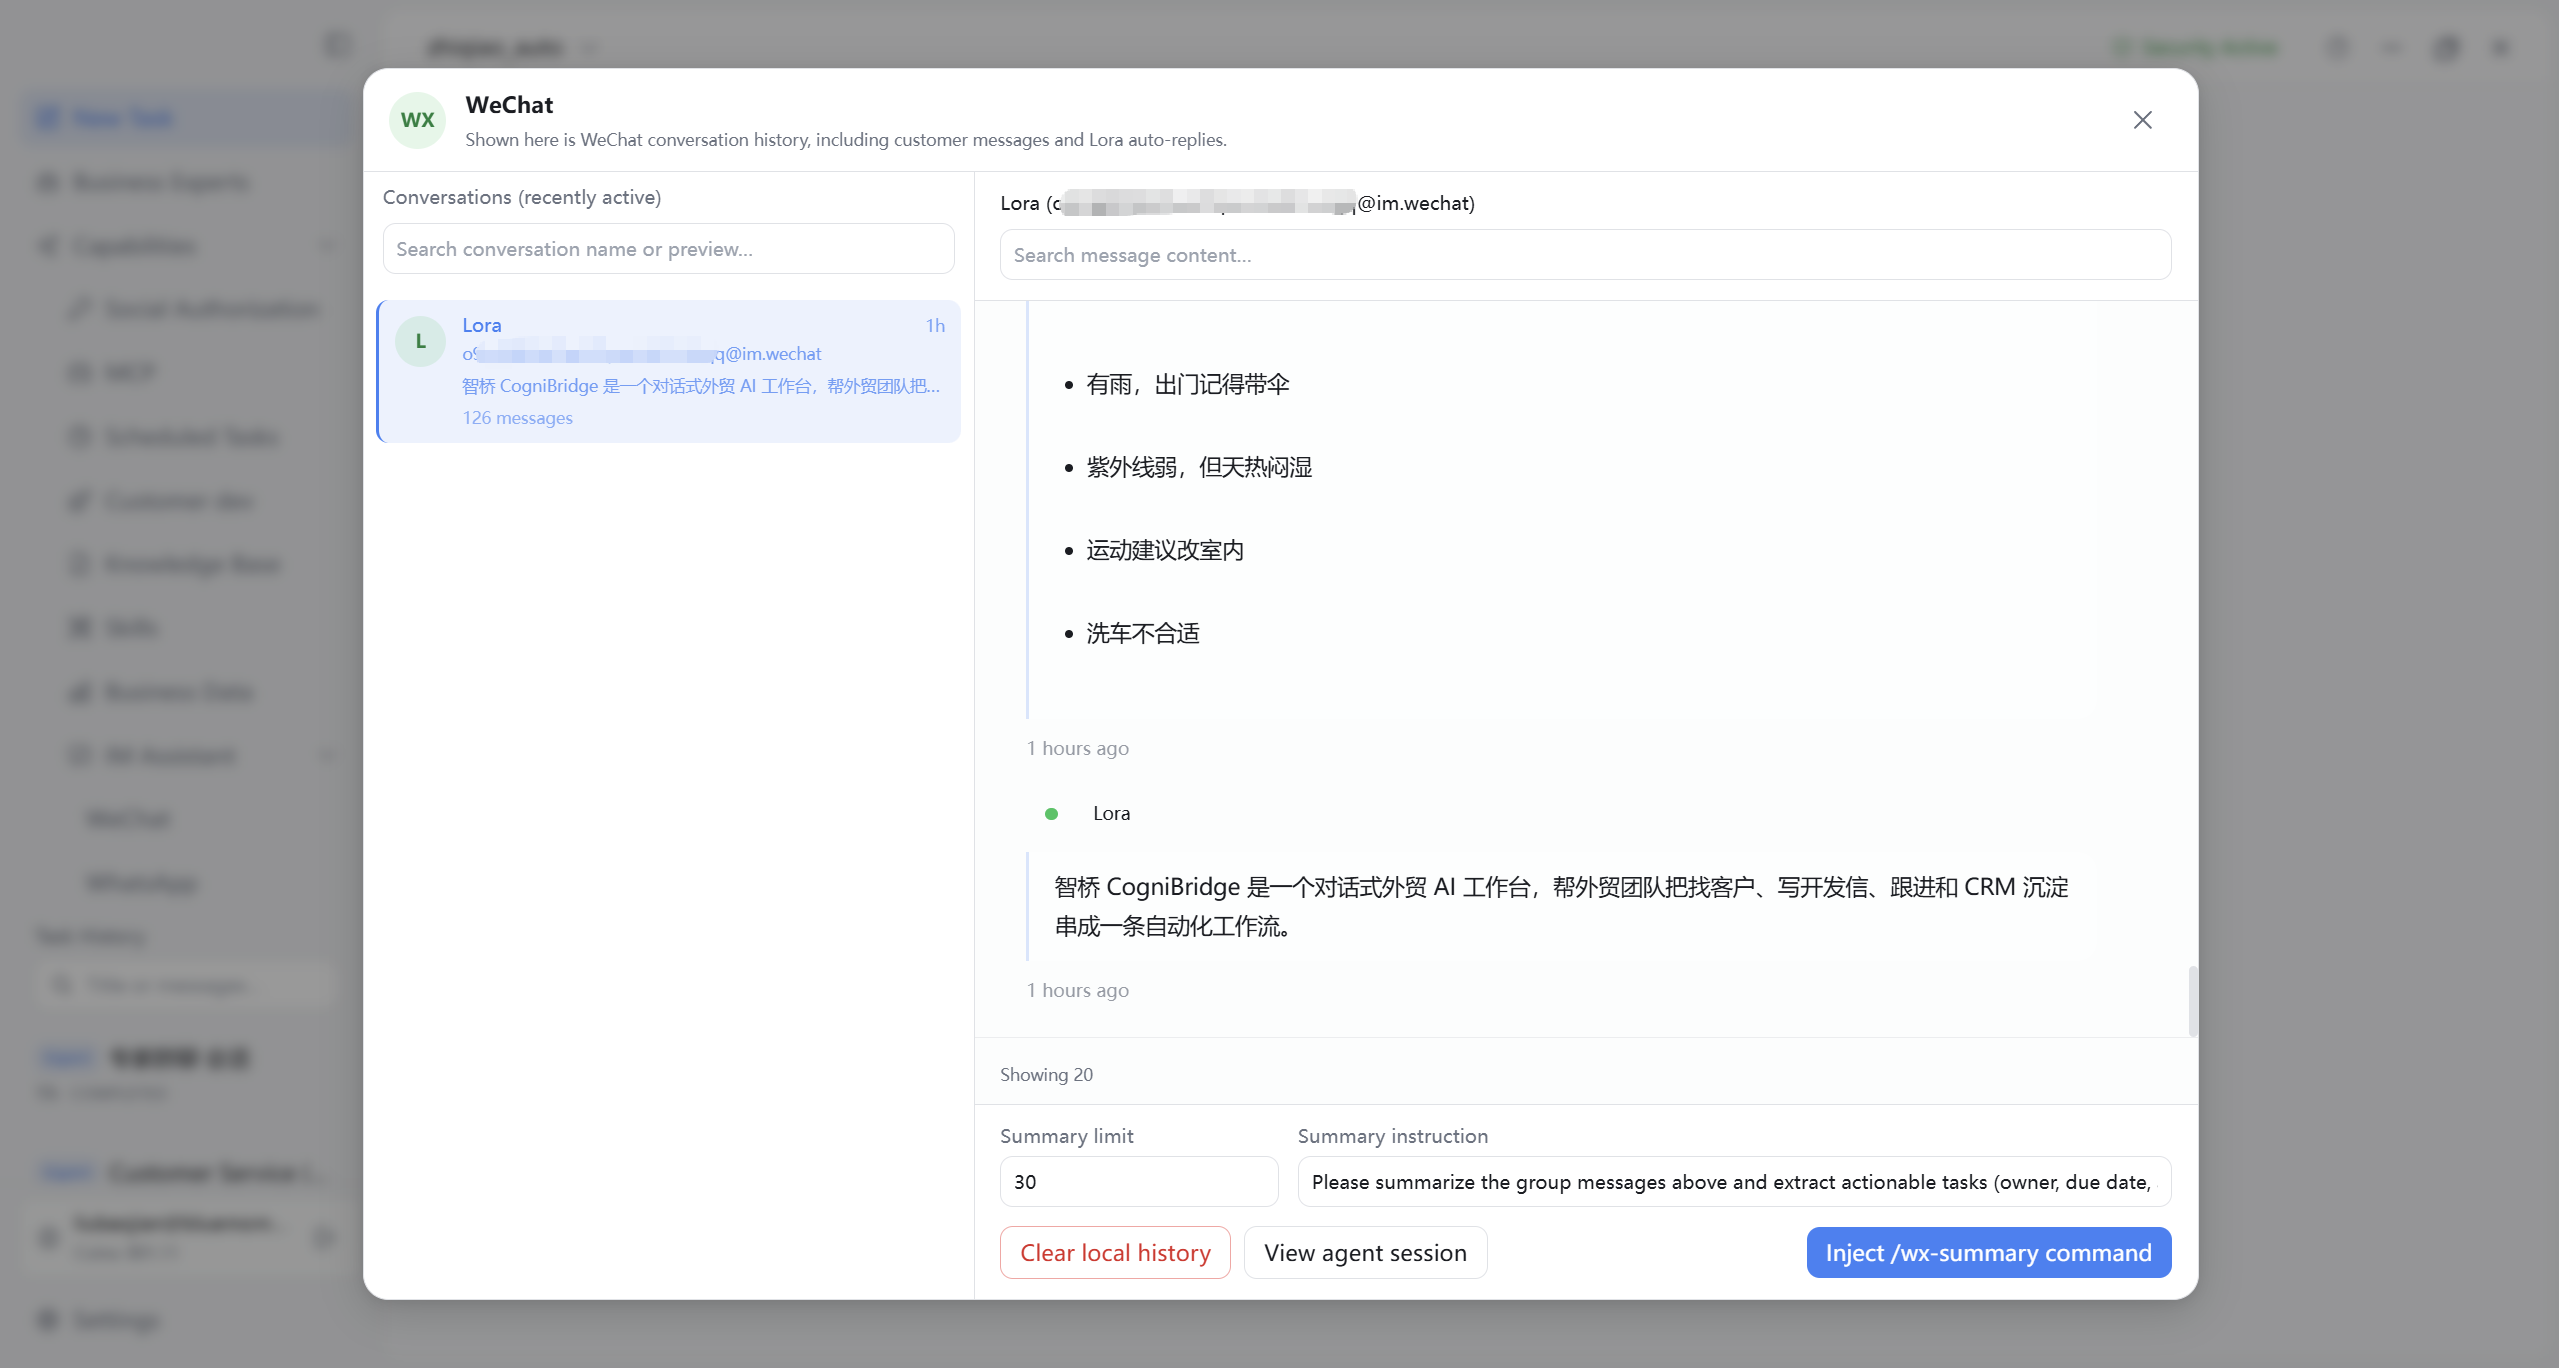
From sidebar Capabilities → IM Assistant → WhatsApp or WeChat opens a full-screen overlay panel (platform name as title). Layout is the same; one-click inject works the same—only platform differs.
- WhatsApp: Bottom One-click inject fills the Tasks page input with a summarize command for the current conversation.
- WeChat: Same One-click inject behavior.
Panel structure (both platforms):
- Left column: Recent conversations by time; title/ID, preview, last message time, message count. Click to switch conversation.
- Right top: Current conversation ID; Summary message count (1–100, default 30) and Summary instruction (optional—default built-in if empty).
- Right middle: Scroll parsed message timeline (customer, account-side, AI auto-reply, per UI).
- Right bottom: Clear local history removes locally stored inbound history (with confirmation); One-click inject builds a command from conversation ID, count, and instruction, writes to Tasks page input and closes panel for summarize tasks.
Note: panel focuses on inbound conversations for viewing and summarizing—complements gateway enable/disable and QR login in Settings. WhatsApp layout similar to WeChat; figure below uses WeChat.
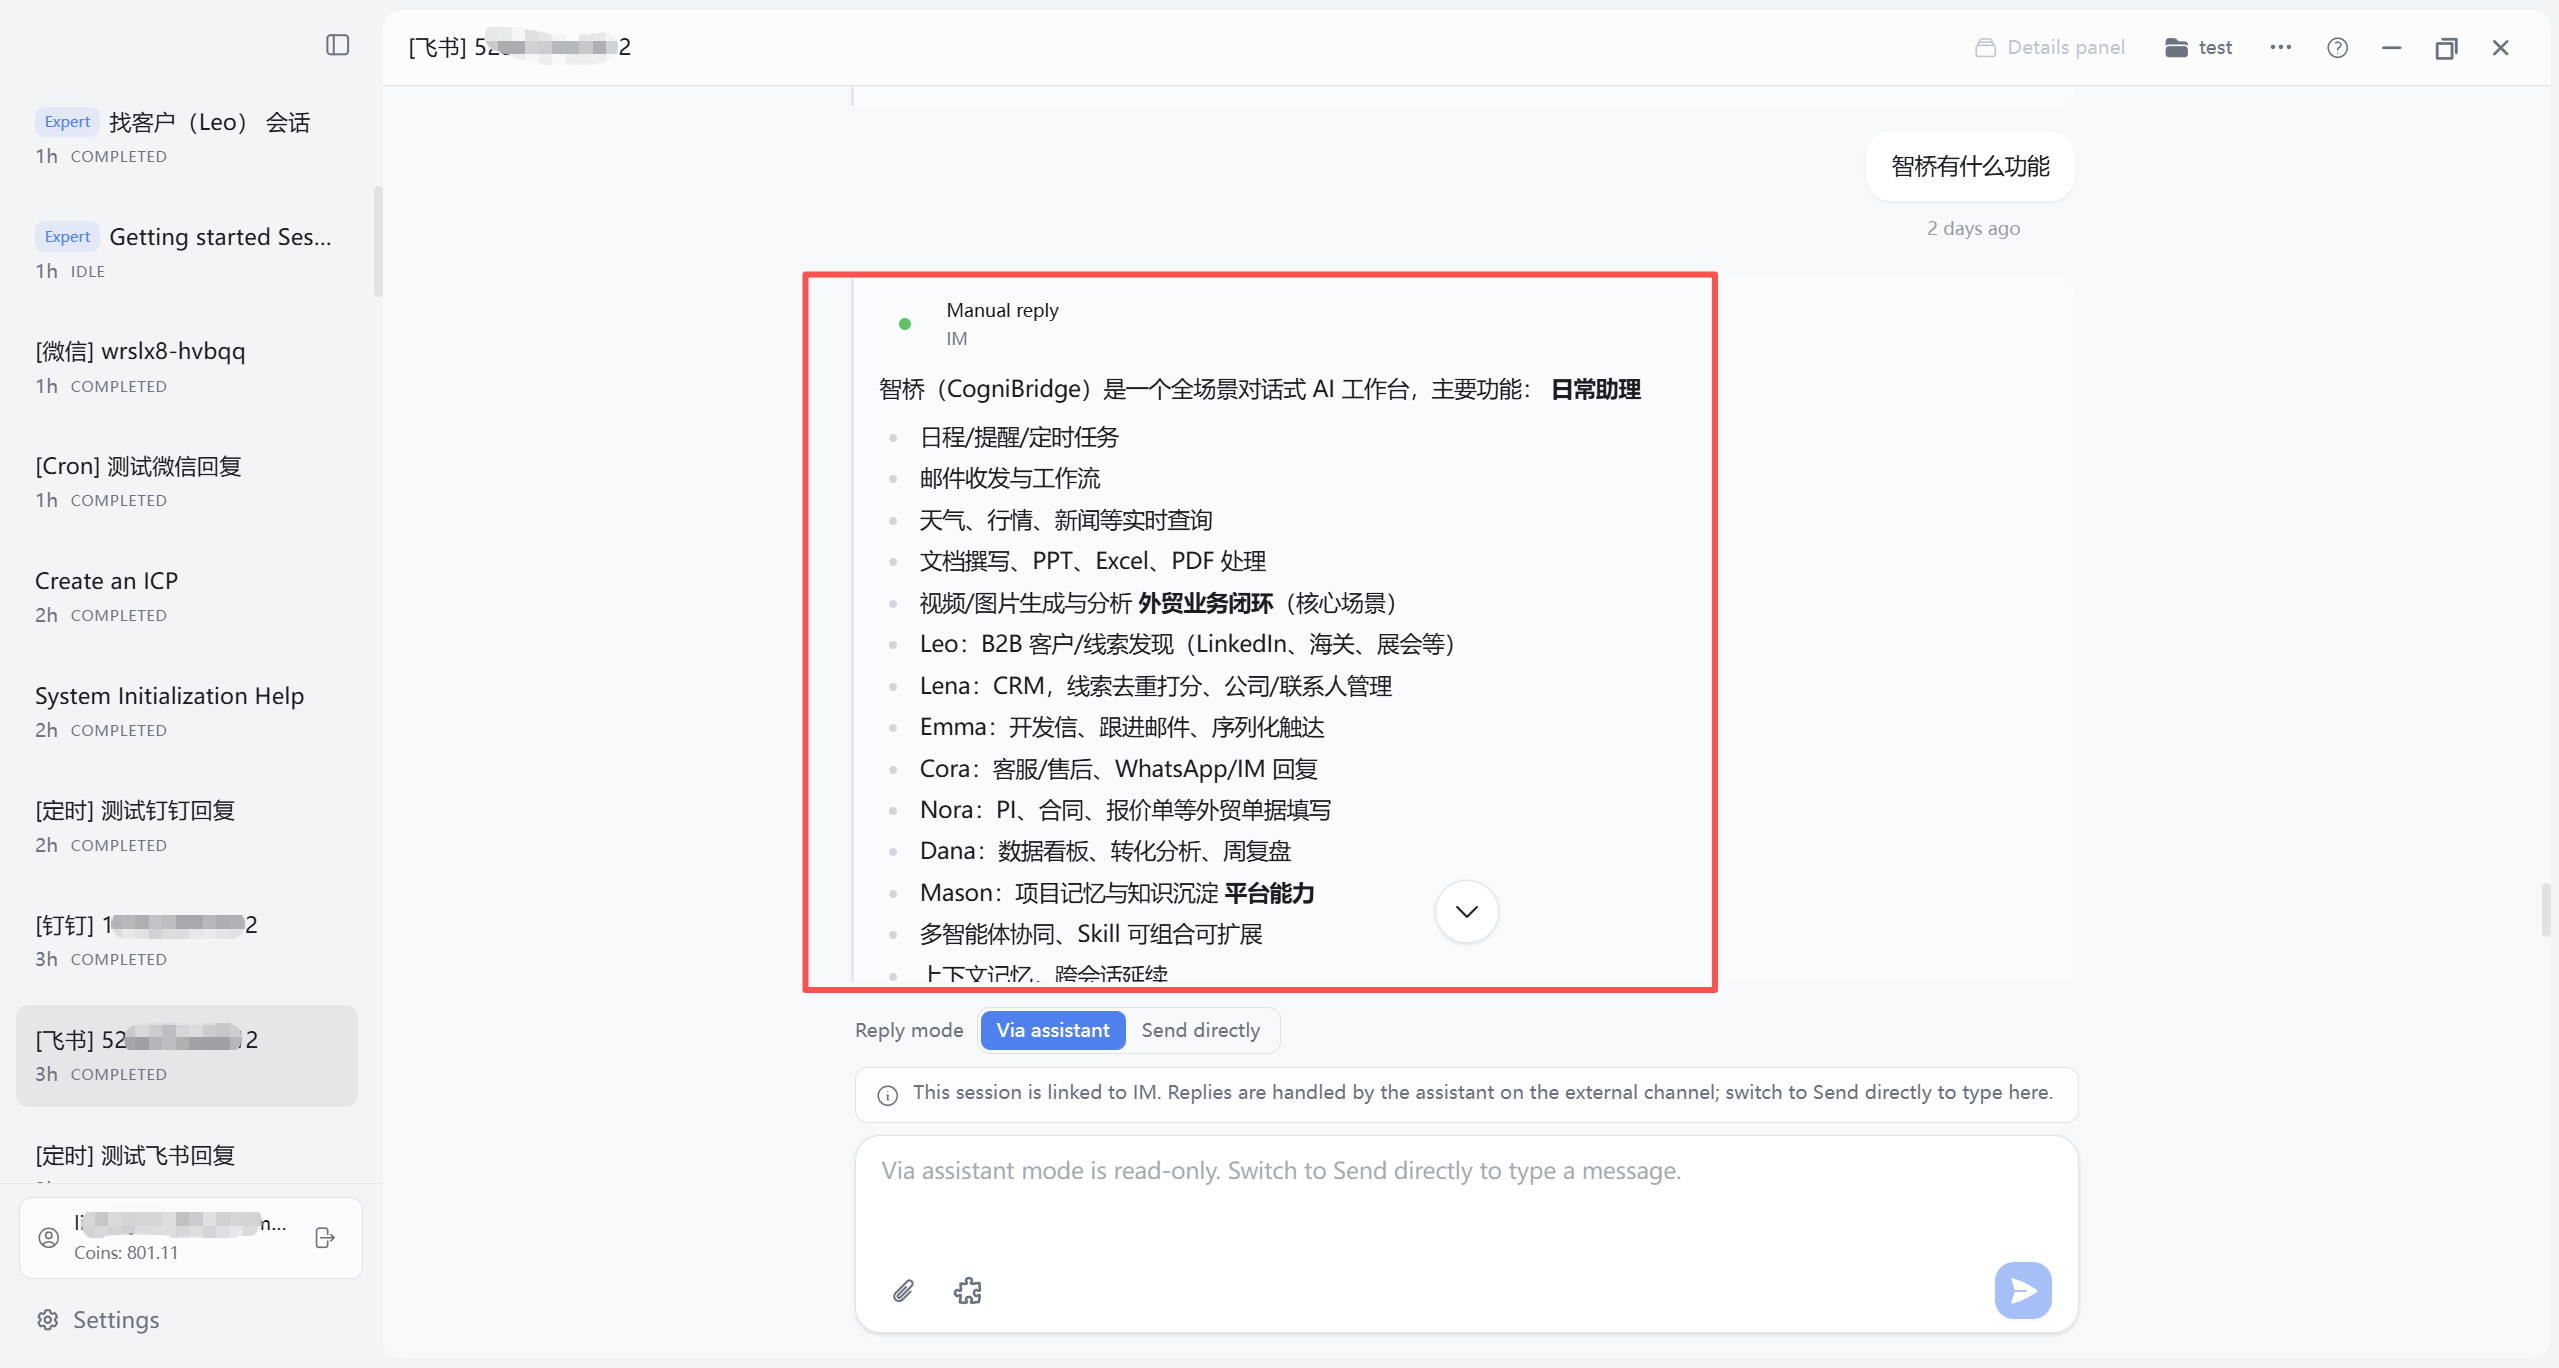
12.5 IM-Linked Tasks and Manual Reply
When inbound IM messages link to a task record, opening that task switches the bottom input to IM remote reply mode (not ordinary task input); the top bar shows linked platform (e.g. “IM”) and Manual reply status.
Reply mode toggle above input (UI may vary):
- Via AI assistant: Input goes to the AI assistant as a new turn; it reasons and drafts a reply—good when you need research, drafts, or summary before answering customers.
- Send directly: Input is not rewritten by the AI assistant—sent as your message to WhatsApp, WeChat, WeCom, etc.; placeholder often “Send directly to IM…”. Good when copy is ready and you need immediate human reply.
vs. “AI auto-reply”: AI auto-reply in Settings → IM Bots (12.3) automatically replies on inbound customer messages; this section’s toggle applies only to each send in a task you opened. Both can coexist: auto-reply handles inbound; Tasks page for review, summary, or human takeover.
When CogniPoints are insufficient, “Via AI assistant” on IM-linked tasks is blocked (3.9); “Send directly” depends on platform connection status.
12.6 WhatsApp Business API Configuration
Besides personal-number QR connect (12.3), CogniBridge provides WhatsApp Business API configuration under Settings → IM Bots for official template outreach—common in Customer Development WhatsApp sends (Chapter 7 7.3 outbound constraints).
Setup: Fill Meta Business WhatsApp credentials in the form (access token, business account ID, phone number ID, etc.—labels per UI). Save and Test connectivity; confirm pass.
- Customer development: Approved WhatsApp outreach drafts can use Business templates; contacts must have opted in, etc.—channel-ready prompts in UI.
- vs. personal number: QR WhatsApp for DMs and IM Assistant history; Business API for enterprise templated outreach—both can be configured; pick by scenario.
- Troubleshooting: On test failure, verify credentials, ID match, and Meta developer console permissions.
13. Task History
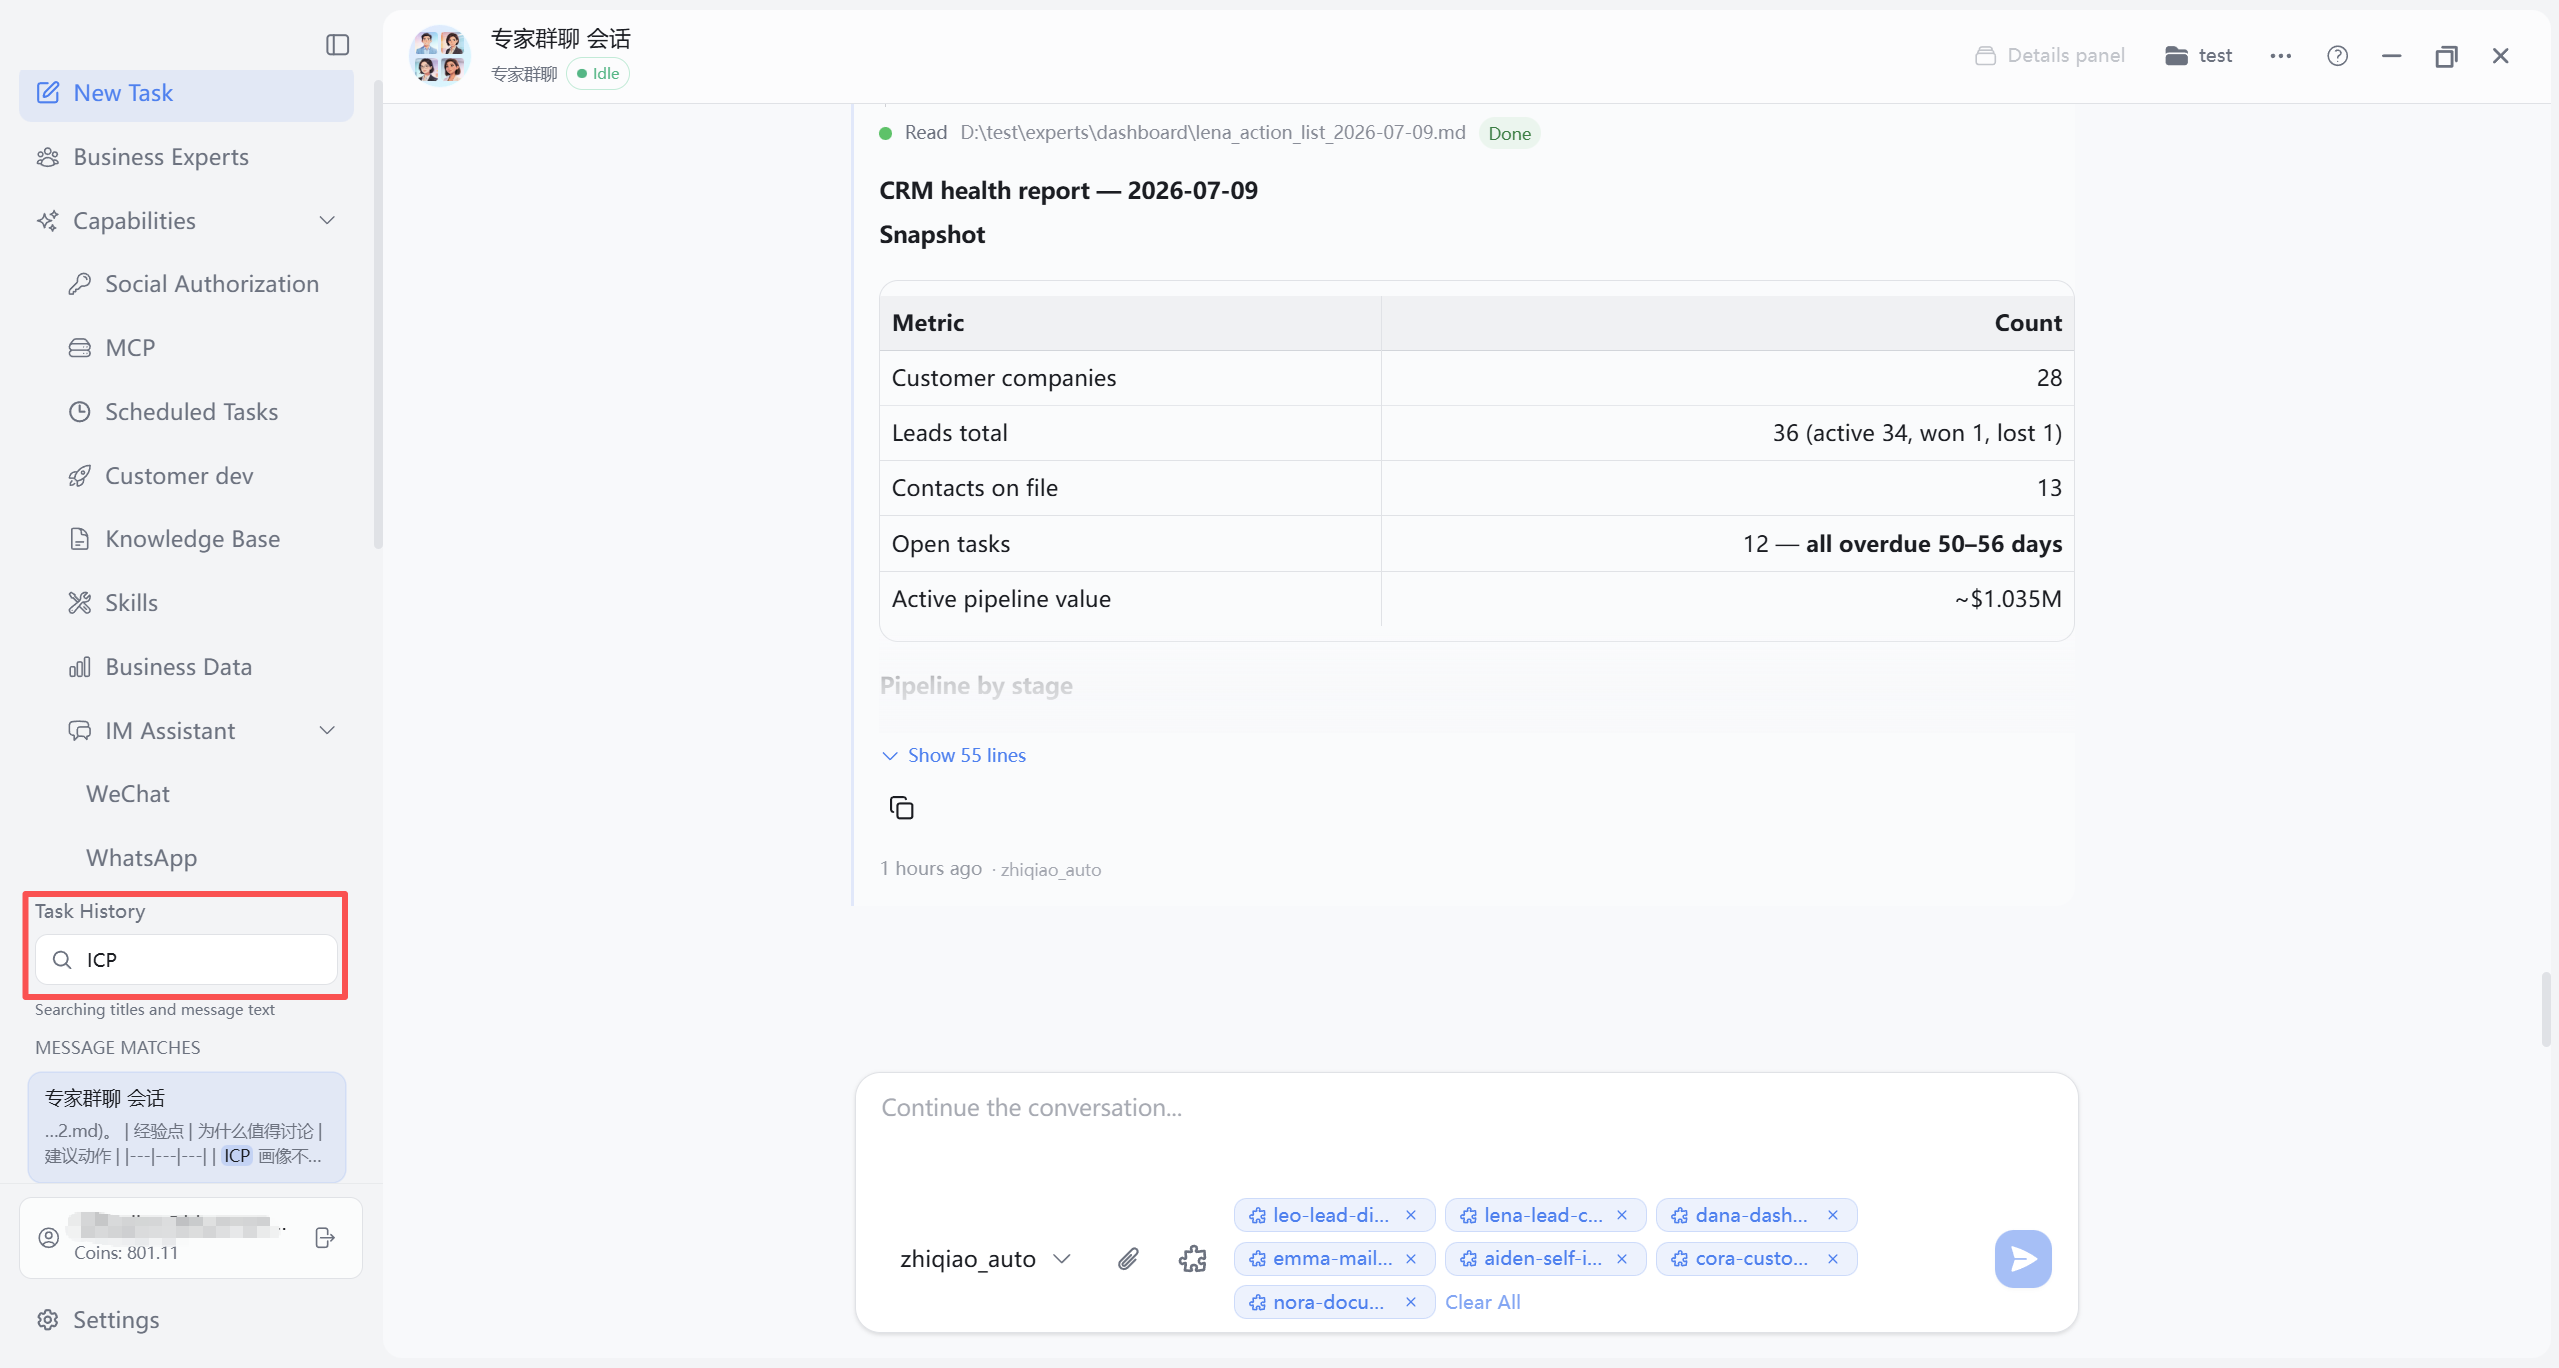
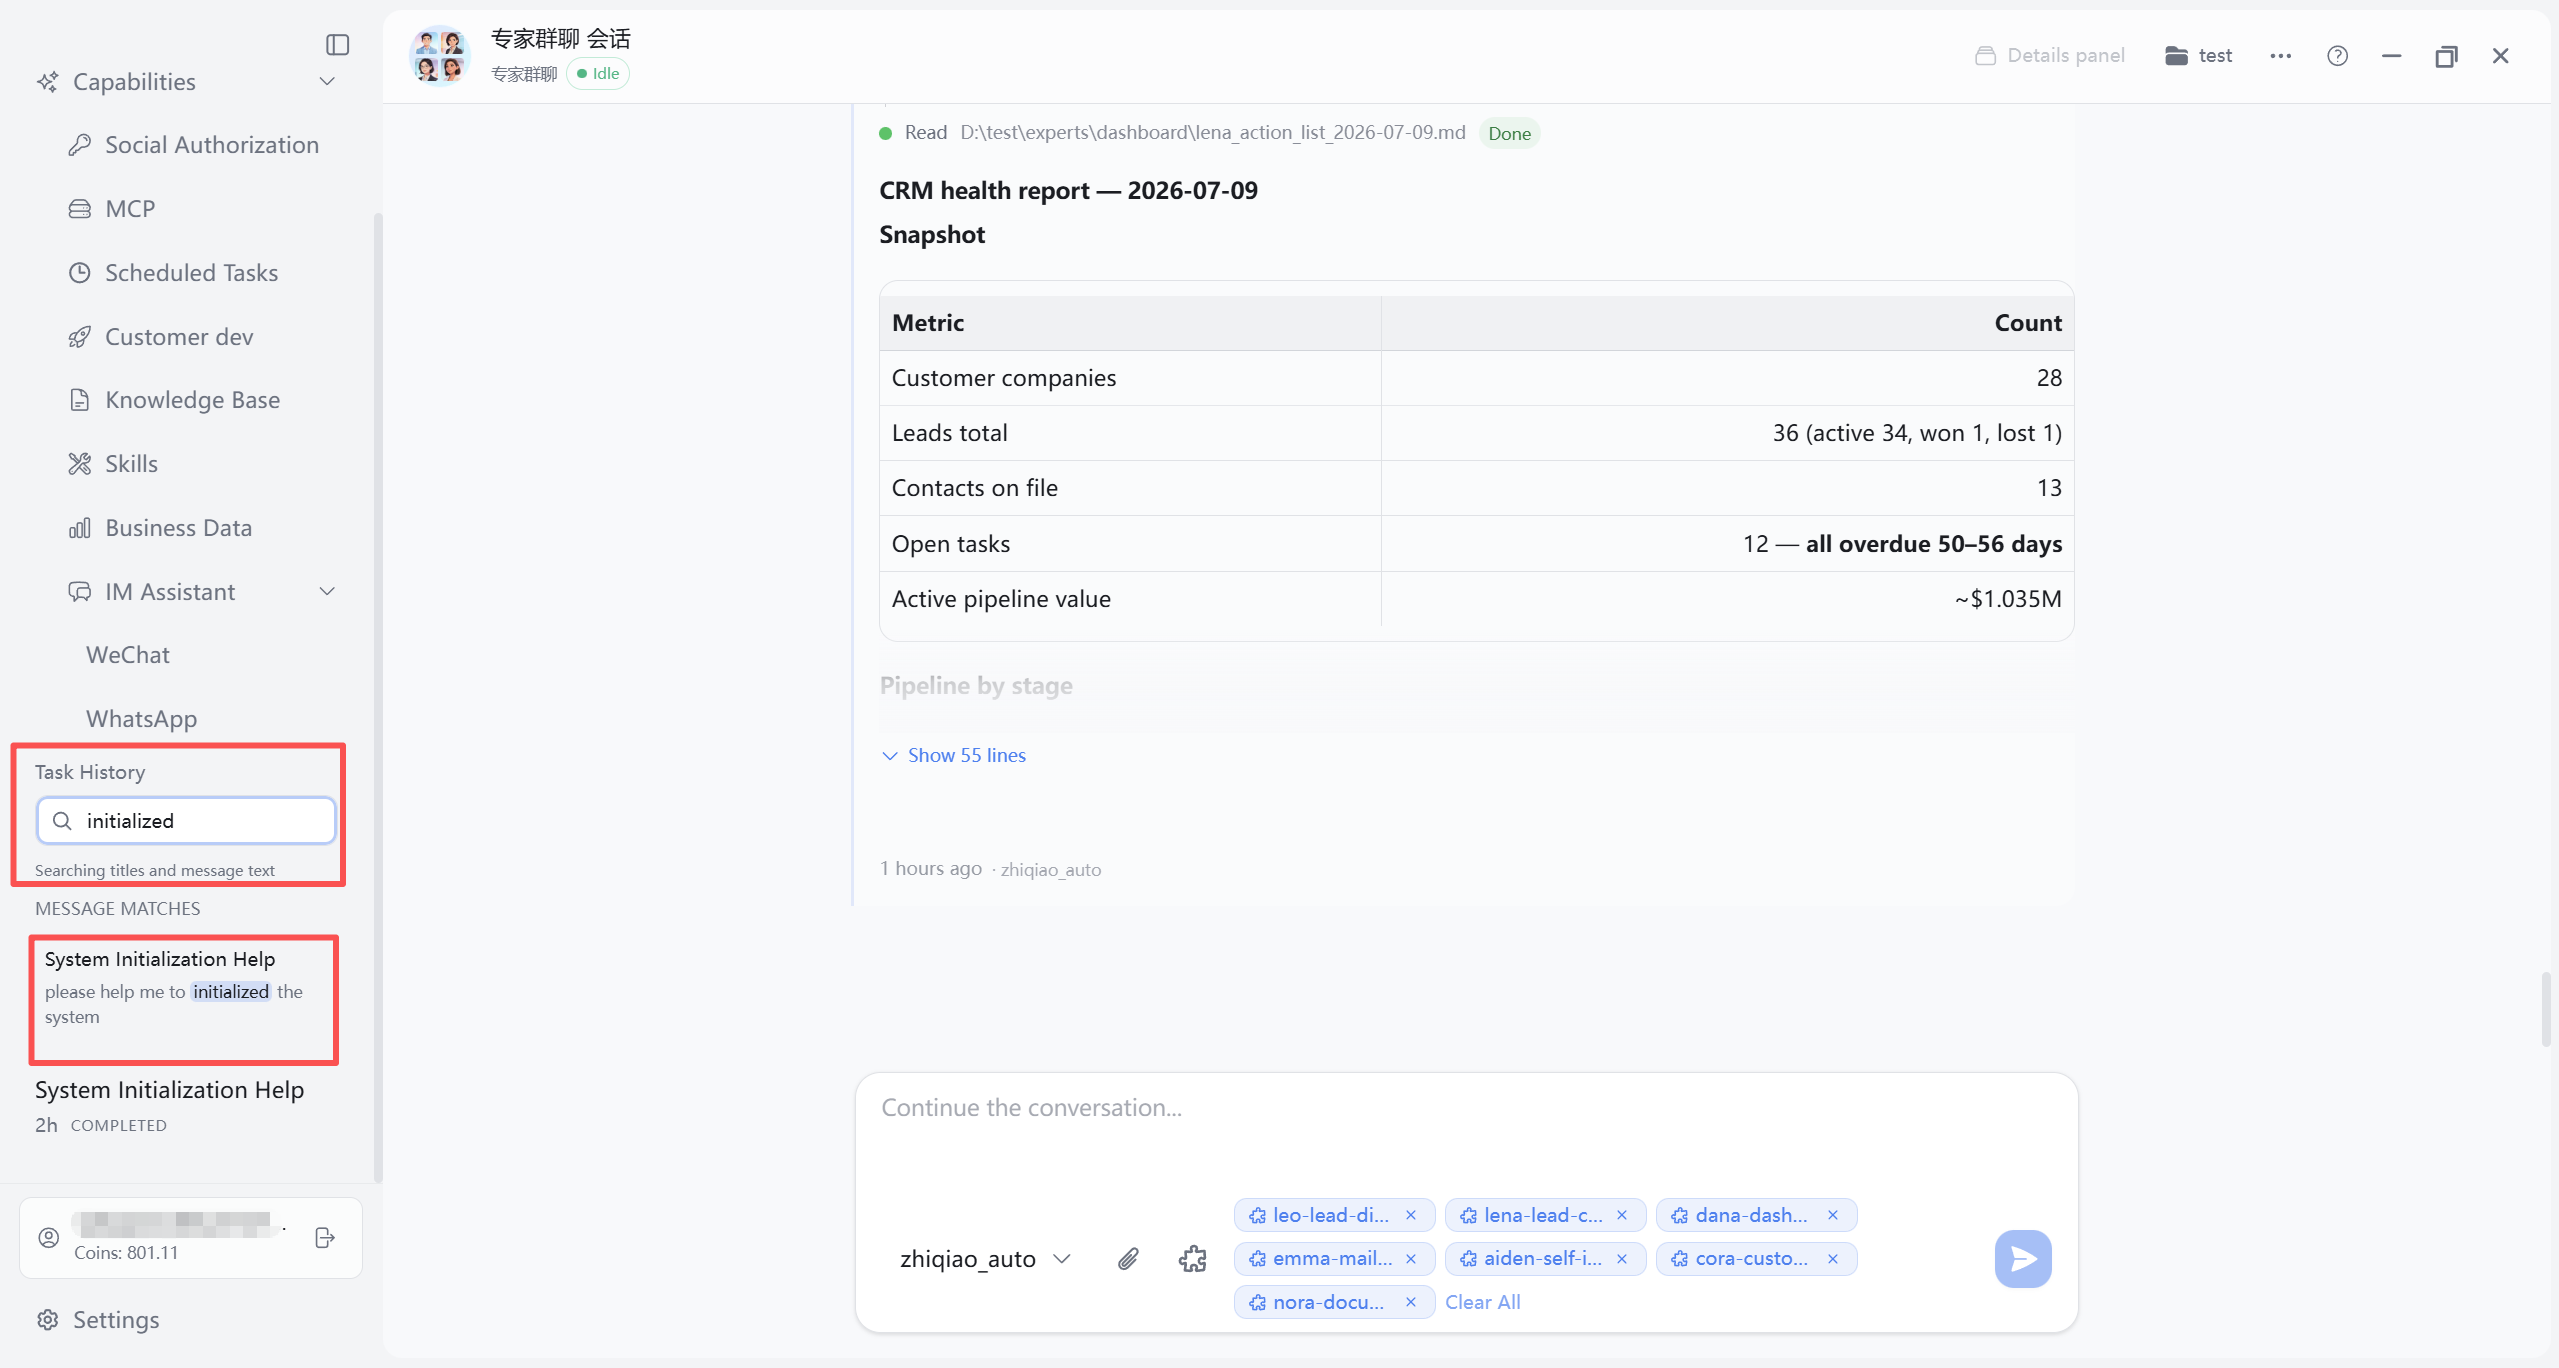
Task History in the left sidebar lists past sessions with the AI assistant; click an entry to switch context. Search placeholder “Search tasks”: by default filters title and preview; with two or more characters, also full-text search of message content—matching sessions appear even if the title lacks the keyword. Pinned sessions sort first within their group; others roughly by recent activity. Each row may show relative time and status (running, completed, stopped, error, etc.—UI may vary). Collapsing the sidebar does not clear the list; if batch mode is active, collapsing exits batch mode.
13.1 Search and List
Use the search box beside “Task History” to narrow the list. Rows show title, preview, relative time, status, etc.
- Short keyword (0–1 characters): Matches title and preview only.
- Long keyword (≥2 characters): Also searches historical messages—when you remember content but not title; hints like “Searched title and full message text,” “Message match”; brief loading while searching.
After opening a session, the Tasks page top bar shows an enlarged expert avatar (if linked) and task title beside the avatar for quick identification (layout per version). IM-linked tasks also show linked platform on the top bar.
13.2 Per-Item “⋯” Menu
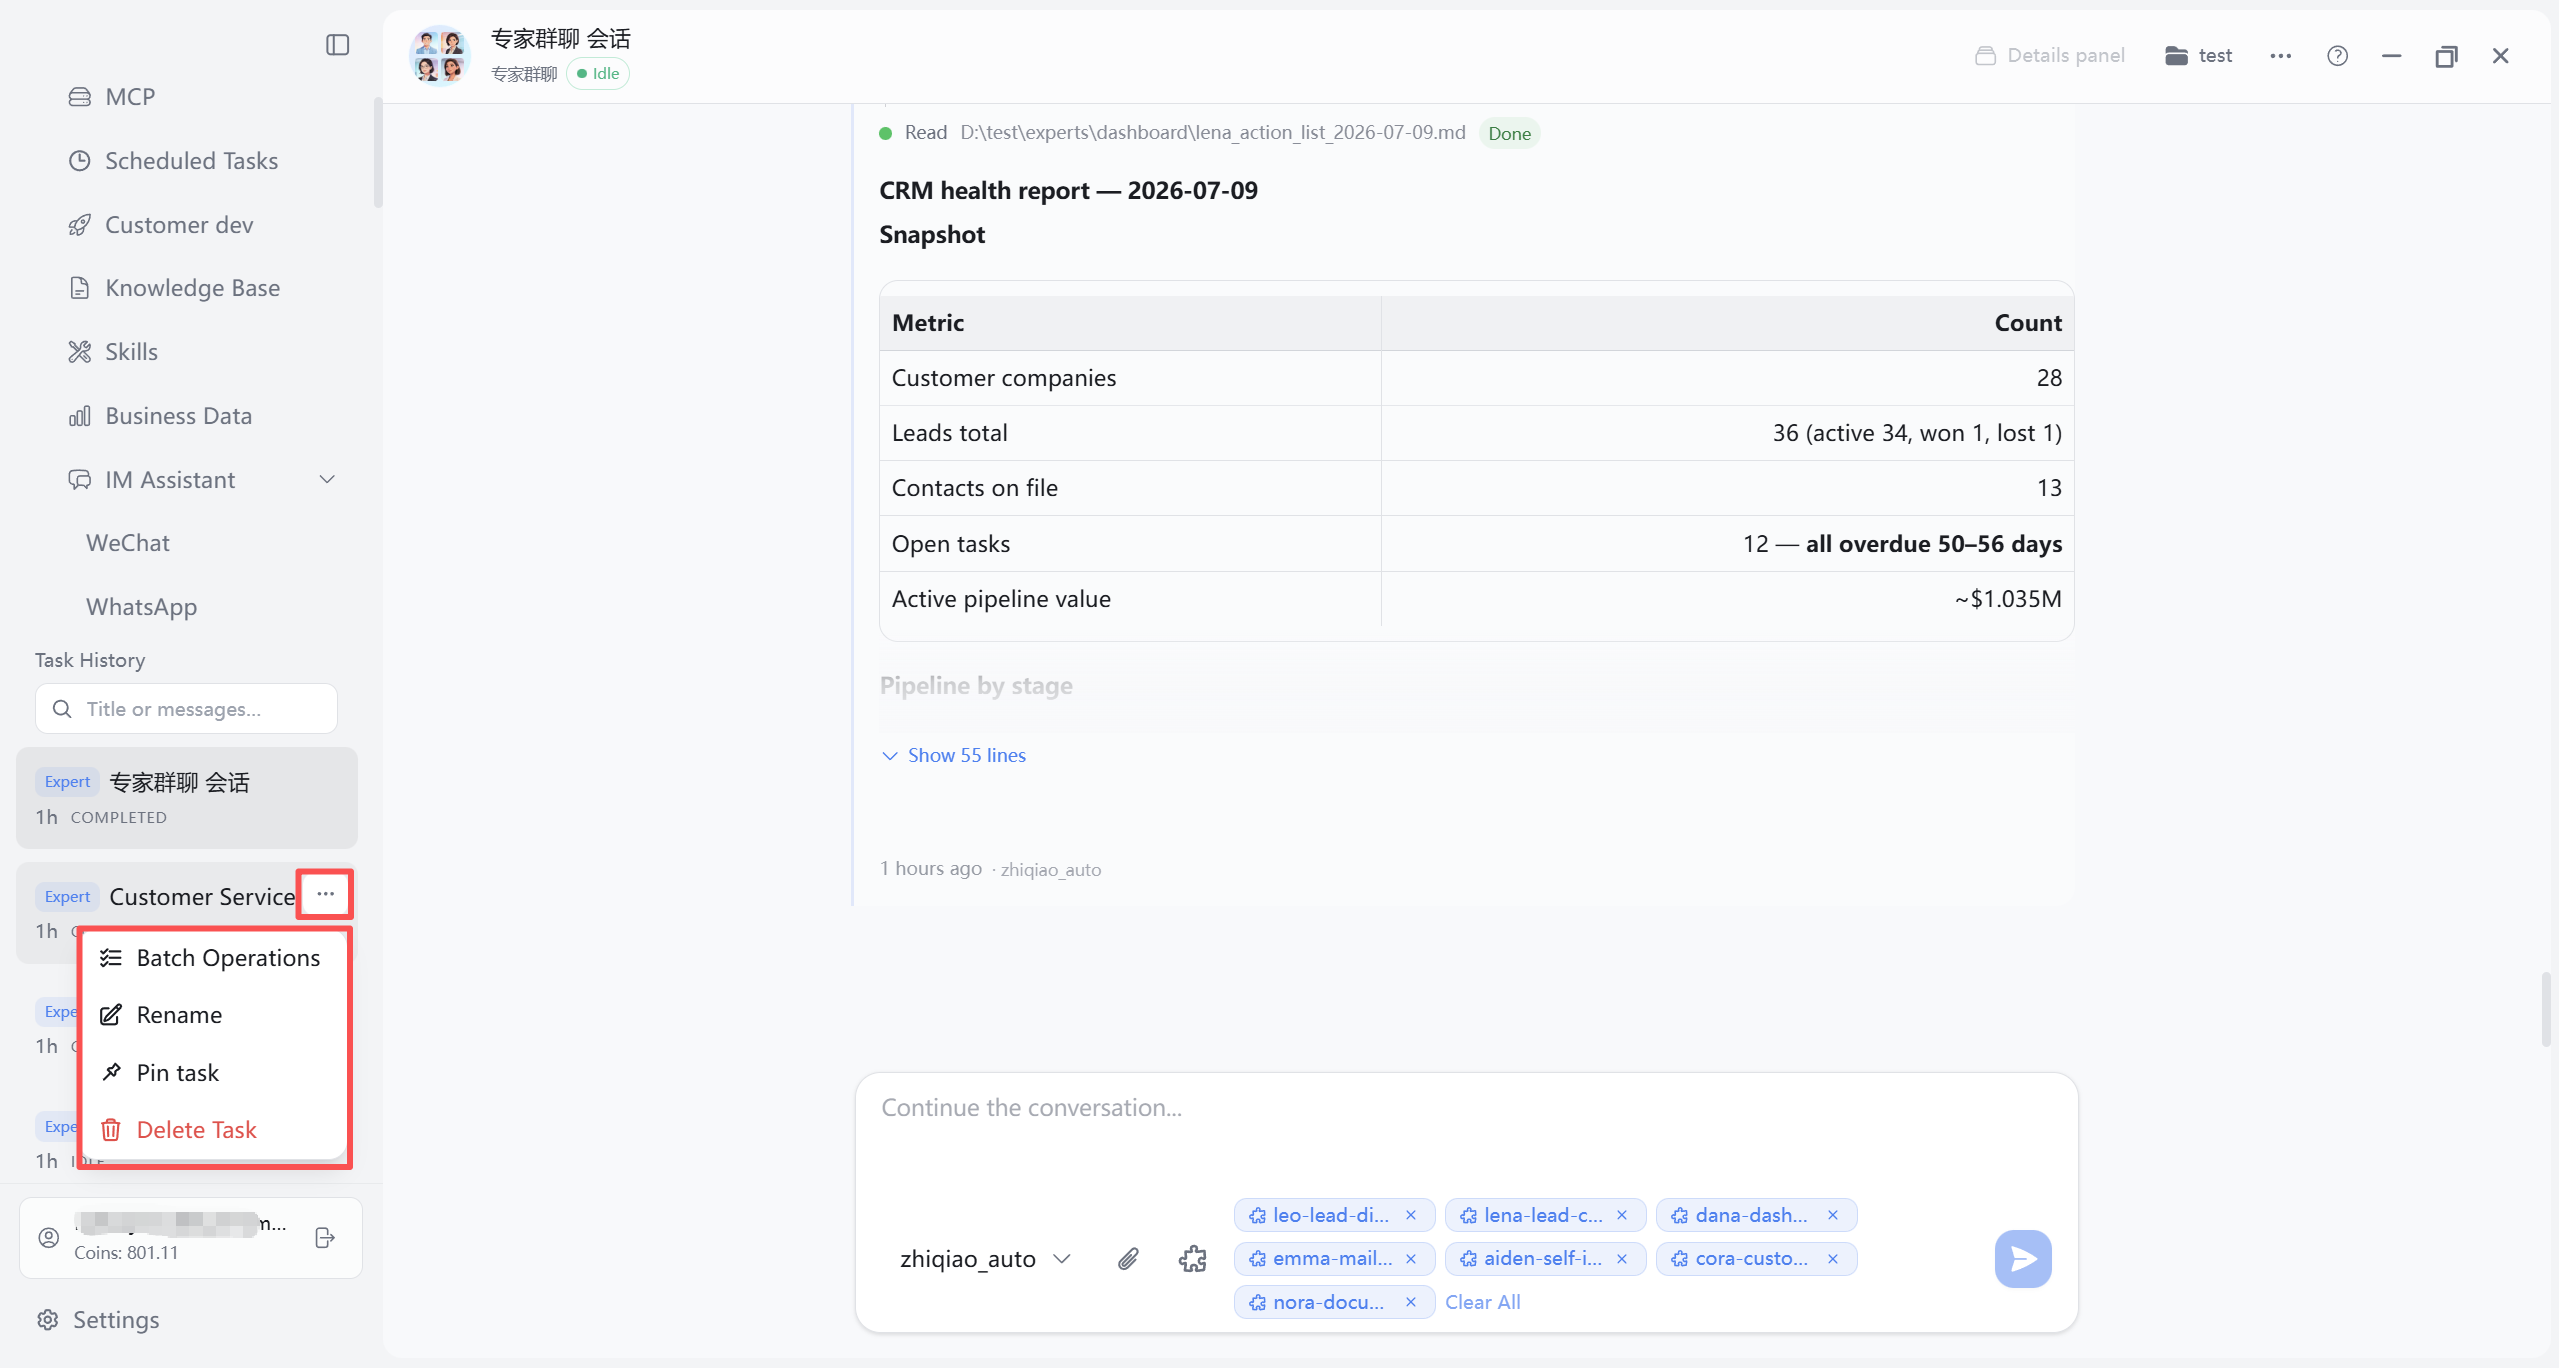
Each session’s ⋯ menu typically includes: Batch actions, Rename, Pin task or Unpin, Delete task (delete with confirmation). Rename: Enter confirm, Esc cancel.
13.3 Batch Mode
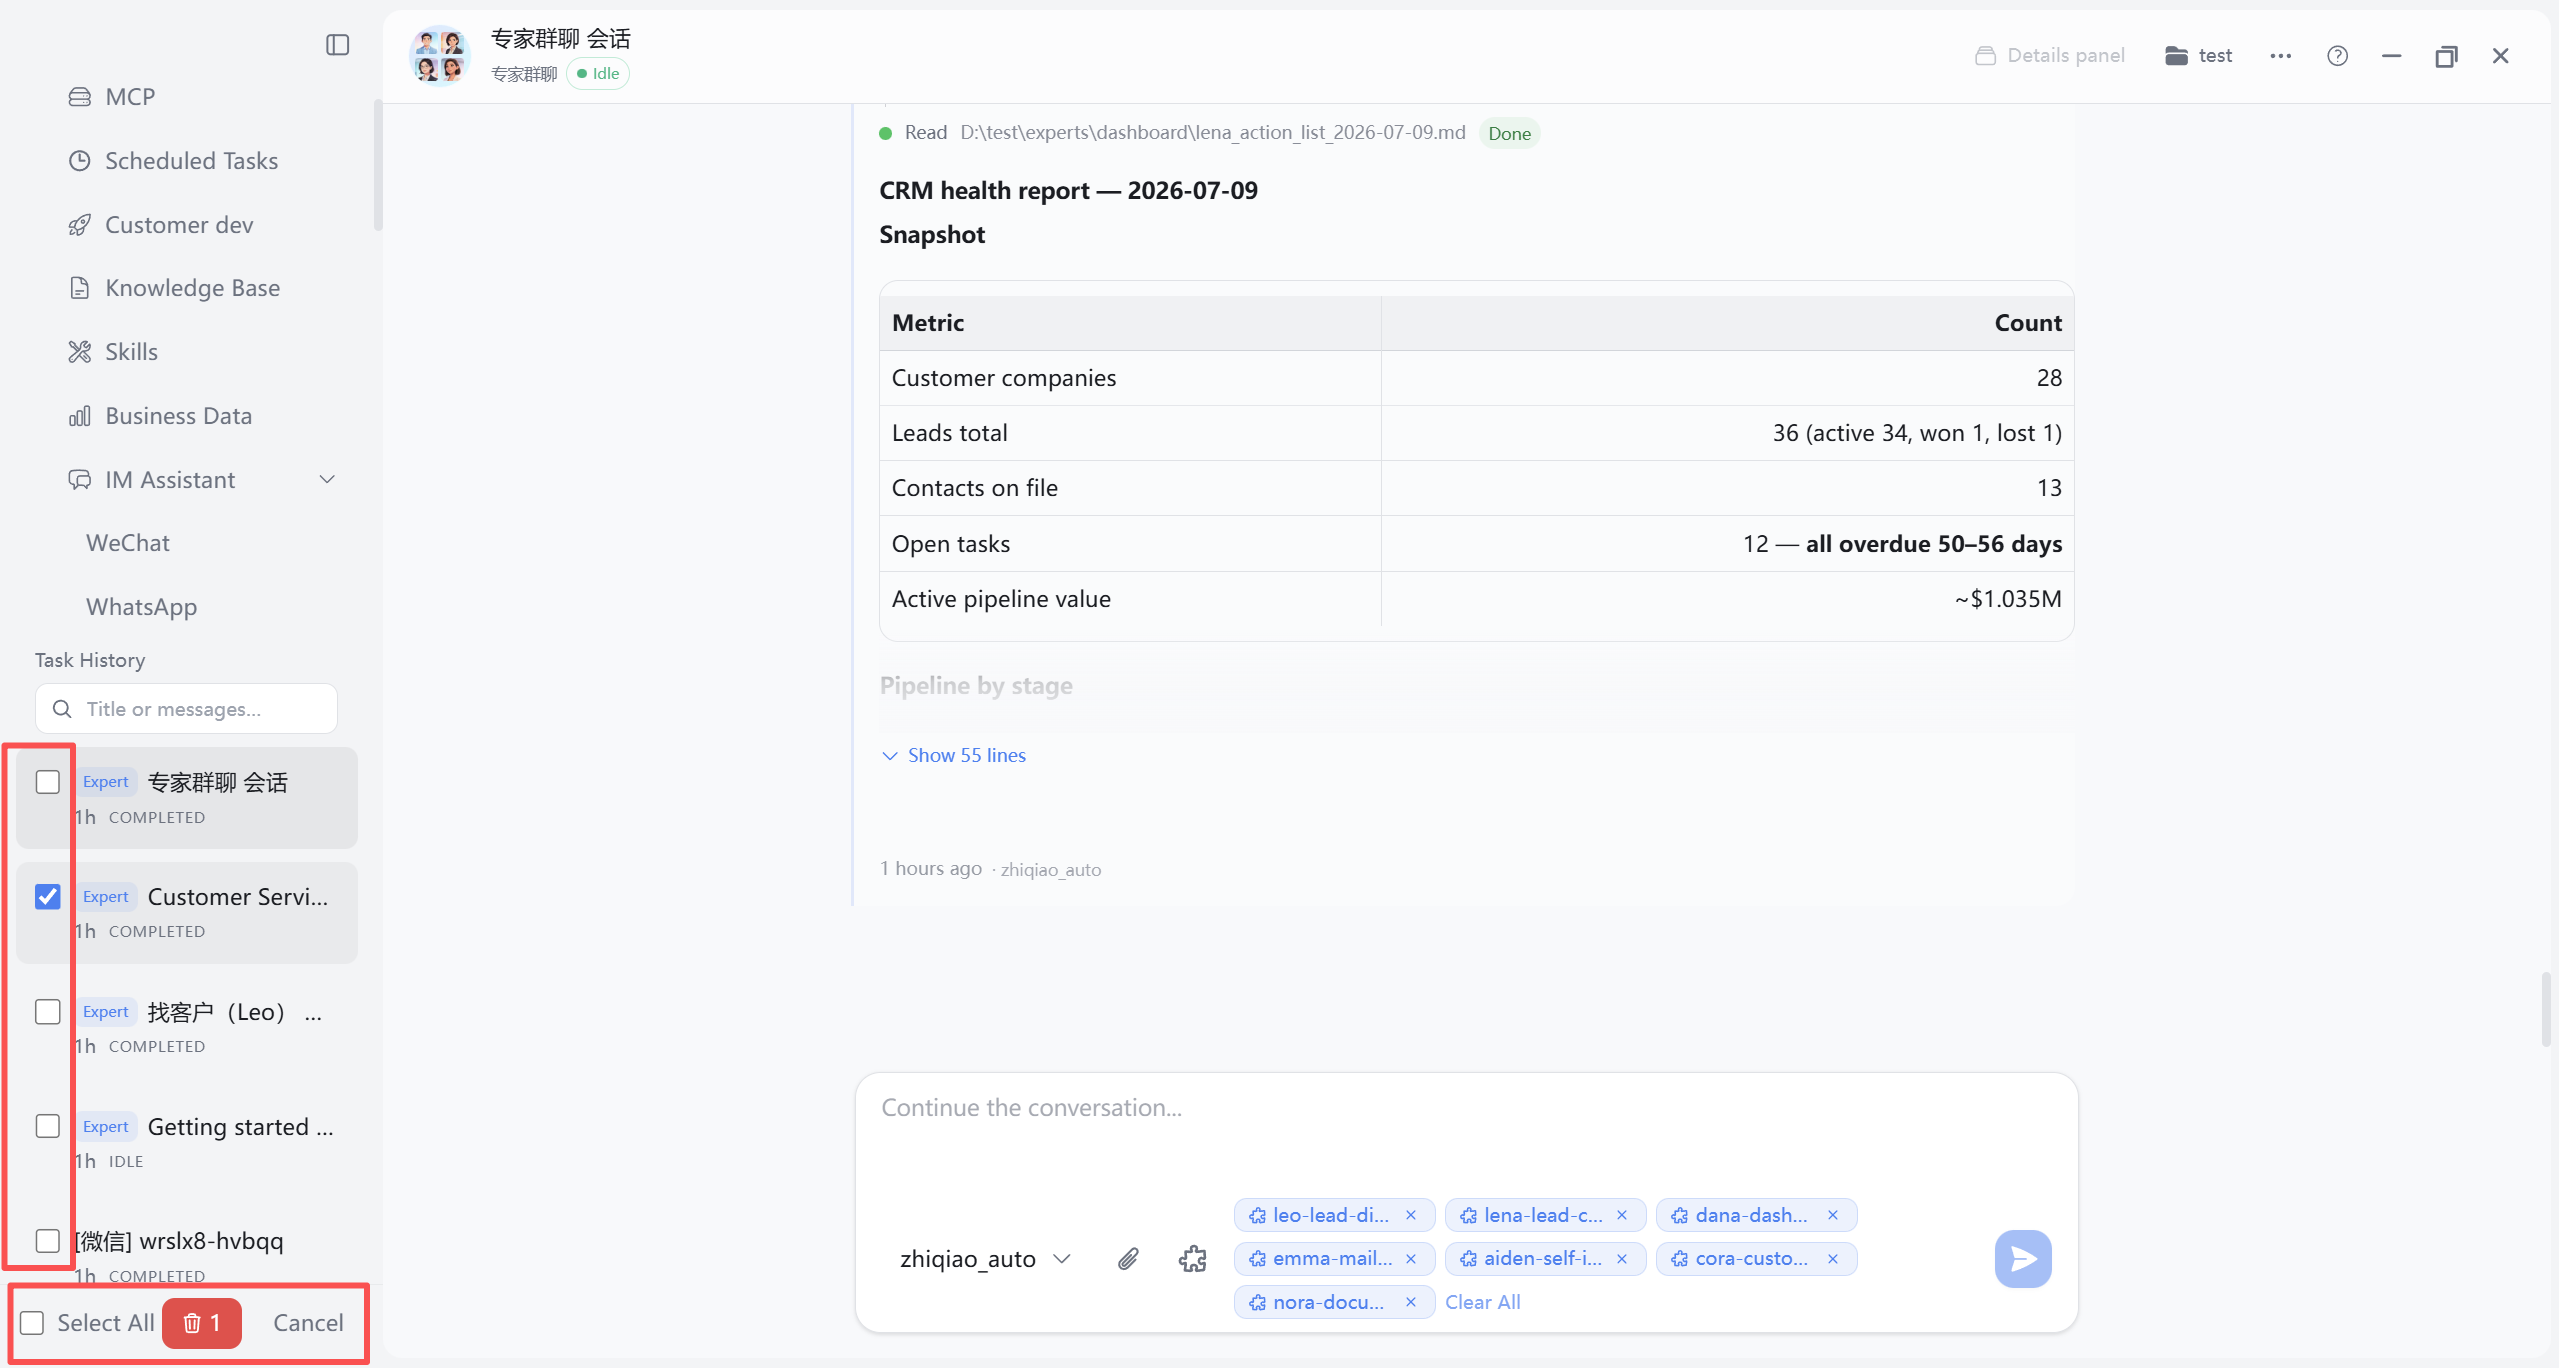
Via “Batch actions,” multi-select shows checkboxes on the left; bottom bar: Select all, red Delete (often with count), Cancel; confirm before batch delete.
14. Settings Page
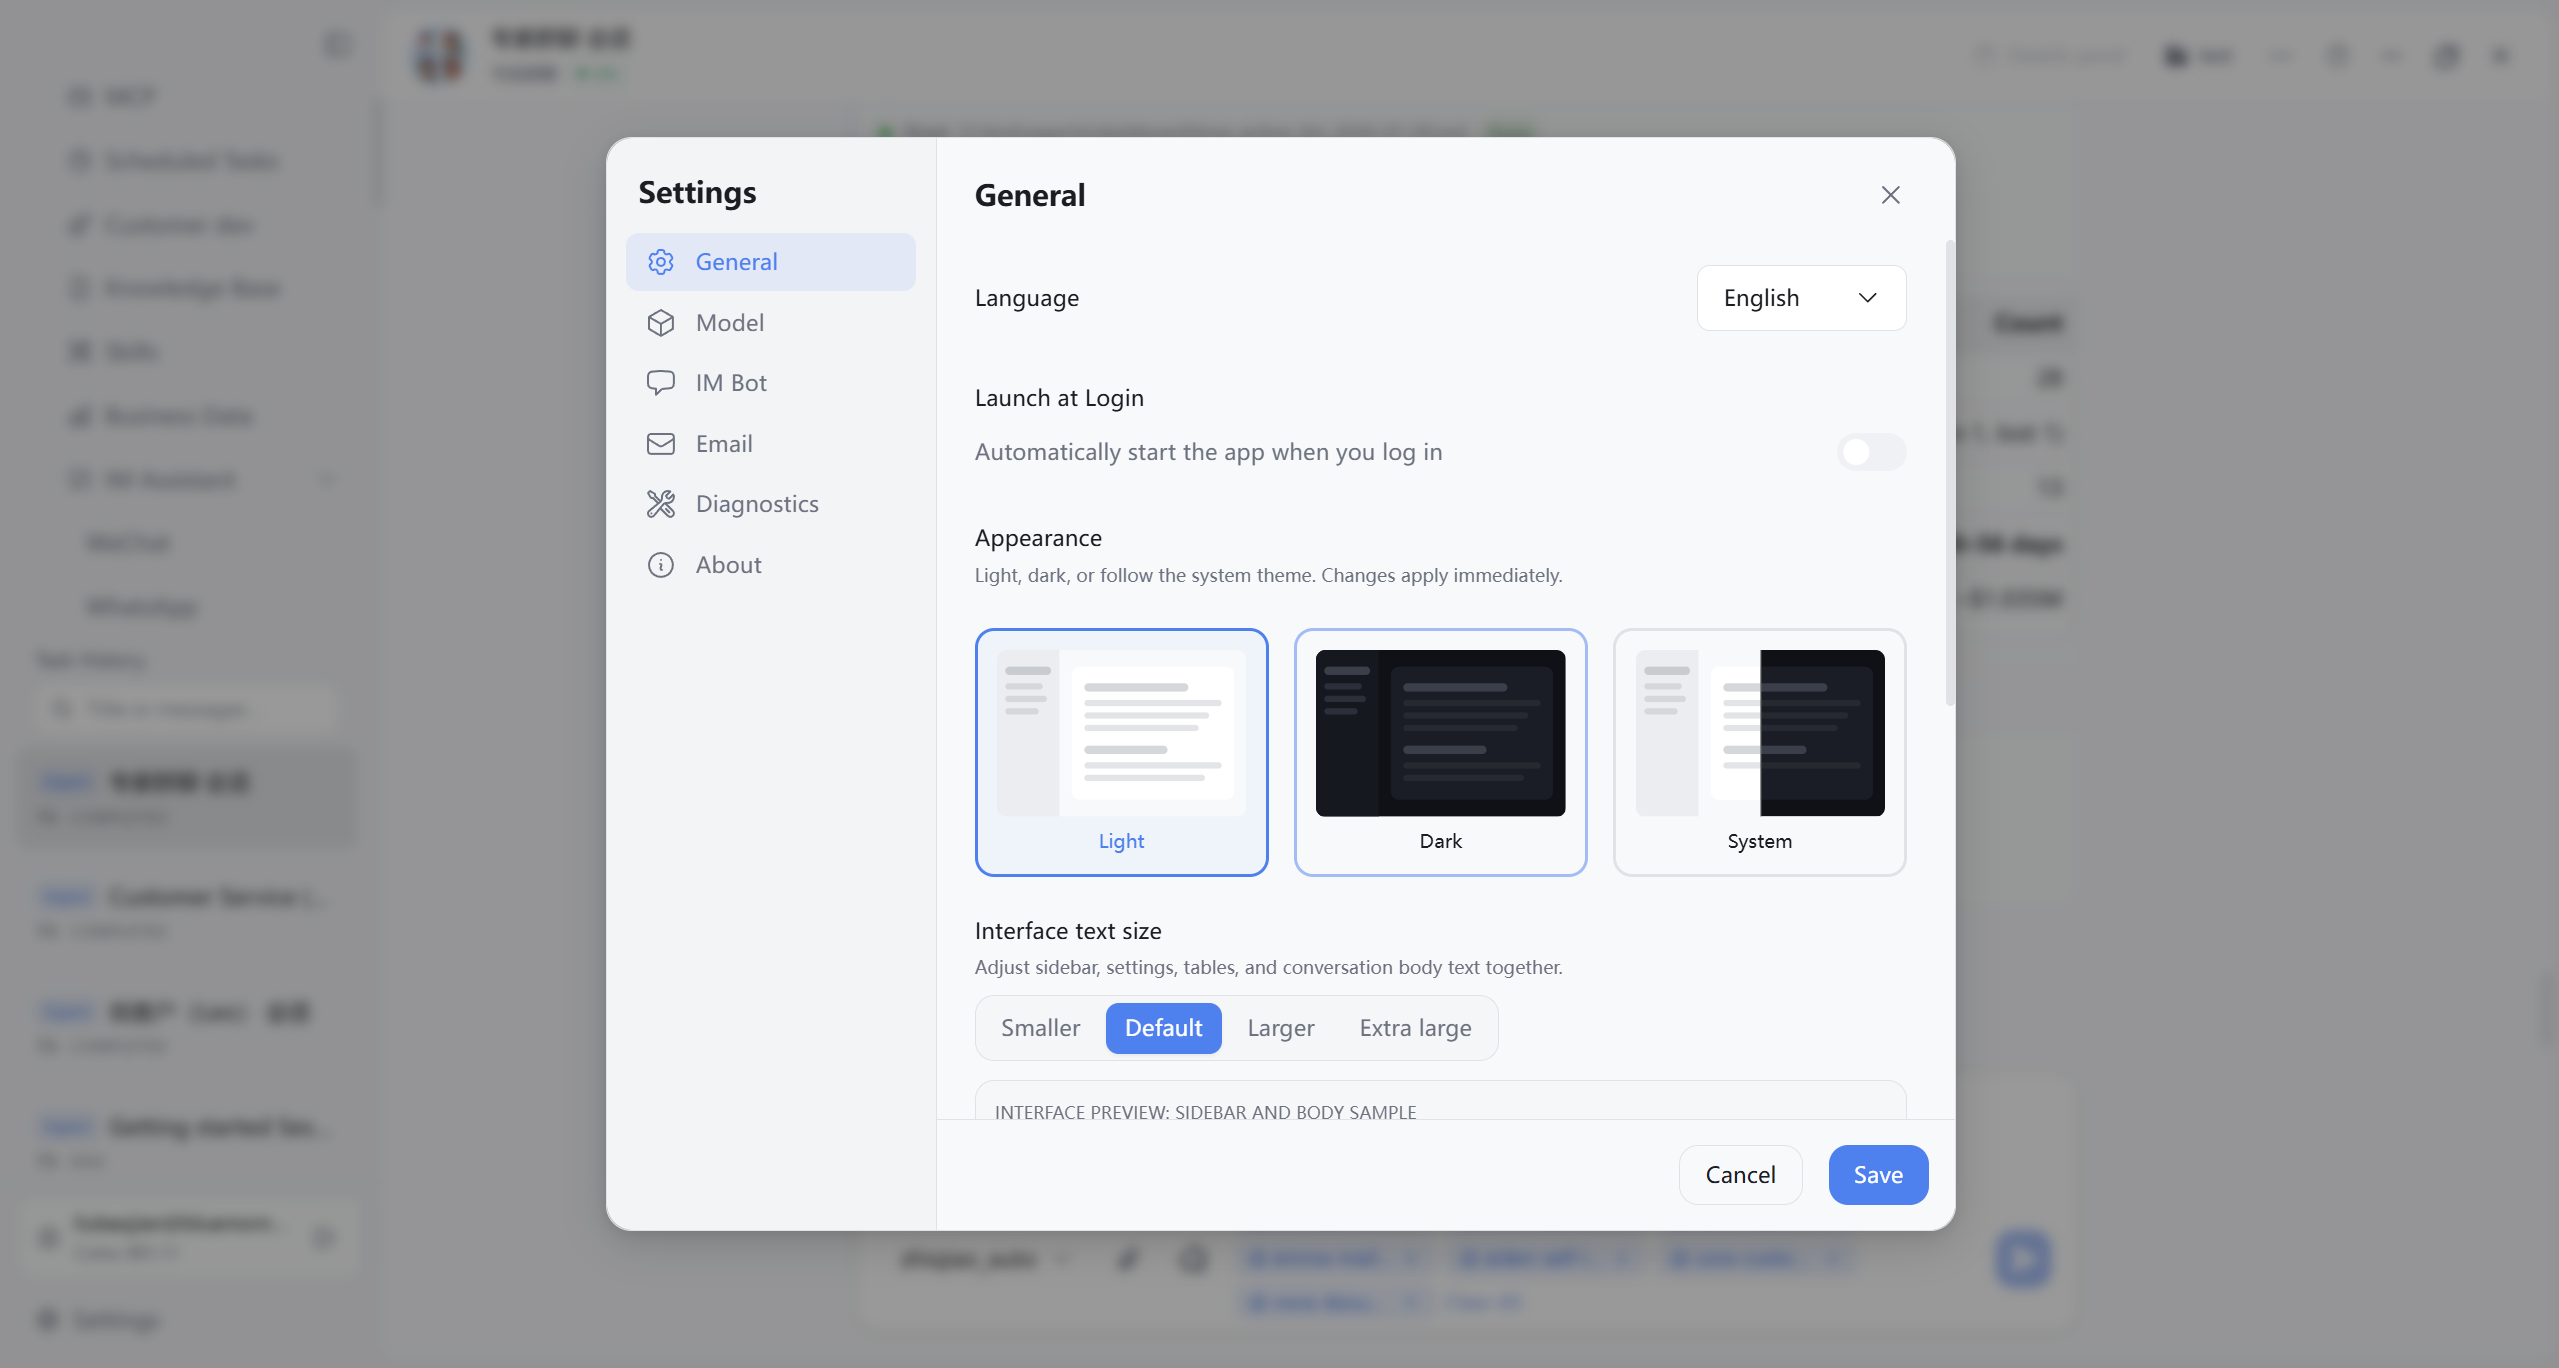
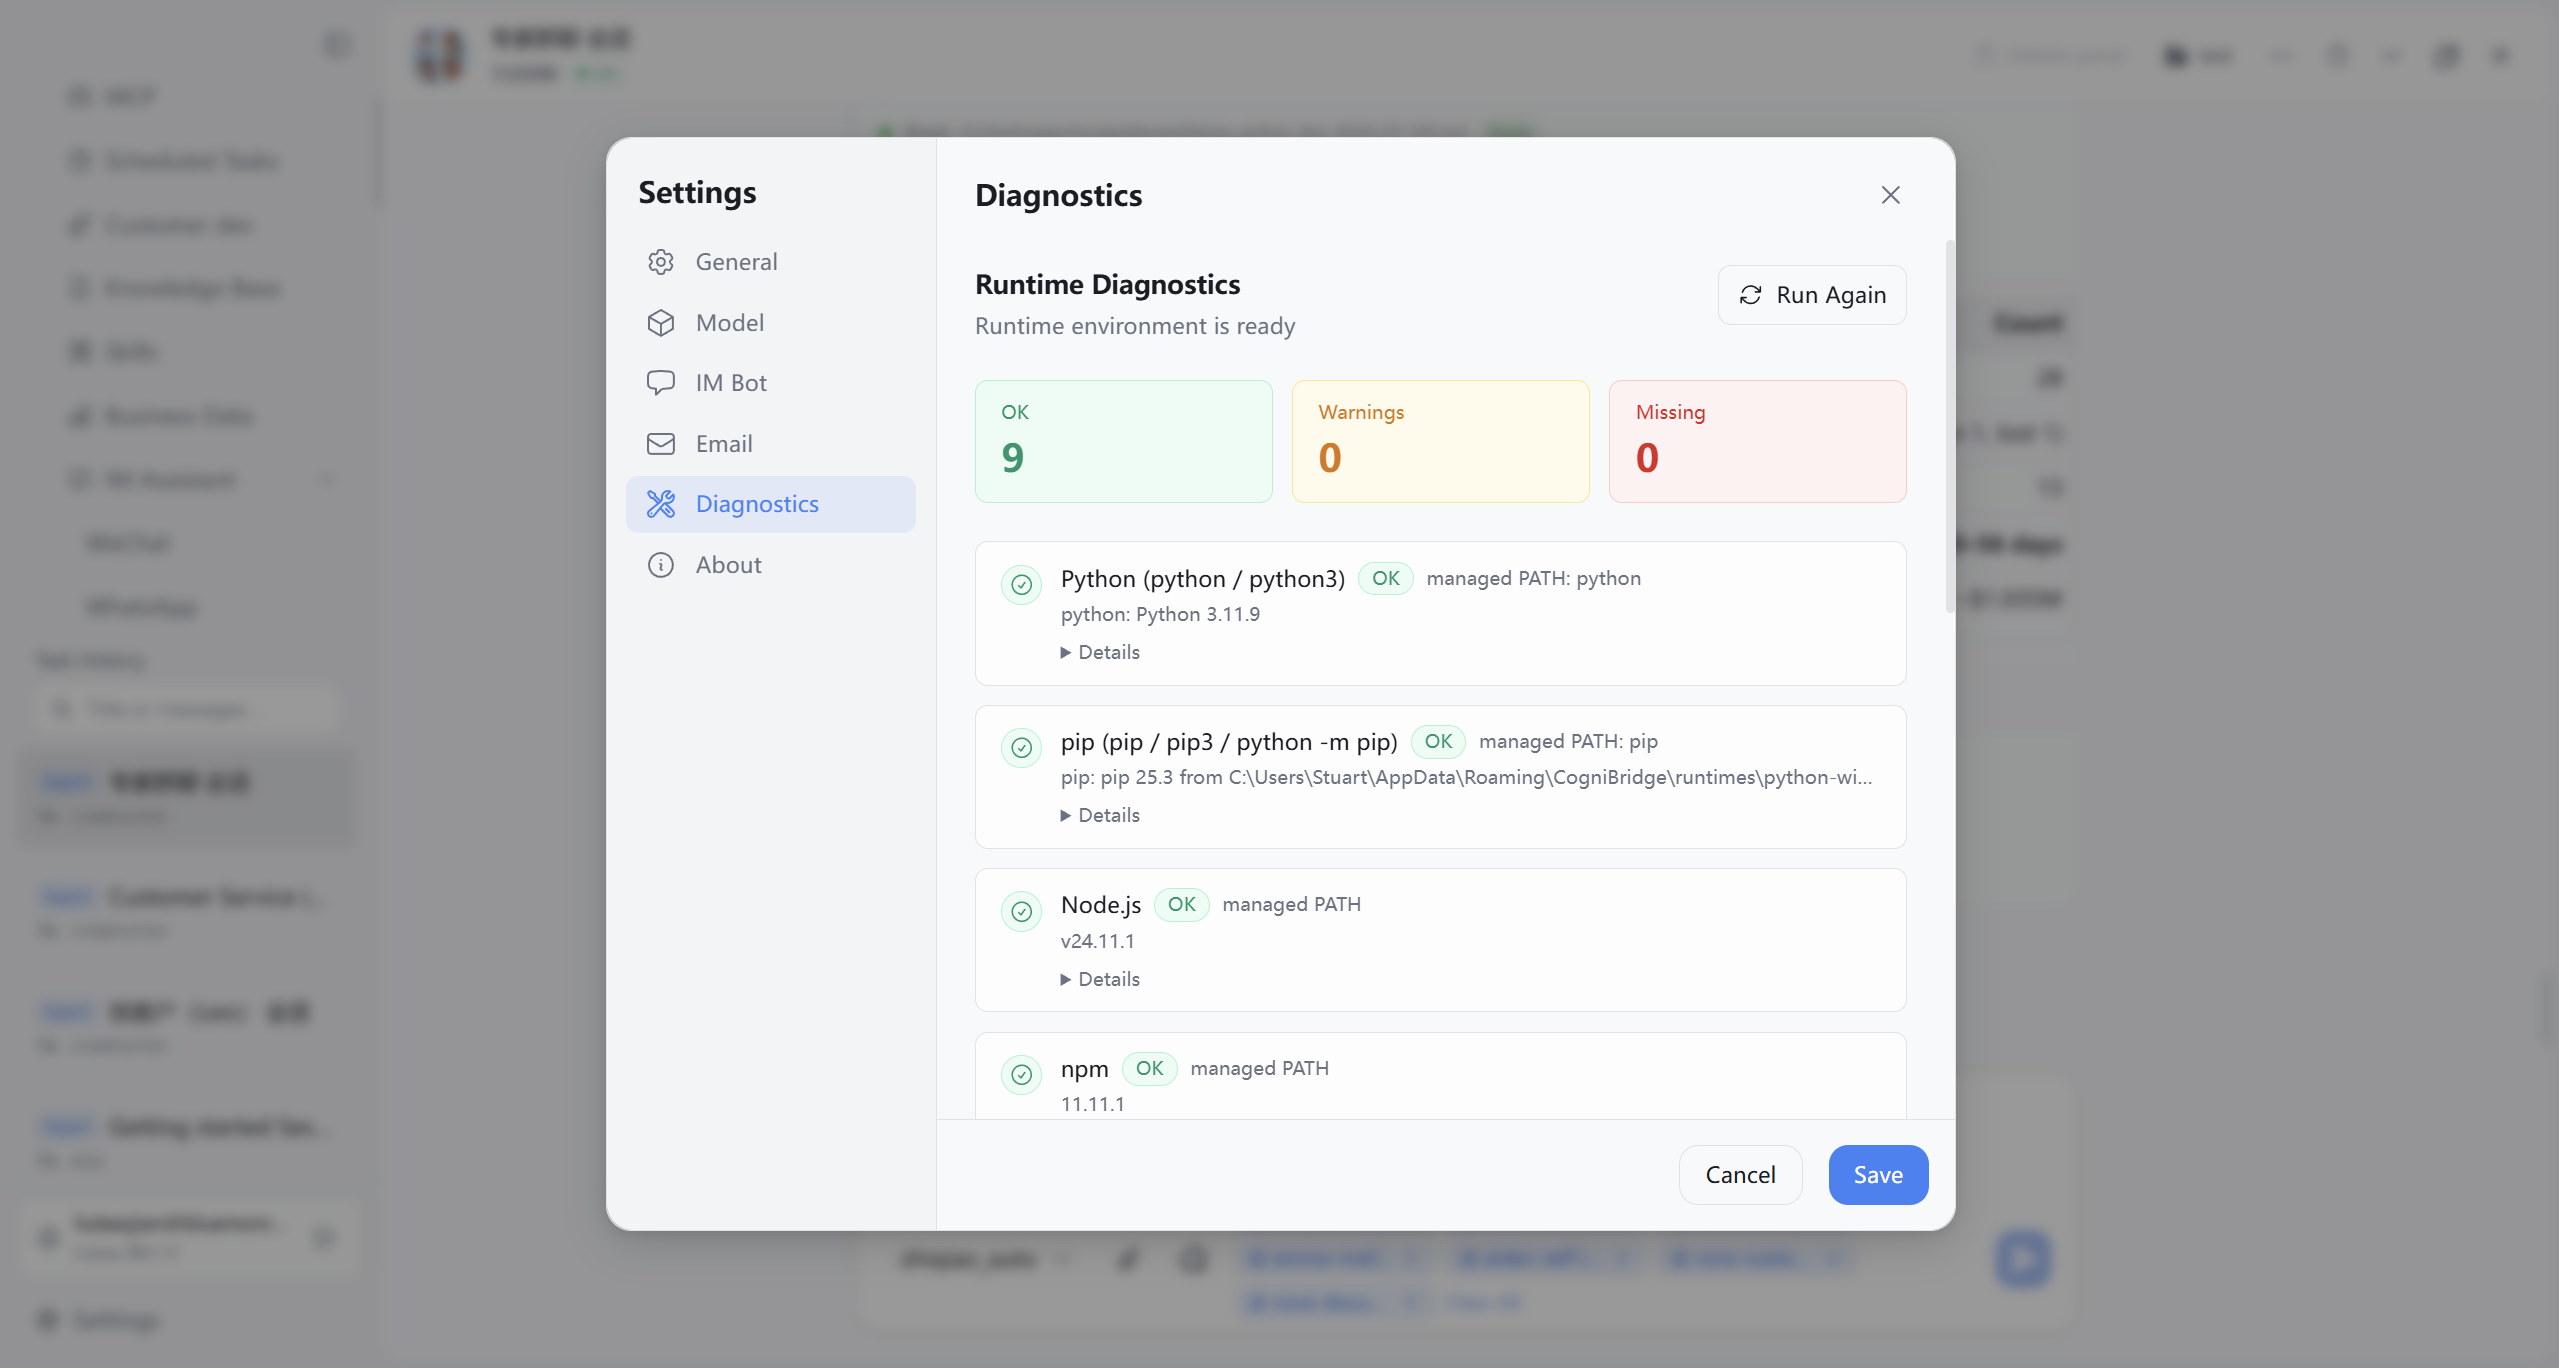
The Settings page uses left tabs for configuration areas (General, Models, IM Bots, Email, Diagnostics, About, etc.); the right side shows forms and buttons for language and theme, models and keys, IM gateways, mail accounts, runtime and environment checks, version and manual links, and other global options. Detailed setup and connectivity tests appear in earlier chapters; this chapter lists reference screenshots and self-check points to verify against the client Settings page.
14.1 Standard Configuration Checklist
- Language set to your team’s usual language.
- Model connection test passed.
- Tasks page working directory selected (path correct).
- Email connection test passed (if using mail).
- IM bots connected as needed (if using IM).
- No critical blockers on Diagnostics.
After the above, most daily tasks run reliably. Settings left tab structure: Figure 14-01; detailed Models, Email, IM Bots, Environment diagnostics in Chapter 4, Chapter 12, and this chapter 14.3, 14.4, and figure notes.
14.2 General Settings
Under Settings → General, adjust common options (right form per client):
- Language: Chinese / English—most UI updates immediately.
- Launch at startup: Start CogniBridge when you log into the OS (helps IM and scheduled tasks in background; disable if not needed).
- Appearance: Light, dark, or follow system—applies immediately.
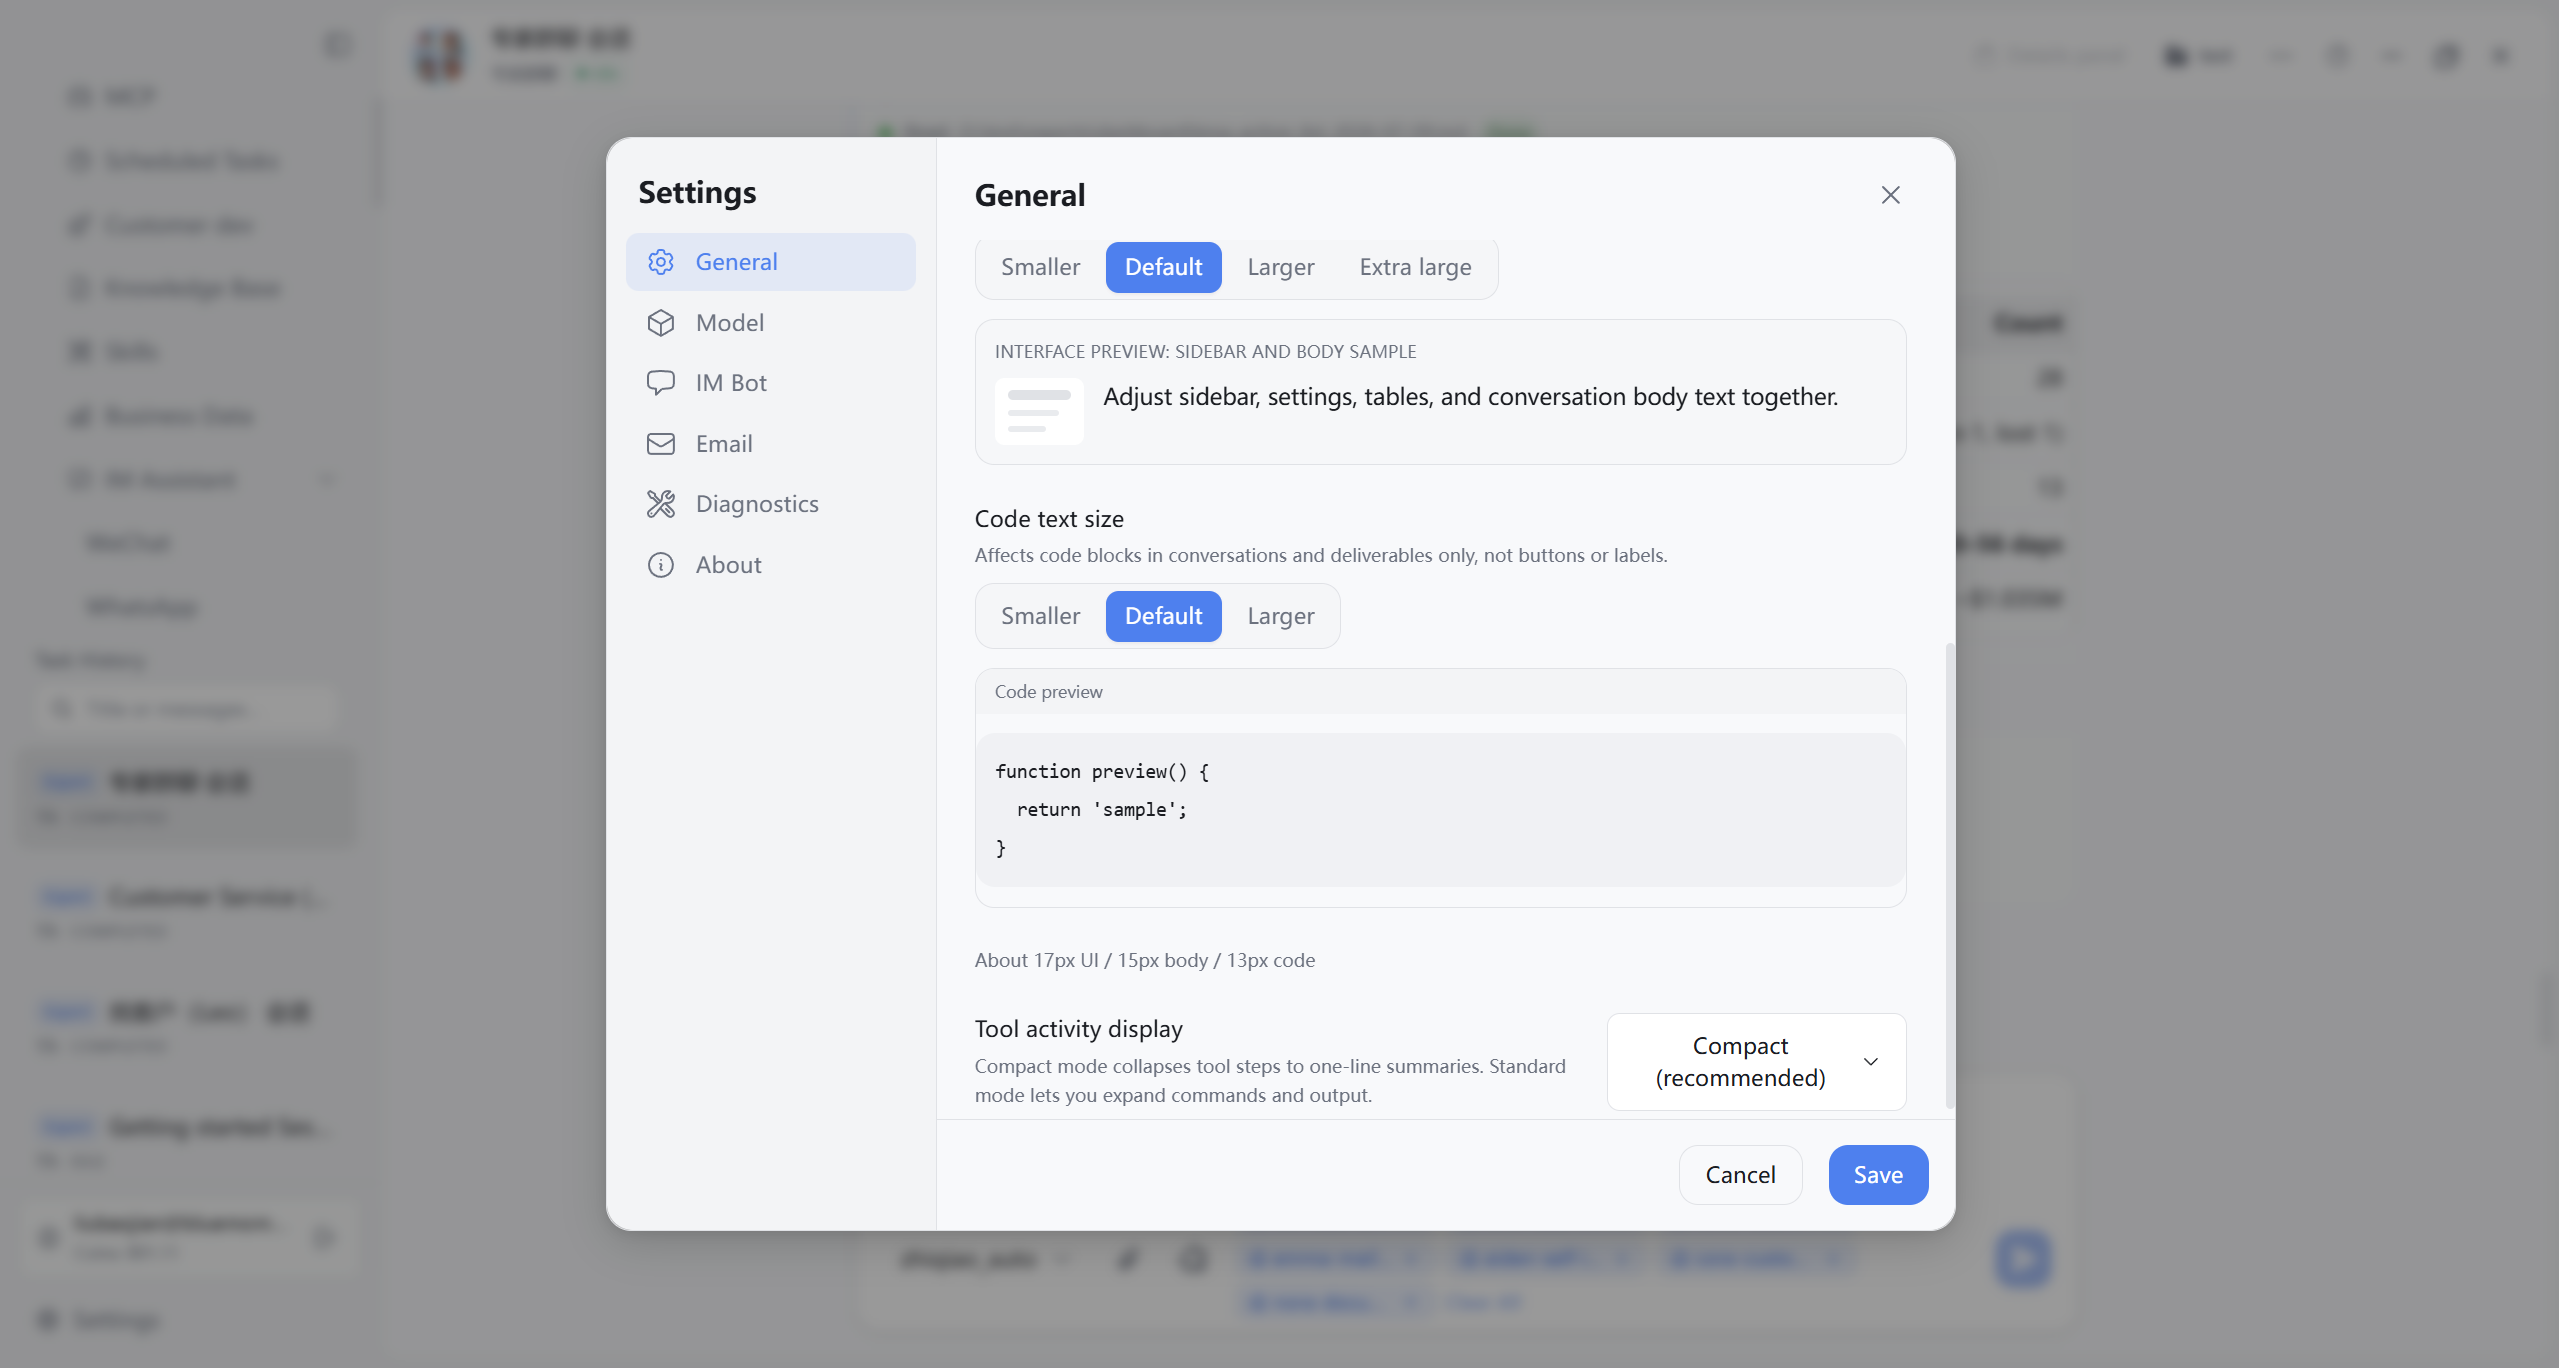
- UI font size: Sidebar, settings, tables, conversation body (Smaller / Standard / Larger / Extra large); preview below.
- Code font size: Code blocks in conversation and outputs only—not buttons or labels (Smaller / Standard / Larger).
- Tool process display: Tool call records in task conversation: Compact (default, recommended) or Standard; compact collapses steps to one-line summary; standard expands commands and output.
Click bottom-right Save after changes; Cancel or close without saving discards edits.
14.3 Model Advanced Options
Beyond providers and keys in Chapter 4, some versions offer execution mode, conversation memory, etc. under Settings → Models. Most users keep defaults; if file or command execution fails, contact your administrator—avoid changing expert options yourself.
14.4 App Updates
CogniBridge supports in-app check for updates and install:
- Open Settings → About, click Check for updates (or confirm when prompted at launch).
- If a new version exists, dialog shows version and release notes; confirm to download; progress bar shows percentage.
- When download completes, Install and restart per prompt; do not force-kill during install.
- If update fails, retry on About or contact administrator for offline installer (Chapter 16 FAQ).
14.5 Verify Settings After Save
- Change any setting and save.
- Switch to another tab and return.
- Confirm the value persisted.
14.6 Settings Troubleshooting
- Value lost after save: save again and re-read.
- Connection test failed: return to config and re-enter parameters.
- Page stuck: switch tabs and return to current page.
15. Skills and Extensions
Skills and extensions enhance CogniBridge. For daily use, know where the entries are, that lists load normally, and whether obvious errors appear. Sidebar Capabilities names may match English UI labels; below we use Skills and Extensions.
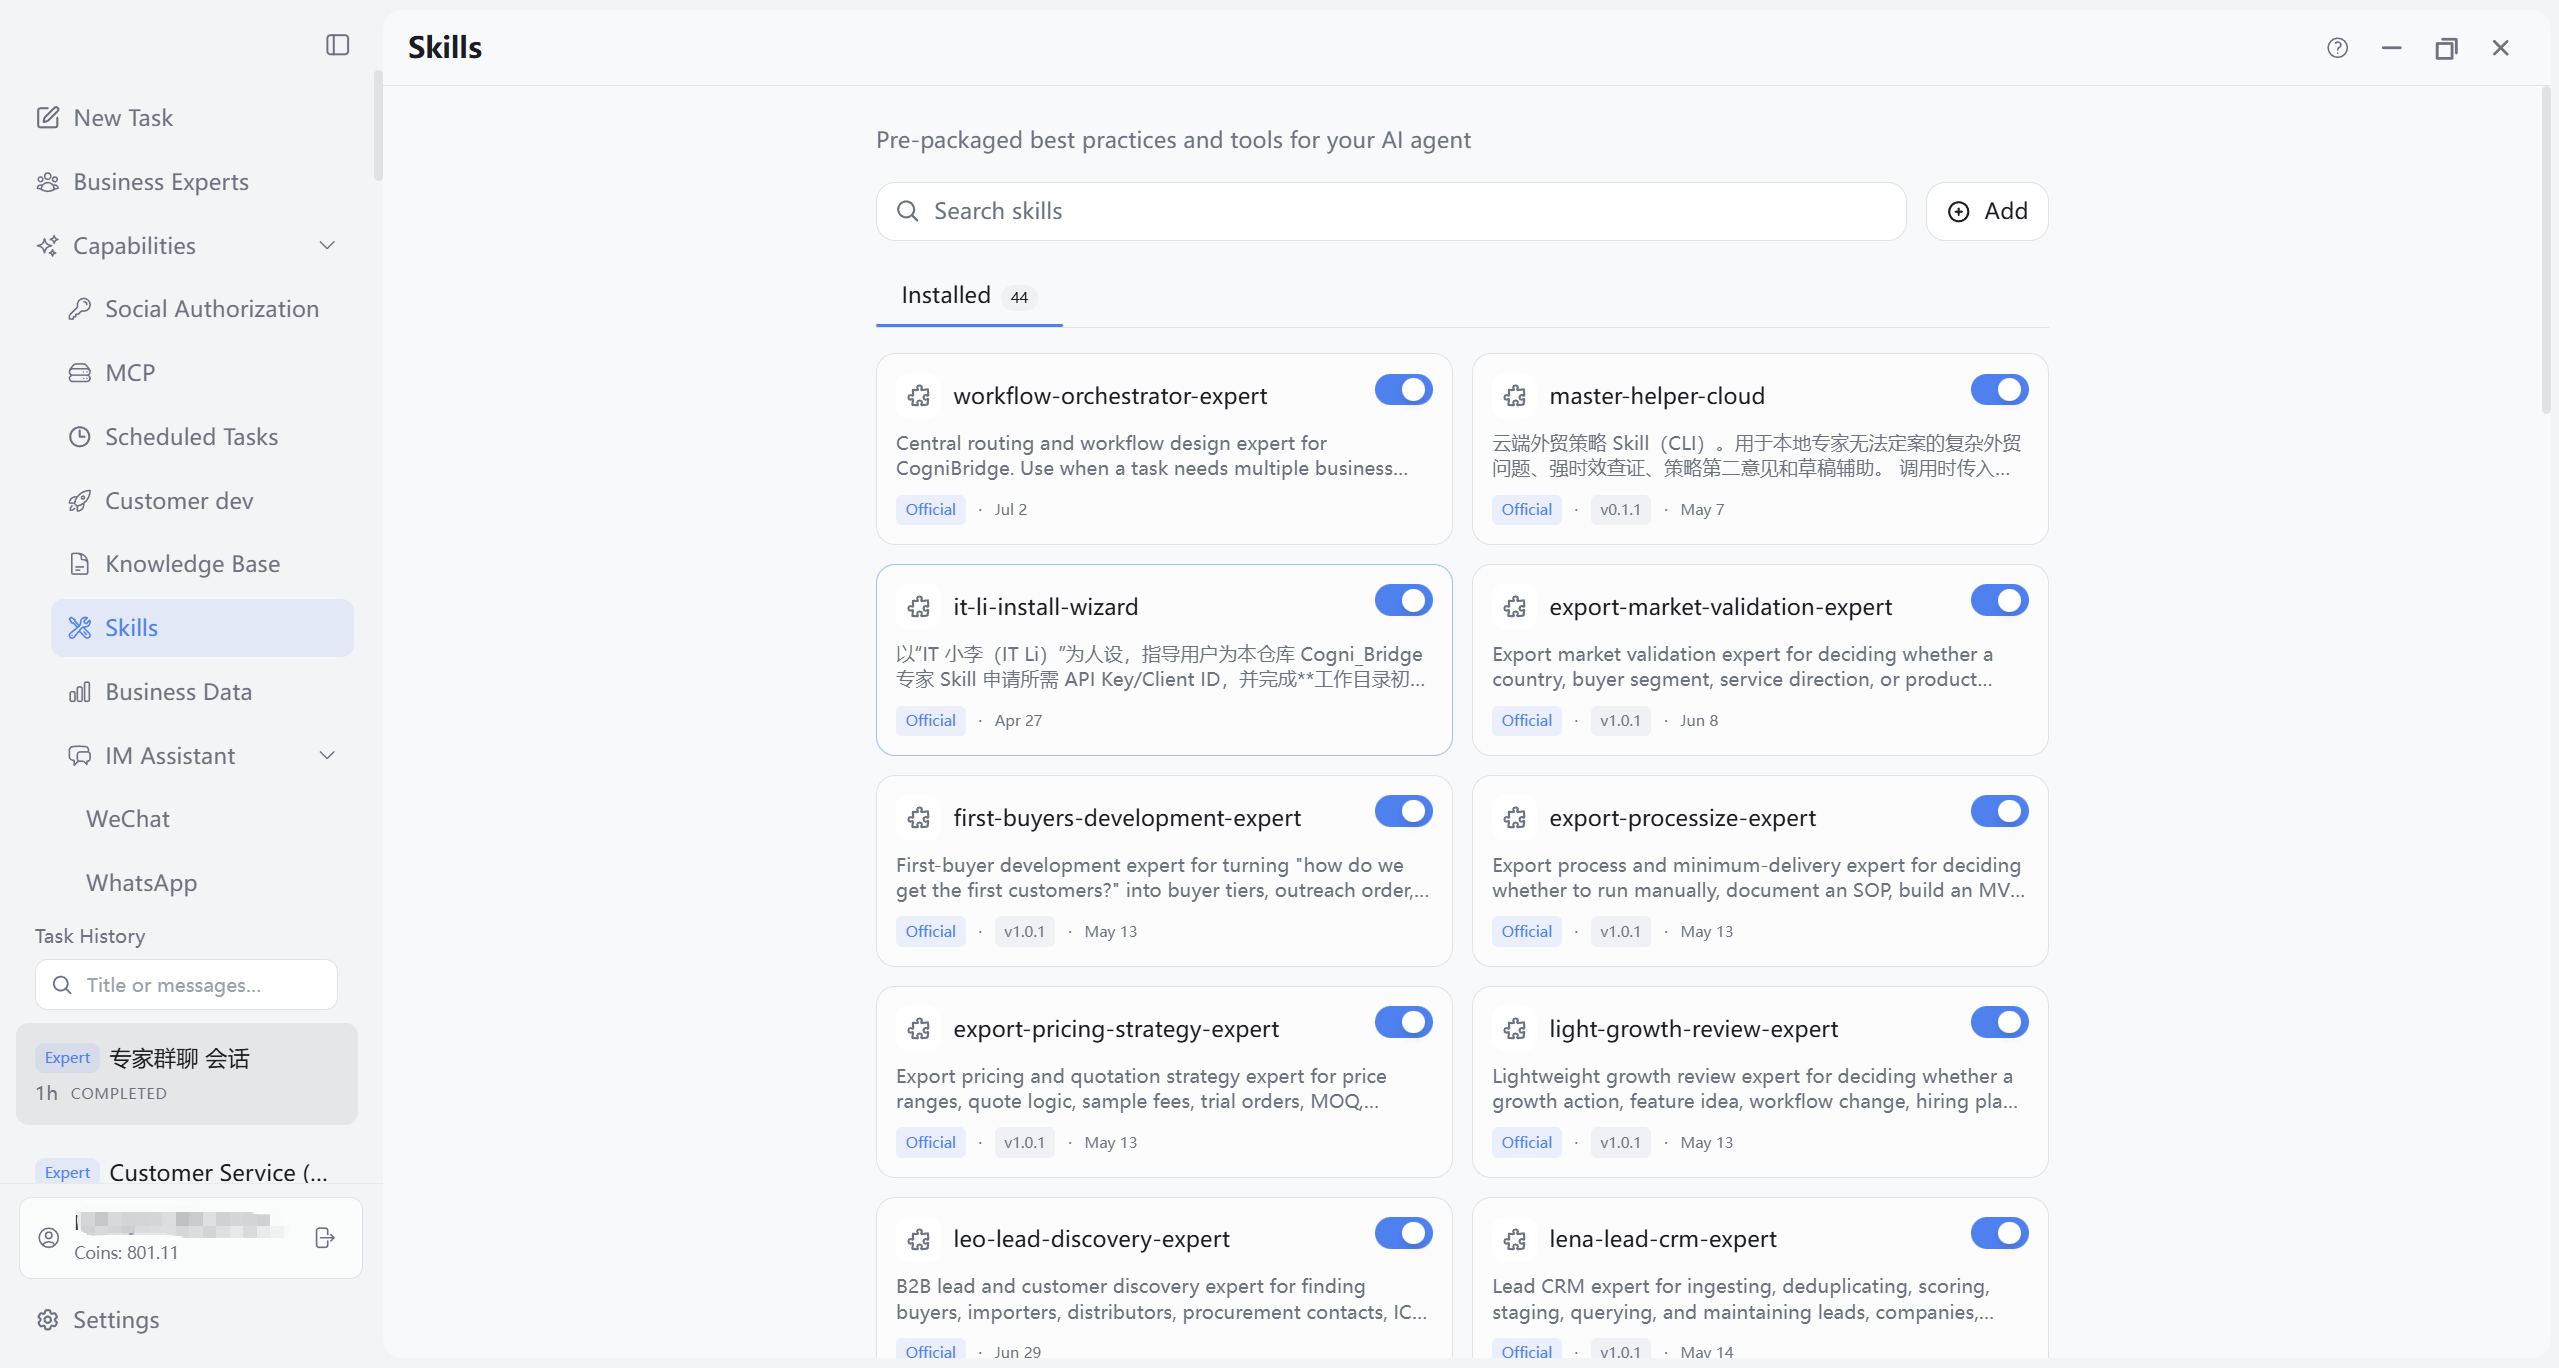
15.1 What to Check When You Open These Pages
- Page opens without long blank screen.
- List or connection status text is readable.
- No full-page error blocking content.
15.2 Skills — Common Actions
From sidebar Capabilities → Skills. Page usually has Installed tabs (Skill marketplace hidden or empty if not available—per version).
- Enable and order: Toggle skills in installed list; drag or use sort controls for priority—affects default order on Tasks page skill list.
- Import from folder: Pick local skill folder; client detects and installs.
- Import from remote repository: Enter remote URL to pull skill package; security report may show before install—read before confirming.
- Uninstall: Remove unused skills; core built-in skills may be non-removable, disable only.
- Use on Tasks page: Check skills in input area button when sending (Chapter 5 5.8).
15.3 Extensions — Common Actions
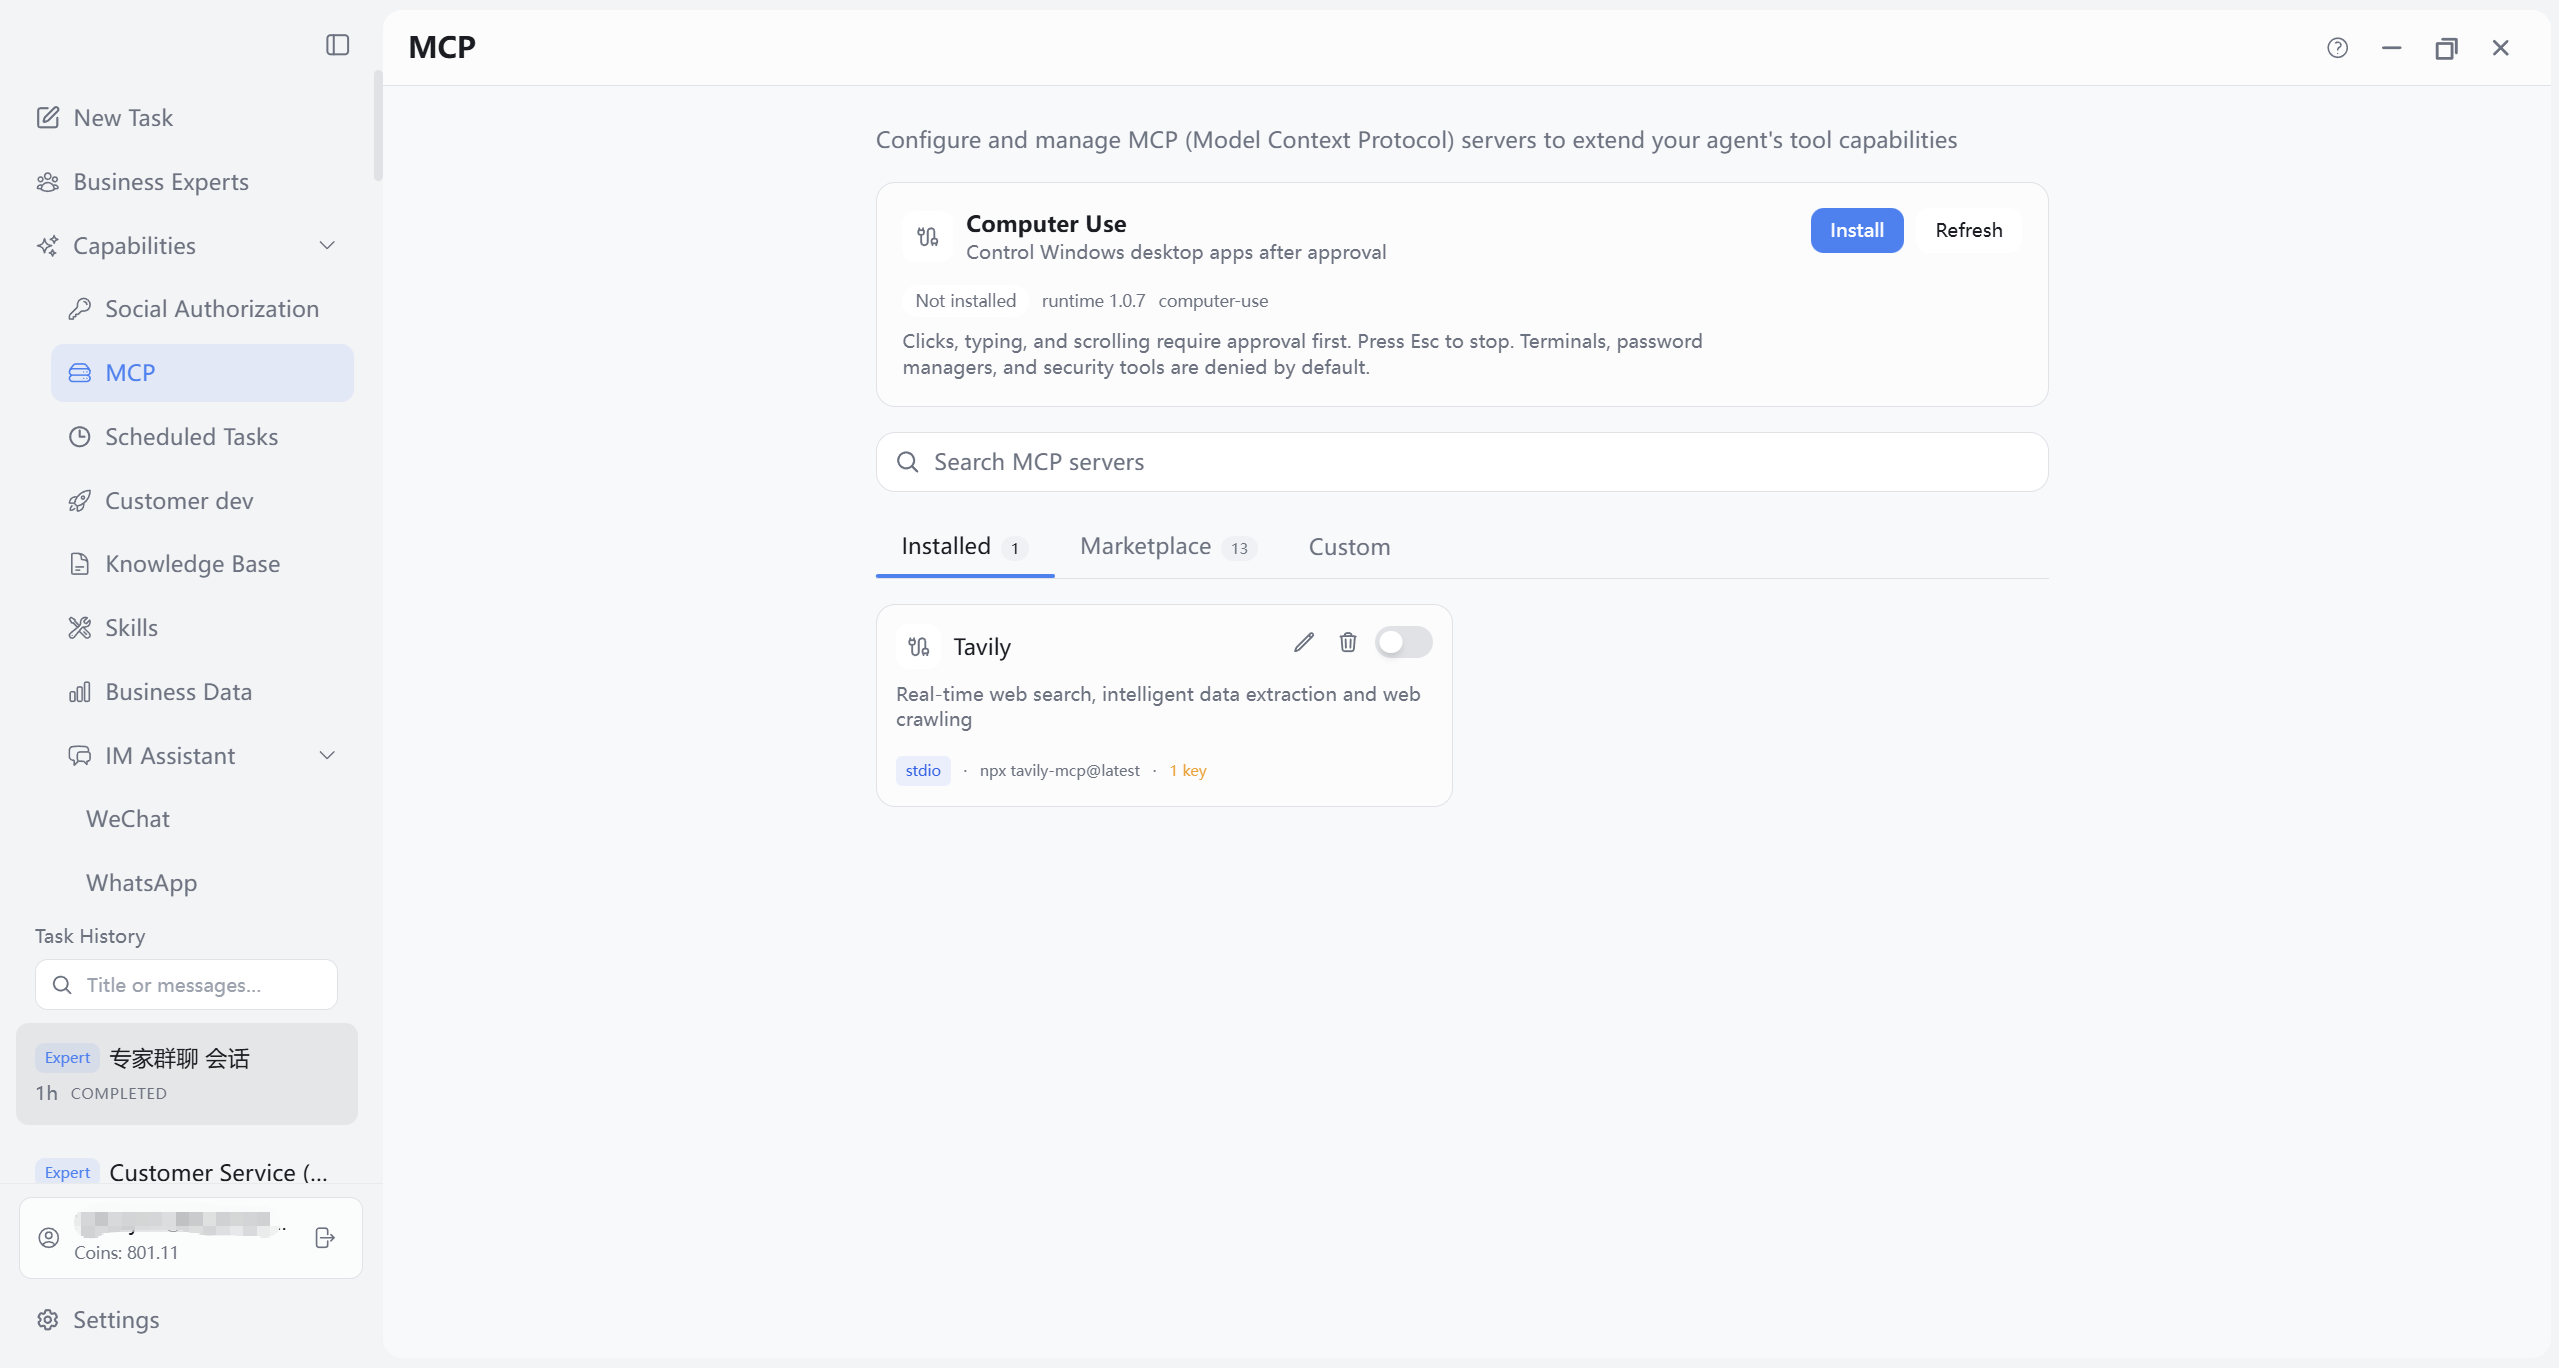
From sidebar Capabilities → Extensions to connect third-party MCP (Model Context Protocol) tool services. Above the regular extension list, there is a dedicated Computer Use block (see 15.4).
- Installed: View enabled extensions and connection status; enable/disable, edit, or delete.
- Marketplace: Browse built-in extensions, one-click install; if UI shows “Syncing,” wait for completion.
- Custom add: Form with name and connection info—for team-built or intranet tools.
After extension changes, if related task capabilities fail, return here and confirm Connected status; use Refresh Bridge or restart the client if needed.
15.4 Computer Use (Windows desktop control)
Computer Use is a built-in capability on the Extensions page: on Windows, after your approval, the AI assistant can operate desktop applications on your PC—list open windows, read UI state, click, type, and scroll—for tasks like “fill this spreadsheet in Excel” or “complete these clicks in the browser.” Currently Windows only; on macOS and other platforms the card shows platform not supported—no install needed.
15.4.1 When to use it
- Repetitive UI work: step through forms, menus, and exports in Office, ERP, or internal web apps.
- Cross-app flows: copy from one app and paste or submit in another (the assistant switches windows step by step).
- Legacy systems without APIs: short workflows via on-screen clicks when scripts are not available.
Not intended for fully unattended long-running jobs. Each real click, keystroke, or scroll asks for your approval first; press Esc anytime to stop further desktop actions.
15.4.2 Install and enable
- Open Capabilities → Extensions and find the Computer Use card at the top (see Figure 15-02; subtitle: control Windows desktop apps after approval).
- If not installed: click Install and wait for runtime download and verification (progress and version show on the card).
- After install, click Enable, then Refresh Bridge if needed so the Tasks page can call the tools.
- When the status badge shows enabled with no errors, you can use it in tasks; on failure, try Refresh, open Logs, or uninstall and reinstall.
15.4.3 Use in tasks
With Computer Use enabled, describe your goal in natural language on the Chapter 5 Tasks page—for example: “Open Notepad, write today’s to-dos, and save to the desktop.” The assistant plans steps and invokes desktop tools; before any real click, typing, or scroll, the client shows an approval dialog—confirm the target app and action before allowing.
- Approval and stop: Unapproved steps are not executed; press Esc during a run to halt further desktop control.
- Denied by default: For safety, terminals, password managers, and common security tools are on a deny list—the assistant cannot operate them automatically.
- Skills: Installing Computer Use also installs the matching skill instructions—you usually do not need to pick it manually on the Tasks page. If desktop tools are not used, confirm Enable and Bridge refresh here first.
16. Frequently Asked Questions
- Manual link not working: check for overlay blocking; switch pages and try again.
- Main UI unresponsive long after sign-in: fully quit and restart the app, wait for load; if still failing, contact your administrator.
- Social authorization failed: confirm login in the browser launched by the app, then verify.
- Business data empty: check working directory, filters, mail sync status.
- Result not as expected: add constraints in the same session and iterate.
16.1 Self-Recovery Order
- Manual entry issue: switch page and retry, or close dialogs then click the round “?” manual entry.
- Social authorization failed: keep authorization window open, return to client and click “Verify connection.”
- Empty data: clear filters first, then check working directory and mail sync.
- Unstable results: ask for “output outline” first, confirm, then generate full text.
16.2 Other Common Issues
- Attachment upload failed: shorten filename and retry with working-directory files.
- Cannot find exported file: sort working directory by time for latest file.
- Mail sync no results: verify email test passed, then retry with narrower scope.
- Ask expert missing context: re-apply filters, then click Ask expert again.
- Page frozen: switch away and return; if still stuck, restart client.
16.3 FAQ (High Frequency)
-
Q: First task—don’t know how to write the prompt?
A: Use the high-quality input template in 5.6: goal, constraints, output format, tone, then send.
-
Q: Result too long—how to shorten?
A: Add “Compress to 120 words, keep core actions.”
-
Q: Format doesn’t match requirements?
A: State target format and ask for a rewrite in that format.
-
Q: Social authorization keeps failing?
A: Separate bridge/extension from platform login: extension not connected—follow 9.2 and the browser extension enablement guide; bridge ready—follow 9.3 connect and verify. Still failing—9.5 triage and record per 9.6.
-
Q: Too much data after filtering?
A: Add owner, time range, and status filters.
-
Q: No new data after mail sync?
A: Confirm email test passed, then sync again.
-
Q: Ask expert results unstable?
A: Outline first, full text second; add constraints each round.
-
Q: Main UI unresponsive long after sign-in?
A: Fully quit the client (see “How to fully quit” below), reopen, wait for load; closing the window (✕) alone is usually not enough. If still failing, contact your administrator.
-
Q: Does clicking window close (✕) count as quitting?
A: Not a full quit. CogniBridge hides the main window to the background; process and gateways keep running so you can reopen from the tray. To end tasks, free resources, or “restart after full quit” above, use tray menu Quit (below).
-
Q: How to fully quit CogniBridge on Windows?
A: In the notification area bottom-right (near clock, may be under “^”), find the CogniBridge tray icon (tooltip often CogniBridge), right-click, choose Quit. Left-click reopens main window. Menu also has “Open CogniBridge,” “New Task,” “Settings,” etc.
-
Q: How to fully quit CogniBridge on Mac?
A: Menu bar top-right tray icon, right-click (or Control+click), Quit; or ⌘Q, or Dock right-click CogniBridge → Quit. Red close button like Windows—usually hides window, not end process. Left-click tray icon reopens main window.
-
Q: Is sidebar “Sign out” the same as tray “Quit”?
A: No. Sidebar account “Sign out” ends the current account session only; client may keep running. Tray Quit closes CogniBridge process and background services.
-
Q: How to install CogniBridge on Windows? Path requirements?
A: Run the team-provided CogniBridge installer, follow the wizard; allow if system permission prompts. At “Choose install location,” install under a pure English path (folder names use letters, numbers, common symbols only—no Chinese or special characters) or built-in components may misbehave. Recommended: “Program Files\CogniBridge”, “D:\Apps\CogniBridge”. Not recommended: paths with Chinese folder names. Launch when install completes if prompted.
-
Q: How to uninstall CogniBridge on Windows?
A: Before uninstall, Quit from tray bottom-right; uninstall may fail if still running. Then Settings → Apps → Installed apps (or “Programs and Features”), find CogniBridge and uninstall, or use Start menu uninstall. Uninstaller tries to end running processes but cannot guarantee success in all cases. Uninstall usually removes local app data (e.g. config/cache under
%APPDATA%\CogniBridge); back up first if you need to keep it. Your chosen Tasks page working directory is not deleted automatically. -
Q: How to install and uninstall CogniBridge on Mac?
A: Install: Open team
.dmg, drag CogniBridge to Applications; if blocked as unidentified developer, allow in System Settings → Privacy & Security. Path usually/Applications/CogniBridge.app(English by default). Uninstall: Fully quit from menu bar tray or Dock, move CogniBridge from Applications to Trash and empty. To clear config/cache, delete user app data (often~/Library/Application Support/CogniBridge—verify on your machine); keep task working directory if you chose a custom location. -
Q: How to check and install a new version?
A: Settings → About → Check for updates, download and install per dialog; see Chapter 14 14.4.
-
Q: CogniPoints insufficient—cannot send?
A: Check balance in sidebar account area; contact administrator to top up or switch to an account with quota. See 3.9.
-
Q: Where to view web pages or charts the AI assistant generated?
A: Click preview entry in task messages; right panel opens output preview—Chapter 5 5.7.
-
Q: Want to reply in a task myself without AI rewriting IM messages?
A: Open IM-linked task, set bottom Reply mode to Send directly, then send—Chapter 12 12.5 and Figure 12-03.
-
Q: Task History title search misses a session but I remember keywords in the chat?
A: Enter at least 2 characters for full-text search—Chapter 13 13.1 and Figure 13-02.
-
Q: Don’t want to fill scheduled task forms—can I just say it?
A: Yes. On Tasks page or related conversation, describe time and task in natural language—the AI assistant creates scheduled tasks; verify under Capabilities → Scheduled Tasks—Chapter 11 11.1.
-
Q: Large project for several weeks—how to plan?
A: On Tasks page ask the AI assistant to split into subtasks, then create scheduled tasks for repeating steps, plus a periodic rollup—Chapter 5 5.1 and Chapter 11 11.1.
-
Q: UI text too small?
A: Adjust UI font and code font under Settings → General—14.2.